Canon REALiS LCOS SX7 Mark II D User Manual
Canon REALiS LCOS SX7 Mark II D Manual
 |
View all Canon REALiS LCOS SX7 Mark II D manuals
Add to My Manuals
Save this manual to your list of manuals |
Canon REALiS LCOS SX7 Mark II D manual content summary:
- Canon REALiS LCOS SX7 Mark II D | User Manual - Page 1
PROJECTOR User's Manual Table of contents/Safety Instructions Before Use Setting Up the Projector Projecting an Image from the Computer Projecting an Image from AV Equipment Useful Functions Available During a Presentation Setting Up Functions from Menus Maintenance Troubleshooting Appendix Index - Canon REALiS LCOS SX7 Mark II D | User Manual - Page 2
Quick Reference - How to start projection Computer 1. Install the projector. z Install the projector at the desired distance from the screen. P32-33 2. Connect the projector. z Connect the projector and the computer with a cable. P36-39 3. Turn on the projector. P40-41 z Connect the power - Canon REALiS LCOS SX7 Mark II D | User Manual - Page 3
control (P29) P32-33 2. Connect the projector. P64-68 z Connect the projector and the AV equipment with a cable* (see P38, 39 for the instruction on connecting a audio cable). 3. Turn on the projector. P40-41 z Connect the power cord and turn on the projector. z Adjust the height of the - Canon REALiS LCOS SX7 Mark II D | User Manual - Page 4
How to start projection 2 Table of Contents 4 Safety Instructions 7 Safety Precautions...8 AC Power Cord Requirement 11 Federal Communication Multimedia Projector SX7 MarkII/SX60 16 Supplied Manuals and Symbols Used in This Manual 17 Supplied Manuals...17 Before Use ...20 Supplied Accessories - Canon REALiS LCOS SX7 Mark II D | User Manual - Page 5
TABLE OF CONTENTS Useful Functions Available During a Presentation 78 Blackened Out an Image Temporarily 78 Freezing the Picture ...78 Muting the Sound ...79 Adjusting the Volume ...79 Showing the Elapsed Time 80 Page Up or Down through the Pages 80 Zooming an Image ...81 Operating a Mouse with - Canon REALiS LCOS SX7 Mark II D | User Manual - Page 6
Display Language 113 Prohibiting the Projector Operation 114 Enabling/Disabling the Guide Message 114 Turning On/Off the LED Illumination 115 Setting up Lamp ...122 Troubleshooting 126 WARNING Lamp Flash Patterns 126 Symptoms and Solutions 127 Appendix ...132 Supported Computer Signal Types - Canon REALiS LCOS SX7 Mark II D | User Manual - Page 7
. If your projector is not operating correctly, read this manual again, check operations and cable connections, and try the solutions shown in the "Troubleshooting" section at the end of this booklet. If the problem still persists, contact the service center or the dealer where you purchased the - Canon REALiS LCOS SX7 Mark II D | User Manual - Page 8
SAFETY INSTRUCTIONS Safety Precautions WARNING: TO REDUCE THE RISK OF FIRE OR distances must be maintained. Do not cover the ventilation slot on the projector. Heat build-up can reduce the service life of your projector, and can also be dangerous. SIDE and TOP REAR 1 m (3.3') 1 m (3.3') - Canon REALiS LCOS SX7 Mark II D | User Manual - Page 9
READ AND KEEP THIS OWNER'S MANUAL FOR LATER USE. All the safety and operating instructions should be read before beginning to operate the product. Read all of the instructions given here and retain them for later use. Unplug this projector from the AC power supply before cleaning. Do not - Canon REALiS LCOS SX7 Mark II D | User Manual - Page 10
service personnel under the following conditions: a. When the power cord or plug is damaged or frayed. b. If liquid has been spilled into the projector. c. If the projector has been exposed to rain or water. d. If the projector does not operate normally after following the operating instructions - Canon REALiS LCOS SX7 Mark II D | User Manual - Page 11
SAFETY INSTRUCTIONS AC Power Cord Requirement The AC Power Cord supplied with this projector meets the contact your local city office, waste authority, approved scheme or your household waste disposal service or visit www.canon-europe.com/environment. (EEA: Norway, Iceland and Liechtenstein) 11 - Canon REALiS LCOS SX7 Mark II D | User Manual - Page 12
B limits in Subpart B of Part 15 of FCC Rules. Do not make any changes or modifications to the equipment unless otherwise specified in the instructions. If such changes or modifications should be made, you could be required to stop operation of the equipment. Canon U.S.A. Inc. One Canon Plaza, Lake - Canon REALiS LCOS SX7 Mark II D | User Manual - Page 13
Handling the Batteries in the Remote Controller SAFETY INSTRUCTIONS Caution Observe the following precautions when handling the a lamp explodes, its shards may scatter inside the projector. Ask the Canon service representative to clean and check the inside of the projector and replace the lamp. - Canon REALiS LCOS SX7 Mark II D | User Manual - Page 14
SAFETY INSTRUCTIONS Disposal of Waste Lamp z Dispose of the projector's mercury lamp projector may be damaged or malfunctioned. z Do not transport the projector through a courier or transport service with the carrying bag. Put the projector in an impact-resistant transport case if such is the - Canon REALiS LCOS SX7 Mark II D | User Manual - Page 15
SAFETY INSTRUCTIONS Caution When placing the projector on a castered stand or table, be sure to lock the casters. z Failure to do so may cause the projector to move or topple, resulting in an injury. Position the projector in a horizontal position. Incorrect installation may cause troubles and - Canon REALiS LCOS SX7 Mark II D | User Manual - Page 16
Features of the Multimedia Projector SX7 MarkII/SX60 Thank you for purchasing a Canon projector. The MULTIMEDIA PROJECTOR SX7 MarkII/SX60 are high-performance projectors which project the data from the computer and the moving picture from the DVD player to the big screen. Major Features Smooth and - Canon REALiS LCOS SX7 Mark II D | User Manual - Page 17
on how to use the projectors. Read this manual thoroughly to make the most of your projector and ensure safety. Important Information and Quick Start Guide First read document. It provides information about projector safety, cautions, quick start guide*, cleaning and replacing the air filter and - Canon REALiS LCOS SX7 Mark II D | User Manual - Page 18
COPYRIGHT NOTICE Please note that enlarging or reducing the size of an image for commercial purposes or public presentation may infringe on the legally protected copyright or the copyright holder of the original material. About Trademarks z Microsoft, Windows, Windows XP, Windows Vista and Windows 7 - Canon REALiS LCOS SX7 Mark II D | User Manual - Page 19
BEFORE USE Table of contents/Safety Instructions Before Use Setting Up the Projector Projecting an Image from the Computer Projecting an Image from AV Equipment Useful Functions Available During a Presentation Setting Up Functions from Menus Maintenance Troubleshooting Appendix Index - Canon REALiS LCOS SX7 Mark II D | User Manual - Page 20
(1.8m/5.9') YH7-2054 z Component cable (RCA/Mini D-sub, 15-pin) (0.4m/1.3') YH7-2084 For the U.S.A and Canada z Carrying bag z Lens cap z Lens cap strap z User's Manual (CD-ROM) z Warranty card z Important Information and Quick Start - Canon REALiS LCOS SX7 Mark II D | User Manual - Page 21
to protect the projector from external shocks. Align the lens with the dimple on the cushioning material. z User's Manual (CD-ROM) z Important Information and Quick Start Guide Cables Remote control z Wait until the cooling fan stops before putting the projector in the carrying bag. Do not - Canon REALiS LCOS SX7 Mark II D | User Manual - Page 22
BEFORE USE Part Names Main Unit of Projector (SX7 MarkII is used in the following illustrations) Front Side Terminals and Connectors Infrared Remote Receiver (P29) Ranging Window Do not place any obstacle between the projector and the Caution screen, as the auto focusing function may fail to - Canon REALiS LCOS SX7 Mark II D | User Manual - Page 23
BEFORE USE Bottom Side Lens Cap Strap Insertion Hole Adjustable Foot (P43) Air Intake Vent Do not block the air intake. Failure to do so will result in malfuncCaution tions or fire hazards. Lamp Cover (P123) Rear Adjustable Foot (for fine adjustment) Air Filter (P121) Screw Holes for - Canon REALiS LCOS SX7 Mark II D | User Manual - Page 24
BEFORE USE Buttons on the Remote Control and Top Control Remote Control (1) This projector can be operated using but- tons on the remote control or the top con- (5) trol on the main unit. The remote control allows you to operate all functions of the projector. (2) (3) (4) (6) (7) (8) - Canon REALiS LCOS SX7 Mark II D | User Manual - Page 25
Top Control (7) (8) (9) BEFORE USE (2) (3) (5) (6) (11) (12) (10) (10) POINTER button (P87) Selects the upper, lower, left, or right item in the menu. Also moves the mouse cursor under the USB connection. On the top control, the [] buttons also turn the volume up and down, - Canon REALiS LCOS SX7 Mark II D | User Manual - Page 26
Input Terminals on Main Unit SX7 MarkII (1) (10) (2) (3) BEFORE USE (5) SX60 (10) (5) (6) (4) (10) (9) (8) (7) (6) (1) (10) (2) (3) (7) (8) (9) 26 - Canon REALiS LCOS SX7 Mark II D | User Manual - Page 27
composite video signal from an AV equipment. (7) S-VIDEO IN terminal (P66) Receives an S-Video signal from an AV equipment. (8) SERVICE PORT jack Exclusively used by the service personnel (it is not used normally). (9) USB terminal (P82) Connected to the computer with a USB cable when the remote - Canon REALiS LCOS SX7 Mark II D | User Manual - Page 28
being turned on. Blink between red and green: The projector is under the power management mode. (2) WARNING lamp (P126) Flashes red when a problem has been detected on the projector. (3) LED illumination lamp (P115) Indicate the projector status with 3 blue LEDs. Blinking from the left: The - Canon REALiS LCOS SX7 Mark II D | User Manual - Page 29
Preparing the Remote Control Installing Remote Control Batteries 1 2 Open the battery com- Insert batteries. 3 partment lid. Insert new two AAA-size Slide the lid with it batteries in the compart- pressed down. ment with the + and - poles positioned cor- rectly. Replace the compartment - Canon REALiS LCOS SX7 Mark II D | User Manual - Page 30
- Canon REALiS LCOS SX7 Mark II D | User Manual - Page 31
contents/Safety Instructions Before Use Setting Up the Projector SETTING UP THE Projecting an Image from the Computer PROJECTOR Projecting an Image from AV Equipment Useful Functions Available During a Presentation Setting Up Functions from Menus Maintenance Troubleshooting Appendix Index - Canon REALiS LCOS SX7 Mark II D | User Manual - Page 32
SETTING UP THE PROJECTOR Setting Up the Projector Determining the Distance to the Screen The projected image size is determined by the distance between the projector lens and the screen. Select the place where the desired image size is obtained according to the illustration shown below. 8.9 m (29 - Canon REALiS LCOS SX7 Mark II D | User Manual - Page 33
SETTING UP THE PROJECTOR Determining the Installation Position Placing in Front of the Screen Place the projector perpendicular to the screen as far as possible. z A slight error in the projection angle can be corrected using the [KEYSTONE] button (P52). Screen Optical axis Placing on a Level - Canon REALiS LCOS SX7 Mark II D | User Manual - Page 34
- Canon REALiS LCOS SX7 Mark II D | User Manual - Page 35
/Safety Instructions Before Use Setting Up the Projector PROJECTING AN IMAGE FROM THE COMPUTER Projecting an Image from the Computer Projecting an Image from AV Equipment Useful Functions Available During a Presentation Setting Up Functions from Menus Maintenance Troubleshooting Appendix - Canon REALiS LCOS SX7 Mark II D | User Manual - Page 36
highperformance cables. z An adapter may be required depending on the shape of the connector on the computer. For more detailed information, refer to your computers instruction manual. 36 - Canon REALiS LCOS SX7 Mark II D | User Manual - Page 37
z Before connecting cables, turn off both the projector and computer. z It may project an image inappropriately when projecting the digital PC signal in 1280 x 1024 or 1400 x 1050 depending on the type of computer or DVI cable. z The USB terminal is used to use the remote control as the computer - Canon REALiS LCOS SX7 Mark II D | User Manual - Page 38
Projector SX7 MarkII Image input terminal (mini D-sub 15-pin terminal) z You can connect one external monitor. The multi-monitor display is not supported. z The projected image is displayed on the external monitor. z You cannot output the input signal to the external monitor if it is DIGITAL - Canon REALiS LCOS SX7 Mark II D | User Manual - Page 39
Connecting to AUDIO IN Terminals (SX60) Connect the audio cable to the AUDIO IN terminal if you want to use the projectors speaker. Audio cable AUDIO OUT terminal Computer Commercial Audio cable PROJECTING AN IMAGE FROM THE COMPUTER AUDIO IN terminal Projector SX60 z Use an audio cable without a - Canon REALiS LCOS SX7 Mark II D | User Manual - Page 40
Caution Connect the Ground Terminal Connect the ground terminal on the power plug to ground. Otherwise, the operating computer may suffer electromagnetic radiation problems and poor reception by TV and radio. Unplug the Power Cord When the Projector is Not in Use The projector constantly consumes - Canon REALiS LCOS SX7 Mark II D | User Manual - Page 41
PROJECTING AN IMAGE FROM THE COMPUTER The countdown window is displayed for approximately 20 seconds, and then the guiding message for the auto setup function appears. Adjust the focus by performing the auto setup or the focus adjustment if you cannot read the message - Canon REALiS LCOS SX7 Mark II D | User Manual - Page 42
Adjusting the Image Adjusting the Image Size (ZOOM) Adjust the image size in accordance with the screen. 1 Press the [ZOOM] button. The Zoom adjustment window appears. 2 Adjust the image size. < Zoom in: Press [ ] for rough adjustment. Press [>] for fine adjustment. Zoom out: Press [ ] for rough - Canon REALiS LCOS SX7 Mark II D | User Manual - Page 43
PROJECTING AN IMAGE FROM THE COMPUTER Adjusting the Projection Angle You can adjust the projection angle with the adjustable foot. 1 Lift the front side of the projector and push the adjusting foot lock button. The adjustable foot extends. 2 Adjust the projection angle while pushing the adjustable - Canon REALiS LCOS SX7 Mark II D | User Manual - Page 44
PROJECTING AN IMAGE FROM THE COMPUTER Preparing the Computer Determining the Output Resolution of the Computer To make the most of the display performance of this projector, set output signal resolution of the computer to an optimum value. Windows 7 1. Open the [Control Panel] from the start menu, - Canon REALiS LCOS SX7 Mark II D | User Manual - Page 45
z The function keys you use and the method used to turn on the external monitor output vary depending on the model. For details, see the instructions of your notebook computer. 45 - Canon REALiS LCOS SX7 Mark II D | User Manual - Page 46
the screen color correction may not be performed properly depending on the brightness of the room or the condition of the screen. Adjust the image manually if such is the case. z If you select [16:9] for [Screen aspect], [Auto screen color] may not correct the screen color properly. If such is - Canon REALiS LCOS SX7 Mark II D | User Manual - Page 47
PROJECTING AN IMAGE FROM THE COMPUTER 2 Press the [AUTO SET] button. The Auto setup window appears. 3 Press the [AUTO SET] button again. One or more functions highlighted in black are performed automatically. z You can perform this step by selecting [OK] with the [ - Canon REALiS LCOS SX7 Mark II D | User Manual - Page 48
< PROJECTING AN IMAGE FROM THE COMPUTER Selecting an Input Signal You can select an input signal type. Select an input signal from the followings: ANALOG PC-1 : Analog signal Connecting with a DVI/Mini D-sub 15-pin cable (supplied cable) DIGITAL PC : Digital signal Connecting with a DVI digital - Canon REALiS LCOS SX7 Mark II D | User Manual - Page 49
< PROJECTING AN IMAGE FROM THE COMPUTER < 3 If the target input signal is unavailable from the list at the left, press the [>] button, and then press the [ ] / [ ] button to select the target input signal from the list at the right. 4 Press the [OK] button. 49 - Canon REALiS LCOS SX7 Mark II D | User Manual - Page 50
< < PROJECTING AN IMAGE FROM THE COMPUTER < < „ Selecting ANALOG PC-2 z Select [ANALOG PC-2] for Input Terminal-2. 1 Press the [INPUT] button. The [INPUT] window appears. 2 Select the second top item in the menu with the [INPUT] button. The selection is toggled through available input signals from - Canon REALiS LCOS SX7 Mark II D | User Manual - Page 51
PROJECTING AN IMAGE FROM THE COMPUTER < < Adjusting the Focus You can adjust the focus. Follow the steps below to adjust the focus manually if the Auto setup function (Auto focus) does not adjust the focus appropriately. 1 Press the [FOCUS] button. The Focus adjustment window appears. 2 Press the - Canon REALiS LCOS SX7 Mark II D | User Manual - Page 52
Adjusting Keystone Distortion The Auto setup function (Auto keystone) automatically adjusts the keystone distortion in a longitudinal direction. Follow the steps below if the function does not adjust the distortion appropriately or you want to adjust the keystone distortion in a horizontal direction - Canon REALiS LCOS SX7 Mark II D | User Manual - Page 53
PROJECTING AN IMAGE FROM THE COMPUTER 3 Press the [OK] button. z The result of keystone adjustment is memorized. If you place the projector at the same position, the keystone adjustment is not necessary. z When the Keystone adjustment is selected, signals are processed digitally. The image may look - Canon REALiS LCOS SX7 Mark II D | User Manual - Page 54
PROJECTING AN IMAGE FROM THE COMPUTER Setting Up the Computer Screen Automatically (AUTO PC) This projector automatically makes optimum settings for the total number of dots and tracking depending on a signal type (SXGA+, XGA, etc.). The auto PC adjustment function does not need to be performed if - Canon REALiS LCOS SX7 Mark II D | User Manual - Page 55
Selecting an Image Mode (IMAGE) You can select an image mode depending on the projecting image. You can also adjust the image quality (sharpness, gamma, color correction, etc.) as you like. 1 Press the [IMAGE] button. PROJECTING AN IMAGE FROM THE COMPUTER (SX7 MarkII) The Image mode window - Canon REALiS LCOS SX7 Mark II D | User Manual - Page 56
Standard Presentation Movie Photo AdobeRGB sRGB SX7 MarkII Standard Presentation Movie Home Cinema sRGB SX60 z You can adjust the followings for each image mode. For detailed information on the procedures, refer to "Image Adjustment Menu" (P102 to 110). - Brightness Adjust this when the image is - Canon REALiS LCOS SX7 Mark II D | User Manual - Page 57
PROJECTING AN IMAGE FROM THE COMPUTER Selecting a Screen Mode (Aspect) You can select one of the following screen modes depending on the aspect ratio or display resolution of your computer. z You can specify the aspect ratio from the menu. Refer to [Aspect] in the menu (P90). z The available - Canon REALiS LCOS SX7 Mark II D | User Manual - Page 58
„ True size Select this if you want to project a computer screen in its original size. A clear image can be obtained because of no image processing. z If the display resolution of the computer is higher than 1400 by 1050 dots, select a lower resolution before starting projection. z The upper, - Canon REALiS LCOS SX7 Mark II D | User Manual - Page 59
is automatically selected for [Aspect]. z [Auto screen color] may not correct the screen color properly. If such is the case, correct it manually. (P98) „ 16:9 D. image shift [ ]: Moves up the image. [ ]: Moves down the image. < < PROJECTING AN IMAGE FROM THE COMPUTER < < Perform the following - Canon REALiS LCOS SX7 Mark II D | User Manual - Page 60
PROJECTING AN IMAGE FROM THE COMPUTER Turning Off the Projector z You may shorten the lamp life if turning off the projector while its lamp is still in an unstable state shortly after turning on the projector. Wait at least 5 minutes before turning off the projector. z Wait at least 5 minutes - Canon REALiS LCOS SX7 Mark II D | User Manual - Page 61
PROJECTING AN IMAGE FROM THE COMPUTER z Wait until the cooling fan stops before putting the projector in the carrying bag. Do not put the projector in the carrying bag until the cooling fan stops rotating. The projector may be damaged due to the heat. z Attach the lens cap to the lens to protect it - Canon REALiS LCOS SX7 Mark II D | User Manual - Page 62
- Canon REALiS LCOS SX7 Mark II D | User Manual - Page 63
/Safety Instructions Before Use Setting Up the Projector PROJECTING AN IMAGE FROM AV EQUIPMENT Projecting an Image from the Computer Projecting an Image from AV Equipment Useful Functions Available During a Presentation Setting Up Functions from Menus Maintenance Troubleshooting Appendix - Canon REALiS LCOS SX7 Mark II D | User Manual - Page 64
cables, turn off both the projector and AV equipment. z The above illustrations are just examples. For more detailed information, refer to the manual for the connecting AV equipment. About the Component Cable The projector cannot be connected to an AV equipment only with the supplied component cable - Canon REALiS LCOS SX7 Mark II D | User Manual - Page 65
PROJECTING AN IMAGE FROM AV EQUIPMENT SCART cable (SCART terminal) AV equipment Digital cable You can project digital content via the HDMI or DVI terminal. AV equipment (HDMI terminal) Digital video output terminal (DVI terminal) LV-CA31 cable Commercial HDMI adapter cable Commercial DVI - Canon REALiS LCOS SX7 Mark II D | User Manual - Page 66
PROJECTING AN IMAGE FROM AV EQUIPMENT S-VIDEO cable S-VIDEO output terminal (S-VIDEO OUT terminal) AV equipment Video cable Video output terminal (VIDEO OUT terminal) AV equipment Commercial S-VIDEO video cable Commercial Video cable S-VIDEO input terminal (S-VIDEO IN) SX7 MarkII Projector - Canon REALiS LCOS SX7 Mark II D | User Manual - Page 67
PROJECTING AN IMAGE FROM AV EQUIPMENT Connecting to AUDIO IN Terminals (SX7 II) Connect an audio cable to the AUDIO IN terminal corresponding to the input image signal if you want to use the projector's speaker. Audio cable AV equipment AUDIO OUT terminal (RCA terminal) (Stereo mini jack) - Canon REALiS LCOS SX7 Mark II D | User Manual - Page 68
Connecting to AUDIO OUT Terminals (SX7 II) Connect the audio cable between the AUDIO OUT terminal and an external audiovisual equipment if you want to output the audio signal to the audio-visual equipment. Audio cable AV equipment AUDIO IN terminal (RCA terminal) (Stereo mini jack) Commercial - Canon REALiS LCOS SX7 Mark II D | User Manual - Page 69
Projecting a Video Image from an AV Equipment You can project a video image with the steps similar to those for projecting an image from a computer. This section provides information specific to the projection from an AV equipment. For more detailed information for each step, refer to the - Canon REALiS LCOS SX7 Mark II D | User Manual - Page 70
Performing the Auto Setup With the auto setup function, a series of screen adjustment and settings, such as Auto focus and Auto keystone is performed automatically when projecting a video image from an AV equipment. You can start the projection only with this operation if the input signal has been - Canon REALiS LCOS SX7 Mark II D | User Manual - Page 71
< < PROJECTING AN IMAGE FROM AV EQUIPMENT < < „ Selecting DIGITAL VIDEO 1 Press the [INPUT] button. The [INPUT] window appears. 2 Select the top item in the menu with the [INPUT] button. The selection is toggled through available input signal types from above. z You can select any input signal - Canon REALiS LCOS SX7 Mark II D | User Manual - Page 72
< < PROJECTING AN IMAGE FROM AV EQUIPMENT < < „ Selecting SCART z Select [SCART] for Input Terminal-2. 1 Press the [INPUT] button. The [INPUT] window appears. 2 Select the second top item in the menu with the [INPUT] button. The selection is toggled through available input signals from above. z - Canon REALiS LCOS SX7 Mark II D | User Manual - Page 73
PROJECTING AN IMAGE FROM AV EQUIPMENT Selecting a Screen Mode (Aspect) You can select one of the following screen modes depending on the aspect ratio of your AV equipment or content software. z You can specify the aspect ratio from the menu. Refer to [Aspect] in the menu (P90, 91). z The available - Canon REALiS LCOS SX7 Mark II D | User Manual - Page 74
(720p/1035i/1080i) DIGITAL VIDEO (720p/1080i) Wide z [Auto screen color] may not correct the screen color properly. If such is the case, correct it manually. (P98) 74 - Canon REALiS LCOS SX7 Mark II D | User Manual - Page 75
„ 16:9 D. image shift Select this when you use a screen with aspect ratio of 16:9. You can vertically shift or finetune the position of the undistorted image without the keystone adjustment. Refer to P59 for detailed information on shifting the image. The following table shows the available [Aspect] - Canon REALiS LCOS SX7 Mark II D | User Manual - Page 76
- Canon REALiS LCOS SX7 Mark II D | User Manual - Page 77
/Safety Instructions Before Use USEFUL FUNCTIONS AVAILABLE DURING A PRESENTATION Setting Up the Projector Projecting an Image from the Computer Projecting an Image from AV Equipment Useful Functions Available During a Presentation Setting Up Functions from Menus Maintenance Troubleshooting - Canon REALiS LCOS SX7 Mark II D | User Manual - Page 78
logo while blackening out the image (SX60) (P100). z The (middle) LED illumination lamp on the top control flash slowly while blackening out the image. z A guiding message appears if you press an invalid button while the NO SHOW function is on. The "FREEZE" message is shown on the screen. Canceling - Canon REALiS LCOS SX7 Mark II D | User Manual - Page 79
Muting the Sound Adjusting the Volume X Useful when: X You want to immediately mute the sound from the projector. X Useful when: X You want to adjust the volume level of the projectors speaker. Mute the sound temporarily. Muting the Sound Adjusting the Volume The projector shows the [MUTE] - Canon REALiS LCOS SX7 Mark II D | User Manual - Page 80
Showing the Elapsed Time Page Up or Down through the Pages X Useful when: X You want to manage the proceedings of the presentation. The elapsed time from 00:00 to 59:59 is displayed at the lower right corner of the screen. X Useful when: X You want to page up or down through the projected - Canon REALiS LCOS SX7 Mark II D | User Manual - Page 81
zoom ratio is 1x to 12x. z You can freeze the enlarged image. z Press the [OK] button to cancel the digital zoom function. z The following guiding message appears if you press an invalid button during operating the digital zoom function. Zooming Out an Image Press this button repeatedly until the - Canon REALiS LCOS SX7 Mark II D | User Manual - Page 82
and projector are turned off, and then connect the supplied USB cable between the USB terminals on the computer and the projector. z This function is supported on Windows 7, Windows Vista, Windows XP, or Mac OS 9.2 and later. Moving the Cursor USB terminal Computer You can move the mouse cursor - Canon REALiS LCOS SX7 Mark II D | User Manual - Page 83
Pointing with a Spotlight X Useful when: X You want to point to a portion of an image that should draw attendees' attention. Moving the Spotlight Highlight a desired portion of the projected image with a spotlight. Showing the Spotlight Move the spotlight to a desired position. z If you select - Canon REALiS LCOS SX7 Mark II D | User Manual - Page 84
- Canon REALiS LCOS SX7 Mark II D | User Manual - Page 85
UP FUNCTIONS FROM MENUS Table of contents/Safety Instructions Before Use Setting Up the Projector Projecting an Image from the Computer Projecting an Image from AV Equipment Useful Functions Available During a Presentation Setting Up Functions from Menus Maintenance Troubleshooting Appendix Index - Canon REALiS LCOS SX7 Mark II D | User Manual - Page 86
Setting Up Functions from Menus How to Use Menus Some of the projector's function are used through the menu screen. It consists of following three menus. Display settings menu (P90) This menu is used to select an input signal and make various settings related to display. Image adjustment menu (P102) - Canon REALiS LCOS SX7 Mark II D | User Manual - Page 87
This section provides the basic operation on the menu. 1 Press the [MENU] button. A menu window appears. z Press the [MENU] button again to close the menu window. 2 Press [] to select the appropriate tab. Press [ ] to move the cursor on the tab if it is not on it. Image adjustment tab ( - Canon REALiS LCOS SX7 Mark II D | User Manual - Page 88
: Contrast z In a different screen Example: Menu position (SX7 MarkII) Press [] to move the slider. Press the [OK] button to display a different screen. Then follow the instruction on the screen. < SETTING UP FUNCTIONS FROM MENUS 88 - Canon REALiS LCOS SX7 Mark II D | User Manual - Page 89
SETTING UP FUNCTIONS FROM MENUS 5 Press the [OK] button. In some menu items, the setting is enabled just by making a selection. 6 Press the [MENU] button when you finish. The menu disappears. 89 - Canon REALiS LCOS SX7 Mark II D | User Manual - Page 90
Setting Display Status Selecting a Screen Mode (1) [Aspect] DIGITAL PC ANALOG PC You can adjust the aspect ratio of the image projected on the screen. Selecting a Screen Mode (2) [Aspect] DIGITAL VIDEO COMP. You can adjust the aspect ratio of the image projected on the screen. T Display - Canon REALiS LCOS SX7 Mark II D | User Manual - Page 91
input signal type suitable for the computer from the displayed signal types. Press the [MENU] button when you finish. z See P132 for the signal types supported by this projector. SETTING UP FUNCTIONS FROM MENUS 91 - Canon REALiS LCOS SX7 Mark II D | User Manual - Page 92
the [Auto] mode. NTSC4.43 PAL-M PAL-N Press the [MENU] button when you finish. z Confirm the input signal type according to the User's Manual that came with the AV equipment connected. Auto 1080i 1035i 720p 575p Selects the component format automatically according to the input signal. Select - Canon REALiS LCOS SX7 Mark II D | User Manual - Page 93
Setting Display Status Adjusting the Total Number of Dots [Total dots] ANALOG PC You can select the total number of dots in the horizontal direction. Adjust the number of dots when the image distorts or noise is displayed on the screen at both sides. Adjusting the Tracking [Tracking] ANALOG PC You - Canon REALiS LCOS SX7 Mark II D | User Manual - Page 94
Adjusting the Horizontal Position [Horizontal position] ANALOG PC You can adjust the horizontal position of the screen when the projected image is shifted in the horizontal direction. Adjusting the Vertical Position [Vertical position] ANALOG PC You can adjust the vertical position of the screen - Canon REALiS LCOS SX7 Mark II D | User Manual - Page 95
Setting Display Status Adjusting the Number of Horizontal Pixels [Horizontal pixels] ANALOG PC You can adjust the number of the pixels in the horizontal direction if the length of the screen is too long or too short in the horizontal direction. Adjusting the Number of Vertical Pixels [Vertical - Canon REALiS LCOS SX7 Mark II D | User Manual - Page 96
Performing Progressive Processing [Progressive] COMP. VIDEO/S-VIDEO You can accumulate and composite information for a signal for a low resolution image to convert it to a high resolution image. Selecting a Menu Position [Menu position] DIGITAL PC ANALOG PC DIGITAL VIDEO COMP./SCART VIDEO/S-VIDEO - Canon REALiS LCOS SX7 Mark II D | User Manual - Page 97
Performing the Ceiling-mounted/Rear Projection [Image flip H/V] DIGITAL PC ANALOG PC DIGITAL VIDEO COMP./SCART VIDEO/S-VIDEO You can make this setting if you want to hang the projector from the ceiling or project an image on a transmissive screen. None (Normal image) T Display settings T Image - Canon REALiS LCOS SX7 Mark II D | User Manual - Page 98
, press the [AUTO SET] button when the following level meter is displayed. Use this function if the [Greenboard] setting is inadequate. < If you manually adjust it, press [ ] or [ ] button to select red, green, or blue. [>] Increases the color tone of each color. [ - Canon REALiS LCOS SX7 Mark II D | User Manual - Page 99
Setting Display Status Selecting a Logo Display Position (SX60) [Logo position] DIGITAL PC ANALOG PC DIGITAL VIDEO COMP./SCART VIDEO/S-VIDEO You can select a logo display position. You can place the logo at the center or a corner of the screen. Displaying a Logo (No signal screen) [No signal - Canon REALiS LCOS SX7 Mark II D | User Manual - Page 100
Displaying a Logo (NO SHOW) [NO SHOW] DIGITAL PC ANALOG PC DIGITAL VIDEO COMP./SCART VIDEO/S-VIDEO You can display a user logo on a screen when the projected image is blackened out temporarily by pressing the [NO SHOW] button on the remote control. (SX60) For SX7 MarkII, you can display either of a - Canon REALiS LCOS SX7 Mark II D | User Manual - Page 101
Selecting Aspect Ratio of the Screen [Screen aspect] DIGITAL PC ANALOG PC DIGITAL VIDEO COMP./SCART VIDEO/S-VIDEO You can select the aspect ratio of the projecting screen. T Display settings T Screen aspect 4:3 Select this when you use a screen with aspect ratio of 4:3. 16:9 Select this when - Canon REALiS LCOS SX7 Mark II D | User Manual - Page 102
Setting the Image Quality Selecting an Image Mode [Image mode] DIGITAL PC ANALOG PC DIGITAL VIDEO COMP./SCART VIDEO/S-VIDEO You can select an image mode suitable for the projecting image. T Image adjustment T Image mode Standard Presentation Movie Photo (SX7 MarkII) Select this to project an - Canon REALiS LCOS SX7 Mark II D | User Manual - Page 103
Setting the Image Quality Adjusting the Brightness [Brightness] DIGITAL PC ANALOG PC DIGITAL VIDEO COMP./SCART VIDEO/S-VIDEO You can adjust the brightness of an image when it is too bright or dark. Adjusting the Contrast [Contrast] DIGITAL PC ANALOG PC DIGITAL VIDEO COMP./SCART VIDEO/S-VIDEO You - Canon REALiS LCOS SX7 Mark II D | User Manual - Page 104
Adjusting the Sharpness [Sharpness] DIGITAL PC ANALOG PC DIGITAL VIDEO COMP./SCART VIDEO/S-VIDEO You can adjust the sharpness when you want to make an image sharper or softer. Making a Gamma Correction [Gamma] DIGITAL PC ANALOG PC DIGITAL VIDEO COMP./SCART VIDEO/S-VIDEO You can make a gamma - Canon REALiS LCOS SX7 Mark II D | User Manual - Page 105
Setting the Image Quality Making Color Adjustment (1) (SX7 II) [Color adjustment] DIGITAL PC ANALOG PC You can adjust color level and color balance and make color adjustment for each color (red, green, and blue). Making Color Adjustment (2) [Color adjustment] DIGITAL PC * ANALOG PC * DIGITAL - Canon REALiS LCOS SX7 Mark II D | User Manual - Page 106
Making Color Adjustment (3) [Color adjustment] COMP. VIDEO/S-VIDEO You can adjust color level and color balance and make color adjustment for each color (red, green, and blue). Making Advanced Color Adjustment (1) [Dynamic gamma] DIGITAL PC ANALOG PC DIGITAL VIDEO COMP./SCART VIDEO/S-VIDEO You can - Canon REALiS LCOS SX7 Mark II D | User Manual - Page 107
Setting the Image Quality Making Advanced Color Adjustment (2) [Mem. color correct] DIGITAL PC ANALOG PC DIGITAL VIDEO COMP./SCART VIDEO/S-VIDEO You can correct colors (e.g. blue sky) in our memory so that they can be projected more vividly. Making Advanced Color Adjustment (3) [6-axis color - Canon REALiS LCOS SX7 Mark II D | User Manual - Page 108
Correcting the Image According to the Ambient Light (SX7 II) [Ambient light] DIGITAL PC ANALOG PC You can correct and project an image more appropriately according to the ambient light on the screen if you have selected [Photo] for [Image mode]. T Image adjustment T Ambient light Level L Select - Canon REALiS LCOS SX7 Mark II D | User Manual - Page 109
Reducing the Lamp Brightness [Lamp mode] DIGITAL PC ANALOG PC DIGITAL VIDEO COMP./SCART VIDEO/S-VIDEO You can reduce the lamp brightness if you want to make the image darker or reduce the fan noise. T Image adjustment T Lamp mode (SX7 MarkII) Normal Quiet Projects an image at the normal - Canon REALiS LCOS SX7 Mark II D | User Manual - Page 110
Resetting the Image Settings [Reset] DIGITAL PC ANALOG PC DIGITAL VIDEO COMP./SCART VIDEO/S-VIDEO You can reset the current image settings to the default settings if you want to make all image settings all over again. T Image adjustment T Reset Performing [Color adjustment] or [Advanced adjustment - Canon REALiS LCOS SX7 Mark II D | User Manual - Page 111
. z A confirmation screen appears during the auto setup so that you can check which functions are enabled/disabled (P46, 70). z You can manually adjust each item. [Auto focus]: [FOCUS] button (P51) [Auto keystone]: [KEYSTONE] button (P52) [Auto input]: [INPUT] button (P48, 71) [Auto screen - Canon REALiS LCOS SX7 Mark II D | User Manual - Page 112
Skip the POWER Button Operation [Direct power on] DIGITAL PC ANALOG PC DIGITAL VIDEO COMP./SCART VIDEO/S-VIDEO You can set the projector to be turned on when you connect the power cord. Enabling/Disabling the Beep [Beep] DIGITAL PC ANALOG PC DIGITAL VIDEO COMP./SCART VIDEO/S-VIDEO You can enable/ - Canon REALiS LCOS SX7 Mark II D | User Manual - Page 113
Selecting a Display Language [Language] DIGITAL PC ANALOG PC DIGITAL VIDEO COMP./SCART VIDEO/S-VIDEO You can select a language to be used in the menu from 20 different languages. T System settings T Language Setting Various Function English Germany French Italian Spanish Portuguese Swedish Russian - Canon REALiS LCOS SX7 Mark II D | User Manual - Page 114
power plug while holding down the [OK] button until the projector beeps. Off Disables the guide message. On Enables the guide message. Press the [OK] button to confirm, and then press the [MENU] button. z The guide message appears on the screen when: - The projector is turned on (P40). - The - Canon REALiS LCOS SX7 Mark II D | User Manual - Page 115
Setting Various Function Turning On/Off the LED Illumination [LED illumination] DIGITAL PC ANALOG PC DIGITAL VIDEO COMP./SCART VIDEO/S-VIDEO You can turn on/off the LED illumination lamp and the LEDs on the terminals (P26, 27, 28). Setting up the Remote Control [Remote control] DIGITAL PC ANALOG - Canon REALiS LCOS SX7 Mark II D | User Manual - Page 116
. L Projects a limited range digital sig- nal. Press the [OK] button to confirm, and then press the [MENU] button. z Refer to the User's Manual that came with the AV equipment for more detailed information on settings. Off Disables the password protection. On Enable the password protection - Canon REALiS LCOS SX7 Mark II D | User Manual - Page 117
Setting Various Function Registering a Password [Register password] DIGITAL PC ANALOG PC DIGITAL VIDEO COMP./SCART VIDEO/S-VIDEO You can register a password that you need to enter when turning on the projector. Resetting to the Default Setting [Factory defaults] DIGITAL PC ANALOG PC DIGITAL VIDEO - Canon REALiS LCOS SX7 Mark II D | User Manual - Page 118
Resetting the Lamp Counter [Lamp counter] DIGITAL PC ANALOG PC DIGITAL VIDEO COMP./SCART VIDEO/S-VIDEO You can reset the lamp counter that indicates the timing to replace the projector when you replace it. T System settings T Other settings T Lamp counter z Do not reset the lamp counter except when - Canon REALiS LCOS SX7 Mark II D | User Manual - Page 119
MAINTENANCE Table of contents/Safety Instructions Before Use Setting Up the Projector Projecting an Image from the Computer Projecting an Image from AV Equipment Useful Functions Available During a Presentation Setting Up Functions from Menus Maintenance Troubleshooting Appendix Index - Canon REALiS LCOS SX7 Mark II D | User Manual - Page 120
cleaning liquid or benzine, as these may damage the finish of the projector. When using a chemical dust cloth, make sure to read the instructions thoroughly. z When cleaning the projector's lens, use a commonly available air blower or lens cleaning paper. The lens surface is easily damaged, so do - Canon REALiS LCOS SX7 Mark II D | User Manual - Page 121
Cleaning and Replacing the Air Filter An air filter is installed in the air intake vent on the bottom of the main body to protect the internal lens and mirror from dust. Should the air filter become clogged with dust, the projector may be damaged since it will block the air flow into the projector - Canon REALiS LCOS SX7 Mark II D | User Manual - Page 122
Replacing the Lamp When the time of use of the lamp exceeds the certain amount of time, the following message (two types) is displayed for 10 seconds every time the projector is turned on. z If the time of use is: SX7 MarkII: 1800 to 2000 hours SX60 : 2400 to 2500 hours * [], the [OK] - Canon REALiS LCOS SX7 Mark II D | User Manual - Page 123
Replacing the Lamp 1 Turn off the projector, disconnect the power plug from the AC outlet, and then let the projector stand for at least 1 hour. 2 Loosen a screw with a flathead screwdriver and remove the lamp cover. Lamp cover Screw 3 Loosen two screws, pull up the handle, and then remove the - Canon REALiS LCOS SX7 Mark II D | User Manual - Page 124
- Canon REALiS LCOS SX7 Mark II D | User Manual - Page 125
TROUBLESHOOTING Table of contents/Safety Instructions Before Use Setting Up the Projector Projecting an Image from the Computer Projecting an Image from AV Equipment Useful Functions Available During a Presentation Setting Up Functions from Menus Maintenance Troubleshooting Appendix Index - Canon REALiS LCOS SX7 Mark II D | User Manual - Page 126
Troubleshooting WARNING Lamp Flash Patterns The WARNING lamp on the Control Panel flashes in red after the projector is turned off when there is a trouble in the projector. z Wait until the cooling fan stops and disconnect the power plug from the AC outlet before dealing with the trouble problem is - Canon REALiS LCOS SX7 Mark II D | User Manual - Page 127
control (P78). selected. No image is sent due to the prob- Turn on the projector and computer in this order again. lem in the computer. TROUBLESHOOTING 127 - Canon REALiS LCOS SX7 Mark II D | User Manual - Page 128
in The ceiling mounted/rear projection setting is incorrect. Check the vertical or horizontal direction. the [Image flip H/V] setting in the [Display settings] menu (P97). TROUBLESHOOTING 128 - Canon REALiS LCOS SX7 Mark II D | User Manual - Page 129
this operation varies among computer manufacturers. For more detailed information, refer to the User's Manual that came with your computer. The displayed image is not the same as that displayed propriate. Other reasons The projector may be damaged. Contact your dealer. TROUBLESHOOTING 129 - Canon REALiS LCOS SX7 Mark II D | User Manual - Page 130
is not, install a mouse driver to the computer. The mouse is not recognized due Turn on the projector and computer in this order again. to a problem in the computer. TROUBLESHOOTING 130 - Canon REALiS LCOS SX7 Mark II D | User Manual - Page 131
Menu Configuration P144 Table of contents/Safety Instructions Before Use Setting Up the Projector Projecting an Image from the Computer Projecting an Image from AV Equipment Useful Functions Available During a Presentation Setting Up Functions from Menus Maintenance Troubleshooting Appendix Index - Canon REALiS LCOS SX7 Mark II D | User Manual - Page 132
Computer Signal Types This projector supports following signal types. If your computer or The specifications in the table above are subject to change without prior notice. - This projector does not support any computer signal of which dot clock is 170MHz or higher. - Use a full connected VGA cable - Canon REALiS LCOS SX7 Mark II D | User Manual - Page 133
Relationship between Screen Size and Projecting Distance Screen size at 4:3 aspect ratio Type - W x D (cm) 40" 81 x 61 50" 102 x 76 60" 122 x 91 70" 142 x 107 80" 163 x 122 90" 183 x 137 100" 203 x 152 110" 224 x 168 120" 244 x 183 130" 264 x 198 140" 284 x 213 150" 305 x 229 160" 325 x 244 170" - Canon REALiS LCOS SX7 Mark II D | User Manual - Page 134
Glossary * is only applicable to SX7 MarkII 6-axis color adjust (P107) The color adjustment function for an advanced user. You can adjust color balance and color level for 6 axis of RGB (red/green/ blue) and CMY (cyan/magenta/yellow) of the projected image to make a fine color adjustment. You can - Canon REALiS LCOS SX7 Mark II D | User Manual - Page 135
gamma correction function works effectively when portions of an image are obscure because they are too light or dark. This projector supports manual gamma correction and dynamic gamma correction which performs the gamma correction automatically. HDCP An abbreviation of High-bandwidth Digital Content - Canon REALiS LCOS SX7 Mark II D | User Manual - Page 136
HDMI (P65, 70) A digital video signal connection interface for an AV equipment. Its terminal is more compact than the DVI terminal. It allows to transmit video and audio signals simultaneously. Memorized Color Correction (P107) A memorized color is a color in our memory. The memorized color such as - Canon REALiS LCOS SX7 Mark II D | User Manual - Page 137
S-video (P27, 66, 92) A signal system (YC separation signal) used to send a brightness signal (Y) and color signal (C) separately. Connect the S-video terminal on the AV equipment and the S-VIDEO IN terminal on this projector with an S-video cable. Select [S-VIDEO] at projection. Tracking (P93) To - Canon REALiS LCOS SX7 Mark II D | User Manual - Page 138
IN terminal S-VIDEO IN terminal AUDIO IN terminal USB terminal SERVICE PORT Video Output terminal Audio Output terminal Digital PC Analog PC cable, component cable, carrying bag, lens cover, string for lens cover, User's Manual and Warranty Card. * 99.99% or more of the LCD panel pixels are - Canon REALiS LCOS SX7 Mark II D | User Manual - Page 139
External View APPENDIX Screw Holes for installation of ceilingmount hanger (M4 x 6) Input terminal-2 (ANALOG IN-2) (Analog PC-2 input/component input terminal) This terminal is used as a computer analog PC input or component input terminal. Use a Dsub computer cable for connection. Mini D-sub 15 - Canon REALiS LCOS SX7 Mark II D | User Manual - Page 140
Dynamic gamma 106 E External monitor 38 F Factory defaults 110, 117 FOCUS 51 Focusing 51 FREEZE 78 G Gain 105, 135 Gamma correction 104, 135 Guide 114 H HDCP 135 HDMI 65, 136 Horizontal pixels 95 Horizontal position 94 I IMAGE 55 Image adjustment menu 86, 102 Image flip H/V (Ceiling - Canon REALiS LCOS SX7 Mark II D | User Manual - Page 141
M Mem. color correct 107 Memorized color correction 136 Menu 86 Menu configuration 144 Menu position 96 Mouse operation 82 MUTE 79 N NO SHOW 78, 100 No signal screen 99 O Offset 105, 136 Output resolution (Preparing the computer 44 P PAGE 80 Page Up/Down 80 Password settings 116 POWER - Canon REALiS LCOS SX7 Mark II D | User Manual - Page 142
-CA31 z Network adapter Part No.: RS-NA01 (SX60) * This part is used to hang the projector from a ceiling. For more detailed information, refer to the instruction manual that comes with the ceiling-mount hanger RS-CL07. 142 - Canon REALiS LCOS SX7 Mark II D | User Manual - Page 143
143 - Canon REALiS LCOS SX7 Mark II D | User Manual - Page 144
Menu Configuration The Display settings menu Aspect Input signal select DIGITAL PC/ANALOG PC P90 Full screen * 4:3 Auto Wide True size VIDEO/S-VIDEO/SCART P91 Full screen * 4:3 Wide DIGITAL VIDEO/COMPO- P90 NENT Auto * Full screen 4:3 Wide ANALOG PC P91 640 x 480 Menu position P96 Screen - Canon REALiS LCOS SX7 Mark II D | User Manual - Page 145
French Hungarian Italian Czech Spanish Danish Portuguese Chinese Swedish (Simplified) Russian Chinese Dutch (Traditional) Finnish Korean Norwegian Japanese Guide Off On * P114 LED illumination Off On * P115 Other settings Remote control Ch1 Ch2 P115 Digital Video F * L P116 - Canon REALiS LCOS SX7 Mark II D | User Manual - Page 146
CANON INC. 30-2, Shimomaruko 3-chome, Ohta-ku, Tokyo 146-8501, Japan U.S.A. CANON U.S.A. INC. One Canon Plaza, Lake Success, NY 110421198, U.S.A. For all inquires concerning this product, call toll free in the U.S. 1-800-OK-CANON CANADA CANON CANADA INC. HEADQUARTERS 6390 Dixie Road, Mississauga,
-
 1
1 -
 2
2 -
 3
3 -
 4
4 -
 5
5 -
 6
6 -
 7
7 -
8
-
9
-
10
-
11
-
12
-
13
-
14
-
15
-
16
-
17
-
18
-
19
-
20
-
21
-
22
-
23
-
24
-
25
-
26
-
27
-
28
-
29
-
30
-
31
-
32
-
33
-
34
-
35
-
36
-
37
-
38
-
39
-
40
-
41
-
42
-
43
-
44
-
45
-
46
-
47
-
48
-
49
-
50
-
51
-
52
-
53
-
54
-
55
-
56
-
57
-
58
-
59
-
60
-
61
-
62
-
63
-
64
-
65
-
66
-
67
-
68
-
69
-
70
-
71
-
72
-
73
-
74
-
75
-
76
-
77
-
78
-
79
-
80
-
81
-
82
-
83
-
84
-
85
-
86
-
87
-
88
-
89
-
90
-
91
-
92
-
93
-
94
-
95
-
96
-
97
-
98
-
99
-
100
-
101
-
102
-
103
-
104
-
105
-
106
-
107
-
108
-
109
-
110
-
111
-
112
-
113
-
114
-
115
-
116
-
117
-
118
-
119
-
120
-
121
-
122
-
123
-
124
-
125
-
126
-
127
-
128
-
129
-
130
-
131
-
132
-
133
-
134
-
135
-
136
-
137
-
138
-
139
-
140
-
141
-
142
-
143
-
144
-
145
-
146
 |
 |
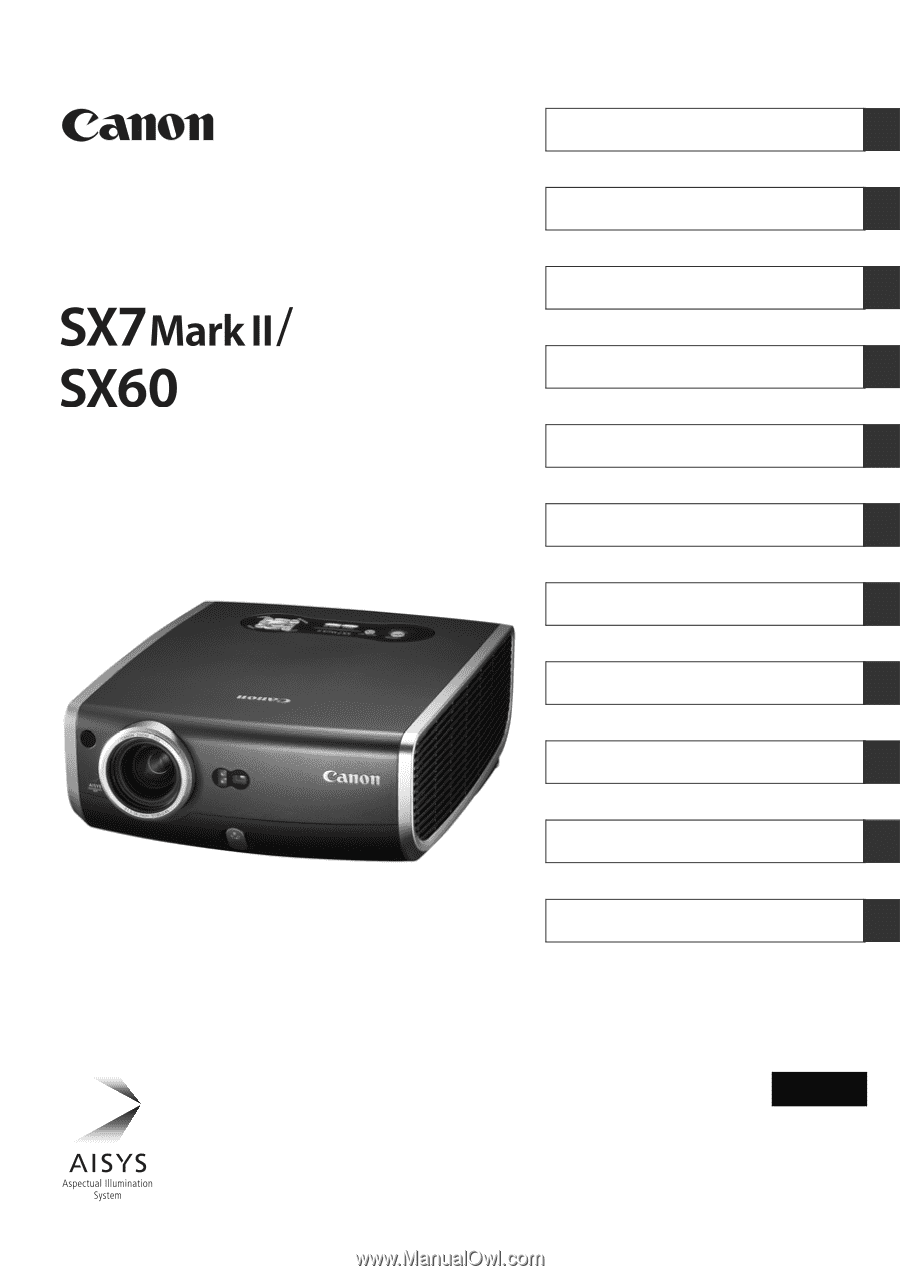
MULTIMEDIA PROJECTOR
Table of contents/Safety Instructions
Before Use
Setting Up the Projector
Projecting an Image from the Computer
Projecting an Image from AV Equipment
Useful Functions Available During a Presentation
Setting Up Functions from Menus
Maintenance
Troubleshooting
Appendix
Index
User’s Manual
ENG