Canon SD20 ImageBrowser Software User Guide
Canon SD20 - PowerShot Digital ELPH Camera Manual
 |
UPC - 750845821703
View all Canon SD20 manuals
Add to My Manuals
Save this manual to your list of manuals |
Canon SD20 manual content summary:
- Canon SD20 | ImageBrowser Software User Guide - Page 1
5.0 1 ImageBrowser Software User Guide - Canon SD20 | ImageBrowser Software User Guide - Page 2
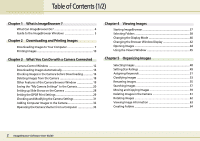
? What Can ImageBrowser Do 4 Guide to the ImageBrowser Windows 5 Chapter 2 Downloading and Printing Images Downloading Images to Your Computer 7 Printing Images 10 Chapter 3 What You Can Do with a Camera Connected Camera Control Window 12 Downloading Images Automatically 14 Checking Images in - Canon SD20 | ImageBrowser Software User Guide - Page 3
Software User Guide NOTE • This guide uses Mac OS X v10.3 screen shots and procedures in the explanations. The screen shots and procedures may vary slightly if you are using another version of the Mac OS. • In this manual, the term "memory card" is used for CF cards, SD cards and PC cards - Canon SD20 | ImageBrowser Software User Guide - Page 4
Camera Settings files. These files are automatically copied to your computer when ImageBrowser is installed. Organize Images • Assign a Star Rating or keywords to images. • Classify images according to their shooting date or Star Rating. • Perform image searches. 4 ImageBrowser Software User Guide - Canon SD20 | ImageBrowser Software User Guide - Page 5
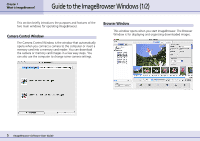
can download the camera or memory card images in a few easy steps. You can also use the computer to change some camera settings. Browser Window This window opens when you start ImageBrowser. The Browser Window is for displaying and organizing downloaded images. 5 ImageBrowser Software User Guide - Canon SD20 | ImageBrowser Software User Guide - Page 6
when you press and hold the [control] key and click an image in the Browser Area of the Browser Window. A contextual menu is, as its name implies, a menu whose options vary according to the context. It you will be impressed with their convenience. Contextual menu 6 ImageBrowser Software User Guide - Canon SD20 | ImageBrowser Software User Guide - Page 7
in order, such as downloading images from the camera and printing downloaded images. This section starts by explaining the procedures for downloading images from the camera. IMPORTANT • This guide assumes that all the relevant software programs and drivers have been correctly installed on - Canon SD20 | ImageBrowser Software User Guide - Page 8
shown below. Camera Control Window with a Memory Card Reader Camera Control Window • Depending upon your camera model, a program different from the one shown here may start up. Please refer to the manual for the software supplied with your camera if this occurs. 8 ImageBrowser Software User Guide - Canon SD20 | ImageBrowser Software User Guide - Page 9
in greater detail how to selectively download images from the camera or a memory card and how to perform tasks such as changing the file destination. • By the default settings, folders named after the shooting dates will be created in the Pictures folder and the downloaded images will be saved there - Canon SD20 | ImageBrowser Software User Guide - Page 10
Options Dialog The Layout Options dialog and Print window open. The selected images are automatically laid out in the Print window. You can select a layout option in the Layout Options dialog. For the moment, just print the images without making any changes. 10 ImageBrowser Software User Guide - Canon SD20 | ImageBrowser Software User Guide - Page 11
the Print window, click [PRINT]. 6. If the Print dialog appears, click [Print]. REFERENCE • You cannot click [Print] in the Print window while the Layout Options dialog is open. • For details on print operations, see the Printing Images section in Chapter 6. 11 ImageBrowser Software User Guide - Canon SD20 | ImageBrowser Software User Guide - Page 12
, the Canon CameraWindow icon may not appear on the desktop. In this case, open the Camera Control Window by double-clicking the [Applications] folder, followed by the [Canon Utilities] and [CameraWindow] folders, and double-click the [CameraWindow] icon. 12 ImageBrowser Software User Guide - Canon SD20 | ImageBrowser Software User Guide - Page 13
section or on the Control Panel. Closing the Camera Control Window Click [Quit] to close the Camera Control Window. You can also open the Camera Control Window by clicking the [File] menu and selecting the [Canon Camera] submenu, followed by [Connect to Camera]. 13 ImageBrowser Software User Guide - Canon SD20 | ImageBrowser Software User Guide - Page 14
or destination folder, set the Default Settings. 1. Click [Preferences]. 3. Select the destination folder for downloaded images, set the creation method for subfolders at the time of downloading and click [Next]. 2. Select the image type option and click [Next]. 14 ImageBrowser Software User Guide - Canon SD20 | ImageBrowser Software User Guide - Page 15
5. To initiate the selected auto download process immediately after the camera and computer are connected, place a check mark beside [Images are automatically downloaded to computer while camera is connected]. 6. Click [Finish]. The default settings are now set. 15 ImageBrowser Software User Guide - Canon SD20 | ImageBrowser Software User Guide - Page 16
also select a series of adjacent images by pressing and holding the [option] and [shift] keys together while clicking on the first and last images. 2. Click [Download Images]. 16 ImageBrowser Software User Guide A window for setting the destination folder and other settings will open. - Canon SD20 | ImageBrowser Software User Guide - Page 17
file name, set the text characters for the file prefix and the consecutive numbering system. Specify a folder as the destination for downloaded images. Set whether or not to create a subfolder and specify the name. Click here to change the destination folder. 17 ImageBrowser Software User Guide - Canon SD20 | ImageBrowser Software User Guide - Page 18
the Camera Browser Window to delete images from the camera. Opening the Camera Browser Window Click [Lets you select and download images] in the Camera Control Window to open the Camera Browser Window. will display. 3. Click [Erase]. The image will be deleted. 18 ImageBrowser Software User Guide - Canon SD20 | ImageBrowser Software User Guide - Page 19
. REFERENCE • You can also download images displayed in the Camera Browser Window by dragging and dropping them into window's right is shown or hidden. Starts ImageBrowser. Displays separate histograms of brightness or RGB data. Histogram Image Information 19 ImageBrowser Software User Guide - Canon SD20 | ImageBrowser Software User Guide - Page 20
. Displaying the My Camera window ImageBrowser comes with some My Camera Settings already prepared. Start by displaying this data. First click the [Set to Camera] tab in the Camera Control Window and then click [Set My Camera]. My Camera window will display. 20 ImageBrowser Software User Guide - Canon SD20 | ImageBrowser Software User Guide - Page 21
in the Type category. The [Computer] list displays the image files and sounds that were previously prepared. Switches between settings types. My Camera Settings in your camera display here. My Camera Settings that are already on your computer display here. 21 ImageBrowser Software User Guide - Canon SD20 | ImageBrowser Software User Guide - Page 22
as My Camera Settings to the Computer list (the procedure is explained later in this section). Saving the My Camera Settings to the camera This topic explains how to save the previously prepared My Camera Settings files to the camera. 1. Select a settings type. 22 ImageBrowser Software User Guide - Canon SD20 | ImageBrowser Software User Guide - Page 23
and the self-timer sound and the shutter sound will play in order. REFERENCE • Please note that the original settings file in the camera is settings file in the camera will now be replaced with the one you specified from the computer. 23 ImageBrowser Software User Guide Select the setting you - Canon SD20 | ImageBrowser Software User Guide - Page 24
Chapter 3 What You Can Do with a Camera Connected Saving the "My Camera Settings" to the Camera (5/8) 5. Click the [Close] button to close the window. This concludes the procedure for adding settings to the camera. See your Camera User Guide for instructions on changing the start-up image, start- - Canon SD20 | ImageBrowser Software User Guide - Page 25
■ Adding new files as My Camera Settings to the My Camera window 1. Open the My Camera window and select the settings type in the [Type] list box. 2. Click [Add]. REFERENCE • The My Camera Settings file cannot be added when the Type list box is set to Theme. 25 ImageBrowser Software User Guide - Canon SD20 | ImageBrowser Software User Guide - Page 26
a Camera Connected Saving the "My Camera Settings" to the Camera (7/8) to the camera using the procedures described in the Saving the My Camera Settings to the Camera section. REFERENCE Previously created settings can also be added as My Camera Settings with the same procedures as above, but have - Canon SD20 | ImageBrowser Software User Guide - Page 27
the My Camera window. This completes the copying process. IMPORTANT • Never detach the interface cable, turn off the camera power or do anything to stop communication between the camera and computer while the My Camera Settings are being saved to the computer. 27 ImageBrowser Software User Guide - Canon SD20 | ImageBrowser Software User Guide - Page 28
Slide Shows on the Camera You can edit a camera slide show from the computer (if your camera supports the slide show function). REFERENCE • See your Camera User Guide for instructions how to use and play slide shows. First click the [Set to Camera] tab in the Camera Control Window and then click - Canon SD20 | ImageBrowser Software User Guide - Page 29
to the documentation that comes with your camera. How to set the DPOF print settings First click the [Set to Camera] tab in the Camera Control Window and then click [Set Slide Show/DPOF]. 29 ImageBrowser Software User Guide When the following window appears, select the [Print Order (DPOF)] option - Canon SD20 | ImageBrowser Software User Guide - Page 30
is specified. When you are done with your selections, click [Save to Camera] to save the information. REFERENCE • The procedure described above also applies when the print type is [Both (Standard/Index)]. 30 ImageBrowser Software User Guide Select the check box to include the image in the index - Canon SD20 | ImageBrowser Software User Guide - Page 31
date and time settings with the computer. Click this button to format the camera's memory card (not supported by some camera models). You can set the date and time from here. After you have checked the camera settings and made the necessary changes, click [OK]. 31 ImageBrowser Software User Guide - Canon SD20 | ImageBrowser Software User Guide - Page 32
can also copy more than one image at a time. 32 ImageBrowser Software User Guide Select this to change the image size before adding it. Select the desired size in the list box directly below (if you are using a memory card reader, input the image size value). REFERENCE • If multiple images have - Canon SD20 | ImageBrowser Software User Guide - Page 33
the destination folder and click [Choose]. A RemoteCapture Task window like the one below will open. Clicking the [Release] button in this window records the image. The image captured by the camera displays here. Switches between showing or hiding the image. 33 ImageBrowser Software User Guide - Canon SD20 | ImageBrowser Software User Guide - Page 34
3 What You Can Do with a Camera Connected Operating the Camera Shutter from a Computer (2/4) Features of the RemoteCapture Task Window Selects the image's recording size and [Shooting settings] tab. (The settings categories vary according to your camera model.) 34 ImageBrowser Software User Guide - Canon SD20 | ImageBrowser Software User Guide - Page 35
] menu in the RemoteCapture Task window and select [Timer Shooting] to open a window like the one shown here. Set the number of seconds for the delay and click [Start]. The timer may be set to a range from 2 seconds to 30 seconds. 35 ImageBrowser Software User Guide ■ Saving and Recalling Shooting - Canon SD20 | ImageBrowser Software User Guide - Page 36
select [Computer only] in the [Save Images On] category, you can record images when the memory card in the camera is full and will not accept more images or when it is not present. ■ [Release Hotkey] Tab You can release the shutter using the key specified here. 36 ImageBrowser Software User Guide - Canon SD20 | ImageBrowser Software User Guide - Page 37
during installation, the Canon ImageBrowser icon may not appear on the desktop. In this case, start ImageBrowser by double-clicking the [Applications] folder, followed by the [Canon Utilities] and [ImageBrowser] folders, and double-click the [ImageBrowser] icon. 37 ImageBrowser Software User Guide - Canon SD20 | ImageBrowser Software User Guide - Page 38
display. You will find it convenient to register a folder that you use regularly as a favorite. Selected folder Explorer Panel 38 ImageBrowser Software User Guide Pre-Registered Folders If you select [All], all the disks that are connected to your computer will display (along with their folders - Canon SD20 | ImageBrowser Software User Guide - Page 39
Selected Click [Add] at the bottom of the Explorer Panel section, select a folder in the window that opens and click [Select]. Deregistering a Favorite Folder Select [Favorite], then the folder you wish the [File] menu and using the [Favorites Folders] submenu. 39 ImageBrowser Software User Guide - Canon SD20 | ImageBrowser Software User Guide - Page 40
Mode (1/2) You can change the display mode in the Browser Window and Browser Area for ease of use. This section explains how the [View] menu and using the [View Mode] submenu. 40 ImageBrowser Software User Guide Selected Thumbnail You can change the thumbnail size. REFERENCE • You can also - Canon SD20 | ImageBrowser Software User Guide - Page 41
] menu and selecting the [Display] submenu, or [Enlarge] or [Reduce]. Use this Control Panel to move the display. REFERENCE • See the Sorting Images by Date and Time-TimeTunnel in Chapter 6 for instructions for operating TimeTunnel and adjusting its settings. 41 ImageBrowser Software User Guide - Canon SD20 | ImageBrowser Software User Guide - Page 42
can be assigned to images. You can limit the images displayed in the Browser Window to only those assigned a Star Rating. You use the Display Control Panel menu between showing/hiding the Information Panel. 42 ImageBrowser Software User Guide REFERENCE • See the Setting Star Ratings in Chapter - Canon SD20 | ImageBrowser Software User Guide - Page 43
Chapter 4 Viewing Images Changing the Browser Window Display (2/2) Setting the Information Displayed beside the sorting criterion. Example showing the "Shooting Date" and "Shooting Time" selected. 43 ImageBrowser Software User Guide You can also switch between ascending and descending order. - Canon SD20 | ImageBrowser Software User Guide - Page 44
double-click the thumbnail of the image that you want to open. The image appears in the viewer window. Double-click the thumbnail of the image that you want to see. REFERENCE • You can also intend to select all the images or deselect images. Viewer Window 44 ImageBrowser Software User Guide - Canon SD20 | ImageBrowser Software User Guide - Page 45
REFERENCE • If you select multiple images and display them in the Viewer Window, you can click Back or Next to move the selection between images the [Display] submenu, or [Enlarge] or [Reduce]. 45 ImageBrowser Software User Guide REFERENCE • You can also switch to the full screen display by - Canon SD20 | ImageBrowser Software User Guide - Page 46
are displayed in the Viewer Window, clicking [Synchronize] sets the display magnification and position on the image to the same for all images. Example of a 4-Image Display Currently selected image. Synchronizes the display magnification and display position. 46 ImageBrowser Software User Guide - Canon SD20 | ImageBrowser Software User Guide - Page 47
button and [Yes] in the confirmation dialog box. The converted image will display in the Viewer Window. 47 ImageBrowser Software User Guide Closing the Viewer Window Click to close the Viewer Window. Or click the [File] menu and select [Close]. REFERENCE • See the Editing Images in Chapter 6 for - Canon SD20 | ImageBrowser Software User Guide - Page 48
and last images. Deselecting All Images Deselect all the images at once by clicking [Selecting Images] in the Control Panel in the Browser Window and selecting [Deselect All]. You can also deselect them by clicking the [Edit] menu and selecting [Deselect All]. 48 ImageBrowser Software User Guide - Canon SD20 | ImageBrowser Software User Guide - Page 49
images. What is a Star Rating? You can assign one of three ratings to an image. When a camera image is downloaded to the computer it is assigned a two-star [✩✩] rating. Setting the Star Rating To set a rating for dialog box, set the Star Rating in the list box. 49 ImageBrowser Software User Guide - Canon SD20 | ImageBrowser Software User Guide - Page 50
Star Ratings (2/2) ■ Viewer Window Method Display the image in the Viewer Window and set the Star Rating in the list box. ■ Slide Show Method While a slide show is in play, use the menu at the bottom of the window to set the Star Rating for the displayed image. 50 ImageBrowser Software User Guide - Canon SD20 | ImageBrowser Software User Guide - Page 51
Keywords] in the Information Panel to open the keyword settings window. Place a check mark beside appropriate words in the various categories, such as People, Places, Events or Others, and click [OK]. 51 ImageBrowser Software User Guide Place a check mark beside appropriate keywords. To add a new - Canon SD20 | ImageBrowser Software User Guide - Page 52
click the [Edit] menu and select the [Keyword] submenu, followed by [Settings] to display the keyword settings window. ■ File Information Dialog Box Method Set the display mode to List or TimeTunnel. Select an image in the a keyword that was used in the past. 52 ImageBrowser Software User Guide - Canon SD20 | ImageBrowser Software User Guide - Page 53
images into folders by the shooting dates or by Star Ratings. Selecting the classification settings dialog box. Classifying by Shooting Dates Set the options and click [OK] to the actual folder that will be created. Select the shooting date option or Star Rating option and click [Next]. Select [ - Canon SD20 | ImageBrowser Software User Guide - Page 54
and click [OK] to start classifying. Select the Star Ratings of the images that will be copied (or moved). Select the destination folder. 54 ImageBrowser Software User Guide Select [Copy] to retain the file in its original location or [Move] to shift it to the new location. - Canon SD20 | ImageBrowser Software User Guide - Page 55
Chapter 5 Organizing Images Renaming Images (1/2) This section describes how to rename images. Renaming Images Click the name of the image that you want to rename. After a moment you can type the new name of the image. Type the new name and press [return]. 55 ImageBrowser Software User Guide - Canon SD20 | ImageBrowser Software User Guide - Page 56
submenu, followed by [Rename], to open the renaming settings window. Set the options in this window and click [OK] to rename the image file. Renaming Folders for the name format selected above. Set the Number of digits and the starting number for the name format selected above. Sample of - Canon SD20 | ImageBrowser Software User Guide - Page 57
as Star Ratings, shooting dates, keywords or comments. window will open. 3. Set the search criteria. Place a check mark beside your chosen criterion and set its individual settings. Sets whether images are searched according to all the parameters or just one. 57 ImageBrowser Software User Guide - Canon SD20 | ImageBrowser Software User Guide - Page 58
images in this folder to another. The images will remain registered in this folder until ImageBrowser is closed or another search is performed. 58 ImageBrowser Software User Guide - Canon SD20 | ImageBrowser Software User Guide - Page 59
Finder to modify files or folders while ImageBrowser is open, those changes might not be reflected in the ImageBrowser window. To remedy this, click [Refresh] on the [View] menu. Moving or copying in the Explorer Panel to move. B Drop it at the desired location. 59 ImageBrowser Software User Guide - Canon SD20 | ImageBrowser Software User Guide - Page 60
releasing the mouse button to drop the image. • Up to two Browser Windows can be open simultaneously. Other Methods ■ Moving or Copying Multiple Images You Browser Window), select the image in the Browser Area, click the [File] menu and select [Duplicate]. 60 ImageBrowser Software User Guide - Canon SD20 | ImageBrowser Software User Guide - Page 61
Images Deleting Images in the Camera This section explains how to delete double-clicking the Trash to open its window and dragging and dropping the file onto its original folder (in the Finder window not in the Explorer Panel section). ■ select [Empty Trash]. 61 ImageBrowser Software User Guide - Canon SD20 | ImageBrowser Software User Guide - Page 62
rotate images to the desired orientation. This is useful for images taken by holding the camera vertically. IMPORTANT • When you rotate an image in ImageBrowser, the actual image file you click on successive images and then perform the rotation procedure. 62 ImageBrowser Software User Guide - Canon SD20 | ImageBrowser Software User Guide - Page 63
Information dialog box contains such information as the camera model, the date the image was shot, and the camera settings at the time of shooting. Hides the Software User Guide REFERENCE • When an image taken by the camera is modified and saved by another program, information about the camera - Canon SD20 | ImageBrowser Software User Guide - Page 64
for the procedures for deleting folders. • When you create a new folder in ImageBrowser, a new folder of the same name appears in the Finder. 64 ImageBrowser Software User Guide New Folder - Canon SD20 | ImageBrowser Software User Guide - Page 65
images displayed in the Viewer Window. About the Editing Features RAW images and movies cannot be edited in the Viewer Window. ■ Crop You can extract part of an image, , blue) channels. ■ Editing with Other Software See the Editing Images with Other Software. ■ Save After you have modified an - Canon SD20 | ImageBrowser Software User Guide - Page 66
unnecessary portions of the image and leave only the necessary portions. Click [Edit] in the Viewer Window and select [Crop] to open the Crop Dialog. Drag to specify the cutout dimensions. Click this sides. You can also specify cutout dimensions with numbers. 66 ImageBrowser Software User Guide - Canon SD20 | ImageBrowser Software User Guide - Page 67
adjusts the chroma, luminance and lightness of the RGB channels. Click [Edit] in the Viewer Window and select [Adjust Color] to open the Color Adjustment Dialog. Use the sliders to adjust the [Restore] restores the image to the state before the adjustments. 67 ImageBrowser Software User Guide - Canon SD20 | ImageBrowser Software User Guide - Page 68
file save dialog box. REFERENCE • After you have modified an image, if you try to close the image window without saving your changes, a message appears to prompt you to save the edited image. To save the changes in the same fashion as conventional JPEG files. 68 ImageBrowser Software User Guide - Canon SD20 | ImageBrowser Software User Guide - Page 69
Preferences] and [Browser Window], and add the camera model). The image editing program starts and displays the selected image. REFERENCE • You can also start another program by clicking the [Edit] menu and selecting it from the [Start Application] submenu. 69 ImageBrowser Software User Guide - Canon SD20 | ImageBrowser Software User Guide - Page 70
a movie. Specify the image quality. (The lower the quality, the rougher the image becomes, but the size of the file also becomes smaller.) 70 ImageBrowser Software User Guide - Canon SD20 | ImageBrowser Software User Guide - Page 71
Software User Guide support auto startup. • You can send the image you just created by opening a new email and attaching the image to the e-mail message. • With e-mail programs, you can attach images to e-mail messages simply by dragging them from the Browser Area to the new message window - Canon SD20 | ImageBrowser Software User Guide - Page 72
export a selected image as a wallpaper file. REFERENCE • Only the Export Image Shooting Properties option can be used with movie files and RAW images. 72 ImageBrowser Software User Guide 4. Set the export settings. The procedures from this point onward vary according to the export format. - Canon SD20 | ImageBrowser Software User Guide - Page 73
all check marks at once. Destination Folder Calculates the postconversion file size. Changes the You can view the post- destination folder. conversion image. 73 ImageBrowser Software User Guide You can input a file name. Destination Folder Changes the destination folder. - Canon SD20 | ImageBrowser Software User Guide - Page 74
a display method for the image. Destination Folder REFERENCE • Use the Mac OS X System Properties window to select and configure a screen saver. REFERENCE • Use the Mac OS X System Properties window to select and configure wallpaper (desktop images). 74 ImageBrowser Software User Guide - Canon SD20 | ImageBrowser Software User Guide - Page 75
to another. (When you click an effect, you can get a preview of how the effect looks in the area to the right.) 75 ImageBrowser Software User Guide Select the "Auto Play" option if you want the slide show to proceed automatically and go to the next slide after a predetermined number of seconds - Canon SD20 | ImageBrowser Software User Guide - Page 76
by clicking the [View] menu and selecting [Slide Show]. 76 ImageBrowser Software User Guide Star Ratings Button You can set the Star Rating for an image while show finishes, the deselected images are no longer selected in the Browser Window. You can also use this function to place a check mark on - Canon SD20 | ImageBrowser Software User Guide - Page 77
the Slide Show Options dialog. (The mouse actions are disabled when the buttons are displayed.) If you selected Hides Buttons in the Slide Show Options window, you can display the control menu while a show is in progress by pressing and holding the [control] key while clicking with the mouse. You - Canon SD20 | ImageBrowser Software User Guide - Page 78
and the sound is saved. The sound is added to the image. The following mark appears when an image is accompanied by sound. 78 ImageBrowser Software User Guide This mark indicates an image with sound. - Canon SD20 | ImageBrowser Software User Guide - Page 79
sound file is created in the same folder as the image file as an AIFF format file with the [.AIF] file name extension. 79 ImageBrowser Software User Guide - Canon SD20 | ImageBrowser Software User Guide - Page 80
have check marks in the Preferences dialog. Click the [ImageBrowser] menu and select [Preferences], and in the [Print] category place a check mark in the [Shooting Date] and/or [File Name] options. Select images. Print Window Layout Options Dialog Click here. 80 ImageBrowser Software User Guide - Canon SD20 | ImageBrowser Software User Guide - Page 81
gaps between images on the page. When you finish selecting a layout, click [Next]. A print preview displays on the right after you select a layout. 81 ImageBrowser Software User Guide - Canon SD20 | ImageBrowser Software User Guide - Page 82
option. Adding Images Click here. You can add images by dragging them from the Browser Area and dropping them into the Print window. Deleting Images You can clear images from the Print window by selecting them, clicking the [Edit] menu and selecting [Clear]. 82 ImageBrowser Software User Guide - Canon SD20 | ImageBrowser Software User Guide - Page 83
button and click a rotation angle on the menu. REFERENCE • You can also select a rotation angle on the [Rotate] submenu on the [Edit] menu. 83 ImageBrowser Software User Guide - Canon SD20 | ImageBrowser Software User Guide - Page 84
for individual images. Select an image and on the [Edit] menu, click [Edit Caption]. The Edit Caption window appears. Type your caption and specify the font and its size, as well as any styles that you want. Photo Size Example Font Style Tracking Text Color 84 ImageBrowser Software User Guide - Canon SD20 | ImageBrowser Software User Guide - Page 85
changes automatically according to its size. ■ Editing text boxes First select a text box and on the [Edit] menu, click [Edit Text]. A window where you can edit your text appears. Edit your text. Another way to open this window is to double-click the text box. 85 ImageBrowser Software User Guide - Canon SD20 | ImageBrowser Software User Guide - Page 86
First, make sure that noting is selected and on the [Edit] menu, click [Edit Header]. The Edit Header window appears. Type your text and specify the font and its size, as well as any styles that you want. The header appears at the top of the page. 86 ImageBrowser Software User Guide Clipping area - Canon SD20 | ImageBrowser Software User Guide - Page 87
you have finished making all the adjustments you want in the Print window, click (Print). Click here. The Print dialog will open. about Exif 2.2 settings. REFERENCE • Images captured by cameras that support the Exif 2.2 standard have the shooting settings data, 87 ImageBrowser Software User Guide - Canon SD20 | ImageBrowser Software User Guide - Page 88
size, you must make the change before you print over multiple pages. Open the print resolution settings window by clicking the [File] menu and selecting the [Print] submenu, followed by [Multiple Page Print the print resolution, the smaller the image is printed. 88 ImageBrowser Software User Guide - Canon SD20 | ImageBrowser Software User Guide - Page 89
, the closest match to the date is displayed instead. Double-click a thumbnail to display it in another window. Control Panel Drag this bar up or down to shift the tunnel display. Click to display the control panel menu (the menu is explained on the next page). 89 ImageBrowser Software User Guide - Canon SD20 | ImageBrowser Software User Guide - Page 90
Allows you to specify the date for the images displayed. Select this option to make the TimeTunnel rings octagonal. Select this option to make the Allows you to change the TimeTunnel look curved. number of TimeTunnel rings. 90 ImageBrowser Software User Guide Click the [Change Viewpoint] menu - Canon SD20 | ImageBrowser Software User Guide - Page 91
Supplementary Features Playing Movies ImageBrowser supports movies. You can download movie files and display them Viewer Window will open and display the movie if you double-click the thumbnail. You can also play the movie in the Viewer Window. Movie mark 91 ImageBrowser Software User Guide Use - Canon SD20 | ImageBrowser Software User Guide - Page 92
various effects: linking movies and still images that have been downloaded to a computer, superimposing titles and other text, and Edit the movie by following the steps displayed on the tabs in the window's midsection, then finish by saving it. The features and procedures for each Software User Guide - Canon SD20 | ImageBrowser Software User Guide - Page 93
the properties of the selected image. Features of the [2. Effect] Window Superimposes titles and other text on the image selected in the storyboard area image by selecting it and clicking this button. 93 ImageBrowser Software User Guide Magnifies part of the selected image. You can set the - Canon SD20 | ImageBrowser Software User Guide - Page 94
file. Proceeds to a window for setting the file name and destination. You can adjust the volume or set the fade-in or fade-out effect for a movie or its linked audio file by selecting the movie or its linked audio file and clicking this button. 94 ImageBrowser Software User Guide You can set the - Canon SD20 | ImageBrowser Software User Guide - Page 95
See your Camera User Guide to check whether your camera supports RAW images or not. • Depending upon your camera model, a different program than the one introduced here may start when you convert RAW images. If that occurs, refer to the manual for the software supplied with your camera. Converting - Canon SD20 | ImageBrowser Software User Guide - Page 96
Window You can adjust the brightness, contrast and coloration of a RAW image as it is converted. See the Features of the Image Quality Adjustment Window Adjustment Window. 4. Click the [2. Save] tab in the main window, marked with a check in the main window). Selects the image file format. Sets - Canon SD20 | ImageBrowser Software User Guide - Page 97
Features of the Image Quality Adjustment Window The adjustable categories may vary according to your camera model. Adjusts the white balance by here, settings changes in this window are immediately reflected in the image. 97 ImageBrowser Software User Guide Restores all adjustments to the initial - Canon SD20 | ImageBrowser Software User Guide - Page 98
Select] beside the original image, select the pre-adjustment image (original image) and click [Next]. 98 ImageBrowser Software User Guide 5. Check the [Preview My Color Applied to the image] and click [Next]. 6. Type a name or it from the [Photo Effect] menu in the Image Quality Adjustment Window. - Canon SD20 | ImageBrowser Software User Guide - Page 99
). • You can make it easier to stitch images together by using the camera's Stitch Assist mode to shoot them. Opening PhotoStitch In the Browser Area, follow the instructions on the upper part of the PhotoStitch window, and stitch your images together. 99 ImageBrowser Software User Guide Save the - Canon SD20 | ImageBrowser Software User Guide - Page 100
by Canon. It allows the output of the image pixels from a digital camera without any deterioration in the quality of the image. Some cameras might not support this file format. ■ PICT files This is the standard file format for Macintosh. This file format is supported by most Macintosh software - Canon SD20 | ImageBrowser Software User Guide - Page 101
Allows you to set the background color of the Preview window. Change the category here. Allows you to set the color of each area in the Browser Area. 101 ImageBrowser Software User Guide If you select this, when you display images in ImageBrowser, a customized icon is automatically attached - Canon SD20 | ImageBrowser Software User Guide - Page 102
you start ImageBrowser.) Click a disk. Processing When Rotating Dialog You can set the processing method used to rotate JPEG images in the Browser Window. Place a check mark here to retain the original image when a JPEG image is rotated in the Browser Window. 102 ImageBrowser Software User Guide - Canon SD20 | ImageBrowser Software User Guide - Page 103
compliant camera. REFERENCE • To print with the date included, place a check mark beside the [Shooting Date] window. Use this setting to specify the direction of rotation. Use this to set the units used for measuring the paper size in the Print window. 103 ImageBrowser Software User Guide - Canon SD20 | ImageBrowser Software User Guide - Page 104
methods. 104 ImageBrowser Software User Guide ■ Check the Camera Confirm that the camera is on and in the correct mode to transfer data. See your Camera User Guide since the methods for setting the camera and computer to the communication mode vary between camera models. ■ Check the Battery You are - Canon SD20 | ImageBrowser Software User Guide - Page 105
19 Opening 16 Selecting and Initiating Download 16 Camera Control Window 12 Closing 13 Opening 12 Camera Settings 31 Contextual Menus 6 Control 37 105 ImageBrowser Software User Guide Images Adding Sounds 78 Adding to the Camera 32 Adjusting Color 67 Auto Downloading 14 Classifying 53 - Canon SD20 | ImageBrowser Software User Guide - Page 106
Dialog 80 Moving Images 83 106 ImageBrowser Software User Guide Number of Images 83 Print Window 80 Reorganizing Images 83 Rotating Images 83 74 Window Browser Window 5 Camera Browser Window 19 Camera Control Window 12 My Camera Window 20 Print Window 10 RemoteCapture Task Window 34 Viewer Window - Canon SD20 | ImageBrowser Software User Guide - Page 107
data due to a mistaken operation or malfunction of the camera, the software, the CompactFlash™ cards (CF cards), personal computers, peripheral devices, or use of non-Canon CF cards. Trademark Acknowledgments • Canon and PowerShot are trademarks of Canon Inc. • Macintosh, Mac OS and QuickTime are
-
 1
1 -
 2
2 -
 3
3 -
 4
4 -
 5
5 -
 6
6 -
 7
7 -
8
-
9
-
10
-
11
-
12
-
13
-
14
-
15
-
16
-
17
-
18
-
19
-
20
-
21
-
22
-
23
-
24
-
25
-
26
-
27
-
28
-
29
-
30
-
31
-
32
-
33
-
34
-
35
-
36
-
37
-
38
-
39
-
40
-
41
-
42
-
43
-
44
-
45
-
46
-
47
-
48
-
49
-
50
-
51
-
52
-
53
-
54
-
55
-
56
-
57
-
58
-
59
-
60
-
61
-
62
-
63
-
64
-
65
-
66
-
67
-
68
-
69
-
70
-
71
-
72
-
73
-
74
-
75
-
76
-
77
-
78
-
79
-
80
-
81
-
82
-
83
-
84
-
85
-
86
-
87
-
88
-
89
-
90
-
91
-
92
-
93
-
94
-
95
-
96
-
97
-
98
-
99
-
100
-
101
-
102
-
103
-
104
-
105
-
106
-
107
 |
 |

1
ImageBrowser Software User Guide
5.0