Canon SD500 ZoomBrowser EX 5.1 Software User Guide
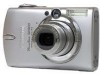
Canon SD500 - PowerShot Digital ELPH Camera Manual
 |
UPC - 013803048421
View all Canon SD500 manuals
Add to My Manuals
Save this manual to your list of manuals |
Canon SD500 manual content summary:
- Canon SD500 | ZoomBrowser EX 5.1 Software User Guide - Page 1
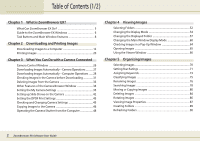
1 ZoomBrowser EX Software User Guide 5.1 - Canon SD500 | ZoomBrowser EX 5.1 Software User Guide - Page 2
Guide to the ZoomBrowser EX Windows 6 Task Buttons and Main Window Features 8 Chapter 2 Downloading and Printing Images Downloading Images to a Computer 12 Printing Images 20 Chapter 3 What You Can Do with a Camera Connected Camera Control Window 26 Downloading ZoomBrowser EX Software User Guide - Canon SD500 | ZoomBrowser EX 5.1 Software User Guide - Page 3
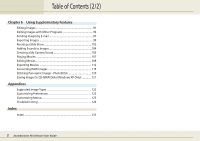
Slide Show 102 Adding Sounds to Images 104 Creating a My Camera Sound 105 Playing Movies 107 Editing Movies 108 Exporting Movies 112 Supported Image Types 122 Customizing Preferences 123 Customizing Menus 125 Troubleshooting 126 Index Index 131 3 ZoomBrowser EX Software User Guide - Canon SD500 | ZoomBrowser EX 5.1 Software User Guide - Page 4
in this guide as indicated below. • CF card, SD card, PC card, multimedia card ➜ memory card NOTE • This manual uses Windows XP screen shots and procedures in the explanations. The screen shots and follow this symbol. Read these topics as you see fit. 4 ZoomBrowser EX Software User Guide - Canon SD500 | ZoomBrowser EX 5.1 Software User Guide - Page 5
information as a text file. • Copy images to CD-R/RW disks (Windows XP only). REFERENCE • The Canon CD-ROM supplied with the camera contains My Camera Settings files. These files are automatically copied to your computer when ZoomBrowser EX is installed. 5 ZoomBrowser EX Software User Guide - Canon SD500 | ZoomBrowser EX 5.1 Software User Guide - Page 6
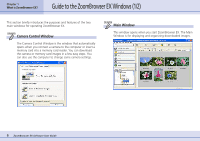
You can download the camera or memory card images in a few easy steps. You can also use the computer to change some camera settings. Main Window This window opens when you start ZoomBrowser EX. The Main Window is for displaying and organizing downloaded images. 6 ZoomBrowser EX Software User Guide - Canon SD500 | ZoomBrowser EX 5.1 Software User Guide - Page 7
Chapter 1 What is ZoomBrowser EX? Guide to the ZoomBrowser EX Windows (2/2) Using the Right-Click in Operations With ZoomBrowser EX you can access many right-clicking in many situations. Browser Area Right-click anywhere on the image to display a shortcut menu. 7 ZoomBrowser EX Software User Guide - Canon SD500 | ZoomBrowser EX 5.1 Software User Guide - Page 8
requiring a connection to the camera, such as downloading, changing the My Camera Settings, changing camera settings and remote shooting. ■ Click this to attach images to e-mail messages. 8 ZoomBrowser EX Software User Guide The following menus appear when you click each respective task button. - Canon SD500 | ZoomBrowser EX 5.1 Software User Guide - Page 9
the related steps appear in the Task Area. ■ Orange Button This color marks the current step. Follow the instructions in the right-hand side of the window to proceed. Once you finish a procedure, click a different the buttons will once again become selectable. 9 ZoomBrowser EX Software User Guide - Canon SD500 | ZoomBrowser EX 5.1 Software User Guide - Page 10
date, shooting date, comments or keywords. Delete Button Deletes selected images or folders from the computer. Rotate Button Rotates the selected image. Choose between 90° Left, 90° Right or 180°. 10 ZoomBrowser EX Software User Guide bracketed images (images shot with the camera's AEB function). - Canon SD500 | ZoomBrowser EX 5.1 Software User Guide - Page 11
Hide Image Information Menu Use this to show or hide image information-such as the file name, shooting date or Star Rating-below the thumbnail. Selection Tool (Operative only in Zoom Mode) Restores the mouse pointer mode, it changes the thumbnail display size. 11 ZoomBrowser EX Software User Guide - Canon SD500 | ZoomBrowser EX 5.1 Software User Guide - Page 12
in order, such as downloading images from the camera and printing downloaded images. This section starts by explaining the procedures for downloading images from the camera. IMPORTANT • This guide assumes that all the relevant software programs and drivers have been correctly installed on - Canon SD500 | ZoomBrowser EX 5.1 Software User Guide - Page 13
computer. This will cause the Camera Control Window in Step 1 on the next page to open. REFERENCE • With a memory card reader, the Events dialog will appear each time. Select [View/Download Images using Canon CameraWindow] to open the Camera Control Window. 13 ZoomBrowser EX Software User Guide - Canon SD500 | ZoomBrowser EX 5.1 Software User Guide - Page 14
if you have both a camera and a memory card reader connected at the same time. Confirm that your camera model name or [Canon Camera] appears in the list box and click [OK]. 1. Use the interface cable to connect the camera to the computer. Please see your Camera User Guide for information on how to - Canon SD500 | ZoomBrowser EX 5.1 Software User Guide - Page 15
shot on different dates are contained on the memory card, ZoomBrowser EX will start up when you download images to the computer and display all of the images. Using Camera Commands to Download Images You can download images using camera commands if your camera supports the direct transfer function - Canon SD500 | ZoomBrowser EX 5.1 Software User Guide - Page 16
a camera and a memory card reader are connected concurrently to allow you to select the device from which images are shown. Select the desired device from the list box and click [OK]. The images will begin to download. The downloaded images will be saved into folders according to the shooting date - Canon SD500 | ZoomBrowser EX 5.1 Software User Guide - Page 17
ZoomBrowser EX Software User Guide If you are using a memory card reader, check to ensure that the card is correctly inserted in the reader. REFERENCE • A dialog will appear if multiple memory card readers are connected and loaded with memory cards, or if a camera and a memory card are connected - Canon SD500 | ZoomBrowser EX 5.1 Software User Guide - Page 18
and type of image to download. The methods for changing the settings are explained in "Downloading Images Automatically" in Chapter 3. • By the default settings, all images that have not yet been downloaded are saved to the My Pictures folder. 18 ZoomBrowser EX Software User Guide Downloaded Images - Canon SD500 | ZoomBrowser EX 5.1 Software User Guide - Page 19
EX, click the (close box) in the Main Window or click the [File] menu and select [Exit]. To close the Camera Control Window, click its [Finish] button. Main Window The downloading procedures after this are described in "Downloading Images to a Computer (6/8)." 19 ZoomBrowser EX Software User Guide - Canon SD500 | ZoomBrowser EX 5.1 Software User Guide - Page 20
the [Ctrl] key while clicking on successive images. To deselect images, click on the images again while holding the [Ctrl] key down. 20 ZoomBrowser EX Software User Guide - Canon SD500 | ZoomBrowser EX 5.1 Software User Guide - Page 21
Chapter 2 Downloading and Printing Images Printing Images (2/6) 3. Click [2. Select Captions for Printing the print image in the album window. REFERENCE • If the PhotoRecord Guide displays at startup, read it as necessary. The Steps in Order 21 ZoomBrowser EX Software User Guide Album Window - Canon SD500 | ZoomBrowser EX 5.1 Software User Guide - Page 22
Chapter 2 Downloading and Printing Images Printing Images (3/6) 5. Click [2 Select Printer & Album Type] and select a printer and an album type. Select a printer. Select an album type. Detailed Settings for Each Album Type 22 ZoomBrowser EX Software User Guide REFERENCE • Select among the - Canon SD500 | ZoomBrowser EX 5.1 Software User Guide - Page 23
Chapter 2 Downloading and Printing Images Printing Images (4/6) 6. Click [3 Select Paper] and choose categories shown in this window may vary according to the printer in use. 23 ZoomBrowser EX Software User Guide Select a design. REFERENCE • The items that can be changed include the themes (a - Canon SD500 | ZoomBrowser EX 5.1 Software User Guide - Page 24
Chapter 2 Downloading and Printing Images Printing Images (5/6) 8. Click [Add Titles & Captions] and input the text. Select the page. Edit it here. 24 ZoomBrowser EX Software User Guide Input the text. REFERENCE • You can also adjust the font, font size, justification and color as desired. - Canon SD500 | ZoomBrowser EX 5.1 Software User Guide - Page 25
Chapter 2 Downloading and Printing Images Printing Images (6/6) 9. Change the size and rotation image correction (default setting) on images shot by cameras that support the Exif 2.2 standard and on other image types, providing you with better print results. 25 ZoomBrowser EX Software User Guide - Canon SD500 | ZoomBrowser EX 5.1 Software User Guide - Page 26
• If the Camera Control Window does not open, click the [Start] menu and select [All Programs] or [Programs], followed by [Canon Utilities], [CameraWindow] and [CameraWindow]. Closing the Camera Control Window Click [Finish] to close the Camera Control Window. 26 ZoomBrowser EX Software User Guide - Canon SD500 | ZoomBrowser EX 5.1 Software User Guide - Page 27
Do with a Camera Connected Downloading Images Automatically-Camera Operations Starting Auto Downloading 1. Set the Direct Transfer settings on the camera, and start the direct transfer. This will download images automatically to the computer. REFERENCE See your Camera User Guide for explanations - Canon SD500 | ZoomBrowser EX 5.1 Software User Guide - Page 28
Settings Change the type of image to download or the destination folder. 1. Click [Preferences]. 2. Select [Change auto download settings] and click [Next]. This will download all the images automatically that have not yet been downloaded to the computer. 28 ZoomBrowser EX Software User Guide - Canon SD500 | ZoomBrowser EX 5.1 Software User Guide - Page 29
, select [Perform selected processes consecutively], click [Select] and select a process in the process selection window. 4. Select a destination folder for the downloaded images and set the new subfolder creation method for downloads, then click [Next]. 29 ZoomBrowser EX Software User Guide - Canon SD500 | ZoomBrowser EX 5.1 Software User Guide - Page 30
initiate the selected auto download process immediately after the camera and computer are connected, place a check mark beside [Images are automatically downloaded to computer while camera is connected]. 7. Click [Finish]. This concludes the settings procedure. 30 ZoomBrowser EX Software User Guide - Canon SD500 | ZoomBrowser EX 5.1 Software User Guide - Page 31
key while clicking on the first and last images. 3. Click [Download pictures]. The Camera Browser Window will open and display the images contained in the camera. Camera Browser Window A window for setting the destination folder and other settings will open. 31 ZoomBrowser EX Software User Guide - Canon SD500 | ZoomBrowser EX 5.1 Software User Guide - Page 32
Camera Connected Checking Images in the Camera before Downloading (2/2) 4. Set the file name and destination folder settings and click [Starts Download]. The images will download numbering system. Specify a folder as the destination for downloaded images. Specify whether or not a subfolder is - Canon SD500 | ZoomBrowser EX 5.1 Software User Guide - Page 33
Camera This section explains how to use the Camera Browser Window to delete images from the camera. 1. Click [Lets you select and download images] in the Camera Control Window. 2. Select images for deleting in the Camera ). Camera Browser Window will open. 33 ZoomBrowser EX Software User Guide A - Canon SD500 | ZoomBrowser EX 5.1 Software User Guide - Page 34
Camera Connected Other Features of the Camera Browser Window This section explains the other features of the Camera Browser Window. REFERENCE • You can also download images displayed in the Camera brightness or RGB data. Histogram Image Information 34 ZoomBrowser EX Software User Guide - Canon SD500 | ZoomBrowser EX 5.1 Software User Guide - Page 35
Settings in the camera. Displaying the My Camera Settings Display the existing My Camera Settings supplied with ZoomBrowser EX. 1. Click the [Set to Camera] tab in the Camera Control Window. 2. Click [Set My Camera]. 35 ZoomBrowser EX Software User Guide The My Camera window displays. REFERENCE - Canon SD500 | ZoomBrowser EX 5.1 Software User Guide - Page 36
window by clicking the [Edit] menu and selecting [Manage My Camera]. My Camera Settings that are already on your computer display here. My Camera Settings in your camera display here. You can save the files that appear in the My Computer list to your camera. 36 ZoomBrowser EX Software User Guide - Canon SD500 | ZoomBrowser EX 5.1 Software User Guide - Page 37
Setup as a theme] tab. 2. In the My Computer list, select a setting you would like to add to the camera. When you select [Setup as a theme]: The start-up image will preview in the area to the right and you select a sound file, it will automatically be played. 37 ZoomBrowser EX Software User Guide - Canon SD500 | ZoomBrowser EX 5.1 Software User Guide - Page 38
you specified from the computer. A Select the setting you want to replace. 4. Click the [Close] button to close the dialog. This concludes the procedure for adding settings to the camera. See your Camera User Guide for instructions on changing the start-up image, start-up sound and other settings - Canon SD500 | ZoomBrowser EX 5.1 Software User Guide - Page 39
pixels and less than 20KB in size. REFERENCE • See the manual and help facility for the editing program for a detailed explanation of WAV format. Sound files that can be added to the camera should conform to these guidelines. Type Start-Up Sound Operating 39 ZoomBrowser EX Software User Guide - Canon SD500 | ZoomBrowser EX 5.1 Software User Guide - Page 40
Click [Add File]. 40 ZoomBrowser EX Software User Guide This concludes the process for adding the new settings. You can save the newly created settings to the camera using the procedures described in the Saving the My Camera Settings to the Camera section. REFERENCE • To delete a settings file - Canon SD500 | ZoomBrowser EX 5.1 Software User Guide - Page 41
My Camera window. This completes the copying process. IMPORTANT • Never detach the interface cable, turn off the camera power or do anything to stop communication between the camera and computer while the My Camera Settings are being saved to the computer. 41 ZoomBrowser EX Software User Guide - Canon SD500 | ZoomBrowser EX 5.1 Software User Guide - Page 42
in the slide show. REFERENCE • When the Main Window is open, you can open the Camera Control Window by clicking [Acquire & Camera Settings], followed by [Set to Camera]. • See your Camera User Guide for instructions how to use and play slide shows. 3. Click the [Slide Show] button at the top - Canon SD500 | ZoomBrowser EX 5.1 Software User Guide - Page 43
you can take a memory card to a camera store or developing laboratory date and file number in the prints. • The date that the image was copied to the camera will print when images copied to the camera from the computer have their size changed while being copied. 43 ZoomBrowser EX Software User Guide - Canon SD500 | ZoomBrowser EX 5.1 Software User Guide - Page 44
. Specify number of copies to print. 2. When you are done with your selections, click [Save to Camera]. This saves the information and completes the print setting. 44 ZoomBrowser EX Software User Guide The index print icon displays when a Select the check box to include check mark is added to - Canon SD500 | ZoomBrowser EX 5.1 Software User Guide - Page 45
clock and your PC clock. Click this button to synchronize the camera's date and time settings with the computer. Click this button to format the camera's memory card (not supported by some camera models). This will open the camera settings window. The settings shown at the right can be adjusted - Canon SD500 | ZoomBrowser EX 5.1 Software User Guide - Page 46
JPEG only) from the computer to the camera (or memory card). IMPORTANT • If you are using a memory card reader, ensure that a memory card is inserted in the reader. 1. Click the [Set to Camera] tab in the Camera Control Window. 2. Click [Uploads images to the camera]. 3. Select files to copy and - Canon SD500 | ZoomBrowser EX 5.1 Software User Guide - Page 47
Chapter 3 What You Can Do with a Camera Connected Copying Images to the Camera (2/2) REFERENCE • If multiple images have been selected, then the selected resizing option will for all other images. • RAW images and movies cannot be uploaded to the camera. 47 ZoomBrowser EX Software User Guide - Canon SD500 | ZoomBrowser EX 5.1 Software User Guide - Page 48
Camera User Guide to check whether your camera supports the remote shooting function or not. • On camera models with lens covers, open the lens for the shutter button, the camera's buttons and switches, including the zoom, cannot be manually operated while the camera is being remotely controlled. • - Canon SD500 | ZoomBrowser EX 5.1 Software User Guide - Page 49
). Sets the shooting settings. It is divided into the "Field angle/ flash" tab and the "Shooting settings" tab. (The settings categories vary according to your camera model.) 49 ZoomBrowser EX Software User Guide - Canon SD500 | ZoomBrowser EX 5.1 Software User Guide - Page 50
and Recalling Shooting Camera Display Settings] to open a window like the one shown here. Select [Video Out terminal] or [Camera's LCD monitor] and click [OK]. REFERENCE • See your Camera User Guide for information about connecting the camera to a TV. 50 ZoomBrowser EX Software User Guide - Canon SD500 | ZoomBrowser EX 5.1 Software User Guide - Page 51
click [Computer only] in the Save Images On category, you can record images when the memory card in the camera is full and will not accept more images or when it is not present. 51 ZoomBrowser EX Software User Guide ■ Options Tab You can release the shutter using the key specified here. Click to - Canon SD500 | ZoomBrowser EX 5.1 Software User Guide - Page 52
the selected folder will display. (Images in subfolders within a folder appear in a rectangular frame.) Folder Area Browser Area 52 ZoomBrowser EX Software User Guide Favorite Folders and All Folders Two tabs, entitled Favorite Folders and All Folders, display in the upper portion of the Folder - Canon SD500 | ZoomBrowser EX 5.1 Software User Guide - Page 53
been registered as favorites. • You can also register folders as favorites by clicking the [View] menu and selecting [Add New Favorite Folder]. 53 ZoomBrowser EX Software User Guide - Canon SD500 | ZoomBrowser EX 5.1 Software User Guide - Page 54
Folders] or [All Folders]. The images in the folder you click will display in whichever mode you select. 54 ZoomBrowser EX Software User Guide Images within subfolders also display. (The rectangular frame indicates a subfolder.) REFERENCE • You can change the zoom speed. The method is explained - Canon SD500 | ZoomBrowser EX 5.1 Software User Guide - Page 55
more levels below the selected folder. REFERENCE • The methods for changing a folder's hierarchical level are explained in "Customizing Preferences (1/2)" in the Appendix. 55 ZoomBrowser EX Software User Guide - Canon SD500 | ZoomBrowser EX 5.1 Software User Guide - Page 56
Previous and Next buttons. Selected Image Information Panel Moves to the next image. Selected Thumbnail Click here to hide the information panel. 56 ZoomBrowser EX Software User Guide - Canon SD500 | ZoomBrowser EX 5.1 Software User Guide - Page 57
here also displays the folder images. You can double-click on an empty part of the folder like this to zoom in on it. By repeating the background color used to indicate a folder frame. 57 ZoomBrowser EX Software User Guide Clicking the to the left of the folder name displays the folder images - Canon SD500 | ZoomBrowser EX 5.1 Software User Guide - Page 58
and then click on one to preview it. By repeating this step, you can go deeper and deeper into the folder hierarchy. 58 ZoomBrowser EX Software User Guide Click the [Up] button to zoom out the folder at that level. REFERENCE • By using the (Back) or (Forward) button, you can move to the - Canon SD500 | ZoomBrowser EX 5.1 Software User Guide - Page 59
by using the [View] menu. Click a folder. Then, on the [View] menu, click [Zoom In to Folder] or [Zoom Out of Folder]. 59 ZoomBrowser EX Software User Guide - Canon SD500 | ZoomBrowser EX 5.1 Software User Guide - Page 60
• See "Setting Star Ratings" in Chapter 5 for the Star Rating settings procedures. 60 ZoomBrowser EX Software User Guide Example with a check mark placed beside the File Name, Shooting Date and Star Rating categories. REFERENCE • You can also specify the image information for display by clicking - Canon SD500 | ZoomBrowser EX 5.1 Software User Guide - Page 61
right. Place a check mark beside the sorting criterion. You can also sort by ascending or descending order. The thumbnail display size changes. 61 ZoomBrowser EX Software User Guide - Canon SD500 | ZoomBrowser EX 5.1 Software User Guide - Page 62
at the right appears. The area enclosed by the red marks indicates the area of the image shown in the Browser Area. 62 ZoomBrowser EX Software User Guide - Canon SD500 | ZoomBrowser EX 5.1 Software User Guide - Page 63
by clicking the [View] menu, selecting [Task and Folder Areas] and removing the check mark from beside the appropriate option. 63 ZoomBrowser EX Software User Guide REFERENCE • You can also change the size of the Task Area and Folder Area by dragging the separator between them. • You can also - Canon SD500 | ZoomBrowser EX 5.1 Software User Guide - Page 64
Window Pop-Up Window REFERENCE • You can hide the pop-up window. See "Customizing Preferences (1/2)" in the Appendix for the settings procedure. 64 ZoomBrowser EX Software User Guide - Canon SD500 | ZoomBrowser EX 5.1 Software User Guide - Page 65
Image). REFERENCE • The Display Control Panel menu is convenient to use if you intend to select all the images or deselect images. 65 ZoomBrowser EX Software User Guide - Canon SD500 | ZoomBrowser EX 5.1 Software User Guide - Page 66
the standard display, click the image or press any key on the keyboard. REFERENCE • You can also switch to the full screen display by double-clicking the image display area in the Viewer Window, or by clicking the [View] menu and selecting [Full screen]. 66 ZoomBrowser EX Software User Guide - Canon SD500 | ZoomBrowser EX 5.1 Software User Guide - Page 67
four images at once in the Viewer Window by clicking the [Split Screen] button. Click the appropriate button, shown from left to right as displayed in the Viewer Window, clicking the Back and Next buttons replaces all the images with the next set of images ahead or ZoomBrowser EX Software User Guide - Canon SD500 | ZoomBrowser EX 5.1 Software User Guide - Page 68
the Viewer Window that is temporarily converted to TIFF type data. Autofocus Frame IMPORTANT • Please see the guide for the software bundled with your camera to see whether your camera supports the display of the autofocus frame. REFERENCE * You can also display the position of the autofocus - Canon SD500 | ZoomBrowser EX 5.1 Software User Guide - Page 69
the right of the Star Ratings buttons. You can replay the movie by clicking this [Play] button. See "Playing Movies" in Chapter 6 for instructions for replaying movies. Closing the Viewer Window Click to close the Viewer window, or click the [File] menu and select [Close Viewer]. REFERENCE • See - Canon SD500 | ZoomBrowser EX 5.1 Software User Guide - Page 70
[Shift] key while clicking on the first and last images. 70 ZoomBrowser EX Software User Guide Deselecting All Images Clicking in the Display Control Panel and selecting [Clear Selection] section in "Customizing Preferences (2/2)" in the Appendix for instructions on changing the selection method. - Canon SD500 | ZoomBrowser EX 5.1 Software User Guide - Page 71
images. What is a Star Rating? You can assign one of three ratings to an image. When a camera image is downloaded to the computer it is assigned a two-star ✩✩ rating. Setting the Star Rating To set a rating for Rating in the Properties window that displays. 71 ZoomBrowser EX Software User Guide - Canon SD500 | ZoomBrowser EX 5.1 Software User Guide - Page 72
a slide show is in play, click the ★ symbol at the window's bottom right to set the Star Rating for the displayed image. 72 ZoomBrowser EX Software User Guide - Canon SD500 | ZoomBrowser EX 5.1 Software User Guide - Page 73
mark beside appropriate keywords. To add a new keyword, type it in the box and click [+]. The View/Modify Keywords window will display. 73 ZoomBrowser EX Software User Guide - Canon SD500 | ZoomBrowser EX 5.1 Software User Guide - Page 74
keyword list based on the keywords assigned to images. This is convenient if you deleted a keyword that was used in the past. 74 ZoomBrowser EX Software User Guide - Canon SD500 | ZoomBrowser EX 5.1 Software User Guide - Page 75
Classifying Images You can classify selected images into folders by the shooting dates. 1. Click [View & Classify] in the Main Window, followed Finish]. The program will start classifying the images. 75 ZoomBrowser EX Software User Guide Select [Copy] to retain the original file or [Move] to - Canon SD500 | ZoomBrowser EX 5.1 Software User Guide - Page 76
select an image in the Browser Area in Preview mode, you can also change its name in the information panel. B Click [Rename]. 76 ZoomBrowser EX Software User Guide - Canon SD500 | ZoomBrowser EX 5.1 Software User Guide - Page 77
name to be created separately from the original file. Type the text in the "new name" spot for the type above. Set the number of digits and the starting number for the number portion of the type selected above. 77 ZoomBrowser EX Software User Guide - Canon SD500 | ZoomBrowser EX 5.1 Software User Guide - Page 78
images using such criteria as Star Ratings, revision dates, shooting dates, comments or keywords. REFERENCE • For information about parameter you wish to use. Next, if you selected the modification or shooting date, set the date range. If you selected Star Rating, select a rank. If you selected - Canon SD500 | ZoomBrowser EX 5.1 Software User Guide - Page 79
or perform another search. • You can also perform a search by clicking the (Search) function button or the [Tools] menu and selecting [Search]. 79 ZoomBrowser EX Software User Guide - Canon SD500 | ZoomBrowser EX 5.1 Software User Guide - Page 80
can move an image in the Browsing Area simply by using a drag-and-drop operation. A Drag the image you want to move. 80 ZoomBrowser EX Software User Guide B Drop it at the desired location. - Canon SD500 | ZoomBrowser EX 5.1 Software User Guide - Page 81
and hold the [Ctrl] key and release the mouse button, while still holding the key. A Drag the image you want to copy. 81 ZoomBrowser EX Software User Guide B While holding down the [Ctrl] key, drop it at the desired location. - Canon SD500 | ZoomBrowser EX 5.1 Software User Guide - Page 82
. Hold down the [Ctrl] key before dropping the image and release the mouse button while holding the key over the target library. 82 ZoomBrowser EX Software User Guide A Drag the image you wish to move. B Drop it in the target folder. REFERENCE • On the other hand, when you drag an image from the - Canon SD500 | ZoomBrowser EX 5.1 Software User Guide - Page 83
in the Display Control Panel and selecting [Select All] from the menu or by clicking the [Edit] menu and selecting [Select All]. 83 ZoomBrowser EX Software User Guide - Canon SD500 | ZoomBrowser EX 5.1 Software User Guide - Page 84
click the [View] menu and select [Refresh Current Folder], the image will reappear in its original location. A Click an image. B Click [Delete]. 84 ZoomBrowser EX Software User Guide - Canon SD500 | ZoomBrowser EX 5.1 Software User Guide - Page 85
] menu and selecting [Delete]. IMPORTANT • All of the actual images and subfolders in a folder are deleted from the computer in this procedure. 85 ZoomBrowser EX Software User Guide - Canon SD500 | ZoomBrowser EX 5.1 Software User Guide - Page 86
how to rotate images to the desired orientation. This is useful for images taken by holding the camera sideways. IMPORTANT • By the default setting, rotating an image in ZoomBrowser EX changes (rotates) Image] from the submenu and a direction of rotation. 86 ZoomBrowser EX Software User Guide - Canon SD500 | ZoomBrowser EX 5.1 Software User Guide - Page 87
in this window, such as the image revision date and file size, shooting date and time and camera shooting settings. In addition, you can change clicking the [View] menu and selecting [Properties]. 87 ZoomBrowser EX Software User Guide Displays the Viewer Window. Sets Star Ratings. Click here to show - Canon SD500 | ZoomBrowser EX 5.1 Software User Guide - Page 88
image in this window, including the revision date or file size, shooting date and time, and the camera shooting settings. In addition, you can . 88 ZoomBrowser EX Software User Guide Assign a keyword. Histogram The information displayed here will vary according to your camera model and the settings - Canon SD500 | ZoomBrowser EX 5.1 Software User Guide - Page 89
and click [OK]. You have created a new folder. 2 Click the [File] menu and select [New Folder]. 89 ZoomBrowser EX Software User Guide REFERENCE • See "Renaming Images (2/2)" for the procedures for changing folder names. • See "Deleting Images (2/2)" for the procedures for deleting folders - Canon SD500 | ZoomBrowser EX 5.1 Software User Guide - Page 90
when an image file is moved or copied using Windows functions or edited with a separate program. In this case, the "current state of the folders" has to be checked and updated. This is what is meant will update ZoomBrowser EX's information about all the folders. 90 ZoomBrowser EX Software User Guide - Canon SD500 | ZoomBrowser EX 5.1 Software User Guide - Page 91
blue) highlights and shadows. ■ Trim This function trims portions of images. Use it to cut away unwanted parts of the image. ■ Edit with External Image Editor See "Editing Images with Other Programs" in this and movies cannot be edited in the Viewer Window. 91 ZoomBrowser EX Software User Guide - Canon SD500 | ZoomBrowser EX 5.1 Software User Guide - Page 92
the corresponding area will be highlighted. 3. Click [OK] when it finishes correcting. Select this to choose manual red eye correction. You can change the display magnification. 92 ZoomBrowser EX Software User Guide Click [Undo All] to restore the image to its pre-correction state. Click [Undo] to - Canon SD500 | ZoomBrowser EX 5.1 Software User Guide - Page 93
these tabs to switch between windows. Color Adjustment Window RGB Adjustment Window You can change the display magnification. 93 ZoomBrowser EX Software User Guide Click [Undo All] to restore the image to its pre-correction state. Click [Undo] to cancel the action immediately preceding. Click - Canon SD500 | ZoomBrowser EX 5.1 Software User Guide - Page 94
. You can change the display magnification. You can adjust the trimming area by dragging the corners or center points of the sides. 94 ZoomBrowser EX Software User Guide Click this button. - Canon SD500 | ZoomBrowser EX 5.1 Software User Guide - Page 95
tools when editing. Red Eye Correction Button (Only available in the manual red eye correction mode) Restores the red eye correction mode when Display Size Changes the image display magnification. 95 ZoomBrowser EX Software User Guide Saving under a Different Name You can leave the original image - Canon SD500 | ZoomBrowser EX 5.1 Software User Guide - Page 96
Task Area of the Main Window, followed by [Edit Image] and [2. Select Image Editing Tool], and selecting [Edit with external image editor]. 96 ZoomBrowser EX Software User Guide - Canon SD500 | ZoomBrowser EX 5.1 Software User Guide - Page 97
ratio relative to the original size of the image. Use this option if you want to reduce the size of the image. 97 ZoomBrowser EX Software User Guide Specify the image quality. (The lower the quality, the rougher the image becomes, but the size of the file also becomes smaller.) Use it to - Canon SD500 | ZoomBrowser EX 5.1 Software User Guide - Page 98
through an email program that does not support MAPI.], click [Browse] to specify a destination. 98 ZoomBrowser EX Software User Guide • If You Selected [Save the not be able to start automatically (those without MAPI support). In this case, save the image to the disk, start the e-mail program and - Canon SD500 | ZoomBrowser EX 5.1 Software User Guide - Page 99
Saver You can export an image as a screen saver file. ■ Export an Image as a Wallpaper You can export an image as a wallpaper file. This function will not work with multiple files selected. 99 ZoomBrowser EX Software User Guide REFERENCE • The shooting information is saved along with the image - Canon SD500 | ZoomBrowser EX 5.1 Software User Guide - Page 100
. You can insert or remove all check marks at once. Destination Folder Changes the destination folder. Calculates the post-conversion file size. 100 ZoomBrowser EX Software User Guide Destination Folder Changes the destination folder (you can also specify a file name). - Canon SD500 | ZoomBrowser EX 5.1 Software User Guide - Page 101
Folder Select whether to save it to the folder used by Windows for screen savers or another destination. Changes the destination folder (you can also specify a file name). 101 ZoomBrowser EX Software User Guide Destination Folder Changes the destination folder (you can also specify a file name - Canon SD500 | ZoomBrowser EX 5.1 Software User Guide - Page 102
how to run a slide show displaying images in sequence in the full-screen mode. Setting and Starting a Slide Show 1. Click [View Classify] in end. 102 ZoomBrowser EX Software User Guide Select [On clicking the left mouse button] to have the slides proceed manually, not automatically. Select - Canon SD500 | ZoomBrowser EX 5.1 Software User Guide - Page 103
the Display Control Panel menu ( ). • You can also start a slide show by clicking the [Edit] menu and selecting [View as a Slide Show]. 103 ZoomBrowser EX Software User Guide Click here to end the slide show. Print Settings Button Click this button if you see an image you would like to print during - Canon SD500 | ZoomBrowser EX 5.1 Software User Guide - Page 104
. How to play a sound added to an image Select an image with a sound attachment, click the [Edit] menu and select [Play Sound]. 104 ZoomBrowser EX Software User Guide - Canon SD500 | ZoomBrowser EX 5.1 Software User Guide - Page 105
Click the [Set individually] tab, followed by [Create a My Camera Sound]. The My Camera Sound Maker window will open. IMPORTANT The My Camera Sound Maker window will not appear if QuickTime is not installed. 105 ZoomBrowser EX Software User Guide Sets the blue and red switches. Volume Shows from - Canon SD500 | ZoomBrowser EX 5.1 Software User Guide - Page 106
you play it, the sound will have a low volume when you upload it to the camera. So when the playback volume is too loud on the computer, turn down the volume of the speakers. 106 ZoomBrowser EX Software User Guide Saving a Sound Switch to the Save window in the [5. Save] tab. Select the sound - Canon SD500 | ZoomBrowser EX 5.1 Software User Guide - Page 107
Chapter 6 Using Supplementary Features Playing Movies ZoomBrowser EX supports movies. You can download movie files and display them in the Browser Area just like ordinary images. The movie Window to start Windows Media Player or QuickTime Player. Movie Icon 107 ZoomBrowser EX Software User Guide - Canon SD500 | ZoomBrowser EX 5.1 Software User Guide - Page 108
You can create movies by adding various effects: linking movies and still images that have been downloaded to a computer, superimposing titles and other text, and adding background music. REFERENCE • Movies images. Links images in order from left to right. 108 ZoomBrowser EX Software User Guide - Canon SD500 | ZoomBrowser EX 5.1 Software User Guide - Page 109
. Transition Box Displays the icon of the transition effect used to link adjacent images. Displays a dialog with the general movie editing settings. 109 ZoomBrowser EX Software User Guide - Canon SD500 | ZoomBrowser EX 5.1 Software User Guide - Page 110
between images by selecting the transition effect box in the storyboard area and clicking this button. Magnifies a portion of the selected image. 110 ZoomBrowser EX Software User Guide - Canon SD500 | ZoomBrowser EX 5.1 Software User Guide - Page 111
fade-out effect for a movie or its linked audio file by selecting it in the storyboard area and clicking this button. 111 ZoomBrowser EX Software User Guide Select this to save it with standard settings. Saves the file. Select this to make advanced settings. You can set the size (horizontal and - Canon SD500 | ZoomBrowser EX 5.1 Software User Guide - Page 112
save the movie file. To save the movie in a rotated orientation, click here to add a check mark and specify a rotation direction. Use this feature when a camera has been turned on its end to shoot a movie sequence. 112 ZoomBrowser EX Software User Guide - Canon SD500 | ZoomBrowser EX 5.1 Software User Guide - Page 113
the image quality. The higher the setting, the clearer the image, but the file size also increases correspondingly. Selects the audio quality. 113 ZoomBrowser EX Software User Guide Selects the destination folder. - Canon SD500 | ZoomBrowser EX 5.1 Software User Guide - Page 114
User Guide to check whether your camera supports RAW images or not. • Depending upon your camera model, a different program than the one introduced here may start when you convert RAW images. If that occurs, refer to the manual for the software supplied with your camera. REFERENCE • RAW images - Canon SD500 | ZoomBrowser EX 5.1 Software User Guide - Page 115
can change the area of a preview image that is zoomed in the Main Window by clicking this red mark and dragging it. 115 ZoomBrowser EX Software User Guide - Canon SD500 | ZoomBrowser EX 5.1 Software User Guide - Page 116
tab and click [OK]. 116 ZoomBrowser EX Software User Guide An ICC Profile is color matching data that heightens color reproduction. You can embed it in the file if you wish. (Please refer to the user guide for the software bundled with your camera to see whether your camera supports this function.) - Canon SD500 | ZoomBrowser EX 5.1 Software User Guide - Page 117
to your camera model. Adjusts the white balance by the light source or color temperature, etc. Adjusts the digital exposure compensation, in this window are immediately reflected in the image. 117 ZoomBrowser EX Software User Guide When there is no check mark in the Preview box, this button - Canon SD500 | ZoomBrowser EX 5.1 Software User Guide - Page 118
Save the two images as BMP, TIFF or JPEG images. • My Color schemes cannot be used with an EOS Digital Camera. 1. Click the [Edit] menu, select [My Colors] and select [Create and Add My Color] from the the preadjustment image (original image) and click [Next]. 118 ZoomBrowser EX Software User Guide - Canon SD500 | ZoomBrowser EX 5.1 Software User Guide - Page 119
target images, apply those corrections to the original image and display the results as the Preview My Color Applied to the Image. 119 ZoomBrowser EX Software User Guide - Canon SD500 | ZoomBrowser EX 5.1 Software User Guide - Page 120
menu). • You can make it easier to stitch images together by using the camera's Stitch Assist mode to shoot them. Opening PhotoStitch 1. Click [Edit] in ] menu and selecting [Stitch Photos]. Then, follow the instructions on the upper part of the PhotoStitch window, and stitch your images together. - Canon SD500 | ZoomBrowser EX 5.1 Software User Guide - Page 121
[Cancel] and close the window. 3. Click [Export] in the ZoomBrowser EX Main Window, followed by [Backup to CD]. 121 ZoomBrowser EX Software User Guide 4. Confirm that [1. Select Images] is selected, and select the folder or image in the Browser Area. 5. Click [2. Specify Backup Settings], select - Canon SD500 | ZoomBrowser EX 5.1 Software User Guide - Page 122
a proprietary image type provided by Canon. It saves the output of the image pixels from a digital camera without any deterioration in the quality of the image. Some cameras might not support this image type. ■ Windows file sizes and delivery over networks. 122 ZoomBrowser EX Software User Guide - Canon SD500 | ZoomBrowser EX 5.1 Software User Guide - Page 123
when the mouse pointer is positioned over a folder or image. Place a check mark here to display tips when ZoomBrowser EX starts up. 123 ZoomBrowser EX Software User Guide - Canon SD500 | ZoomBrowser EX 5.1 Software User Guide - Page 124
an image selects it. To deselect it, click it again. You can select multiple images by clicking on more images in succession. 124 ZoomBrowser EX Software User Guide Place a check here to have the original image left untouched and the rotation applied to a copy when a JPEG image is rotated. - Canon SD500 | ZoomBrowser EX 5.1 Software User Guide - Page 125
hide items not used on a daily basis to streamline the menus or to shorten the menus so that scrolling is not required. 125 ZoomBrowser EX Software User Guide - Canon SD500 | ZoomBrowser EX 5.1 Software User Guide - Page 126
to download images from the camera. • Even though [Canon CameraWindow] is selected in the Events dialog, the Camera Control Window fails to open when the camera and computer are connected with the interface cable and set to the correct communication mode. 126 ZoomBrowser EX Software User Guide In - Canon SD500 | ZoomBrowser EX 5.1 Software User Guide - Page 127
computer. If the camera is running on batteries, ensure they are fully charged. If the problem does not rest in the four areas above, the driver may not be properly installed. Uninstall the driver and then reinstall it. For instructions for this task, refer to the Software Starter Guide. How to Get - Canon SD500 | ZoomBrowser EX 5.1 Software User Guide - Page 128
Appendices Troubleshooting (3/5) If You by clicking the [Start] menu and selecting [All Programs], followed by [Accessories] and [Windows Explorer]. (With Windows 2000/Windows Me/Windows 98 SE, \Program Files\Canon\ZoomBrowser EX\Database\My Database.zbd]. 128 ZoomBrowser EX Software User Guide - Canon SD500 | ZoomBrowser EX 5.1 Software User Guide - Page 129
Appendices Troubleshooting (4/5) 5. Click [OK] if the following dialog appears. 6. Click [Close] when the dialog in Step 4 appears. This will display in One] folder is in the Program Files folder, move it to a higher location, such as the [C:\] drive. 129 ZoomBrowser EX Software User Guide - Canon SD500 | ZoomBrowser EX 5.1 Software User Guide - Page 130
Appendices Troubleshooting (5/5) IMPORTANT • Do not copy just the images from within the folder, copy the folder itself to a location higher in the 4, the images will now display. Click the copied folder to display its images in the Browsing Area. 130 ZoomBrowser EX Software User Guide - Canon SD500 | ZoomBrowser EX 5.1 Software User Guide - Page 131
50 J JPEG 122 K Keywords 73, 87, 88 L Layout Print 20 M Main Window 6, 16 Monitor's Color Profile 123 Moving Images 80 MPEG4 122 My Camera Settings 36 My Camera Sound 105 File Length 39 Recording 105 My Camera Window 35 My Color (Custom Color Schemes) 118 131 ZoomBrowser EX Software User Guide - Canon SD500 | ZoomBrowser EX 5.1 Software User Guide - Page 132
by E-mail 97 Slide Show 42, 102 Sorting Thumbnails 61 Sounds 104 Split Screen 67 Standard Print (DPOF) 43, 44 Star Rating 60, 71, 87, 50 Titles 43 Trim 91, 94 U Using the Task Windows 9 132 ZoomBrowser EX Software User Guide V Video Clip 122 Viewer Window 66, 91 W Wallpaper 99, 101 Windows Bitmap - Canon SD500 | ZoomBrowser EX 5.1 Software User Guide - Page 133
and complete, no liability can be accepted for any errors or omissions. Canon reserves the right to change the specifications of the hardware and software described herein at any time without prior notice. • No part of this guide may be reproduced, transmitted, transcribed, stored in a retrieval
-
 1
1 -
 2
2 -
 3
3 -
 4
4 -
 5
5 -
 6
6 -
 7
7 -
8
-
9
-
10
-
11
-
12
-
13
-
14
-
15
-
16
-
17
-
18
-
19
-
20
-
21
-
22
-
23
-
24
-
25
-
26
-
27
-
28
-
29
-
30
-
31
-
32
-
33
-
34
-
35
-
36
-
37
-
38
-
39
-
40
-
41
-
42
-
43
-
44
-
45
-
46
-
47
-
48
-
49
-
50
-
51
-
52
-
53
-
54
-
55
-
56
-
57
-
58
-
59
-
60
-
61
-
62
-
63
-
64
-
65
-
66
-
67
-
68
-
69
-
70
-
71
-
72
-
73
-
74
-
75
-
76
-
77
-
78
-
79
-
80
-
81
-
82
-
83
-
84
-
85
-
86
-
87
-
88
-
89
-
90
-
91
-
92
-
93
-
94
-
95
-
96
-
97
-
98
-
99
-
100
-
101
-
102
-
103
-
104
-
105
-
106
-
107
-
108
-
109
-
110
-
111
-
112
-
113
-
114
-
115
-
116
-
117
-
118
-
119
-
120
-
121
-
122
-
123
-
124
-
125
-
126
-
127
-
128
-
129
-
130
-
131
-
132
-
133
 |
 |

1
ZoomBrowser EX Software User Guide
5.1