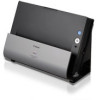
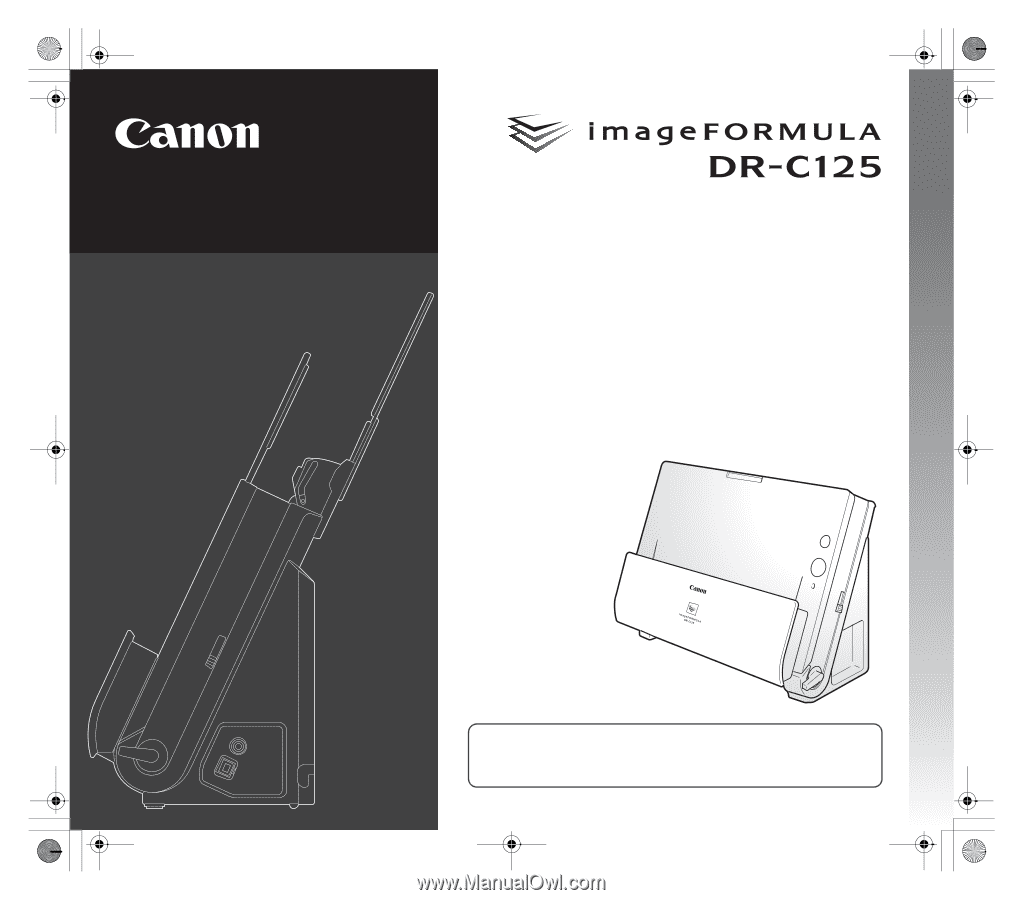
Canon imageFORMULA DR-C125 Reference Guide
Canon imageFORMULA DR-C125 Manual
 |
View all Canon imageFORMULA DR-C125 manuals
Add to My Manuals
Save this manual to your list of manuals |
Canon imageFORMULA DR-C125 manual content summary:
- Canon imageFORMULA DR-C125 | Reference Guide - Page 1
0-00-DR-C125_RG_UK.book Page 1 Thursday, September 8, 2011 6:03 PM Reference Guide • Please read this manual before operating this scanner. • After you finish reading this manual, store it in a safe place for future reference. - Canon imageFORMULA DR-C125 | Reference Guide - Page 2
0-00-DR-C125_RG_UK.book Page 2 Thursday, September 8, 2011 6:03 PM - Canon imageFORMULA DR-C125 | Reference Guide - Page 3
0-00-DR-C125_RG_UK.book Page 3 Thursday, September 8, 2011 6:03 PM FCC REGULATIONS (For 120 V model) Document Scanner, Model M111081 This device radiate radio frequency energy and, if not installed and used in accordance with the instructions, may cause harmful interference to radio communications. - Canon imageFORMULA DR-C125 | Reference Guide - Page 4
sales region of the Document Scanner. DR-C125: Model M111081 Trademarks • Canon and the Canon logo are registered trademarks, of Canon Inc. in the United States and may also be trademarks or registered trademarks in other countries. • imageFORMULA is a trademark of CANON ELECTRONICS INC. • Microsoft - Canon imageFORMULA DR-C125 | Reference Guide - Page 5
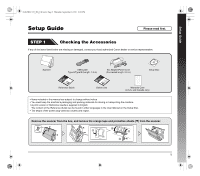
Setup Guide 0-00-DR-C125_RG_UK.book Page 5 Thursday, September 8, 2011 6:03 PM Setup Guide Please read first. STEP 1 Checking the Accessories If any of the items listed below are missing or damaged, contact your local authorized Canon dealer or service representative. Scanner USB Cable Type - Canon imageFORMULA DR-C125 | Reference Guide - Page 6
makes it easy to store, organize, and retrieve digital documents. - In order to receive support of this product, you need to upgrade to a Professional version. For details on upgrading, visit the following URL. http://www.nuance.com/partneroffer/canon • eCopy PDF Pro Office (Windows only) Nuance - Canon imageFORMULA DR-C125 | Reference Guide - Page 7
consult your local authorized Canon dealer. • Scanning speeds are lower if your computer's standard USB interface is USB Full-Speed (equal to USB 1.1.) application software retailer. Precautions for Use in 64-bit Operating Systems • The scanner driver supplied with this product supports scanning - Canon imageFORMULA DR-C125 | Reference Guide - Page 8
installation. Hint • If you choose Evernote, the Web browser will start and display a webpage for downloading the software during the installation. Download and install the software following the instructions on the webpage. To install Evernote, you need a connection to the Internet. • If you want - Canon imageFORMULA DR-C125 | Reference Guide - Page 9
Setup Guide 0-00-DR-C125_RG_UK.book Page 9 Thursday, September 8, 2011 6:03 PM 4 Click [Next]. 6 Click [Install]. 5 Read the license agreement, and click [I accept the terms in the license agreement] and then [Next] if you agree to it. 7 When the driver installation is complete, click [Finish]. - Canon imageFORMULA DR-C125 | Reference Guide - Page 10
0-00-DR-C125_RG_UK.book Page 10 Thursday, September 8, 2011 6:03 PM 9 Read the license agreement, and click [Yes] if you agree to it. 11 Specify whether to - Canon imageFORMULA DR-C125 | Reference Guide - Page 11
Setup Guide 0-00-DR-C125_RG_UK.book Page 11 Thursday, September 8, 2011 6:03 PM 13 Select the language you want to use, and click [Next]. 15 Click [Exit] to finish installing the software. Installing in Mac OS X IMPORTANT • Install the software before connecting the scanner to the computer. • - Canon imageFORMULA DR-C125 | Reference Guide - Page 12
of selecting [DR-C125 Installer], you can choose third-party software applications for installation. Hint If you choose Evernote, the Web browser will start and display a webpage for downloading the software during the installation. Download and install the software following the instructions on the - Canon imageFORMULA DR-C125 | Reference Guide - Page 13
Setup Guide 0-00-DR-C125_RG_UK.book Page 13 Thursday, September 8, 2011 6:03 PM 7 Click [Install]. 8 Enter the user name and the password with administrator privileges, and click [OK]. 9 When the installation is complete, click [Close]. 13 - Canon imageFORMULA DR-C125 | Reference Guide - Page 14
0-00-DR-C125_RG_UK.book Page 14 Thursday, September 8, 2011 6:03 PM STEP 3 Connecting to a Computer Connect the scanner to the computer and the power supply. IMPORTANT • Do not connect the scanner to the computer before installing the software. • Before connecting the scanner to the computer, - Canon imageFORMULA DR-C125 | Reference Guide - Page 15
Setup Guide 0-00-DR-C125_RG_UK.book Page 15 Thursday, September 8, 2011 6:03 PM STEP 4 Turning the Power ON The power of the scanner can be turned ON and OFF with the power button on the front of the scanner. 1 Make sure that the scanner and computer are connected properly. 2 Press the power - Canon imageFORMULA DR-C125 | Reference Guide - Page 16
Thursday, September 8, 2011 6:03 PM Introduction Thank you for purchasing the Canon imageFORMULA DR-C125 Document Scanner. Please read the following manuals carefully and familiarize yourself with the functions of the scanner before use to ensure you sufficiently understand the functions and make - Canon imageFORMULA DR-C125 | Reference Guide - Page 17
Setup Guide 5 Introduction 16 Symbols Used in This Manual 16 Important Safety Instructions 18 Installation Location 18 AC Adapter 18 Moving the Scanner 19 Handling 19 Disposal 20 When sending the scanner for repairs 20 Features of the Scanner 21 Names and Functions of Parts 23 Documents - Canon imageFORMULA DR-C125 | Reference Guide - Page 18
50°F to 90.5°F) Humidity: 20% to 80% RH ● Avoid installing the scanner near equipment that generates a magnetic field (e.g. speakers, televisions, or radios.) AC Adapter ● Connect only to a power outlet of the rated voltage and power supply frequency (120 V, 60 Hz or 220-240 V, 50/60 Hz depending on - Canon imageFORMULA DR-C125 | Reference Guide - Page 19
other highly flammable substance near the scanner. ● Canon dealer or service representative to have the unit serviced. ● Before moving the scanner scanner. Such objects may tip or fall over, resulting in personal injury. ● Connect only to a power outlet of the rated voltage and power supply frequency - Canon imageFORMULA DR-C125 | Reference Guide - Page 20
0-00-DR-C125_RG_UK.book Page 20 Thursday, September 8, 2011 6:03 PM ● Do not allow water or flammable substances (alcohol, paint thinner, benzene, etc.) to spill into the scanner, as this may result in a fire or electric shock. ● Push the power button to turn the scanner OFF for safety when not - Canon imageFORMULA DR-C125 | Reference Guide - Page 21
to scan cards and other thick documents. ● High Image Quality The 600 dpi optical resolution sensor incorporated in the scanner enables documents to be scanned with high image quality. ● USB 2.0 Interface The scanner supports Hi-Speed USB 2.0. ● Color/Grayscale Support Documents can be scanned in 24 - Canon imageFORMULA DR-C125 | Reference Guide - Page 22
enables scanning to be automatically started when a document placed in the feeder is detected. ● Sleep Mode The scanner is designed to save energy by entering the sleep mode when it is not scanning documents. IMPORTANT Depending on the bundled software you are using, all of the preceding features - Canon imageFORMULA DR-C125 | Reference Guide - Page 23
Pull this out when loading long documents. D Eject Support Open this when loading long documents. E Feed Support Pull out this to support loaded documents. F Document Feed Tray Open this when loading documents for scanning. G Power Button This turns the scanner ON and OFF. H Start Button This - Canon imageFORMULA DR-C125 | Reference Guide - Page 24
0-00-DR-C125_RG_UK.book Page 24 Thursday, September 8, 2011 6:03 PM Connectors A B A Power Connector Cable Grooves Secure the USB cable and power cord that are connected to the scanner along the rear of the scanner. Use these when you want to run the cables on the side opposite the connectors. 24 - Canon imageFORMULA DR-C125 | Reference Guide - Page 25
58 lb bond) 0.05 to 0.25 mm (0.002" to 0.0098") * Setting the scanner to Long Document mode enables documents up to 3,000 mm (118.1") long to be scanned. Refer to the User Manual for detailed information. IMPORTANT The documents to be scanned must satisfy certain criteria. Read the following items - Canon imageFORMULA DR-C125 | Reference Guide - Page 26
0-00-DR-C125_RG_UK.book Page 26 Thursday, September 8, 2011 6:03 PM Card (plastic or laminated) Size: 53.9 mm x 85.5 mm (2.12" x 3.37") (ISO standard) Card thickness: 0.76 - Canon imageFORMULA DR-C125 | Reference Guide - Page 27
DR-C125_RG_UK.book Page 27 Thursday, September 8, 2011 6:03 PM How to Place Documents Switching the Feed and Eject Methods Use the two levers on the scanner to switch the feed and eject methods based on the type of document path (lower) Straight path (lower) 2 Pull out the feed support. 27 - Canon imageFORMULA DR-C125 | Reference Guide - Page 28
-DR-C125_RG_UK.book Page 28 Thursday, September 8, 2011 6:03 PM 3 When scanning long documents, pull out the feed extension plates and eject support. ( ). When scanning documents that contain both standard paper and plastic cards, use the straight path. 5 Adjust the document guides to fit the width - Canon imageFORMULA DR-C125 | Reference Guide - Page 29
will be ejected in reverse order in such cases. • If you select the [Upside-down feeding] check box in the scanner driver settings, you can insert documents into the scanner in the opposite orientation. Refer to the User Manual for detailed information. Default [Upside-down feeding] selected 29 - Canon imageFORMULA DR-C125 | Reference Guide - Page 30
DR-C125_RG_UK.book Page 30 Thursday, September 8, 2011 6:03 PM Placing Documents for Non Separation Feeding When scanning a thick document one page at a time or scanning a document that has multiple pages fastened together, set document ( ). 2 Adjust the document guides to fit the width of the - Canon imageFORMULA DR-C125 | Reference Guide - Page 31
-DR-C125_RG_UK.book Page 31 Thursday, September 8, 2011 6:03 PM 3 Place the document in the document feed tray. IMPORTANT • With the straight path, documents are ejected at the front of the scanner. Do not place anything that will block output near the document eject area. Also, install the scanner - Canon imageFORMULA DR-C125 | Reference Guide - Page 32
0-00-DR-C125_RG_UK.book Page 32 Thursday, September 8, 2011 6:03 PM 3 Place the card horizontally with the top edge facing upward. IMPORTANT With the straight path, documents are ejected at the front of the scanner. Do not place anything that will block output near the document eject area. Also, - Canon imageFORMULA DR-C125 | Reference Guide - Page 33
0-00-DR-C125_RG_UK.book Page 33 Thursday, September 8, 2011 6:03 PM Scanning with CaptureOnTouch (Windows) What is CaptureOnTouch? CaptureOnTouch is a scanning application that allows you to scan a document with a simple operation by following the instructions on the screen. Cloud Service Save - Canon imageFORMULA DR-C125 | Reference Guide - Page 34
[Start] - [All Programs] - [Canon DR-C125] - [DR-C125 CaptureOnTouch]. • Press the Start button on the scanner (in this case, the main screen of Operation Flow Scan the document ▼ Configure the output settings ▼ Output the scanned images 1 Place the document in the scanner. 2 Click [Scan First - Canon imageFORMULA DR-C125 | Reference Guide - Page 35
the continuous scanning screen (see p. 41) appears when scanning of the document is finished. The document is scanned. While scanning is in progress, the number of pages scanned is displayed in addition to the scanner settings. When scanning is finished, the Output settings screen appears. If you - Canon imageFORMULA DR-C125 | Reference Guide - Page 36
0-00-DR-C125_RG_UK.book Page 36 Thursday, September 8, 2011 6:03 PM 5 Configure the Scan Job Operation Flow Register the job ▼ Select the job ▼ Scan the document ▼ Output the scanned images Registering and Editing Jobs In CaptureOnTouch, up to 10 jobs can be registered for use with Select Scan Job. - Canon imageFORMULA DR-C125 | Reference Guide - Page 37
0-00-DR-C125_RG_UK.book Page 37 Thursday, September 8, 2011 6:03 PM 2 Enter the job name, and press the job. (See p. 42) Hint You can assign the job to the Start button by selecting [Start button] for [Button assignment]. (See p. 39) Selecting a Job and Scanning 1 Place the document in the scanner - Canon imageFORMULA DR-C125 | Reference Guide - Page 38
, click [Next step]. The document is scanned. While scanning is in progress, the number of pages scanned is displayed in addition to the scanner settings. When all the pages of the document are scanned, the scanned images are output according to the registered job settings and the complete screen - Canon imageFORMULA DR-C125 | Reference Guide - Page 39
0-00-DR-C125_RG_UK.book Page 39 Thursday, September 8, 2011 6:03 PM When [Check example, the scanning mode and document size, you can configure the desired scanning conditions in the scanner settings. The scanner setting items are common to Scan First and Select Scan Job. When Scan First: Scanning - Canon imageFORMULA DR-C125 | Reference Guide - Page 40
0-00-DR-C125_RG_UK.book Page 40 Thursday, September 8, 2011 6:03 PM When Select Scan Job: For Select Scan Job, configure the scanner settings for each job. Setting Basic Items Scanner settings include the basic items that are configured in [Scanner setting], and the setting items that are - Canon imageFORMULA DR-C125 | Reference Guide - Page 41
of the advanced settings dialog box of the scanner driver Operation in Continuous Scanning Screen When [Enable continuous scanning] is set to [ON] in the Start screen, the continuous scanning screen appears when all of the pages of the placed document have been fed. You can confirm the scanned - Canon imageFORMULA DR-C125 | Reference Guide - Page 42
DR-C125_RG_UK.book Page 42 Thursday, September 8, 2011 6:03 PM Setting the Output Method CaptureOnTouch is provided with various output methods for processing scanned images. The output method specification is common to Scan First and Select Scan Job system) that supports MAPI (Messaging - Canon imageFORMULA DR-C125 | Reference Guide - Page 43
operation by following the instructions on the screen. Cloud Service Save to folder Save the file to a specified folder. Print Print with a specified printer. Scan with Start Button Scan First is pre-assigned to the Start button of the scanner, so you can load a document and then start scanning - Canon imageFORMULA DR-C125 | Reference Guide - Page 44
Operation Flow Scan the document ▼ Configure the output settings ▼ Output the scanned images 1 Place the document in the scanner. 2 Click [Scan Applications] - [Canon DR-C125] folder from the Finder, and double-click [CaptureOnTouch DR-C125]. • Press the Start button on the scanner (in this case - Canon imageFORMULA DR-C125 | Reference Guide - Page 45
to scan in parts, select [ON] to enable continuous scanning. B Specify whether to scan the document in full auto mode. When you want to specify arbitrary scanning conditions, select [OFF] and configure the scanner settings. (See p. 49) 4 Click the Start button. IMPORTANT If you configure scanning - Canon imageFORMULA DR-C125 | Reference Guide - Page 46
0-00-DR-C125_RG_UK.book Page 46 Thursday, September 8, 2011 6:03 PM 5 Configure the Scan Job Operation Flow Register the job ▼ Select the job ▼ Scan the document ▼ Output the scanned images Registering and Editing Jobs In CaptureOnTouch, up to 10 jobs can be registered for use with Select Scan Job. - Canon imageFORMULA DR-C125 | Reference Guide - Page 47
0-00-DR-C125_RG_UK.book Page 47 Thursday, September 8, 2011 6:03 PM 2 Enter the job name, and press the job. (See p. 42) Hint You can assign the job to the Start button by selecting [Start button] for [Button assignment]. (See p. 49) Selecting a Job and Scanning 1 Place the document in the scanner - Canon imageFORMULA DR-C125 | Reference Guide - Page 48
is in progress, the number of pages scanned is displayed in addition to the scanner settings. When all the pages of the document are scanned, the scanned images are output according to the registered job settings and the complete screen appears. IMPORTANT If you configure scanning conditions that - Canon imageFORMULA DR-C125 | Reference Guide - Page 49
0-00-DR-C125_RG_UK.book Page 49 Thursday, September 8, 2011 6:03 PM When [Check example, the scanning mode and document size, you can configure the desired scanning conditions in the scanner settings. The scanner setting items are common to Scan First and Select Scan Job. When Scan First: Scanning - Canon imageFORMULA DR-C125 | Reference Guide - Page 50
0-00-DR-C125_RG_UK.book Page 50 Thursday, September 8, 2011 6:03 PM When Select Scan Job: For Select Scan Job, configure the scanner settings for each job. Setting Basic Items Scanner settings include the basic items that are configured in [Scanner setting], and the setting items that are - Canon imageFORMULA DR-C125 | Reference Guide - Page 51
] Settings of the advanced settings dialog box of the scanner driver Settings of the advanced settings dialog box of the scanner driver Operation in Continuous Scanning Screen If a document is scanned with either Scan First or Select Scan Job when [Enable continuous scanning] is set to [ON] in - Canon imageFORMULA DR-C125 | Reference Guide - Page 52
DR-C125_RG_UK.book Page 52 Thursday, September 8, 2011 6:03 PM Setting the Output Method CaptureOnTouch is provided with various output methods for processing scanned images. The output method specification is common to Scan First and Select Scan Job of typical software that is supported. • Mail - Canon imageFORMULA DR-C125 | Reference Guide - Page 53
than 100,000 pages have been fed (total number of pages fed by the scanner), a message prompting you to replace the rollers is displayed when the computer is started. Opening and Closing the Front Unit 1 Open the document feed tray. Press the OPEN button and pull open the front unit toward you - Canon imageFORMULA DR-C125 | Reference Guide - Page 54
0-00-DR-C125_RG_UK.book Page 54 Thursday, September 8, 2011 6:03 PM 2 When closing the front unit, make sure that it is completely closed by gently pressing the left and right until you hear a click. Replacing the Feed Roller 1 Open the roller cover. 3 Close the document feed tray. 2 Slide the - Canon imageFORMULA DR-C125 | Reference Guide - Page 55
0-00-DR-C125_RG_UK.book Page 55 Thursday, September 8, 2011 6:03 PM 4 Slide the roller to the right to secure it. Replacing the Retard Roller 1 Open the roller cover. 5 Close the roller cover. Make sure that it is - Canon imageFORMULA DR-C125 | Reference Guide - Page 56
the Start button, and then click [All Programs], [Canon DR-C125], and [Canon imageFORMULA Utility]. imageFORMULA Utility starts. 4 Click the [Maintenance] tab, and click [Reset]. 3 Click [CANON DR-C125 USB] and click [Properties]. The scanner's properties appear. The counter for [Current Rollers - Canon imageFORMULA DR-C125 | Reference Guide - Page 57
privileges. 2 Click the Start button, and then click [All Programs], [Canon DR-C125], and [Canon imageFORMULA Utility]. imageFORMULA Utility starts. 10 Click to close the [Maintenance] dialog box. 3 Click [CANON DR-C125 USB] and click [Properties]. Scanner properties are displayed. 57 - Canon imageFORMULA DR-C125 | Reference Guide - Page 58
0-00-DR-C125_RG_UK.book Page 58 Thursday, September 8, 2011 6:03 PM 4 Click the [Maintenance] tab and then clear the [Turn off automatically after 4 hours] check box. 5 Click [OK] to close the scanner properties. 58 - Canon imageFORMULA DR-C125 | Reference Guide - Page 59
needed. Refer to the User Manual for detailed information. Problem 4 Solutions Problem 5 Solutions Problem 6 Solutions Problem 7 Solutions Documents are not scanned according to the settings configured in the scanner driver. When you scan using a job registered with CaptureOnTouch, the registered - Canon imageFORMULA DR-C125 | Reference Guide - Page 60
Problem 9 Solutions All of the placed documents have been scanned, but the scanned image does not appear on the application. When [Panel-Feeding] or [Automatic Feeding] is selected as the feeding method on the scanner driver size is set to [Scanner's Maximum]. • A high resolution (600dpi etc.) is - Canon imageFORMULA DR-C125 | Reference Guide - Page 61
0-00-DR-C125_RG_UK.book Page 61 Thursday, September 8, 2011 6:03 PM Clearing a Paper Jam When paper jams occur during scanning, use removing jammed paper. It is possible to cut your hand on the edge of a sheet of paper. 1 Remove any documents that have been left in the eject tray. 2 When the jammed - Canon imageFORMULA DR-C125 | Reference Guide - Page 62
0-00-DR-C125_RG_UK.book Page 62 Thursday, September 8, 2011 6:03 PM 4 Return the document eject tray to its original position. Make sure that it is completely closed by pushing until you hear a click. 6 Remove the jammed document. 5 Press the OPEN button and pull open the front unit toward you. - Canon imageFORMULA DR-C125 | Reference Guide - Page 63
0-00-DR-C125_RG_UK.book Page 63 Thursday, September 8, 2011 6:03 PM 7 Close the continue scanning. Hint When a paper jam or other problem occurs while [Rapid recovery system] is enabled in the scanner driver, the image of the last document that was scanned properly is saved before scanning is stopped - Canon imageFORMULA DR-C125 | Reference Guide - Page 64
150 x 150dpi/200 x 200dpi/300 x 300dpi/ 400 x 400dpi/600 x 600dpi Scanning Speed (Conditions: Core 2 Duo 3.0GHz CPU, 2 GB memory, A4 document size) Black and white Simplex 200dpi 25 pages/min. 300dpi 25 pages/min. Duplex 200dpi 50 images/min. 300dpi 50 images/min. Grayscale Simplex 200dpi 25 - Canon imageFORMULA DR-C125 | Reference Guide - Page 65
0-00-DR-C125_RG_UK.book Page 65 Thursday, September 8, 2011 6:03 PM code: 5484B001) Kit to replace the rollers (feed roller, retard roller) and document holding guide. • For the replacement procedure, see "Replacing Consumable Parts" on p. 53. • Contact your local authorized Canon dealer or service - Canon imageFORMULA DR-C125 | Reference Guide - Page 66
0-00-DR-C125_RG_UK.book Page 66 Thursday, September 8, 2011 6:03 PM Memo 66 - Canon imageFORMULA DR-C125 | Reference Guide - Page 67
0-00-DR-C125_RG_UK.book Page 67 Thursday, September 8, 2011 6:03 PM Memo 67 - Canon imageFORMULA DR-C125 | Reference Guide - Page 68
0-00-DR-C125_RG_UK.book Page 68 Thursday, September 8, 2011 6:03 PM CANON ELECTRONICS INC. 1248, SHIMOKAGEMORI, CHICHIBU-SHI, SAITAMA 369-1892, JAPAN CANON U.S.A. INC. ONE CANON PLAZA, LAKE SUCCESS, N.Y. 11042, U.S.A. CANON CANADA INC. 6390 DIXIE ROAD, MISSISSAUGA, ONTARIO L5T 1P7, CANADA CANON
-
 1
1 -
 2
2 -
 3
3 -
 4
4 -
 5
5 -
 6
6 -
 7
7 -
8
-
9
-
10
-
11
-
12
-
13
-
14
-
15
-
16
-
17
-
18
-
19
-
20
-
21
-
22
-
23
-
24
-
25
-
26
-
27
-
28
-
29
-
30
-
31
-
32
-
33
-
34
-
35
-
36
-
37
-
38
-
39
-
40
-
41
-
42
-
43
-
44
-
45
-
46
-
47
-
48
-
49
-
50
-
51
-
52
-
53
-
54
-
55
-
56
-
57
-
58
-
59
-
60
-
61
-
62
-
63
-
64
-
65
-
66
-
67
-
68
 |
 |
Reference Guide
• Please read this manual before operating this scanner.
• After you finish reading this manual, store it in a safe place for future
reference.
0-00-DR-C125_RG_UK.book
Page 1
Thursday, September 8, 2011
6:03 PM