Chamberlain B6765 B4545 B6765 Users Guide - English French
Chamberlain B6765 Manual
 |
View all Chamberlain B6765 manuals
Add to My Manuals
Save this manual to your list of manuals |
Chamberlain B6765 manual content summary:
- Chamberlain B6765 | B4545 B6765 Users Guide - English French - Page 1
® 20 Erase the Memory 21 To Open the Door Manually 21 Maintenance 22 Troubleshooting 23 Warranty 25 Repair Parts 28 Rail Assembly Parts 28 Installation Parts 28 Model B4545 29 Model B6765 30 Go to chamberlain.com/belt-install to see installation videos. www.chamberlain.com - Chamberlain B6765 | B4545 B6765 Users Guide - English French - Page 2
Review This garage door opener has been designed and tested to offer safe service provided it is installed, operated, maintained and tested in strict accordance with the instructions and warnings contained in this manual the Installation Manual. Go to chamberlain.com/belt-install to see installation - Chamberlain B6765 | B4545 B6765 Users Guide - English French - Page 3
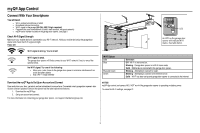
the latest operational features. 1. Download the myQ® App. 2. Set up an account and connect. For more information on connecting your garage door opener, visit support.chamberlaingroup.com. LED An LED on the garage door opener will indicate Wi-Fi status. See table below. Wi-Fi Status LED Blue Blue - Chamberlain B6765 | B4545 B6765 Users Guide - English French - Page 4
release. 7. NEVER connect garage door opener to power source until instructed to do so. 8. NEVER wear watches, rings or loose clothing while installing or servicing opener. They could be caught in garage door or opener mechanisms. 9. Install wall-mounted garage door control: l within sight of the - Chamberlain B6765 | B4545 B6765 Users Guide - English French - Page 5
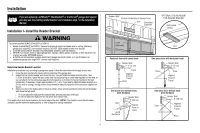
replacing a LiftMaster®, Chamberlain®, or Craftsman® garage door opener you may use the existing header bracket, see Installation step 1 in the Installation Manual. Installation 1- Install the Header Bracket Header Wall Vertical Centerline of Garage Door 2x4 Structural Supports OPTIONAL CEILING - Chamberlain B6765 | B4545 B6765 Users Guide - English French - Page 6
Wall Mounting Holes 2x4 Structural Support Optional Mounting Holes Horizontal Line Highest Point of Garage Door Travel CEILING INSTALLATION Ceiling Mounting Holes I 6" (15 cm) Maximum To continue, go to Installation step 2 in the Installation Manual Door Spring Header Wall I Garage - Chamberlain B6765 | B4545 B6765 Users Guide - English French - Page 7
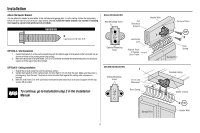
Chamberlain, or Craftsman garage door opener you may use the existing door bracket, see Installation step 10 in the Installation Manual. Installation 10 - Install door, OR directly below any structural support across the top of the door. 3. Mark, drill holes and install as follows, depending on your - Chamberlain B6765 | B4545 B6765 Users Guide - English French - Page 8
on the top edge of the door if required for your installation. (Refer to the dotted line optional placement drawing.) For one-piece door installation continue to page 9 Header Wall 2x4 Support Header Bracket (Finished Ceiling) O Optional Placement of Door Bracket Vertical Centerline of Garage - Chamberlain B6765 | B4545 B6765 Users Guide - English French - Page 9
. 5. Pull the emergency release handle toward the garage door opener until the trolley release arm is horizontal. To continue, go to Installation step 14 in the Installation Manual HARDWARE PP Clevis Pin 5/16"x1-1/4" KK Ring Fastener QQ Clevis Pin 5/16"x1" MM Lock Washer LL Hex Bolt NN Nut - Chamberlain B6765 | B4545 B6765 Users Guide - English French - Page 10
track will not support the sensor bracket a wall installation is recommended. Choose one of the following installations. Wall Installation Position sensor brackets continue, to Electrical and Wiring step 7 in the Installation Manual Wall Installation 3/16" Pre-Drill Lag Screws (not provided) P - Chamberlain B6765 | B4545 B6765 Users Guide - English French - Page 11
with pre-wiring, see Electrical and Wiring step 8 in the Installation Manual. 1 Electrical and Wiring 8 - Wire the Safety Reversing Sensors continue, go to Electrical and Wiring 10 in the Installation Manual 3 HARDWARE Insulated Staple (Not Shown) 2 Staple 7/16" (11 mm) RED WHITE WHITE GREY 11 - Chamberlain B6765 | B4545 B6765 Users Guide - English French - Page 12
make it fit outlet. Be sure the opener is grounded. To align the safety reversing sensors, see Electrical and Wiring step 13 in the Installation Manual. If LEDs are still flashing or not glowing, follow the directions below. Electrical and Wiring 14 - Align the Safety Reversing Sensors The door - Chamberlain B6765 | B4545 B6765 Users Guide - English French - Page 13
Adjustments For sectional door installations see Adjustments in the Installation Manual. Adjustments One-Piece Doors Only Without a properly installed safety reversal system, persons (particularly small children) could be SERIOUSLY INJURED or KILLED by a closing garage door. l Incorrect adjustment - Chamberlain B6765 | B4545 B6765 Users Guide - English French - Page 14
app and setup your account if you haven't already. 2. Follow the instructions in the app to setup and use the camera. The camera powers . Camera firmware is updating. For more information on using the camera, visit support.chamberlaingroup.com. NOTES: myQ® App control and camera WILL NOT work if - Chamberlain B6765 | B4545 B6765 Users Guide - English French - Page 15
are to be used ONLY with sectional doors. 16. SAVE THESE INSTRUCTIONS. Using your Garage Door Opener l The garage door opener can be 10 times. If the door is fully open, and the safety reversing sensors are not installed, or are misaligned, the door will not close from a remote control, TTC, or - Chamberlain B6765 | B4545 B6765 Users Guide - English French - Page 16
service or maintenance. l Use ONLY Chamberlain part # 041A6357-1 for replacement battery. l DO NOT dispose of battery in fire. Battery may explode. Check with local codes for disposal instructions installation, see Electrical and Wiring step 16 in the Installation Manual indicating low battery power - Chamberlain B6765 | B4545 B6765 Users Guide - English French - Page 17
time, temperature, and current battery charge (if applicable) until the menu button is pressed, and then it will display the menu options. If there is a problem with the garage doors opener the screen will display an error code, see page 23. PUSH BAR: Press the push bar to open or close - Chamberlain B6765 | B4545 B6765 Users Guide - English French - Page 18
Operation Motion Detecting Control Panel Push Bar Motion Sensor Switch LEARN Button LOCK Button 1, 5, and 10 Minute TTC LED LIGHT Button Motion Sensor Command LED ON (TTC) OFF (TTC) HOLD OPEN Button(TTC) SYNCHRONIZE THE DOOR CONTROL: To synchronize the door control to the garage door opener, - Chamberlain B6765 | B4545 B6765 Users Guide - English French - Page 19
Operation Multi-Function Control Panel Push Bar Command LED LEARN Button LOCK Button LIGHT Button SYNCHRONIZE THE DOOR CONTROL: To synchronize the door control to the garage door opener, press the push bar until the garage door opener activates (it may take up to 3 presses). Test the door control - Chamberlain B6765 | B4545 B6765 Users Guide - English French - Page 20
Entry Pre-programmed remote control included, no need to program the remote. To add or reprogram a remote control, follow the instructions below. Older Chamberlain remote controls are NOT compatible. Program Using the Multi-Function or Motion Detecting Control Panel 1. Press the LEARN button on the - Chamberlain B6765 | B4545 B6765 Users Guide - English French - Page 21
garage door opener so the trolley release arm snaps to the horizontal position. The trolley will reconnect on the next UP or DOWN operation, either manually or by using the door control or remote control. Erase the Camera Settings 1. Press and hold the reset button on the side of the camera - Chamberlain B6765 | B4545 B6765 Users Guide - English French - Page 22
Installation Manual - Adjustments 1. l Test the safety reversal system, see the Installation Manual Pods Models B1381 and B6765 The lighting of this issues with the LED, contact customer service or a certified door professional. To to 3 years. If the battery is low, the remote control's LED will not - Chamberlain B6765 | B4545 B6765 Users Guide - English French - Page 23
Troubleshooting path while closing. Door moves 6-8" (15-20 cm) stops or reverses. Manually open and close the door. Check for binding or obstructions, such as a attempt to reprogram travel, see Program the Travel in the Installation Quickstart. Opener runs approximately 6-8" (15-20 cm), stops - Chamberlain B6765 | B4545 B6765 Users Guide - English French - Page 24
bridge.chamberlain.com Canada ICES standard. These limits are designed to provide reasonable protection against harmful interference in a residential installation. This equipment generates, uses and can radiate radio frequency energy and, if not installed and used in accordance with the instructions - Chamberlain B6765 | B4545 B6765 Users Guide - English French - Page 25
STOP! This garage door opener WILL NOT work until the safety reversing sensors are properly installed and aligned. Visit us online at: support.chamberlaingroup.com CHAMBERLAIN® LIMITED WARRANTY The Chamberlain Group, Inc.® ("Seller") warrants to the first retail purchaser of this product, for the - Chamberlain B6765 | B4545 B6765 Users Guide - English French - Page 26
potential harm. Please review the safety and maintenance tips in this guide carefully and keep it trouble-free manner. Be sure to read all Important Safety Information found in your garage door opener's manual as it provides more details and safety considerations than can be supplied with this guide - Chamberlain B6765 | B4545 B6765 Users Guide - English French - Page 27
your regular routine. Review your owner's manual for both the door and door opener. If you don't have the owner's manuals, contact the manufacturer them. Visually check the door and installation: l Starting with the door in the closed position, use the manual disconnect on the opener to disconnect - Chamberlain B6765 | B4545 B6765 Users Guide - English French - Page 28
9 White and red/white wire 10 3V CR2032 lithium battery 11 Hanging brackets Not shown User's Guide Installation Manual 1 2 3 11 8 5 4 6 8 6 7 5 7 Part Number 041B0035B 041A5047-1 041A2828 041A5047-2 K029B0137 041A5266-3 041A5034 4178B0034B 041B4494-1 K010A0020 012B0776 114-5355B - Chamberlain B6765 | B4545 B6765 Users Guide - English French - Page 29
Repair Parts Garage Door Opener Parts - Model B4545 1 11 3 8 12 4 9 6 5 7 10 2 3 4 13 14 Description 1 Sprocket and sprocket cover with screws 2 End panel with light socket 3 Light lens 4 Light socket 5 Transformer 6 Cover 7 Motor with travel module 8 End panel for receiver logic board with - Chamberlain B6765 | B4545 B6765 Users Guide - English French - Page 30
Repair Parts Garage Door Opener Parts - Model B6765 Description Part Number 1 3 7 8 1 Sprocket and sprocket cover with screws 2 End panel with LED light connector/driver board 3 LED light pod 2 3 4 Transformer 5 Cover 041C1751 041D9202 041D2052 - Chamberlain B6765 | B4545 B6765 Users Guide - English French - Page 31
31 - Chamberlain B6765 | B4545 B6765 Users Guide - English French - Page 32
114-5355B © 2019, The Chamberlain Group, Inc. All Rights Reserved Wi-Fi® is a registered trademark of Wi-Fi Alliance The Chamberlain Group, Inc. 300 Windsor Drive Oak Brook, IL 60523 - Chamberlain B6765 | B4545 B6765 Users Guide - English French - Page 33
Guide de l'utilisateur avec instructions spécialisées Ouvre-portes de garage à courroie d'entraînement B4545 B6765 POUR USAGE RÉSIDENTIEL SEULEMENT TÉLÉCOMMANDE PRÉPROGRAMMÉE INCLUSE Enregistrez votre ouvre-porte de garage pour recevoir des mises à jour et des offres de Chamberlain PAS installer sur - Chamberlain B6765 | B4545 B6765 Users Guide - English French - Page 34
but d'offrir un service sûr à condition qu'il soit installé, utilisé, entretenu et mis à l'essai en stricte conformité avec les instructions et les avertissements indique de consulter le manuel d'installation. Aller à chamberlain.com/belt-install pour voir les vidéos d'installation. Numéro de série - Chamberlain B6765 | B4545 B6765 Users Guide - English French - Page 35
l'appli myQ®. 2. Créer un compte et se connecter. Pour plus d'information sur la façon de connecter votre ouvre-porte de garage, aller à support.chamberlaingroup.com. État du Wi-Fi DEL Bleue Bleue et verte Verte Définition Hors fonction - Le Wi-Fi n'est pas activé. Clignotante - L'ouvre-porte - Chamberlain B6765 | B4545 B6765 Users Guide - English French - Page 36
Pour réduire le risque de BLESSURES GRAVES, voire MORTELLES : 1. LIRE ET OBSERVER TOUS LES AVERTISSEMENTS ET INSTRUCTIONS D'INSTALLATION. 2. Installer l'ouvre-porte de garage UNIQUEMENT sur une porte de garage bien équilibrée et lubrifiée. Une porte mal équilibrée peut ne PAS inverser sa - Chamberlain B6765 | B4545 B6765 Users Guide - English French - Page 37
Si un ouvre-porte de garage LiftMaster®, Chamberlain® ou Craftsman® est remplacé, il est possible d'utiliser le support de linteau existant, voir l'étape 1, Installation, dans le manuel d'installation. Installation 1 - Installation du support de linteau Mur du linteau Ligne centrale verticale - Chamberlain B6765 | B4545 B6765 Users Guide - English French - Page 38
, au-dessus de la porte, ou au plafond. Suivre les instructions qui répondent le mieux aux besoins particuliers. Ne pas installer le support de linteau sur des cloisons sèches. Utiliser des ancrages de béton (non fournis) pour l'installation dans la maçonnerie. QUINCAILLERIE II Tire-fond de 5/16 po - Chamberlain B6765 | B4545 B6765 Users Guide - English French - Page 39
en fibre de verre, en aluminium ou en acier léger DOIVENT être renforcées AVANT d'installer le support de porte. Contacter le fabricant de la porte de garage ou l'installateur pour les instructions relatives aux renforts ou obtenir une trousse de renforts. Le manquement à renforcer la section sup - Chamberlain B6765 | B4545 B6765 Users Guide - English French - Page 40
Installation Portes rigides uniquement 1. Centrer le support de porte (O) sur le dessus de la porte, en l'alignant sur le support de linteau, comme illustré. 2. Marquer l'emplacement des trous de gauche et de droite, ou des trous du haut et du bas. Portes métalliques : l Percer des trous guides de 5 - Chamberlain B6765 | B4545 B6765 Users Guide - English French - Page 41
le support de porte installation QUINCAILLERIE PP QQ Axe de chape de 5/16 pox1 1/4 po Axe de chape de 5/16 x1 po KK Bague de fixation MM Rondelle de blocage LL Boulon hexagonal NN Écrou 9 Biellette de porte droite (rainure orientée vers l'extérieur) Biellette courbée Porte rigide sans guide - Chamberlain B6765 | B4545 B6765 Users Guide - English French - Page 42
à plus de 15 cm (6 po) au-dessus du sol. Si le guide de porte ne supporte pas solidement le support de capteur, une installation murale est recommandée. Choisir l'une des installations suivantes. Installation murale Positionner les supports de capteur (P) sur le mur. S'assurer que les capteurs sont - Chamberlain B6765 | B4545 B6765 Users Guide - English French - Page 43
précâblage, voir l'étape 8, Électricité et câblage dans le manuel d'installation. 1 Électricité et câblage 8 - Câblage des capteurs d'inversion de 10, Électricité et câblage, du 3 manuel d'installation QUINCAILLERIE Agrafe isolée (non montrée) 2 Agrafe 11 mm (7/16 po) ROUGE BLANC BLANC GRIS - Chamberlain B6765 | B4545 B6765 Users Guide - English French - Page 44
aligner les capteurs d'inversion de sécurité, voir l'étape 13, Électricité et câblage dans le manuel d'installation. Si les DEL continuent de clignoter ou ne sont pas allumées, suivre les instructions ci-dessous. Électricité et câblage 14 - Alignement des capteurs d'inversion de sécurité La porte - Chamberlain B6765 | B4545 B6765 Users Guide - English French - Page 45
. Réglages Portes rigides uniquement Sans un système d'inversion de sécurité bien installé, des personnes (plus particulièrement les petits enfants) pourraient être GRIÈVEMENT BLESSÉES ou TUÉES par une porte de garage qui se referme. l - Chamberlain B6765 | B4545 B6765 Users Guide - English French - Page 46
® et configurer votre compte, si ce n'est déjà fait. 2. Suivre les instructions dans l'appli pour configurer et utiliser la caméra. La caméra se à jour. Pour plus d'information sur l'utilisation de la caméra, visiter support.chamberlaingroup.com. REMARQUES : La commande de l'appli myQ® et la camé - Chamberlain B6765 | B4545 B6765 Users Guide - English French - Page 47
11. GARDER TOUJOURS LA PORTE DE GARAGE BIEN ÉQUILIBRÉE (voir Guide rapide d'installation). Une porte mal équilibrée peut ne PAS inverser sa course en tre utilisés UNIQUEMENT avec des portes articulées. 16. CONSERVER CES INSTRUCTIONS. Utilisation de votre ouvre-porte de garage l L'ouvre-porte de - Chamberlain B6765 | B4545 B6765 Users Guide - English French - Page 48
Chamberlain nº 041A6357-1 pour remplacer la batterie. l Ne PAS jeter la batterie au feu. La batterie peut exploser. Pour connaître les instructions de la batterie. Pour installer la batterie, voir l'étape 16, Électricité et câblage dans le manuel d'installation Le système d'alimentation par - Chamberlain B6765 | B4545 B6765 Users Guide - English French - Page 49
Fonctionnement Smart Control Panel® Barre-poussoir Touches de navigation Écran Détecteur de mouvement Bouton d'éclairage SYNCHRONISATION DE LA COMMANDE DE PORTE : Pour synchroniser la commande de porte et l'ouvre-porte de garage, appuyer sur la barre-poussoir jusqu'à ce que l'ouvre-porte de - Chamberlain B6765 | B4545 B6765 Users Guide - English French - Page 50
Fonctionnement Tableau de commande de détection de mouvement Barre-poussoir Interrupteur de détecteur de mouvement Bouton « LEARN » (apprentissage) Bouton « LOCK » (verrouillage) DEL de minuterie de 1, 5 et 10 minutes Bouton LIGHT (éclairage) Détecteur de mouvement DEL de la commande MARCHE ( - Chamberlain B6765 | B4545 B6765 Users Guide - English French - Page 51
Fonctionnement Tableau de commande de porte multifonction Barre-poussoir DEL de la commande Bouton « LEARN » (apprentissage) Bouton « LOCK » (verrouillage) Bouton LIGHT (éclairage) SYNCHRONISATION DE LA COMMANDE DE PORTE : Pour synchroniser la commande de porte et l'ouvre-porte de garage, appuyer - Chamberlain B6765 | B4545 B6765 Users Guide - English French - Page 52
clé Télécommande préprogrammée incluse, ne pas programmer la télécommande. Pour ajouter ou reprogrammer une télécommande, suivre les instructions cidessous. Les télécommandes Chamberlain plus anciennes ne sont PAS compatibles Programmation par le tableau de commande multifonction ou de détection de - Chamberlain B6765 | B4545 B6765 Users Guide - English French - Page 53
Fonctionnement Effacement de la mémoire Effacer toutes les télécommandes et tous les dispositifs d'entrée sans clé 1. Enfoncer et tenir le bouton « LEARN » (d'apprentissage) de l'ouvre-porte de garage jusqu'à ce que la DEL d'apprentissage s'éteigne (environ 6 secondes). Tous les codes de la télé - Chamberlain B6765 | B4545 B6765 Users Guide - English French - Page 54
installation. Régler au besoin. CHAQUE ANNÉE l Huiler les galets, les roulements et les charnières de la porte. Il n'est pas nécessaire de lubrifier davantage l'ouvre-porte de garage. Ne pas graisser les guides Modèles B1381 et B6765 L'éclairage de cet les DEL, contacter le service à la clientèle - Chamberlain B6765 | B4545 B6765 Users Guide - English French - Page 55
mes de porte. Si la porte ne force pas ou ne colle pas, essayer de reprogrammer la course, voir Programmation de la course dans le guide rapide d'installation. 5 La porte est en mouvement sur une distance de 15 à 20 cm (6 à Erreur de communication avec le module de commande de la course. Vérifier - Chamberlain B6765 | B4545 B6765 Users Guide - English French - Page 56
àsupport chamberlain service Canada. Ces limites ont pour but de fournir une protection raisonnable contre le brouillage nuisible dans une installation résidentielle. Cet équipement génère, utilise et peut émettre des fréquences radio et, s'il n'est pas installé et utilisé conformément aux instructions - Chamberlain B6765 | B4545 B6765 Users Guide - English French - Page 57
garage NE fonctionnera PAS si les capteurs d'inversion de sécurité ne sont pas correctement installés et alignés. Ou aller à : support.chamberlaingroup.com GARANTIE LIMITÉE DE CHAMBERLAIN® The Chamberlain Group, Inc.® (« le vendeur ») garantit à l'acheteur au détail initial de ce produit pour la - Chamberlain B6765 | B4545 B6765 Users Guide - English French - Page 58
d'enfants ou d'adultes et entraîner des blessures ou la mort. L'installation appropriée du dispositif, l'emploi correct de l'ouvre-porte, de même que son tails et de consignes de sécurité que ne peut en contenir cette guide. Les ouvre-porte de garage ne sont pas des jouets Discuter de - Chamberlain B6765 | B4545 B6765 Users Guide - English French - Page 59
é d'alimentation. AVERTISSEMENT - Les ressorts sont fortement tendus. Seules des personnes qualifiées peuvent les régler. Vérifiez visuellement la porte et l'installation : l en commençant par la porte en position fermée, servez-vous du mécanisme de déverrouillage manuel pour déconnecter la porte - Chamberlain B6765 | B4545 B6765 Users Guide - English French - Page 60
é 8 Bras porte rectiligne 9 Fils blanc et rouge-blanc 10 Pile au lithium de 3 V CR2032 11 Supports de suspension Non illustré Guide de l'utilisateur Manuel d'installation Numéro de pièce 041B0035B 041A5047-1 041A2828 041A5047-2 K029B0137 041A5266-3 041A5034 4178B0034B 041B4494-1 K010A0020 - Chamberlain B6765 | B4545 B6765 Users Guide - English French - Page 61
Pièces de réparation Pièces de l'ouvre-porte de garage - Modèle B4545 1 11 3 8 12 4 9 6 5 7 10 2 3 4 13 14 Description Numéro de pièce 1 Pignon et carter de pignon avec vis 041C1751 2 Panneau d'extrémité avec douille d'éclairage 041D0207 3 Diffuseur 041D7572 4 Douille d'ampoule - Chamberlain B6765 | B4545 B6765 Users Guide - English French - Page 62
Pièces de réparation Pièces de l'ouvre-porte de garage - Modèle B6765 1 3 7 8 2 4 6 9 5 10 11 Description Numéro de pièce 1 Pignon et carter de pignon avec vis 041C1751 2 Panneau d'extrémité avant avec connecteur/carte pilote d'éclairage à - Chamberlain B6765 | B4545 B6765 Users Guide - English French - Page 63
31 - Chamberlain B6765 | B4545 B6765 Users Guide - English French - Page 64
114-5355B © 2019, The Chamberlain Group, Inc. Tous droits réservés Wi-Fi® est une marque déposée de Wi-Fi Alliance. The Chamberlain Group, Inc. 300 Windsor Drive Oak Brook, IL 60523
-
 1
1 -
 2
2 -
 3
3 -
 4
4 -
 5
5 -
 6
6 -
 7
7 -
8
-
9
-
10
-
11
-
12
-
13
-
14
-
15
-
16
-
17
-
18
-
19
-
20
-
21
-
22
-
23
-
24
-
25
-
26
-
27
-
28
-
29
-
30
-
31
-
32
-
33
-
34
-
35
-
36
-
37
-
38
-
39
-
40
-
41
-
42
-
43
-
44
-
45
-
46
-
47
-
48
-
49
-
50
-
51
-
52
-
53
-
54
-
55
-
56
-
57
-
58
-
59
-
60
-
61
-
62
-
63
-
64
 |
 |
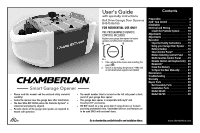
User’s Guide
with specialty instructions
Belt Drive Garage Door Openers
B4545 B6765
FOR RESIDENTIAL USE ONLY
PRE-PROGRAMMED REMOTE
CONTROL INCLUDED
Register your garage door opener to receive
updates and offers from Chamberlain
1.
Take a photo of the camera icon including the
points (
).
2.
Send it in by texting the photo to 71403 (US)
or visit chamberlain.registria.com (Global)
Smart Garage Opener
l
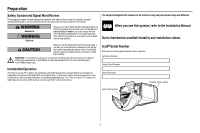
Please read this manual and the enclosed safety materials
carefully!
l
Fasten the manual near the garage door after installation.
l
The door WILL NOT CLOSE unless the Protector System® is
connected and properly aligned.
l
Periodic checks of the garage door opener are required to
ensure safe operation.
l
The model number label is located on the left side panel or back
panel of your garage door opener.
l
This garage door opener is compatible with myQ
®
and
Security+2.0® accessories.
l
DO NOT install on a one-piece door if using devices or features
providing unattended close. Unattended devices and features are
to be used ONLY with sectional doors.
Contents
Preparation
2
myQ® App Control
3
Installation
4
Electrical and Wiring
10
Install the Protector System
10
Adjustments
13
Adjustments
14
Operation
15
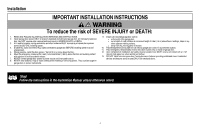
Important Safety Instructions
15
Using your Garage Door Opener
15
Battery Backup
16
Smart Control Panel®
17
Motion Detecting Control Panel
18
Multi-Function Control Panel
19
Remote Control and Keyless Entry
20
HomeLink®
20
Erase the Memory
21
To Open the Door Manually
21
Maintenance
22
Troubleshooting
23
Warranty
25
Repair Parts
28
Rail Assembly Parts
28
Installation Parts
28
Model B4545
29
Model B6765
30
Go to chamberlain.com/belt-install to see installation videos.
www.chamberlain.com