Cisco 12416 Chassis Replacement Instructions
Cisco 12416 Manual
 |
View all Cisco 12416 manuals
Add to My Manuals
Save this manual to your list of manuals |
Cisco 12416 manual content summary:
- Cisco 12416 | Chassis Replacement Instructions - Page 1
Cisco 12016, Cisco 12416, and Cisco 12816 Router Chassis Replacement Instructions Cisco Product Number: GSR16-CHASSIS= Document Order Number: DOC-7816082= Introduction This publication describes how to remove and install the Cisco 12016, Cisco 12416, and Cisco 12816 Router chassis. Contents The - Cisco 12416 | Chassis Replacement Instructions - Page 2
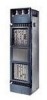
1 Cisco 12016, Cisco 12416, and Cisco 12816 Router (Front View, AC-Input Power Subsystem Shown) Power shelf and power supplies Upper blower module Upper cable management bracket RP Alarm card Upper card cage Air filter door Switch fabric card cage (behind filter door) Alarm card Lower card cage - Cisco 12416 | Chassis Replacement Instructions - Page 3
of the power shelf. Power The router can be ordered with the AC-input power subsystem with three AC-input power supplies, or the DC-input power subsystem with four DC-input power entry modules (PEMs). 78-16082-01 Cisco 12016, Cisco 12416, and Cisco 12816 Router Chassis Replacement Instructions 3 - Cisco 12416 | Chassis Replacement Instructions - Page 4
a potential hazard to people or makes the equipment unsafe. • Carefully examine your work area for possible hazards such as moist floors, ungrounded power extension cables, and missing safety grounds. Cisco 12016, Cisco 12416, and Cisco 12816 Router Chassis Replacement Instructions 4 78-16082-01 - Cisco 12416 | Chassis Replacement Instructions - Page 5
power source but still connected to telephone or network wiring: • Never install telephone wiring during a lightning storm. • Never install telephone jacks in wet locations unless the jack is specifically 78-16082-01 Cisco 12016, Cisco 12416, and Cisco 12816 Router Chassis Replacement Instructions 5 - Cisco 12416 | Chassis Replacement Instructions - Page 6
RX ACTIVCEARRRIXERPKT 2 2 TX TX RX RX 1 1 0 TX TX RX RX 0 0 TX TX CD CD LA LA CDHNT CDHNT RA RA DOWN LOOP DOWN LOOP 26208 Cisco 12016, Cisco 12416, and Cisco 12816 Router Chassis Replacement Instructions 6 78-16082-01 - Cisco 12416 | Chassis Replacement Instructions - Page 7
Guide • Regulatory Compliance and Safety Information for the Cisco 12000 Series Internet Router Removing and Installing the Chassis The router chassis is an integrated, sheet-metal assembly that includes the upper blower module bay, the upper card cage, the switch fabric card cage and air filter - Cisco 12416 | Chassis Replacement Instructions - Page 8
cable and connector requirements, refer to the "Supplemental Unit Bonding and Grounding Guidelines" section in the Cisco 12016, Cisco 12416, and Cisco 12816 Router Installation and Configuration Guide. Cisco 12016, Cisco 12416, and Cisco 12816 Router Chassis Replacement Instructions 8 78-16082-01 - Cisco 12416 | Chassis Replacement Instructions - Page 9
, and that the power fan in each power supply is off. c. Verify that the green LED labeled OK on each blower module is off. Caution You must power down the router to remove and the install the chassis. 78-16082-01 Cisco 12016, Cisco 12416, and Cisco 12816 Router Chassis Replacement Instructions 9 - Cisco 12416 | Chassis Replacement Instructions - Page 10
the trough and the screws safely aside. You will need to reinstall the trough on the replacement chassis after it has been installed in the equipment rack. c. Repeat a. and b. for the remaining trough. Cisco 12016, Cisco 12416, and Cisco 12816 Router Chassis Replacement Instructions 10 78-16082-01 - Cisco 12416 | Chassis Replacement Instructions - Page 11
Removing and Installing the Chassis Figure 5 Removing the Vertical Cable-Management Troughs PWR OK FAULT TEMP I LIM PWR OK TX TX CD CD LA LA CDHNT CDHNT RA RA DOWN LOOP DOWN LOOP 28746 78-16082-01 Cisco 12016, Cisco 12416, and Cisco 12816 Router Chassis Replacement Instructions 11 - Cisco 12416 | Chassis Replacement Instructions - Page 12
the blower modules and then install them into the replacement chassis. Refer to the Cisco 12016, Cisco 12416, and Cisco 12816 Router Installation and Configuration Guide for detailed procedures. Remove the power supplies and the power shelf and then install them into the replacement chassis. Refer - Cisco 12416 | Chassis Replacement Instructions - Page 13
the platform, and insert and tighten the four bolts to prevent the chassis from shifting on the scissor-jack platform. (See Figure 7.) 78-16082-01 Cisco 12016, Cisco 12416, and Cisco 12816 Router Chassis Replacement Instructions 13 - Cisco 12416 | Chassis Replacement Instructions - Page 14
Removing and Installing the Chassis Figure 7 Securing the Chassis to the Scissor-Jack Platform Front of chassis 29157 hand truck, and secure the chassis to the hand truck with the locking safety strap. Cisco 12016, Cisco 12416, and Cisco 12816 Router Chassis Replacement Instructions 14 78-16082-01 - Cisco 12416 | Chassis Replacement Instructions - Page 15
, page 21 • Completing the Installation, page 21 Positioning the Replacement Chassis for Insertion into the Rack Position the replacement chassis and scissor-jack platform in -mounting platform 29161 78-16082-01 Cisco 12016, Cisco 12416, and Cisco 12816 Router Chassis Replacement Instructions 15 - Cisco 12416 | Chassis Replacement Instructions - Page 16
-jack platform to raise the chassis to the same height as the rack-mounting platform installed in the rack. To insert the chassis into the rack, follow these steps: Step platform. (See Figure 11.) Cisco 12016, Cisco 12416, and Cisco 12816 Router Chassis Replacement Instructions 16 78-16082-01 - Cisco 12416 | Chassis Replacement Instructions - Page 17
ACO/LT CRITICALMAJORMINOR Removing and Installing the Chassis ACTIVCEARRRIXERPKT TX TX router. These handles are not designed to support the weight of the chassis, and should be used only to steady and guide Cisco 12016, Cisco 12416, and Cisco 12816 Router Chassis Replacement Instructions 17 - Cisco 12416 | Chassis Replacement Instructions - Page 18
brackets, if installed). Close the scissor-jack platform and put it with the rest of the shipping container. Note Save and reassemble all parts of the shipping on the mounting flanges of the rack. Cisco 12016, Cisco 12416, and Cisco 12816 Router Chassis Replacement Instructions 18 78-16082-01 - Cisco 12416 | Chassis Replacement Instructions - Page 19
Figure 13 Chassis Mounting Hole Groups Removing and Installing the Chassis Chassis mounting holes group E Chassis mounting holes group D Chassis mounting holes group five on each side of the chassis). 78-16082-01 Cisco 12016, Cisco 12416, and Cisco 12816 Router Chassis Replacement Instructions 19 - Cisco 12416 | Chassis Replacement Instructions - Page 20
-4 ATM ROUTE PROCESSOR NEBS supplemental earth ground receptacle Air filter door 28022 Figure 15 Router Top Bonding and Grounding Receptacles 29183 Supplemental bonding and grounding receptacle Cisco 12016, Cisco 12416, and Cisco 12816 Router Chassis Replacement Instructions 20 78-16082-01 - Cisco 12416 | Chassis Replacement Instructions - Page 21
4 Reconnect power to the power shelf. Refer to the Cisco 12016, Cisco 12416, and Cisco 12816 Router Power System Procedures Guide for detailed procedures. Reconnect the line card interface cables. Refer to the line card installation and configuration note for detailed instructions. Reconnect the - Cisco 12416 | Chassis Replacement Instructions - Page 22
12416, and Cisco 12816 Router Installation and Configuration Guide for detailed instructions. Checking Router Operation To restart the router and verify that it restarts successfully after replacing the chassis, follow these steps: Step 1 Verify that the following conditions are true: • All cards - Cisco 12416 | Chassis Replacement Instructions - Page 23
12416, and Cisco 12816 Router Installation and Configuration Guide that shipped with your router for additional information and installation troubleshooting procedures. If you are still unable to resolve the problem, contact your Cisco service representative for assistance. Packaging the Replaced - Cisco 12416 | Chassis Replacement Instructions - Page 24
scissor-jack platform and lower the top of the scissor-jack platform slowly until the hold-down brackets contact the top of the shipping pallet. Cisco 12016, Cisco 12416, and Cisco 12816 Router Chassis Replacement Instructions 24 78-16082-01 - Cisco 12416 | Chassis Replacement Instructions - Page 25
Installing the Chassis Step 8 Step 9 Step 10 Set a blocking plate into the hold-down bracket so that the blank in this fashion maintains the correct overall container dimensions and strength. Step 5 Step 6 To Cisco 12016, Cisco 12416, and Cisco 12816 Router Chassis Replacement Instructions 25 - Cisco 12416 | Chassis Replacement Instructions - Page 26
This section includes regulatory, compliance, and safety information in the following sections: • Translated Safety Warnings and Agency Approvals • Electromagnetic Compatibility Regulatory Statements Cisco 12016, Cisco 12416, and Cisco 12816 Router Chassis Replacement Instructions 26 78-16082-01 - Cisco 12416 | Chassis Replacement Instructions - Page 27
. This equipment generates, uses, and can radiate radio-frequency energy and, if not installed and used in accordance with the instruction manual, may cause harmful à la norme NMB-003 du Canada. 78-16082-01 Cisco 12016, Cisco 12416, and Cisco 12816 Router Chassis Replacement Instructions 27 - Cisco 12416 | Chassis Replacement Instructions - Page 28
Control Council for Interference by Information Technology Equipment (VCCI). If this equipment is used in a domestic environment, radio disturbance may arise. When such trouble of installation and protection Cisco 12016, Cisco 12416, and Cisco 12816 Router Chassis Replacement Instructions 28 - Cisco 12416 | Chassis Replacement Instructions - Page 29
& Promotional Materials in the left navigation bar. Ordering Documentation You can find instructions for ordering documentation at this URL: http://www.cisco.com/univercd/cc/td/doc/es_inpck/pdi.htm 78-16082-01 Cisco 12016, Cisco 12416, and Cisco 12816 Router Chassis Replacement Instructions 29 - Cisco 12416 | Chassis Replacement Instructions - Page 30
TAC website requires a Cisco.com user ID and password. If you have a valid service contract but do not have a login ID or password, register at this URL: http://tools.cisco.com/RPF/register/register.do Cisco 12016, Cisco 12416, and Cisco 12816 Router Chassis Replacement Instructions 30 78-16082-01 - Cisco 12416 | Chassis Replacement Instructions - Page 31
titles. Both new and experienced users will benefit from these publications. For current Cisco Press titles and other information, go to Cisco Press online at this URL: http://www.ciscopress.com 78-16082-01 Cisco 12016, Cisco 12416, and Cisco 12816 Router Chassis Replacement Instructions 31 - Cisco 12416 | Chassis Replacement Instructions - Page 32
/US/learning/index.html This document is used in conjunction with the Cisco 12016, Cisco 12416, and Cisco 12816 Router Installation and Configuration Guide. CCIP, CCSP, the Cisco Arrow logo, the Cisco Powered Network mark, Cisco Unity, Follow Me Browsing, FormShare, and StackWise are trademarks of
-
 1
1 -
 2
2 -
 3
3 -
 4
4 -
 5
5 -
 6
6 -
 7
7 -
8
-
9
-
10
-
11
-
12
-
13
-
14
-
15
-
16
-
17
-
18
-
19
-
20
-
21
-
22
-
23
-
24
-
25
-
26
-
27
-
28
-
29
-
30
-
31
-
32
 |
 |

Corporate Headquarters:
Copyright © 2004 Cisco Systems, Inc. All rights reserved.
Cisco Systems, Inc., 170 West Tasman Drive, San Jose, CA 95134-1706
USA
Cisco 12016, Cisco 12416, and Cisco 12816 Router
Chassis Replacement Instructions
Cisco Product Number: GSR16-CHASSIS=
Document Order Number: DOC-7816082=
Introduction
This publication describes how to remove and install the Cisco 12016, Cisco 12416, and Cisco 12816
Router chassis.
Contents
The following sections are included in this publication:
•
Chassis Overview, page 2
•
Preparing for Installation, page 4
•
Removing and Installing the Chassis, page 7
•
Regulatory, Compliance, and Safety Information, page 26
•
Obtaining Documentation, page 29
•
Obtaining Technical Assistance, page 30
•
Obtaining Additional Publications and Information, page 31