Compaq Evo Notebook n200 Reference Guide Mobile Expansion Unit
Compaq Evo Notebook n200 Manual
 |
View all Compaq Evo Notebook n200 manuals
Add to My Manuals
Save this manual to your list of manuals |
Compaq Evo Notebook n200 manual content summary:
- Compaq Evo Notebook n200 | Reference Guide Mobile Expansion Unit - Page 1
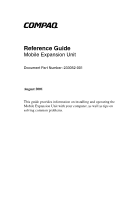
b Reference Guide Mobile Expansion Unit Document Part Number: 233052-001 August 2001 This guide provides information on installing and operating the Mobile Expansion Unit with your computer, as well as tips on solving common problems. - Compaq Evo Notebook n200 | Reference Guide Mobile Expansion Unit - Page 2
names mentioned herein may be trademarks of their respective companies. Compaq shall not be liable for technical or editorial errors or omissions kind and is subject to change without notice. The warranties for Compaq products are set forth in the express limited warranty statements accompanying - Compaq Evo Notebook n200 | Reference Guide Mobile Expansion Unit - Page 3
3-2 Inserting a MultiBay Device 3-3 Removing a MultiBay Device 3-4 Following MultiBay Guidelines 3-5 Inserting and Removing Optical Discs 3-6 Inserting Optical Discs 3-6 Removing Optical Discs 3-6 Using the Stereo Speakers 3-8 Reference Guide iii - Compaq Evo Notebook n200 | Reference Guide Mobile Expansion Unit - Page 4
Contents A Troubleshooting Using the World Wide Web A-1 Preparing to Call Technical Support A-1 Solving Common Problems A-2 B Specifications Regulatory Agency Series Numbers B-1 Index iv Reference Guide - Compaq Evo Notebook n200 | Reference Guide Mobile Expansion Unit - Page 5
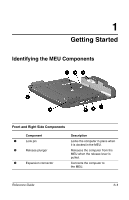
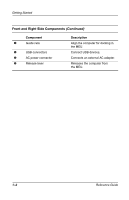
it is docked in the MEU. Releases the computer from the MEU when the release lever is pulled. Connects the computer to the MEU. Reference Guide 1-1 - Compaq Evo Notebook n200 | Reference Guide Mobile Expansion Unit - Page 6
Getting Started Front and Right Side Components (Continued) Component 4 Guide rails 5 USB connectors 6 AC power connector 7 Release lever Description Align the computer for docking in the MEU. Connect USB devices. Connects an external AC adapter. - Compaq Evo Notebook n200 | Reference Guide Mobile Expansion Unit - Page 7
/2 devices. 2 Parallel connector Connects a parallel device. 3 Serial connector Connects a serial device. 4 VGA connector Connects a VGA monitor. 5 MultiBay (with device installed) Holds one MultiBay device. Reference Guide 1-3 - Compaq Evo Notebook n200 | Reference Guide Mobile Expansion Unit - Page 8
Getting Started Bottom Components Component 1 MultiBay release latch 2 MultiBay device grip Description Releases a device from the MultiBay when the latch is pushed. Provides area to grasp and remove a device from the MultiBay. 1-4 Reference Guide - Compaq Evo Notebook n200 | Reference Guide Mobile Expansion Unit - Page 9
site at http://www.compaq.com for product news and software updates. Å WARNING: Misuse of your personal computer or failure to establish a safe and comfortable workstation may result in discomfort or serious injury. Refer to the Safety & Comfort Guide on the Notebook Products Reference Library CD - Compaq Evo Notebook n200 | Reference Guide Mobile Expansion Unit - Page 10
to the computer before connecting to the MEU. To connect the computer to the MEU: 1. Close the computer display. 2. Align the computer between the MEU guide rails. Reference - Compaq Evo Notebook n200 | Reference Guide Mobile Expansion Unit - Page 11
Connecting and Disconnecting 3. Do one of the following: I If an optional external battery pack is not attached to the computer, push the computer toward the expansion connector until the computer is docked. 2-2 Reference Guide - Compaq Evo Notebook n200 | Reference Guide Mobile Expansion Unit - Page 12
1 down into the recess of the MEU, then push the computer 2 toward the expansion connector until the computer is docked. Ä CAUTION: Be sure the battery is fully seated in the MEU recess so the connectors on the rear of the computer are exposed. Failure to fully expose the connectors prevents - Compaq Evo Notebook n200 | Reference Guide Mobile Expansion Unit - Page 13
Connecting and Disconnecting 4. Slide the computer display release latch 1 to the right and open the computer 2. 2-4 Reference Guide - Compaq Evo Notebook n200 | Reference Guide Mobile Expansion Unit - Page 14
MEU. To disconnect the computer from the MEU: 1. Close the computer display. 2. Pull the release lever 1 forward until the computer disconnects from the MEU 2. Reference Guide 2-5 - Compaq Evo Notebook n200 | Reference Guide Mobile Expansion Unit - Page 15
it up and away from the MEU expansion connector. I If an optional external battery pack is attached to the computer, remove the computer by sliding it forward and it straight up from the MEU. Ä CAUTION: Do not rotate the battery out of the MEU recess when disconnecting from the MEU; doing so can - Compaq Evo Notebook n200 | Reference Guide Mobile Expansion Unit - Page 16
, do not attempt to operate the computer and MEU with a voltage converter kit sold for appliances. Use the AC Adapter included with your computer. Reference Guide 2-7 - Compaq Evo Notebook n200 | Reference Guide Mobile Expansion Unit - Page 17
by country.) ✎ In Japan, attach the 3-to-2 prong plug adapter (included with your computer) to the power cord before connecting to an electrical outlet. 2-8 Reference Guide - Compaq Evo Notebook n200 | Reference Guide Mobile Expansion Unit - Page 18
external device. ✎ Some manufacturers require that you install software drivers before using the devices. Refer to the documentation included with these devices for details. Reference Guide 2-9 - Compaq Evo Notebook n200 | Reference Guide Mobile Expansion Unit - Page 19
3 Using the MEU Turning the System On and Off When the computer and MEU are connected, turn the system on and off using the power button on the computer. Reference Guide 3-1 - Compaq Evo Notebook n200 | Reference Guide Mobile Expansion Unit - Page 20
Inserting and Removing MultiBay Devices The MultiBay supports the following devices: I Diskette drive I Optical drive (CD, DVD) I Zip drive I LS-120 drive I Hard drive Ä CAUTION: Static electricity can damage discs) should only be inserted or removed when the computer is off. 3-2 Reference Guide - Compaq Evo Notebook n200 | Reference Guide Mobile Expansion Unit - Page 21
chapter for more information. To insert a device into the MultBay: 1. Prepare the device for inserting, if necessary, according to the instructions included with the device. ✎ A hard drive must be installed in an adapter before it can be inserted in the MultiBay. For more information, refer to the - Compaq Evo Notebook n200 | Reference Guide Mobile Expansion Unit - Page 22
Using the MEU Removing a MultiBay Device To remove a device from the MultiBay: 1. Close the computer display. 2. Tilt up the front of the MEU 1 and slide the release latch 2. 3. Pull the device 3 from the MultiBay. 3-4 Reference Guide - Compaq Evo Notebook n200 | Reference Guide Mobile Expansion Unit - Page 23
removing a hard drive while the computer is connected to the MEU. I Diskette drive-Turn off the system before replacing a diskette drive with an optical drive. I Optical drive (CD, DVD)-Turn off the system before replacing an optical drive with a diskette drive or LS-120 drive. A CD-RW drive can be - Compaq Evo Notebook n200 | Reference Guide Mobile Expansion Unit - Page 24
application or operating system software may disable the drive tray release button to prevent accidental damage to the disc. When you cannot eject the optical disc using the release button or your computer software, use the following procedure to manually eject an optical disc. 3-6 Reference Guide - Compaq Evo Notebook n200 | Reference Guide Mobile Expansion Unit - Page 25
the MEU Ä CAUTION: Before beginning this procedure, turn off power to your system and connected devices. 1. Insert a straightened paper clip into the manual eject hole and push firmly. 2. When the eject mechanism releases, pull out the tray until it is fully extended. 3. Remove the optical disc - Compaq Evo Notebook n200 | Reference Guide Mobile Expansion Unit - Page 26
through the MEU speakers. ✎ Pressing the Fn+F5 hotkeys on the computer keyboard brings up an application that allows you to control the volume. 3-8 Reference Guide - Compaq Evo Notebook n200 | Reference Guide Mobile Expansion Unit - Page 27
user and submit your own questions. Compaq responds to questions within one business day. To access the Compaq Support Forum, go to the Compaq Web site at http://www.compaq.com. Preparing to Call Technical Support If you cannot solve a problem using the troubleshooting tips in this section, you may - Compaq Evo Notebook n200 | Reference Guide Mobile Expansion Unit - Page 28
Troubleshooting I Type of printer connected I Printed information from Compaq Diagnostics or a list of the devices and error messages received I Configuration settings, including contents of the system files Solving Common Problems The following tables list possible problems, the possible cause of - Compaq Evo Notebook n200 | Reference Guide Mobile Expansion Unit - Page 29
Troubleshooting Computer Disconnection Problems and Solutions Problem The computer will not disconnect. Possible Cause The connectors may be jammed. The optional extended battery may damage connector pins. Push down on the battery pack to reseat it in the MEU recess, then disconnect the computer - Compaq Evo Notebook n200 | Reference Guide Mobile Expansion Unit - Page 30
Troubleshooting External Device Problems and Solutions Problem A new device is not recognized as part of off the computer, turn on the device, then restart the computer. Optical Drive Problems and Solutions Problem The system cannot read the optical disc. Possible Cause The optical disc is not - Compaq Evo Notebook n200 | Reference Guide Mobile Expansion Unit - Page 31
Troubleshooting Optical Drive Problems and Solutions (Continued) Problem The system cannot eject the optical disc. Possible Cause The optical disc is not properly seated in the drive tray. There is no power to the MEU. Solution Turn off the computer, then manually MultiBay. Reference Guide A-5 - Compaq Evo Notebook n200 | Reference Guide Mobile Expansion Unit - Page 32
Notebook Products Reference Library CD included with your computer. Regulatory Agency Series Numbers Regulatory agency series numbers are used for product identification. Each approved product displays the assigned agency series External Battery Agency Series - Compaq Evo Notebook n200 | Reference Guide Mobile Expansion Unit - Page 33
series number B-1 troubleshooting A-2 bottom components 1-4 C cautions battery placement 2-3, 2-6 CD removal 3-7 connector pin damage A-3 data loss situations 2-1 electrical safety 3-2 CD/DVD ROM drives inserting discs 3-6 installing 3-2, 3-5 troubleshooting A-4 Compaq Diagnostics A-1 Compaq Support - Compaq Evo Notebook n200 | Reference Guide Mobile Expansion Unit - Page 34
Index disconnecting computer from MEU 2-6 series number B-1 troubleshooting A-2 external devices connecting 2-9 operating 3-2 troubleshooting A-4 F front components 1-1 G grounding procedures 3-2 guide rails 1-2 H hard drives, installing 3-2, 3-3, 3-5 I installing MultiBay devices 3-2 K keyboards, - Compaq Evo Notebook n200 | Reference Guide Mobile Expansion Unit - Page 35
T technical support A-1 troubleshooting A-1 turning on/off computer 3-1 U USB connectors 1-2 V VGA connector 1-3 Index W warnings computer misuse 1-5 electrical safety 2-7 Web sites, Compaq 1-5 Z Zip drives, installing 3-2, 3-5 Reference Guide Index-3
-
 1
1 -
 2
2 -
 3
3 -
 4
4 -
 5
5 -
 6
6 -
 7
7 -
8
-
9
-
10
-
11
-
12
-
13
-
14
-
15
-
16
-
17
-
18
-
19
-
20
-
21
-
22
-
23
-
24
-
25
-
26
-
27
-
28
-
29
-
30
-
31
-
32
-
33
-
34
-
35
 |
 |

b
Reference Guide
Mobile Expansion Unit
Document Part Number: 233052-001
August 2001
This guide provides information on installing and operating the
Mobile Expansion Unit with your computer, as well as tips on
solving common problems.