D-Link DI-784 Product Manual
D-Link DI-784 Manual
 |
UPC - 790069264399
View all D-Link DI-784 manuals
Add to My Manuals
Save this manual to your list of manuals |
D-Link DI-784 manual content summary:
- D-Link DI-784 | Product Manual - Page 1
D-Link Air Premier AG DI-784 11a/11g Dualband Wireless 108Mbps Router Manual Building Networks for People - D-Link DI-784 | Product Manual - Page 2
3 Introduction 4 Connections 5 Features 6 LEDs ...7 Wireless Basics 8 Getting Started 10 Using the Configuration Menu 11 Networking Basics 44 Troubleshooting 59 Technical Specifications 65 Frequently Asked Questions 68 Contacting Technical Support 96 Warranty 97 Registration 100 2 - D-Link DI-784 | Product Manual - Page 3
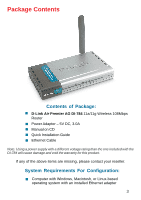
Contents Contents of Package: D-Link Air Premier AG DI-784 11a/11g Wireless 108Mbps Router Power Adapter - 5V DC, 3.0A Manual on CD Quick Installation Guide Ethernet Cable Note: Using a power supply with a different voltage rating than the one included with the DI-784 will cause damage and void - D-Link DI-784 | Product Manual - Page 4
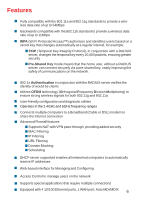
the DI-784, bandwidth-intensive applications like graphics or multimedia will benefit significantly because large files are able to move across the network quickly. This versatile wireless router also features four times the number of non-overlapping channels than a device that supports only 802 - D-Link DI-784 | Product Manual - Page 5
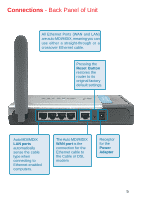
LAN) are auto MDI/MDIX, meaning you can use either a straight-through or a crossover Ethernet cable. Pressing the Reset Button restores the router to its original factory default settings. Auto MDI/MDIX LAN ports automatically sense the cable type when connecting to Ethernet-enabled computers. The - D-Link DI-784 | Product Manual - Page 6
Utilizes OFDM technology (Orthogonal Frequency Division Multiplexing) to ensure strong wireless signals for both 802.11g and 802.11a User-friendly configuration IP Filtering URL Filtering Domain Blocking Scheduling DHCP server supported enables all networked computers to automatically receive IP - D-Link DI-784 | Product Manual - Page 7
power supply. Status A blinking light indicates that the DI-784 is ready. WAN LED A solid light indicates connection on the WAN port. This LED blinks during data transmission. WLAN LEDs for 11g and 11a wireless network segments. A solid light indicates that the wireless segment is ready. The LEDs - D-Link DI-784 | Product Manual - Page 8
to-use and compatible high-speed wireless connectivity within your home, business or public access wireless networks. D-Link wireless products will allow you access to Wireless adapter cards used on laptop and desktop systems support the same protocols as Ethernet adapter cards. People use wireless - D-Link DI-784 | Product Manual - Page 9
(continued) Standards-Based Technology The DI-784 Wireless Broadband Router utilizes the new 802.11g standard, the number of walls and ceilings between the DI-784 and other network devices to a minimum - each wall or ceiling can reduce your D-Link wireless product's range from 3-90 feet (1-30 meters - D-Link DI-784 | Product Manual - Page 10
the modem Connect the Cable or DSL modem to the DI-784 Wireless Router (see the printed Quick Installation Guide included with your router.) If you are connecting a desktop computer to your network, install the D-Link Air Premier AG DWL-AG530 wireless PCI adapter into an available PCI slot on your - D-Link DI-784 | Product Manual - Page 11
the default IP Address assigned to the DI-784, make sure to enter the correct IP Address. Type admin in the User Name field Leave the Password blank Click OK Home > Wizard The Home>Wizard screen will appear. Please refer to the Quick Installation Guide for more information regarding the Setup - D-Link DI-784 | Product Manual - Page 12
52 Wireless SettingsChoose 802.11a or 802.11g. Here, 802.11a is selected. 802.11a uses the 5GHz frequency range and can support speeds of up to 54Mbps. 802.11g uses the 2.4GHz frequency range and can support speeds of up to 54Mbps. 802.11g is also backwards compatible with 802.11b. SSID"default - D-Link DI-784 | Product Manual - Page 13
client and the router must have the same passphrase in order to establish the wireless connection. A RADIUS server is not required with PSK. WEP- Select Enabled or Disabled. Disabled is the default setting. WEP Encryption- Select the level of encryption desired: 64, 128 or 152-bit All the - D-Link DI-784 | Product Manual - Page 14
selected. Wi-Fi Protected Access authorizes and authenticates users onto the wireless network. WPA uses stronger security than WEP and is based on 1- IP - Enter the IP Address of the RADIUS server. Port - Enter the port number that your RADIUS server uses for Authentication. The default setting - D-Link DI-784 | Product Manual - Page 15
WPA-PSK - Pre-Shared Key mode means that the wireless client and the router must have the same passphrase in order to establish the wireless connection. A RADIUS server is not required with PSK. Passphrase- Enter a passphrase for the router. The RADIUS server should use the same passphrase (secret - D-Link DI-784 | Product Manual - Page 16
modem users will select this option to obtain an IP Address automatically from their ISP (Internet Service Provider). Host Name- This is optional, but may be required by some ISPs. The host name is the device name of the Router. MAC Address- The default MAC Address is set to the WAN's physical - D-Link DI-784 | Product Manual - Page 17
provided by your ISP. (DNS is short for Domain Name System. It translates domain names into IP Addresses). MTU- Enter an MTU value only if required by your ISP. Otherwise, leave this section to its default setting of 1500. (MTU is short for Maximum Transfer Unit. Messages longer than the MTU will - D-Link DI-784 | Product Manual - Page 18
. User NamePassword- Your PPPoE username provided by your ISP. Your PPPoE password provided by your ISP. Retype Password- Re-enter the PPPoE password Service Name- Enter the Service Name provided by your ISP (optional). IP Address- This option is only available for Static PPPoE. Enter the - D-Link DI-784 | Product Manual - Page 19
disable this feature, enter zero or enable Auto-reconnect. MTU- Maximum Transmission Unit-1472 is default-you may need to change the MTU to conform with your ISP. Auto-reconnect- If enabled, the DI-784 will automatically connect to your ISP after your system is restarted or if the connection is - D-Link DI-784 | Product Manual - Page 20
proper TCP/ IP settings provided by the DI-784. The DHCP Server will automatically allocate an unused IP Address from the IP Address pool assign the same IP Address to a MAC Address that you specify here. This prevents the problems sometimes encountered with changing IP Addresses. Displays a - D-Link DI-784 | Product Manual - Page 21
be configured as a virtual server so that remote users accessing Web or FTP services via the public IP Address can be automatically redirected to local servers in the LAN (Local Area Network). The DI-784 firewall feature filters out unrecognized packets to protect your LAN network so all computers - D-Link DI-784 | Product Manual - Page 22
the Configuration Menu (continued) Advanced > Virtual Server continued The DI-784 is also capable of port-redirection meaning incoming traffic to a particular port may be redirected to a different port on the server computer. Each virtual service that is created will be listed at the bottom of the - D-Link DI-784 | Product Manual - Page 23
virtual service Example #2: If you have an FTP server that you wanted Internet users to access by WAN port 2100 and only during the weekends, you would need to enable it as such. FTP server is on LAN computer 192.168.0.30. FTP uses port 21, TCP. Name: FTP Server Private IP - D-Link DI-784 | Product Manual - Page 24
Applications makes some of these applications work with the DI-784. If you need to run applications that require multiple public ports associated with the trigger port to open them for inbound traffic. The DI-784 provides some predefined applications in the table on the bottom of the web page. - D-Link DI-784 | Product Manual - Page 25
from accessing the Internet. The DI-784 can be setup to deny internal computers by their IP or MAC addresses. The DI-784 can also block users from accessing restricted web sites. IP Filters- IPPortProtocol TypesSchedule- Use IP Filters to deny LAN IP Addresses from accessing the Internet. You - D-Link DI-784 | Product Manual - Page 26
Using the Configuration Menu Advanced > Filters > URL Blocking URL Blocking is used to deny LAN computers from accessing specific web sites. A URL is a specially formatted text string that defines a location on the Internet. If any part of the URL contains the blocked word, the site will not be - D-Link DI-784 | Product Manual - Page 27
Network) computers by their MAC addresses from accessing the Internet. You can either manually add a MAC address or select the MAC address from the list of clients that are currently connected to the Broadband Router. FiltersMAC FiltersNameMAC Address- Select the filter you wish to use; in this - D-Link DI-784 | Product Manual - Page 28
Using the Configuration Menu (continued) Advanced > Filters > Domain Blocking Domain Blocking is used to allow or deny LAN (Local Area Network) computers from accessing specific domains on the Internet. Domain blocking will deny all requests to a specific domain such as http and ftp. It can also - D-Link DI-784 | Product Manual - Page 29
advanced feature used to deny or allow traffic from passing through the DI-784. It works in the same way as IP Filters with additional settings. You can create more detailed access rules for the DI-784. When virtual services are created and enabled, it will also display in Firewall Rules. Firewall - D-Link DI-784 | Product Manual - Page 30
a client PC that cannot run Internet applications properly from behind the DI-784, then you can set the client up to unrestricted Internet access. It to the Internet. This feature is useful for gaming purposes. Enter the IP Address of the internal computer that will be the DMZ host. Adding a - D-Link DI-784 | Product Manual - Page 31
your selection. Beacons are packets sent by the DI-784 to synchronize a wireless network. Specify a value. 100 is the default setting and is recommended. This value should remain at its default setting of 2346. If inconsistent data flow is a problem, only a minor modification should be made. This - D-Link DI-784 | Product Manual - Page 32
Dynamic Turbo, or Super A with Static Turbo. Standard 802.11a support, no enhanced capabilities. Capable of Packet Bursting, FastFrames, Compression, this window are the Wireless Performance features for the Access Point portion of the DI-784. TX Rates- Auto is the default selection. Select from - D-Link DI-784 | Product Manual - Page 33
default setting In this mode, in order to access the DI-784 on the network, the device must be listed in the MAC Address Control List Choose Enabled to broadcast the SSID across the network. All devices on a network must share the same SSID (Service 802.11g support, no enhanced the wireless network - D-Link DI-784 | Product Manual - Page 34
of traffic and collisions that occurs on the wireless network. 802.11g only mode- Select router. Admin PasswordUser Password- The default setting is blank - no password. To change the password, enter and confirm the new password. The default setting is blank - no password. To change the password - D-Link DI-784 | Product Manual - Page 35
Remote Management allows the DI-784 to be configured from the Internet by a web browser. A username and password is still required to the IP Address of the remote computer allowed to configure the DI-784. Port: For security purposes, select a separate port number used to access the Router. ( - D-Link DI-784 | Product Manual - Page 36
the current settings to the local Hard Drive. Load Settings from Local Hard Drive- Click Browse to find the settings, then click Load. Restore to Factory Default Settings- Click Restore to restore the - D-Link DI-784 | Product Manual - Page 37
Using the Configuration Menu (continued) Tools > Firmware Firmware Upgrade- Browse- Click on the link in this screen to find out if there is an updated firmware; if so, download the new firmware to your hard drive. After you have downloaded the new firmware, click Browse in this window to locate - D-Link DI-784 | Product Manual - Page 38
Click Enabled to block the WAN ping. The DI-784 supports VPN (Virtual Private Network) pass-through for both PPTP (Point-to-Point Tunneling Protocol) and IPSec (IP Security). Once VPN pass-through is enabled, there is no need to open up virtual services. Multiple VPN connections can be made through - D-Link DI-784 | Product Manual - Page 39
swaps, and impedance mismatch. This feature significantly reduces service calls and returns by allowing users to easily troubleshoot their cable connections. Ports - The Ethernet port names associated to the physical ports. Link Status - The current link status of the Ethernet cable connected to the - D-Link DI-784 | Product Manual - Page 40
Using the Configuration Menu (continued) Status > Device Info Device Information- This screen displays information about the DI-784. Status > Log View Log- This screen displays the activity on the DI-784. Log Settings- For advanced features, click on Log Settings. 40 - D-Link DI-784 | Product Manual - Page 41
Using the Configuration Menu (continued) Status > Log > Log Settings SMTP Server/ IP Address- Email Address- Log Type- Enter the proper SMTP Server information or the IP Address. Enter the email address of the recipient who will receive the email logs. The administrator can specify which - D-Link DI-784 | Product Manual - Page 42
the receive and transmit packets that are passing through the DI-784. Click on Refresh, for the most recent information. Click Reset to reset the counters back to zero. Status > Wireless Connected Wireless Client List- Displays the wireless clients that are connected to the Access Point function - D-Link DI-784 | Product Manual - Page 43
Using the Configuration Menu (continued) Help Help- Displays the complete Help menu. For help at anytime, click the Help tab in the Configuration menu. 43 - D-Link DI-784 | Product Manual - Page 44
Networking Basics Using the Network Setup Wizard in Windows XP In this section you will learn how to establish a network at home or work, using Microsoft Windows XP. Note: Please refer - D-Link DI-784 | Product Manual - Page 45
Networking Basics Please follow all the instructions in this window: Click Next In the following window, select the best description of your computer. If your computer connects to the internet through a gateway/router, select the second option as shown. Click Next 45 - D-Link DI-784 | Product Manual - Page 46
Networking Basics Enter a Computer description and a Computer name (optional.) Click Next Enter a Workgroup name. All computers on your network should have the same Workgroup name. Click Next 46 - D-Link DI-784 | Product Manual - Page 47
Networking Basics Please wait while the Network Setup Wizard applies the changes. When the changes are complete, click Next. Please wait while the Network Setup Wizard configures the computer. This may take a few minutes. 47 - D-Link DI-784 | Product Manual - Page 48
Networking Basics In the window below, select the option that fits your needs. In this example, Create a Network Setup Disk has been selected. You will run this disk on each of the computers on your network. Click Next. Insert a disk into the Floppy Disk - D-Link DI-784 | Product Manual - Page 49
Networking Basics Please wait while the Network Setup Wizard copies the files. Please read the information under Here's how in the screen below. After you complete the Network Setup Wizard you will use the Network Setup Disk to run the Network Setup Wizard once on each of the computers on your - D-Link DI-784 | Product Manual - Page 50
the computer. Click Yes to restart the computer. You have completed configuring this computer. Next, you will need to run the Network Setup Disk on all the other computers on your network. After running the Network Setup Disk on all your computers, your new wireless network will be ready to use. 50 - D-Link DI-784 | Product Manual - Page 51
Networking Basics Naming your Computer To name your computer, please follow these directions:In Windows XP: Click Start (in the lower left corner of the screen) Right-click on My Computer Select Properties and click Select the Computer Name Tab in the System Properties window. You may enter a - D-Link DI-784 | Product Manual - Page 52
the same Workgroup name. Click OK Checking the IP Address in Windows XP The wireless adapter-equipped computers in your network must be in the same IP Address range (see Getting Started in this manual for a definition of IP Address Range.) To check on the IP Address of the adapter, please do the - D-Link DI-784 | Product Manual - Page 53
Protocol) technology. If you are using a DHCP-capable Gateway/Router you will not need to assign Static IP Addresses. If you are not using a DHCP capable Gateway/Router, or you need to assign a Static IP Address, please follow these instructions: Go to Start Double-click on Control Panel 53 - D-Link DI-784 | Product Manual - Page 54
Networking Basics Assigning a Static IP Address in Windows XP/2000 Double-click on Network Connections Right-click on Local Area Connections Double-click on Properties 54 - D-Link DI-784 | Product Manual - Page 55
for all the computers on the network. Enter the IP Address of the Default Gateway (in this case it is 192.168.0.1 for the DI-784) Input your DNS server address. 192 168 0 1 The DNS server address will be supplied by your ISP (Internet Service Provider). If the DNS Server address is not available - D-Link DI-784 | Product Manual - Page 56
in the Show pull-down menu Select Manually in the Configure pull-down menu Input the Static IP Address, the Subnet Mask and the Router IP Address in the appropriate fields Input the Domain Name Server address. Your ISP (Internet Service Provider) will provide the IP address of the DNS Server. If - D-Link DI-784 | Product Manual - Page 57
on Network Select Built-in Ethernet in the Show pull-down menu Select Using DHCP in the Configure pull-down menu Click Apply Now The IP Address, Subnet mask, and the Router's IP Address will appear in a few seconds 57 - D-Link DI-784 | Product Manual - Page 58
this one will appear. Type ping xxx.xxx.xxx.xxx, where xxx is the IP Address of the Wireless Router or Access Point. A good wireless connection will show four replies from the Wireless Router or Acess Point, as shown. Checking the Wireless Connection by Pinging in Windows Me and 98 Go to Start > Run - D-Link DI-784 | Product Manual - Page 59
Troubleshooting This Chapter provides solutions to problems that can occur during the installation and operation of the DI-784 Wireless Broadband Router. We cover various aspects of the network setup, including the network adapters. Please read the following if you are having problems. Note: It is - D-Link DI-784 | Product Manual - Page 60
of this manual.) If it is necessary to assign a Static IP Address to the wireless adapter, please refer to the appropriate section in Networking Basics. If you are entering a DNS Server address you must also enter the Default Gateway Address. (Remember that if you have a DHCP-capable router, you - D-Link DI-784 | Product Manual - Page 61
Troubleshooting 3. Check that the drivers for the network adapters are installed properly. You may be using different network adapters than those illustrated here, but this procedure will remain the same, - D-Link DI-784 | Product Manual - Page 62
Troubleshooting Double-click on Network Adapters Right-click on D-Link AirPro DWL-A650 Wireless Cardbus Adapter (In this example, the DWL-A650 is used; you may be using another network adapter, but the procedure will remain the same.) Select Properties to check that the drivers are installed - D-Link DI-784 | Product Manual - Page 63
Considerations in the Wireless Basics section of this manual for further information about the most advantageous placement of your D-Link wireless products. 5. Why does my wireless connection keep dropping? Antenna Orientation- Try different antenna orientations for the DI-784. Try to keep - D-Link DI-784 | Product Manual - Page 64
methods for troubleshooting your network, you may choose to Reset the DI-784 to the factory default settings. Remember that D-Link Air Premier AG products network together, out of the box, at the factory default settings. To hard-reset the D-Link Air Premier AG DI-784 to Factory Default Settings - D-Link DI-784 | Product Manual - Page 65
added security MAC Filtering IP Filtering URL Filtering Domain Blocking Scheduling Device Management: Web-based -Internet Explorer v6 or later; Netscape Navigator v6 or later; or other Java-enabled browsers DHCP Server and Client Wireless Data Rates* with Automatic Fallback: D-Link 108 AG 108Mbps - D-Link DI-784 | Product Manual - Page 66
OFDM, 10% PER,-90dBm 6Mbps OFDM, 10% PER,-91dBm 5.5Mbps CCK, 8% PER,-92dBm 2Mbps QPSK, 8% PER,-93dBm 1Mbps BPSK, 8% PER,-94dBm *Maximum wireless signal rate based on IEEE Standard 802.11a and 802.11g specifications. Actual data throughput will vary. Network conditions and environmental factors - D-Link DI-784 | Product Manual - Page 67
Transmit Power: 15dBm ± 2dB LEDs: Power Status WAN WLAN (Wireless Connection) - 802.11a, 802.11g Local Network (Ports 1-4) External Antenna Type: Single Non-Detachable Antenna Operating Temperature: 32°F to 131°F (0°C to 55°C) Humidity: 95% maximum ( - D-Link DI-784 | Product Manual - Page 68
configuration? When entering the IP Address of the DI-784 (192.168.0.1), you are checking for solid link lights on the device. If you do not get a solid link light, try using a require a Straight-through Cable: Computer to Residential Gateway/Router Computer to Normal Port (hub/switch) Access Point - D-Link DI-784 | Product Manual - Page 69
. The order in which you pin the cable is important. Using a pattern other than what is specified in the above diagram could cause connection problems. When to use a crossover cable and when to use a straight-through cable: Computer to Computer - Crossover Computer to an normal port on a Hub/Switch - D-Link DI-784 | Product Manual - Page 70
. Go to Start>Settings>Control Panel. Double click the Internet Options Icon. From the Security tab, click the button to restore the settings to their defaults. Click to the Connection tab and set the dialup option to Never Dial a Connection. Click the LAN Settings button. Nothing should be checked - D-Link DI-784 | Product Manual - Page 71
your IP Address. Your computer must have an IP Address in the same range as the device you are attempting to configure. Most D-Link devices use the 192.168.0.X range. How can I find my IP Address adapter, it will display your IP Address, subnet mask, and default gateway. Step 5 Click OK to close the - D-Link DI-784 | Product Manual - Page 72
to configure. Most D-Link devices use the 192.168.0.X range. How can I find my IP Address in Windows 2000/XP? Step 1 Click on Start and select Run. Step 2 Type cmd then click OK. Step 3 From the Command Prompt, enter ipconfig. It will return your IP Address, subnet mask, and default gateway. Step - D-Link DI-784 | Product Manual - Page 73
in the same range of the device you are attempting to configure. Most D-Link devices use the 192.168.0.X range. How can I assign a Static IP Address in Windows XP? Step 1 Click on Start > Control Panel > Network and Internet Connections > Network connections. Step 2 See Step 2 for Windows 2000 - D-Link DI-784 | Product Manual - Page 74
number you choose is not in use on the network. Set the Default Gateway to be the same as the LAN IP Address of your router (192.168.0.1). Set the Primary DNS to be the same as the LAN IP Address of your router (192.168.0.1). The Secondary DNS is not needed or enter a DNS - D-Link DI-784 | Product Manual - Page 75
server search order, enter the LAN IP Address of your router (192.168.0.1). Click Add. IP Address. Step 5 Access the web management. Open your web browser and enter the IP Address of your D-Link device in the address bar. This should open the login page for the web management. Follow instructions - D-Link DI-784 | Product Manual - Page 76
typing in the IP Address of the router (default:192.168.0.1) in your web browser. The username is admin (all lowercase) and the password is blank (nothing). Step 2 Click the Home tab and click the WAN button. Dynamic IP Address is the DI-784 default value, however, if Dynamic IP Address is not - D-Link DI-784 | Product Manual - Page 77
Static Cable Connection Step 1 Log into the web based configuration by typing in the IP Address of the router (default:192.168.0.1) in your web browser. The username is admin (all lowercase) and the password DI-784 is blank (nothing). Step 2 Click the Home tab and click the WAN button. Select - D-Link DI-784 | Product Manual - Page 78
support website at: http://support.dlink.com for the latest firmware upgrade information.) Step 2 Take a paperclip and perform a hard reset. With the unit on, use a paperclip and hold down the reset button on the back of the unit for 10 seconds. Release it and the router will recycle, the lights - D-Link DI-784 | Product Manual - Page 79
been assigned an IP Address. Can I use my D-Link Broadband Router to share my Internet connection provided by AOL DSL Plus? In most cases yes. AOL DSL+ may use PPPoE for authentication bypassing the client software. If this is the case, then our routers will work with this service. Please contact - D-Link DI-784 | Product Manual - Page 80
router will block the request. Step 1 Open your web browser and enter the IP Address of your D-Link router (192.168.0.1). Enter username (admin) and your password (blank by default Private IP, enter the IP Address of the computer on your local network that you want to allow the incoming service to. - D-Link DI-784 | Product Manual - Page 81
pages might be corrupted but no other company information would be exposed. D-Link, a leading maker of routers, is one company that sells products designed for setting up a DMZ How settings before using DMZ. Step 1 Find the IP address of the computer you want to use as the DMZ host. To find - D-Link DI-784 | Product Manual - Page 82
? (continued) Step 2 Log into the web based configuration of the router by typing in the IP Address of the router (default:192.168.0.1) in your web browser. The username is admin (all lowercase) and the password is blank (nothing) DI-784 admin Step 3 Click the Advanced tab and then click on the - D-Link DI-784 | Product Manual - Page 83
a range of ports on my router using Firewall rules? Step 1 Access the router's web configuration by entering the router's IP Address in your web browser. The default IP Address is 192.168.0.1. Login using your password. The default username is "admin" and the password is blank. If you are having - D-Link DI-784 | Product Manual - Page 84
is defined as a service port, and all requests to this port will be redirected to the computer specified by the server IP. For example, if router? You will need to open 3 ports in the Virtual Server section of your D-Link router. Step 1 Open your web browser and enter the IP Address of the router - D-Link DI-784 | Product Manual - Page 85
Frequently Asked Questions (continued) How do I use PC Anywhere with my router? (continued) Step 6 Create a second entry as shown here: Step 7 Click Apply and then click Continue . Step 10 Run PCAnywhere from the remote site and use the WAN IP Address of the router, not your computer´s IP Address. 85 - D-Link DI-784 | Product Manual - Page 86
) How can I use eDonkey behind my D-Link router? You must open ports on your router to allow incoming traffic while using eDonkey. eDonkey 1 Open your web browser and enter the IP Address of your router (192.168.0.1). Enter username (admin) and your password (leave blank). Step 2 Click on Advanced - D-Link DI-784 | Product Manual - Page 87
Game Mode, and open port 6869 to the IP Address of your Playstation. Step 1 Upgrade firmware (follow link above). Step 2 Open your web browser and enter the IP Address of the router (192.168.0.1). Enter username (admin) and your password (blank by default). Step 3 Click on the Advanced tab and then - D-Link DI-784 | Product Manual - Page 88
Frequently Asked Questions (continued) How can I use Gamespy behind my D-Link router? Step 1 Open your web browser and enter the IP Address of the router (192.168.0.1). Enter admin for the username and your password (blank by default). Step 2 Click on the Advanced tab and then click Virtual Server - D-Link DI-784 | Product Manual - Page 89
or on the Kazaa software. If you are having problems, please follow steps below: Step 1 Enter the IP Address of your router in a web browser (192.168.0.1). Step 2 Enter your username (admin) and your password (blank by default). Step 3 Click on Advanced and then click Virtual Server. Step 4 Click - D-Link DI-784 | Product Manual - Page 90
you do not have to configure your router. Warcraft 3 (Battlenet) uses port 6112. For the DI-604, DI-614+. DI-624, DI-754, DI-764, or DI-784: Step 1 Open your web browser and enter the IP Address of your router (192.168.0.1). Enter username (admin) and your password (leave blank). Step 2 Click on - D-Link DI-784 | Product Manual - Page 91
is a whole lot more work than a router normally does and may actually be a weak point in the firewall. D-Link is not one of the manufacturers. To read Open your web browser and enter the IP Address of your router (192.168.0.1). Enter username (admin) and your password (leave blank). Step 2 Click on - D-Link DI-784 | Product Manual - Page 92
Frequently Asked Questions (continued) How do I set up my router to use iChat? -for Macintosh users(continued) Step 3 *. Leave the second box empty. Next to Destination, select LAN under interface. Enter the IP Address of the computer you are running iChat from. . .ichat1 WAN .LAN 192.168.0.100 - D-Link DI-784 | Product Manual - Page 93
Step 4 Next to Private IP, enter the IP Address of the computer on your local network that you want to allow the incoming service to. ichat3 192.168 use the Mac OS X Firewall, you must open the same ports as in the router: Step 1 Choose Apple menu > System Preferences. Step 2 Choose View > Sharing. - D-Link DI-784 | Product Manual - Page 94
file when the Mac OS X firewall is active in its default state. If you have opened the AIM port, you may be able to receive a do not want to turn off the firewall at the sending computer, a different file sharing service may be used instead of iChat. The types of file sharing available in Mac OS X - D-Link DI-784 | Product Manual - Page 95
network) using one IP Address. D-Link´s broadband routers support NAT. With proper configuration, multiple users can access the Internet using a single account via the NAT device. For more information on RFC-1631: The IP Network Address Translator (NAT), visit http://www.faqs.org/rfcs/rfc1631.html - D-Link DI-784 | Product Manual - Page 96
-5265 Monday to Friday 7:30am to 12:00am EST D-Link Technical Support over the Internet: http://support.dlink.ca email:[email protected] When contacting technical support, please provide the following information: • Serial number of the unit • Model number or product name • Software type and version - D-Link DI-784 | Product Manual - Page 97
to the original owner or to refund at D-Link's sole discretion. Such repair or replacement will be rendered by D-Link at an Authorized D-Link Service Office. The replacement Hardware need not be new or have an identical make, model or part. D-Link may in its sole discretion replace the defective - D-Link DI-784 | Product Manual - Page 98
surge, and cosmetic damage; Any hardware, software, firmware or other products or services provided by anyone other than DLink; Products that have been purchased from inventory clearance or liquidation sales or other sales in which D-Link, the sellers, or the liquidators expressly disclaim their - D-Link DI-784 | Product Manual - Page 99
LIABILITY OF D-LINK UNDER THIS WARRANTY IS LIMITED TO THE PURCHASE PRICE OF THE PRODUCT COVERED BY THE WARRANTY. THE radio frequency energy and, if not installed and used in accordance with the instructions, may cause harmful interference to radio communication. However, there is no guarantee - D-Link DI-784 | Product Manual - Page 100
Registration Register your D-Link product online at http://support.dlink.com/register/ (10/11/04) 100
-
 1
1 -
 2
2 -
 3
3 -
 4
4 -
 5
5 -
 6
6 -
 7
7 -
8
-
9
-
10
-
11
-
12
-
13
-
14
-
15
-
16
-
17
-
18
-
19
-
20
-
21
-
22
-
23
-
24
-
25
-
26
-
27
-
28
-
29
-
30
-
31
-
32
-
33
-
34
-
35
-
36
-
37
-
38
-
39
-
40
-
41
-
42
-
43
-
44
-
45
-
46
-
47
-
48
-
49
-
50
-
51
-
52
-
53
-
54
-
55
-
56
-
57
-
58
-
59
-
60
-
61
-
62
-
63
-
64
-
65
-
66
-
67
-
68
-
69
-
70
-
71
-
72
-
73
-
74
-
75
-
76
-
77
-
78
-
79
-
80
-
81
-
82
-
83
-
84
-
85
-
86
-
87
-
88
-
89
-
90
-
91
-
92
-
93
-
94
-
95
-
96
-
97
-
98
-
99
-
100
 |
 |

11a/11g Dualband Wireless
Manual
Building Networks for People
D-Link
Air
Premier AG DI-784
108Mbps Router