D-Link KVM 121 Quick Installation Guide
D-Link KVM 121 - KVM / Audio Switch Manual
 |
UPC - 790069291197
View all D-Link KVM 121 manuals
Add to My Manuals
Save this manual to your list of manuals |
D-Link KVM 121 manual content summary:
- D-Link KVM 121 | Quick Installation Guide - Page 1
Wireless Internet Camera Wirewleitshs3GGMUoSbBil2e.V0idAedoapter - D-Link KVM 121 | Quick Installation Guide - Page 2
Requirements System Requirements • PS/2 keyboard • PS/2 Mouse • Speakers or Headphones • VGA or Higher Monitor Package Contents D-Link KVM-121 KVM Switch 2 Sets of KVM Cables Quick Install Guide If any of the above items are missing, please contact your reseller. D-Link KVM-121 Quick Install - D-Link KVM 121 | Quick Installation Guide - Page 3
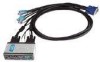
and easily between both computers. VGA Port Mouse Port Audio Jack Keyboard Port KVM Cables Plug the cables from your keyboard, monitor, sound card, and mouse into the KVM switch, and plug the supplied cables from your KVM switch into your computers. 3 D-Link KVM-121 Quick Install Guide - D-Link KVM 121 | Quick Installation Guide - Page 4
PC 1 into your first computer (Computer 1), and plug the cable from PC 2 into your second computer (Computer 2). PC1 Connect the audio and VGA cable to your first computer (Computer 1). PC2 Connect your audio or VGA cable to your second computer (Computer 2). D-Link KVM-121 Quick Install Guide 4 - D-Link KVM 121 | Quick Installation Guide - Page 5
or speakers to the green audio jack located on the KVM-121. Attach your monitor's 15-pin VGA connector to the blue VGA port located on the KVM-121. Attach your computer's 6-pin PS/2 male keyboard connector to the purple keyboard port located on the KVM-121. 5 D-Link KVM-121 Quick Install Guide - D-Link KVM 121 | Quick Installation Guide - Page 6
Attach your computer's 6-pin PS/2 male mouse connector to the green mouse port located on the KVM-121. Note: Make sure that all your computers are turned OFF before installing the KVM-121 to avoid mouse and keyboard errors when booting up your computers. D-Link KVM-121 Quick Install Guide 6 - D-Link KVM 121 | Quick Installation Guide - Page 7
case. Plug the KVM-121's included keyboard cable (purple coated) to the PS/2 keyboard port located on the back of your computer case. Plug the KVM-121's included mouse cable (green coated) to the PS/2 mouse port located on the back of your computer case. 7 D-Link KVM-121 Quick Install Guide - D-Link KVM 121 | Quick Installation Guide - Page 8
connected from the PC 2 port of the KVM-121 to Computer 2. Power ON both of your attached computers after you have completed the KVM-121 installation. Once you've completed your KVM-121 installation, your connections may appear similar to the diagram below. D-Link KVM-121 Quick Install Guide 8 - D-Link KVM 121 | Quick Installation Guide - Page 9
Switching the KVM-121 Switching the KVM-121 You can use your keyboard to switch between your computers. Press and hold the Scroll Lock key twice to enter the Hot Key switching mode. A beep confirms that the Hot Key switching mode is activated. Hot Key Menu Scroll Lock + Scroll Lock + 1 : Switches - D-Link KVM 121 | Quick Installation Guide - Page 10
when switching between computers, try shutting down your computer and rebooting. • Verify that your computers do not have more than one mouse driver installed (check your config.sys and autoexec.bat files for Windows) and that you are using the latest mouse driver. D-Link KVM-121 Quick Install Guide - D-Link KVM 121 | Quick Installation Guide - Page 11
a cordless or scrolling mouse, make sure you use generic PS/2 mouse drivers. A non-standard PS/2 mouse may have extensions on the PS/2 protocol that are not supported by the KVM-121. • Do not move the mouse or press any mouse buttons when switching from one PC to another. • Try resetting the mouse - D-Link KVM 121 | Quick Installation Guide - Page 12
Support Technical Support D-Link's website contains the latest user documentation and software updates for D-Link products. U.S. and Canadian customers can contact D-Link Technical Support that depicted on the packaging. Visit www.dlink.com for more details. D-Link KVM-121 Quick Install Guide 12
-
 1
1 -
 2
2 -
 3
3 -
 4
4 -
 5
5 -
 6
6 -
 7
7 -
8
-
9
-
10
-
11
-
12
 |
 |

Wireless
G USB 2.0 Adapter
Wireless Internet Camera
with 3G Mobile Video