DELPHI SA10085 User Guide
DELPHI SA10085 - XM Roady 2 Radio Tuner Manual
 |
UPC - 689604157787
View all DELPHI SA10085 manuals
Add to My Manuals
Save this manual to your list of manuals |
DELPHI SA10085 manual content summary:
- DELPHI SA10085 | User Guide - Page 1
SA10085 User Guide Satellite Radio Receiver Important: This manual contains important safety and operating information. Please read and follow the instructions in this manual. Failure to do so could result in personal injury, death, and/or damage to your Roady2 and/or to your vehicle. - DELPHI SA10085 | User Guide - Page 2
, including interference that may cause undesired operation. IMPORTANT: The FCC and FAA have not certified the Delphi XM Roady2 Satellite Radio Receiver for use in any aircraft (neither portable nor permanent installation). Therefore, Delphi cannot support this type of application or installation. - DELPHI SA10085 | User Guide - Page 3
you for purchasing a Delphi XM® Roady2™ Satellite Radio Receiver. Your Roady2 gives you access to over 120 XM Satellite Radio channels of music, news, and information from coast-to-coast.* Your Roady2 must be used with the enclosed connecting devices (or other approved accessories) to ensure maximum - DELPHI SA10085 | User Guide - Page 4
About Roady Roady2 is the latest in the acclaimed line of portable devices from Delphi and XM Satellite Radio and represents the best in audio technology. The smallest and lightest satellite radio receiver currently available, Roady2 is always ready to go with you. Just plug it in and go! Roady2 now - DELPHI SA10085 | User Guide - Page 5
the Display 11 Save and Recall 11 Section 4 Menu 12 Section 5 Installation Roady2 Kit Set-up 17 Roady2 Installation 19 XM Antenna Set-up 22 Section 6 Reference Taking Care of Your Roady2 25 Troubleshooting 26 Contacting Customer Service 29 Technical Information 29 Accessories 29 Section - DELPHI SA10085 | User Guide - Page 6
installation instructions in Section 5 of this guide (see page 17) or with the help of a professional installer. 2. Press the power button to turn your Roady2 on and verify that it is playing Channel 1, the XM Preview Channel. 3. Select Channel 0. The receiver's eight-character XM Satellite Radio ID - DELPHI SA10085 | User Guide - Page 7
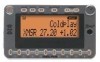
Section 2 7 Roady2 Receiver Roady2 Display Screen While tuned to an XM channel, the Roady2 default display contains information about that channel and the Roady2 settings. See figure 1. Signal-strength indicator (zero to three bars) Display mode indicator Category search indicator Direct/preset - DELPHI SA10085 | User Guide - Page 8
a Tuning Wheel, and 10 number keys. Section 2 Turns the Roady2 on or off. display The display button toggles between four display options ). menu Press Menu to select and change receiver configuration options. Pressing Menu when in menu mode will allow the user to back out to the previous level. - DELPHI SA10085 | User Guide - Page 9
Section 3 9 Basic Operations Turning Roady2 On and Off Press on the Roady2. When first turned on, the receiver will automatically tune in to the last channel listened to and recall the previous settings. Basic Channel Selection Select a channel by number 1. Make sure that Roady2 is in Direct Entry - DELPHI SA10085 | User Guide - Page 10
the preset you would like to set. The receiver will beep to indicate that the preset is registered. 4. When you first get Roady2, all presets go to Channel 1. Preview and select channels using the Tuning Wheel You can use your Roady2 to preview the XM channel lineup, see what is currently playing - DELPHI SA10085 | User Guide - Page 11
11 Section 3 Display Option 1 Display Option 2 Display Option 3 Display Option 4 Figure 3. Roady2 screen displays. Changing the Display Pressing display lets you change what is shown on your two-line Roady2 display during normal listening from among four options: • Display mode 1 (factory - DELPHI SA10085 | User Guide - Page 12
allows you to use the Tuning Wheel to select the FM rebroadcast frequency. First, make sure that your Roady2 is turned off. Then, find an open FM frequency on your car (or home/portable) radio by using its tuning knob or buttons to sample the following frequencies, selecting the one that does not - DELPHI SA10085 | User Guide - Page 13
Direct Wiring Adaptor described in the Available Accessories section on page 29. Note that you may need to repeat this procedure if you travel to areas with different FM stations in order to ensure the most static-free performance. In order to optimize the performance of this feature, the XM antenna - DELPHI SA10085 | User Guide - Page 14
When using the optional home kit, you can optimize the position of your home antenna using this screen. For optimal performance, your home antenna should be positioned to maximize the satellite signal received by your Roady2. TuneSelect™ Using this function, you can program your Roady2 to alert you - DELPHI SA10085 | User Guide - Page 15
the functionality of the Tuning Wheel so that is automatically selects a channel each time it is moved, without having to press Tuning Wheel in. Note: Roady2 does not have a preview mode when this feature is active. Warning: When using this product it is always important to keep your eyes on the - DELPHI SA10085 | User Guide - Page 16
in the menu and then select "Off." Auto-Off You can set your radio to automatically shut off 60, 120, or 180 minutes after it is turned At home, this can be used as a "sleep" feature to turn Roady2 off automatically after a period of time. Factory Default This feature lets you restore your Roady2 to - DELPHI SA10085 | User Guide - Page 17
Figure 4. Roady2 Kit components. Your kit also includes: • Car mount bracket • Extra adhesive pad • Surface preparation cleaning kit • Alcohol prep pad • Cable wrap • Adhesive-backed Velcro® pads Hooking up your Roady2 Receiver (Optional) Figure 5. Connect accessories to your Roady2 as shown - DELPHI SA10085 | User Guide - Page 18
is recommended over the wireless or wired FM modulator configurations for vehicles kit that will connect Roady2 and internal FM modulator directly to your vehicle radio's antenna jack can be purchased. See www.delphi.com or your retailer for details. Wireless FM Modulator Many late model cars - DELPHI SA10085 | User Guide - Page 19
, as described on page 12. In order to ensure optimum performance, the signal is broadcast to your car's FM radio from both inside the Roady2, and from the included XM antenna. Roady2 Installation Your Roady2 can be installed as follows: 1. First, attach all of the components as shown in figure - DELPHI SA10085 | User Guide - Page 20
the identified flat surface in your vehicle. (b) Vent mount: Your Roady2 kit includes an optional vent mount that can be used in place of the more permanent Velcro® or swivel mounts so you can easily move your Roady2 and mount from car to car. Assemble the mount by inserting the two clips into the - DELPHI SA10085 | User Guide - Page 21
's cassette deck and the 12V power adaptor into the cigarette lighter. 5. Attach the antenna as explained on page 22 and route the antenna cable as described on page 24. Figure 7. Attach car mount to back of Roady2 as shown. Removing swivel mount from your dashboard You can remove the swivel - DELPHI SA10085 | User Guide - Page 22
or sunroof. Figure 8 shows three typical mounting locations. • For optimum wireless FM reception, the XM antenna should be placed in a location close to the vehicle's FM radio antenna. Note that in some vehicles the FM antenna is embedded in the front windshield or rear window. • If the vehicle has - DELPHI SA10085 | User Guide - Page 23
jamb which carries the power window and power lock wires. If the cable does not fit easily through the grommet, do not try to force it through. Instead, route the cable under the weather seal near the bottom of the door. Front Mounting Option Figure 9. Route XM Antenna through windshield as shown. - DELPHI SA10085 | User Guide - Page 24
vehicle manufacturer whenever possible. Rear Mounting Option Figure 10. Route XM Antenna wiring as shown. Final installation Verify that the antenna is in its final desired position. The antenna contains a powerful magnet that will secure the antenna to a metal roof under normal driving conditions. - DELPHI SA10085 | User Guide - Page 25
Section 6 25 Reference Taking Care of Your Roady2 (Failure to follow these instructions may result in personal injury or damage to your Roady2 or to your vehicle.) Important: • Use only a soft, dry cloth to clean the outside of your Roady2 and any peripherals. • Do not use any solvents, chemicals, - DELPHI SA10085 | User Guide - Page 26
Section 6 26 Troubleshooting Your Roady2 is designed and built to provide you with trouble-free performance without the need for service. If it does not appear to be functioning correctly, please follow these troubleshooting steps: 1. Make sure all connectors are properly attached. 2. Make sure the - DELPHI SA10085 | User Guide - Page 27
. If the problem persists, make sure your antenna is mounted outside and on top of your car with a clear view of the sky. ANTENNA Cause: The antenna jack that plugs into your Roady2 has probably come loose. Make sure antenna is correctly attached to the receiver and that antenna cable is undamaged - DELPHI SA10085 | User Guide - Page 28
using the optional FM Modulator Direct Wiring Adaptor as described in the Available Accessories section on page 29. The audio on the XM instant traffic and weather channels does not sound the same as the other XM channels. Nothing is wrong with your receiver. These channels use a different audio - DELPHI SA10085 | User Guide - Page 29
by category. Home Kit Use your Roady2 with an existing stereo or set of powered speakers at home or in the office. Includes home stand, remote control, XM home antenna, AC adaptor, and audio cable. Cases and additional accessories are available at www.delphi.com. FM Modulator Direct Wiring Adapter - DELPHI SA10085 | User Guide - Page 30
Warranty Delphi Product and Service Solutions ("Delphi") warrants all XM Satellite Radio Products sold by Delphi ("Products") to be free of defects in material and workmanship, subject to the following conditions. The duration of Delphi's warranty with respect to Delphi XM Satellite Radio Products - DELPHI SA10085 | User Guide - Page 31
with the original receipt to the original place of purchase. To obtain warranty service during the remainder of the warranty period, you must contact Delphi by phone at 1.877.GO DELPHI (1.877.463.3574). If warranty service is needed at any time during the warranty period, the purchaser will be - DELPHI SA10085 | User Guide - Page 32
Delphi Corporation 1441 West Long Lake Road Troy, Michigan 48098-5090 U.S.A. Customer Service: [1] 877.GO DELPHI www.delphi.com The Roady2 name, XM name, and related logos are trademarks of XM Satellite Radio Inc. Printed on Recycled Paper ©2004 Delphi Corporation. All rights reserved. DPSS-04-E-030
-
 1
1 -
 2
2 -
 3
3 -
 4
4 -
 5
5 -
 6
6 -
 7
7 -
8
-
9
-
10
-
11
-
12
-
13
-
14
-
15
-
16
-
17
-
18
-
19
-
20
-
21
-
22
-
23
-
24
-
25
-
26
-
27
-
28
-
29
-
30
-
31
-
32
 |
 |
Satellite
Radio
Receiver
User
Guide
SA10085
Important:
This manual contains important safety and operating information.
Please read and follow the instructions in this manual. Failure to do so could result
in personal injury, death, and/or damage to your Roady2 and/or to your vehicle.