Dacor EO230 Installation Instructions
Dacor EO230 Manual
 |
View all Dacor EO230 manuals
Add to My Manuals
Save this manual to your list of manuals |
Dacor EO230 manual content summary:
- Dacor EO230 | Installation Instructions - Page 1
Installation Instructions Discovery Wall Oven EO, MOH and MOV Series Part No. 65433 Rev. L - Dacor EO230 | Installation Instructions - Page 2
All specifications are subject to change without notice. Dacor ® assumes no liability for changes to specifications. © 2007 Dacor, all rights reserved. - Dacor EO230 | Installation Instructions - Page 3
and warnings in these instructions are not meant to cover all possible problems and conditions that can occur. Use common sense and caution when installing, maintaining or operating this or any other appliance. • Always contact the Dacor Customer Service Team about problems and conditions that you - Dacor EO230 | Installation Instructions - Page 4
panel or fuse box so that they know where and how to turn off electric power to the oven. Dacor is not responsible for service required to correct a faulty installation. The owner is responsible to make sure this appliance is properly installed. • Do not use the door handle(s) to lift or move the - Dacor EO230 | Installation Instructions - Page 5
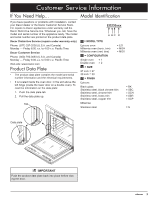
If You Need Help... Model Identification If you have questions or problems with installation, contact your Dacor dealer or the Dacor Customer Service Team. For repairs to Dacor appliances under warranty call the Dacor Distinctive Service line. Whenever you call, have the model and serial number of - Dacor EO230 | Installation Instructions - Page 6
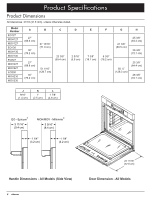
Product Specifications Product Dimensions All tolerances: ±1/16 (±1.6 mm), unless otherwise stated. Model Number EO127 MOH127 MOV127 EO130 MOH130 MOV130 EO227 MOH227 MOV227 EO230 MOH230 MOV230 A B C 27" (68.6 cm) 30" (76.2 cm) 27" (68.6 cm) 30" (76.2 cm) 27 15/16" (71.0 cm) 51 1/16" (129.7 cm - Dacor EO230 | Installation Instructions - Page 7
E D F G Utility cutout Control panel front Chassis notch side view L J K A Top of chassis 66" (167.6 cm) Flexible conduit Single Wall Oven Dimensions C 1 1/4" (3.2 cm) Top of chassis H E D F B Utility G cutout Control panel front Chassis notch side view L J K A Top of chassis 66 - Dacor EO230 | Installation Instructions - Page 8
.4 cm) (76.2 cm) MOV230 Cutout tolerances: +1/16 (1.6 mm), -0, unless otherwise stated. C C Recommended electrical location Recommended electrical location 1" (2.5 cm) min. clear to bottom of door Single Wall Oven Cutout A B Alternate 3/4" (1.9 cm) support platform electrical location - Dacor EO230 | Installation Instructions - Page 9
Installation D Recommended electrical location Recommended electrical location NOTES: • Cutout tolerances: +1/16 (1.6 mm), -0, unless otherwise stated. • 24" minimum cutout depth. • 3/4" support support platform 4" typical toe kick (shown) Recommended electrical location Single Wall Oven Under - Dacor EO230 | Installation Instructions - Page 10
of 3/4" (1.9 cm) thick plywood is recommended. All contact surfaces between the appliance and the cabinet, including the support platform, must be sturdy, straight and level. The oven cannot be leveled after it has been installed. Oven door Cool air intake (do not block) Exhaust deflector (do not - Dacor EO230 | Installation Instructions - Page 11
exact ratings see the product data plate. See page 3 for location. Installation Instructions Parts List Verify that all the parts are included. If any item is missing • Standard oven racks two (2) for a single oven, five (5) or damaged, please contact your dealer immediately. Also for a double - Dacor EO230 | Installation Instructions - Page 12
Installation Instructions Electrical Service Installation warning • Wire the oven only in compliance with local ordinances. • If the electrical service provided does not meet the product specifications, do not proceed with the installation. Call a licensed electrician to install the required wiring - Dacor EO230 | Installation Instructions - Page 13
Insulated Pipe Jumper Wire nut (3 places) Conduit to wall oven Three (3) Wire Junction Box Connection (Where Local Codes Permit) note If the junction box has been properly grounded by a licensed electrician, the green (ground) wire from the appliance conduit may be connected to the junction box - Dacor EO230 | Installation Instructions - Page 14
Installation Instructions Connecting to a Three (3) Wire Electrical System with External Ground - tight on pipe Conduit to wall oven Three (3) Wire Connection with External Ground Final Installation warning • A minimum of two people are required to safely install this appliance. • Do not attempt to - Dacor EO230 | Installation Instructions - Page 15
hand on each side. Lift the door up and out. Door Gripping Points Install the Oven in the Cabinet warning • Use an appliance dolly to move the appliance when installing it or removing it from the wall for service. Use of an appliance dolly will minimize the risk of personal injury as a result of the - Dacor EO230 | Installation Instructions - Page 16
mode as instructed in the use and care manual. NOTES: If the oven does not operate properly, follow these troubleshooting steps: • Verify that power is supplied to the oven. • Check for proper electrical connection. • Repeat the above bake test. • If the appliance still does not work, contact Dacor - Dacor EO230 | Installation Instructions - Page 17
checklist should be completed by the installer to ensure that no part of the installation has been overlooked. • Proper installation is the responsibility of the homeowner. The importance of proper installation of your Dacor oven cannot be overemphasized. □□ Oven is wired to all applicable codes - Dacor EO230 | Installation Instructions - Page 18
Notes 16 - Dacor EO230 | Installation Instructions - Page 19
- Dacor EO230 | Installation Instructions - Page 20
Dacor ● 600 Anton Blvd. Suite 1000 Costa Mesa, CA 92626 ● Phone: (800) 793-0093 ● Fax: (626) 403-3130 ● www.Dacor.com
-
 1
1 -
 2
2 -
 3
3 -
 4
4 -
 5
5 -
 6
6 -
 7
7 -
8
-
9
-
10
-
11
-
12
-
13
-
14
-
15
-
16
-
17
-
18
-
19
-
20
 |
 |

Installation Instructions
Discovery Wall Oven
EO, MOH and MOV Series
Part No. 65433
Rev. L