Dacor EORS227 Installation Instructions
Dacor EORS227 Manual
 |
View all Dacor EORS227 manuals
Add to My Manuals
Save this manual to your list of manuals |
Dacor EORS227 manual content summary:
- Dacor EORS227 | Installation Instructions - Page 1
Installation Instructions Renaissance Wall Oven Models: EOR, MOR Part No. 102579 Rev. K - Dacor EORS227 | Installation Instructions - Page 2
All specifications are subject to change without notice. Dacor ® assumes no liability for changes to specifications. © 2007 Dacor, all rights reserved. - Dacor EORS227 | Installation Instructions - Page 3
Service Information 3 If You Need Help 3 Appliance Data Plate 3 Model Identification 3 Product Specifications 4 Power Supply Requirements 4 Product Dimensions 4 Installation Specifications 6 Installation Planning 6 Installation Instructions 8 Verify the Package Contents 8 Remove the oven - Dacor EORS227 | Installation Instructions - Page 4
store items of interest to children above the oven. Children could be burned or injured while climbing on the appliance. • Do not tamper with the controls. Do not adjust or alter any part of the oven unless specifically instructed to do so in this manual. WARNING • To prevent injury due to the unit - Dacor EORS227 | Installation Instructions - Page 5
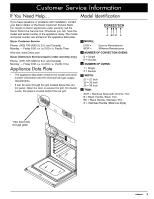
problems with installation, contact your Dacor dealer or the Dacor Customer Service Team. For repairs to Dacor appliances under warranty call the Dacor Distinctive Service Millennia Renaissance B NUMBER OF CONVECTION OVENS: S = Single D = Double C NUMBER OF OVENS: 1 = Single 2 = Double - Dacor EORS227 | Installation Instructions - Page 6
EORS230 MORS230 EORD227 MORD227 EORD230 MORD230 Dedicated Circuit specifications are for reference only. See the appliance data plate (page 3) for exact specifications 126.8 cm) (124.6 cm) 7/8" (2.2 cm) X = Number of convection ovens, see page 3 * Width at light covers on sides ** To top of - Dacor EORS227 | Installation Instructions - Page 7
Design Specifications Product Dimensions All tolerances: ±1/16 (±1.6 mm), unless otherwise stated. L J C Top of front Chassis Notch Side View K E M Conduit: 60" (152 cm) Long Top of chassis Single Oven 3 3/8" (8.6 cm) 1" (2.5 cm) 1" (2.5 cm) Light cover Control panel front Chassis Notch - Dacor EORS227 | Installation Instructions - Page 8
contact surfaces between the appliance and the this built-in appliance. Proper installation is the respon- cabinet must be solid and level. sibility of the customer. • Provide a platform within the cabinet to support the • Carefully check the location where the oven is to be oven. It must be - Dacor EORS227 | Installation Instructions - Page 9
P 1" (2.5 cm) Min. to top of cabinet door Alternate electrical location 31 1/4" (79.4 cm) recommended 3/4" (1.9 cm) support platform 1" (2.5 cm) Min. to top of drawer face 4" typical toe kick Single Wall Oven - Cut Out Dimensions 4" typical toe kick 9 5/8" (24.4 cm) recommended Double Wall - Dacor EORS227 | Installation Instructions - Page 10
or incomplete appliance. Make sure that you have everything necessary to ensure proper installation before proceeding. • Use and care manual • Exhaust grill with 2 mounting screws (2, #8 X 3/8", • Mounting screws (Wood, #6 X ¾, Dacor PN 83331, 4 for single ovens, 6 for double ovens) color should - Dacor EORS227 | Installation Instructions - Page 11
shock or fire hazard. • Do not turn on power to the appliance until the oven is properly grounded according to these instructions. • The installer must connect the ground terminal (or lead) on the appliance to a grounded, metallic, permanent wiring system or grounding conductor. Failure to - Dacor EORS227 | Installation Instructions - Page 12
Installation Instructions Electrical Connection - (continued) Connecting to a Four Wire Electrical System 1. Separate the wires coming out of the appliance conduit. 2. Connect the white wire from the appliance conduit to the white (neutral) supply wire in the junction box. 3. Connect the black - Dacor EORS227 | Installation Instructions - Page 13
Installation Instructions Connecting to a Three Wire Electrical System with External Ground - Where Local Codes Permit 4 AWG wire (minimum) Insulating device warning • Do not ground the appliance to Clamp wire tightly to pipe Conduit to oven Three Wire Connection with External Ground 11 - Dacor EORS227 | Installation Instructions - Page 14
the cabinet platform or coils above the oven chassis as the oven is slid into place. The cable must be placed into the recessed area located along the rear vertical edge of the oven or coiled above the oven chassis. Do not trap the appliance cable between the oven case back and the rear wall. 12 - Dacor EORS227 | Installation Instructions - Page 15
Installation Instructions Installing the Exhaust Grill With the oven secured to the cabinet, install the exhaust grill by mounting it to the oven with the two (2) provided screws. Reinstalling the Oven Doors warning Failure to fully rotate the hinge catches will result in a safety hazard and may - Dacor EORS227 | Installation Instructions - Page 16
is being supplied to the oven. • If power is being properly supplied, turn off power at the circuit breaker or fuse box and check the electrical connections. • Turn on power and repeat the above heating test. • If the appliance still does not work, contact Dacor Distinctive Service at (877) 337-3226 - Dacor EORS227 | Installation Instructions - Page 17
, the installer must complete the checklist below to make sure that no part of the installation has been overlooked. □□ Is the oven mount on a level platform? □□ Is the oven wired and grounded according to these instructions and in accordance with all applicable electrical codes? See pages 4 and - Dacor EORS227 | Installation Instructions - Page 18
Notes 16 - Dacor EORS227 | Installation Instructions - Page 19
- Dacor EORS227 | Installation Instructions - Page 20
Dacor ● 600 Anton Blvd. Suite 1000 Costa Mesa, CA 92626 ● Phone: (800) 793-0093 ● Fax: (626) 403-3130 ● www.Dacor.com
-
 1
1 -
 2
2 -
 3
3 -
 4
4 -
 5
5 -
 6
6 -
 7
7 -
8
-
9
-
10
-
11
-
12
-
13
-
14
-
15
-
16
-
17
-
18
-
19
-
20
 |
 |

Installation Instructions
Renaissance Wall Oven
Models: EOR, MOR
Part No. 102579
Rev. K