Dacor PCS130 User Manual - Classic Wall Oven
Dacor PCS130 Manual
 |
View all Dacor PCS130 manuals
Add to My Manuals
Save this manual to your list of manuals |
Dacor PCS130 manual content summary:
- Dacor PCS130 | User Manual - Classic Wall Oven - Page 1
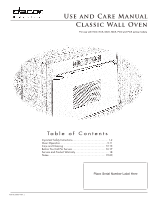
Use and Care Manual Classic Wall Oven For use with ECD, ECS, MCD, MCS, PCD and PCS series models Ta b l e o f C o n t e n t s Important Safety Instructions 1-2 Oven Operation 3-11 Care and Cleaning 12-15 Before You Call For Service 16-17 Service and Product Warranty 18 Notes 19-20 Place Serial - Dacor PCS130 | User Manual - Classic Wall Oven - Page 2
- Dacor PCS130 | User Manual - Classic Wall Oven - Page 3
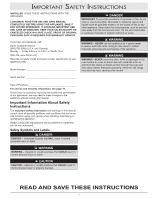
Dacor is constantly improving the quality and performance of our appliances, we may need to make changes to the appliance without revising this manual. Important Information About Safety Instructions The Important Safety Instructions and warnings in this manual cannot cover all possible problems - Dacor PCS130 | User Manual - Classic Wall Oven - Page 4
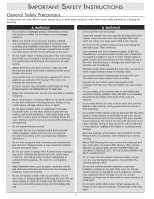
regularly as instructed in this manual. Keep the entire oven free of grease that could catch fire. Clean only those parts listed in this manual. • Do a fire hazard or causing property damage. • Non-stick coatings, when heated, can be harmful to birds. Remove birds to a separate, well-ventilated - Dacor PCS130 | User Manual - Classic Wall Oven - Page 5
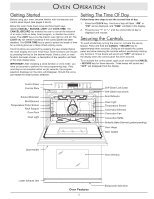
Oven Operation Getting Started Before using your oven, become familiar with the features and control panel layout (see pages 4 and 5). Below the oven mode touch keys are three touch keys labeled CANCEL • SECURE, LIGHT and COOK TIME. The CANCEL•SECURE key enables the user to cancel the selection of - Dacor PCS130 | User Manual - Classic Wall Oven - Page 6
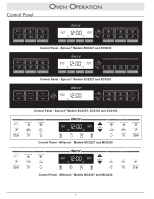
Control Panel Oven Operation Control Panel - Epicure® Models ECD227 and ECD230 Control Panel - Epicure® Models ECS227 and ECS230 Control Panel - Epicure® Models ECS127, ECS130 and ECS136 Control Panel - Millennia™ Models MCD227 and MCD230 Control Panel - Millennia™ Models MCS227 and MCS230 4 - Dacor PCS130 | User Manual - Classic Wall Oven - Page 7
Oven Operation Control Panel - Millennia™ Models MCS127 and MCS130 Control Panel - Preference™ Models PCD227 and PCD230 Control Panel - Preference™ Model PCS230 Control Panel - Preference™ Model PCS130 5 - Dacor PCS130 | User Manual - Classic Wall Oven - Page 8
heating the oven. Also, remove the oven racks prior to self-cleaning to prevent permanent discoloration of the racks. The porcelain rack supports the rack with the horizontal guide rails of the rack supports, then slide the rack into the oven. GlideRack™ Oven Rack Dacor's GlideRack oven rack is - Dacor PCS130 | User Manual - Classic Wall Oven - Page 9
models ECD230, PCD230, and MCD230. Convection broil is always performed with the door closed. PURE CONVECTION™ - In Pure Convection mode a third heating later time if desired. Oven Mode Selection Follow these steps to manually operate the oven in standard bake, Pure Convection or convection bake - Dacor PCS130 | User Manual - Classic Wall Oven - Page 10
baking time for pies and yeast breads. Heated Air Circulation in Convection Modes Baking and Roasting satisfactory results are achieved. See Common Baking Problems on the facing page for additional information. the steps in the Oven Modes section to manually operate the oven, or refer to the Delay - Dacor PCS130 | User Manual - Classic Wall Oven - Page 11
light up in the clock display, the broiler element will begin heating. 5. Dacor recommends that you set the minute timer(s) to time the broiling hot water and dishwashing liquid, then scrub them with an abrasive pad. PROBLEM Cookies and biscuits burn on the bottom. Cookies and biscuits are too - Dacor PCS130 | User Manual - Classic Wall Oven - Page 12
desired time: 1. Follow steps 1 thru 4 in the previous instructions for timed cooking. 2. Press the STOP TIME key. 3. " know about the meat probe: • Double oven models have a meat probe connector in the upper oven rest in the center of the thickest meaty part of the roast. Cable Plug Probe Handles - Dacor PCS130 | User Manual - Classic Wall Oven - Page 13
hold the oven temperature at 150˚F. The residual heat of the oven will cause the internal temperature of for the type of food being prepared. 5. Dacor recommends that you set the minute timer(s) to off the oven if it is operating. You must manually shut the oven off by pressing the CANCEL • SECURE - Dacor PCS130 | User Manual - Classic Wall Oven - Page 14
. Use of these cleaners can produce hazardous fumes or can permanently damage the porcelain finishes. Read and follow these Care and Cleaning instructions completely to maintain proper oven operation and appearance throughout the life of the product. Several materials and finishes are used in the - Dacor PCS130 | User Manual - Classic Wall Oven - Page 15
in place during self-clean. The filter will discolor due to the high heat, but the filtering capabilities will not be affected. 3. Wipe up excess grease -cleaning cycle to eliminate the need for difficult and time-consuming manual scrubbing of interior surfaces. During this cycle, the oven reaches - Dacor PCS130 | User Manual - Classic Wall Oven - Page 16
• SECURE. 9. After completion of the self-clean cycle, the oven will stop heating and the "ON" and "CLEAN" indicators will disappear from the clock display. cooking is complete and when electricity rates are lower. • On double oven models, if one oven is in the self-clean mode the other oven is - Dacor PCS130 | User Manual - Classic Wall Oven - Page 17
your hand under the lens for support then pry out to remove the . Use Dacor Part No. 86364 available from any authorized Dacor parts distributor or Model No. ACS273 • 30" Oven - Model No. ACS303 • 36" Oven - Model No. ACS363 Replacement Oven Light Bulb • Part No. 86364 Stainless Steel Cleaner • Part - Dacor PCS130 | User Manual - Classic Wall Oven - Page 18
Service Problem Solution Guide Unnecessary service calls may be expensive, frustrating and time-consuming. Before you call for service, please review the potential problems is normally displayed on the control panel. PROBLEM Nothing works. Oven will not heat. Clock displays incorrect time of day. - Dacor PCS130 | User Manual - Classic Wall Oven - Page 19
CANCEL • SECURE key. The oven will not heat after a failure code is displayed. Call a qualified appliance technician to repair the oven. Clock Display F0. F1. F2. F3. F4. F6. F7 F8. Cause Touch pad is stuck in depressed position. Relay circuit failure. Oven temperature exceeded the clean runaway - Dacor PCS130 | User Manual - Classic Wall Oven - Page 20
able to resolve the problem. If the service agency is not able to respond effectively, call or write the DACOR Customer Service Department. The phone defect in material or workmanship, DACOR will furnish a new part, F.O.B. factory, to replace the defective part. All delivery, installation and labor - Dacor PCS130 | User Manual - Classic Wall Oven - Page 21
Notes 19 - Dacor PCS130 | User Manual - Classic Wall Oven - Page 22
Notes 20 - Dacor PCS130 | User Manual - Classic Wall Oven - Page 23
fold here BUSINESS REPLY MAIL FIRST-CLASS MAIL PERMIT NO. 4507 DIAMOND BAR CA POSTAGE WILL BE PAID BY ADDRESSEE DACOR INC. ATTN: WARRANTY PROCESSING DEPT 1440 BRIDGE GATE DR STE 200 PO BOX 6532 DIAMOND BAR CA 91765-9861 NO POSTAGE NECESSARY IF MAILED IN THE UNITED STATES - Dacor PCS130 | User Manual - Classic Wall Oven - Page 24
Dealer Showroom I. Model Home E. Home Show J. Other 2. Where did you buy your Dacor appliances? A. Appliance Dealer B. Kitchen Dealer C. Builder Supplier D. Builder E. Other 3. For what purpose was the product purchased? A. Replacement only B. Part of a Remodel C. New
-
 1
1 -
 2
2 -
 3
3 -
 4
4 -
 5
5 -
 6
6 -
 7
7 -
8
-
9
-
10
-
11
-
12
-
13
-
14
-
15
-
16
-
17
-
18
-
19
-
20
-
21
-
22
-
23
-
24
 |
 |
Use and Care Manual
Classic Wall Oven
Part No. 65031
Rev. J
Table of Contents
Important Safety Instructions
.............................................
1-2
Oven Operation
...........................................................
3-11
Care and Cleaning
.....................................................
12-15
Before You Call For Service
..........................................
16-17
Service and Product Warranty
...........................................
18
Notes
........................................................................
19-20
Place Serial Number Label Here
For use with ECD, ECS, MCD, MCS, PCD and PCS series models