Dacor RNMD30 Installation Instructions - Flush Mount
Dacor RNMD30 Manual
 |
View all Dacor RNMD30 manuals
Add to My Manuals
Save this manual to your list of manuals |
Dacor RNMD30 manual content summary:
- Dacor RNMD30 | Installation Instructions - Flush Mount - Page 1
RNMD30S For Use With: RNMD30B / RNMD30S RNMD24B / RNMD24S Ta b le o f C o nt e nt s Important Safety Instructions 2 What You Need to Consumer 3 Grounding Instructions 3 24" Flush Mount Installation Instructions......... 4-5 30" Flush Mount Installation Instructions......... 6-7 Information - Dacor RNMD30 | Installation Instructions - Flush Mount - Page 2
with the appliance. Customer: Please read and keep these installation instructions for future reference. This guide provides proper installation information. If you have any questions, call: Dacor Customer Service 1-800-793-0093 (U.S.A. and Canada) Monday - Friday 6:00 am to 5:00 pm Pacific - Dacor RNMD30 | Installation Instructions - Flush Mount - Page 3
begin the installation process, read this entire installation instruction manual. It contains information necessary for proper, safe installation. Any questions or problems with the installation should be directed to your Dacor dealer or the Dacor Customer Service Department at 800.793.0093. You can - Dacor RNMD30 | Installation Instructions - Flush Mount - Page 4
24" Flush MounHt eInasdtainllgation Instructions Parts includes: Qty. Part minimum depth K. 22 1/8" (561.97 mm) L. 1 3/4" (44.45 mm) M. 16 7/8" (428.62 mm) opening N. Floor must support 100 lb (45.4 kg) O. 1 3/4" (44.45 mm) Figure 2A A CL Top view Anti-Tip block Mounting cleat Drawer face B - Dacor RNMD30 | Installation Instructions - Flush Mount - Page 5
24" Flush MounHt eInasdtainllgation Instructions Suggested electrical outlet location No oven A B C Anti-Tip wall or cabinet opening. Plug the power supply cord into the electrical outlet. 4. Carefully guide the drawer into the prepared opening. Avoid contact with the sides of the cutout opening - Dacor RNMD30 | Installation Instructions - Flush Mount - Page 6
Flush MounHt eInasdtainllgation Instructions Parts includes: Qty. Part RNMD30S RNMD30B PREF-B020MRP0 PREF 7/16" (722.3 mm) L. 1 3/4" (44.45 mm) M. 16 7/8" (428.62 mm) opening N. Floor must support 100 lb (45.4 kg) O. 1 3/4" (44.45 mm) Figure 2A A CL Top view Anti-Tip block Mounting cleat - Dacor RNMD30 | Installation Instructions - Flush Mount - Page 7
30" Flush MounHt eInasdtainllgation Instructions Suggested electrical outlet location No oven A B C Anti-Tip wall or cabinet opening. Plug the power supply cord into the electrical outlet. 4. Carefully guide the drawer into the prepared opening. Avoid contact with the sides of the cutout opening - Dacor RNMD30 | Installation Instructions - Flush Mount - Page 8
and operating instruction sections in your use & care manual. It may save you time and expense. The list includes common occurrences that are not the result of defective workmanship or materials in this microwave. Refer to the warranty in your use & care manual for Dacor's toll-free service number - Dacor RNMD30 | Installation Instructions - Flush Mount - Page 9
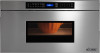
KEEP WARM DEFROST REHEAT CLOSE EASY MINUTE Modèle RNMD30S Pour un usage avec : RNMD30B / RNMD30S RNMD24B / RNMD24S Ta b l e de s mat iè re s 11 Instructions de mise à la terre 11 Encastré de 24 po d'installation instructions 12-13 Encastré de 30 po d'installation instructions 14 - Dacor RNMD30 | Installation Instructions - Flush Mount - Page 10
rifier que les revêtements muraux et les armoires autour du tiroir peuvent supporter la chaleur générée par le four à micro-ondes. • Ne jamais laisser appelez : Service à la clientèle de Dacor 1-800-793-0093 (É.-U. et Canada) Lundi à vendredi, 6 h à 1 h Heure du Pacifique site Web: www.Dacor.com Ayez - Dacor RNMD30 | Installation Instructions - Flush Mount - Page 11
Dacor ou au service assistance à la clientèle de Dacor au 800.793.0093. Vous pouvez consulter aussi notre site Web à www.Dacor.com vigueur. • Veiller à laisser ces directives au client. REMARQUES IMPORTANTES AU CLIENT INSTRUCTIONS POUR LA MISE À LA TERRE MISE EN GARDE Un mauvais usage de la - Dacor RNMD30 | Installation Instructions - Flush Mount - Page 12
Encastré de 24 po d'installation instructions Parts includes: Qté La partie 1 RNMD24S 3/4 po (44,45 mm) M.Ouverture de 16 7/8 po (428,62 mm) N. Le plancher doit être en mesure de supporter 100 lb (45,4 kg) O. 1 3/4 po (44,45 mm) Figure 2A Bloc antibasculement A CL Vue du dessus Tasseau de - Dacor RNMD30 | Installation Instructions - Flush Mount - Page 13
Encastré de 24 po d'installation instructions Emplacement de la prise électrique suggéré Pas de four A B C 3. Placer le tiroir près de l'ouverture du mur ou de l'armoire. Brancher le cordon d'alimentation dans - Dacor RNMD30 | Installation Instructions - Flush Mount - Page 14
instructions Parts includes: Qté La partie 1 RNMD30S PREF-B020MRP0 Déflecteur de sortie pour montage encastré RNMD30B PREF mm) M.Ouverture de 16 7/8 po (428,62 mm) N. Le plancher doit être en mesure de supporter 100 lb (45,4 kg) O. 1 3/4 po (44,45 mm) Figure 2A Bloc antibasculement A CL Vue - Dacor RNMD30 | Installation Instructions - Flush Mount - Page 15
Encastré de 30 poHeda'idnisntagllation instructions Emplacement de la prise électrique suggéré Pas de four A B C 3. Placer le tiroir près de l'ouverture du mur ou de l'armoire. Brancher le cordon d'alimentation dans - Dacor RNMD30 | Installation Instructions - Flush Mount - Page 16
mode d'emploi et d'entretien pour les instructions de nettoyage. AVANT D'APPELER LE SERVICE DE RÉPARATIONS Lire AVANT D'APPELER et riaux défectueux de ce four. Vous trouverez le numéro de service sans frais et l'adresse de Dacor dans la garantie dans votre mode d'emploi et d'entretien. Veuillez
-
 1
1 -
 2
2 -
 3
3 -
 4
4 -
 5
5 -
 6
6 -
 7
7 -
8
-
9
-
10
-
11
-
12
-
13
-
14
-
15
-
16
 |
 |

Table of Contents
Important Safety Instructions
..........................
2
What You Need to Know
About Safety
............................................
2
Safety Symbols and Labels
.........................
2
Installation Requirements
................................
3
Important Notes To The Installer
.................
3
Important Notes To The Consumer
...............
3
Grounding Instructions
...............................
3
24" Flush Mount Installation Instructions
........
4-5
30" Flush Mount Installation Instructions
........
6-7
Information You Need To Know
.........................
8
Model and Serial Number Location
...............
8
Care, Cleaning and Maintenance
..................
8
Before You Call for Service
..........................
8
Microwave In-A-Drawer
™
Part No. 109616
TINSKB223MRR0
For Use With:
RNMD30B / RNMD30S
RNMD24B / RNMD24S
Model RNMD30S
Flush Mount Installation Instructions
KEEP
WARM
SOFTEN
MELT
CLOSE
OPEN
EASY MINUTE
CONTROL
LOCK
WARM
BEVERAGE
CENTER
SENSOR
POPCORN
SENSOR
COOK
SENSOR
REHEAT
DEFROST
REHEAT