Danby DDR5009REE Product Manual
Danby DDR5009REE Manual
 |
View all Danby DDR5009REE manuals
Add to My Manuals
Save this manual to your list of manuals |
Danby DDR5009REE manual content summary:
- Danby DDR5009REE | Product Manual - Page 1
de ce produit. PORTABLE DEHUMIDIFIER Owner's Use and Care Guide • Welcome • Important Safety Information • Installation Instructions • Features • Operating Instructions • Care and Maintenance • Troubleshooting • Warranty 1 - 10 DÉSHUMIDIFICATEUR PORTATIF Guide d'utilisation et soins de - Danby DDR5009REE | Product Manual - Page 2
Owner's Use and Care Guide will provide you with valuable information necessary for the proper care and maintenance of your new appliance. If properly maintained, your Danby appliance will give you many years of trouble free operation. Please take a few moments to read the instructions thoroughly - Danby DDR5009REE | Product Manual - Page 3
according to the manufacturer's instructions may result in conditions which can produce bodily injury and/or property damage. Contact your dealer, service agent, or the manufacturer about any problems or conditions you do not fully understand. For Danby Customer Service call 1-800-26- (1-800 - Danby DDR5009REE | Product Manual - Page 4
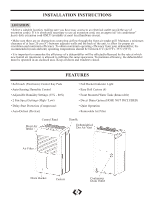
INSTALLATION INSTRUCTIONS LOCATION • Select a suitable location, making sure you have easy access to an 35°C (95°F). • It is important to remember the efficiency of a dehumidifier will be effected/influenced by the rate at which new humid air (moisture) is allowed to infiltrate the same space - Danby DDR5009REE | Product Manual - Page 5
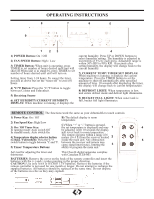
INSTRUCTIONS 8 7 6 5 9 1 23 1) POWER Button: On / Off 2) FAN SPEED Button: High / Low dehumidifiers touch controls. 1) Power Key: On / Off B) The default display is room temperature. 2) Fan Speed Key: High/Low meters (16.4 ft.)from the receiver located 2 (Celsius / Fahrenheit): Press the - Danby DDR5009REE | Product Manual - Page 6
dehumidifier is suitable for operating on an electricity supply having the same voltage as that shown on its rating label. 3) Make sure the water tank is correctly located defaults to the following factory setting: Humidity Setting: 60% Fan Speed: Low NOTE: In the event of a power failure, - Danby DDR5009REE | Product Manual - Page 7
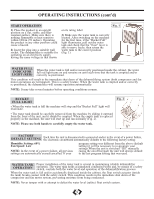
OPERATING INSTRUCTIONS (cont'd) DEFROST When the machine is operated at low temperatures (less than 18°C), the surface when the compressor is running. AIR FILTER Fig. 3 Your dehumidifier features a removable Air Filter. This filter is located at the front of the unit (behind the air intake grill - Danby DDR5009REE | Product Manual - Page 8
OPERATING INSTRUCTIONS (cont'd) INSTALLING PVC DRAIN HOSE When using the continuous drain function, the direction onto the rear of the unit (Fig. D). 8) Place the bucket in its original location (Fig. E). Drain cover Drain hose Fig. C Drain hose Fig. D Drain cover Drain hose Fig. E Bucket 7 - Danby DDR5009REE | Product Manual - Page 9
. 2) DO NOT use insect/oil/paint spray around the machine; these products might cause damage to plastic parts or start a fire. 3) DO NOT place the unit on uneven ground to avoid shaking, noise, and or putting in storage, do not place the dehumidifier on its side, or upside down, to avoid shaking. 8 - Danby DDR5009REE | Product Manual - Page 10
. Use this troubleshooting guide to identify possible problems you may be experiencing. If the unit continues to operate improperly, call your local Danby Service Depot or 1-800-26- (1-800-263-2629) PROBLEM 1) Unit will not operate. 2) Dehumidifying capacity (moisture removal) low. 3) Relative - Danby DDR5009REE | Product Manual - Page 11
vous offre des renseignements pratiques pour le soin et l'entretien de votre nouvel appareil. Un appareil Danby bien entretenu vous fournira plusieurs années de service sans ennui. Veuillez prendre quelques moments pour lire attentivement toutes les directives pour vous renseigner et vous - Danby DDR5009REE | Product Manual - Page 12
. Pour contacter le centre de service-client; 1-800-26-DANBY (1-800-263-2629) CONDITIONS Pour être alimenté par un circuit 120 volts CA, 60 Hz (circuit indépendant à 3 conducteurs, alimentant une appareil ou de tout autre appareil ménager. INSTRUCTIONS DE Le raccordement incorrect à la terre de - Danby DDR5009REE | Product Manual - Page 13
INSTRUCTIONS D'INSTALLATION L'EMPLACEMENT • Choisir un emplacement approprié, avec accès facile à une prise de courant (éviter l'emploi d'une rallonge). S'il est absolument nécessaire d'utiliser une rallonge pour l' - Danby DDR5009REE | Product Manual - Page 14
CONSIGNES D'OPÉRATION 8 7 6 5 9 1 23 1) Bouton d'Alimentation: Marche/Arrêt 2) VITESSE DU VENTILATEUR: Bouton Haut/Bas 3) Bouton de MINUTERIE: Lorsque l'appareil est en fonction, appuyez sur «MINUTERIE» afin de régler le nombre d'heures de fonctionnement de l'appareil. Lorsque l'appareil est - Danby DDR5009REE | Product Manual - Page 15
é et/ou dans le cas d`une panne électrique, le circuit électronique est automatiquement réinitialisé au réglage d'origine. Ajustement de l'humidité : 60% Vitesses du ventilateur: Bas REMARQUE: Dans le cas d'une panne électrique, tous les réglages précédents sont automatiquement effacés/annulés. Si - Danby DDR5009REE | Product Manual - Page 16
suivante: Réglage selon l'hygrométrie ambiante: Hygrométrie relative de 60% Vitesse ventilateur: Bas IMPORTANTE: Selon le taux d'hygrométrie de indique que le taux d'hygrométrie de l'environment est inférieur à 60%). Par conséquent il sera alors nécessaire de sélectionner successivement chacun des - Danby DDR5009REE | Product Manual - Page 17
CONSIGNES D'OPÉRATION (suite) INSTALLATION DE DRAINAGE EN PVC Lorsque vous utilisez la fonction de drainage continue, le tuyau de PVC doit être placé horizontalement en-dessous du trou de drainage. Évitez les planchers inégaux et que le tuyau soit plié. NOTE: Si vous endommagez ou mal placez la - Danby DDR5009REE | Product Manual - Page 18
PRÉCAUTIONS 1) NE PAS tirer sur le cordon d'alimentation afin d'éviter la rupture, des dangers potentiels ou des blessures. 2) Ne pas utiliser d'huile à insecte ou de la peinture en vaporisateur autour de l'appareil: cela pourrait causer du dommage aux pièces de plastique ou faire démarrer un - Danby DDR5009REE | Product Manual - Page 19
. Utiliser le guide de diagnostic ci-dessous pour identifier les éventuels problèmes qui se manifesteraient. Si l'appareil persiste à ne pas fonctionner correctement, obtenir l'aide du centre de service Danby local, ou téléphoner au 1-800-26- (1-800-263-2629) PROBLEME CAUSE PROBABLE 1) Le - Danby DDR5009REE | Product Manual - Page 20
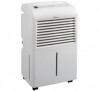
èle DDR5009REE, DDR6009REE, DDR7009REE For service, contact your nearest service depot or call: 1-800-26(1-800-263-2629) to recommend a depot in your area. PORTABLE DEHUMIDIFIER The model number can be found on the serial plate located on the back panel of the unit. All repair parts are available
-
 1
1 -
 2
2 -
 3
3 -
 4
4 -
 5
5 -
 6
6 -
 7
7 -
8
-
9
-
10
-
11
-
12
-
13
-
14
-
15
-
16
-
17
-
18
-
19
-
20
 |
 |

Owner’s Use and Care Guide
Guide d'utiliser et soins de Propriètaire
Model • Modèle
DDR5009REE, 6009REE, 7009REE
Danby Products Ltd, PO Box 1778, Guelph, Ontario Canada N1H 6Z9
Danby Products Inc, PO Box
669, Findlay, Ohio USA 45839-0669
V. 2.5.08.09 JF
KEEP THESE INSTRUCTIONS FOR FUTURE REFERENCE: If the Dehumidifier changes
ownership, be sure this manual accompanies the unit.
CONSERVER CES INSTRUCTIONS POUR CONSULTATION ULTÉRIEURE: En cas de revente du
déshumidificateur, ce manuel doit être inclus avec l’appareil.
CAUTION:
Read and follow all
safety rules and operating
instructions before first
use of this product.
PRÉCAUTION:
Veuillez lire attentivement
les consignes de sécurité et
les directives d’utilisation
avant l’utilisation initiale
de ce produit.
PORTABLE DEHUMIDIFIER
Owner’s Use and Care Guide
. . . . . . . . . . . . . . . . . . . . . . . . . . . . . . . . . . . . . . . . . .
1 - 10
• Welcome
• Important Safety Information
• Installation Instructions
• Features
• Operating Instructions
• Care and Maintenance
• Troubleshooting
• Warranty
DÉSHUMIDIFICATEUR PORTATIF
Guide d’utilisation et soins de Propriètaire
. . . . . . . . . . . . . . . . . . . . . . . . . . . . . . . 11 - 20
• Bienvenue
• Consignes de Sècurité Importante
• Consignes d’installation
• Caractéristiques
• Consignes de Fonctionnement
• Soins et Entretien
• Dépannage
• Garantie