Dell 1320c User Guide
Dell 1320c - Color Laser Printer Manual
 |
UPC - 662919013061
View all Dell 1320c manuals
Add to My Manuals
Save this manual to your list of manuals |
Dell 1320c manual content summary:
- Dell 1320c | User Guide - Page 1
Dell™ Color Laser Printer 1320c User's Guide Dell Color Laser Printer 1320c User's Guide Finding Information About Your Printer Installing the Toner Cartridges and PHD (Print Head Device) Unit Connecting Your Printer Dell Printer Configuration Web Tool Print Media Guidelines Loading Print Media - Dell 1320c | User Guide - Page 2
- Dell 1320c | User Guide - Page 3
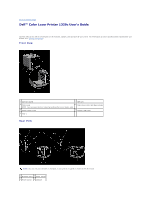
to contents page Dell™ Color Laser Printer 1320c User's Guide Click the links on the left for information on the features, options, and operation of your printer. For information on other documentation included with your printer, see "Finding Information". Front View 1 Operator panel 5 Belt unit - Dell 1320c | User Guide - Page 4
Ethernet port To order replacement toner cartridges or supplies from Dell: 1. Double-click the icon on your desktop. 2. Visit the Dell Printer Supplies website at www.dell.com/supplies, or order Dell printer supplies by phone. For best service, have your Dell printer Service Tag available. For help - Dell 1320c | User Guide - Page 5
your printer. Setup diagram Troubleshooting Express Service Code and Service Tag number Troubleshooting Guide Latest drivers for my printer The Express Service Code and Service Tag numbers are located inside the side door of your printer. See the Dell Support website at support.dell.com - Dell 1320c | User Guide - Page 6
- Contact information, order status, warranty, and repair information Downloads - Drivers Reference - Printer documentation and product specifications You can access the Dell Support website at support.dell.com. Select your region on the support page, and fill in the requested details to access help - Dell 1320c | User Guide - Page 7
to contents page About Your Printer Operator Panel Protecting Your Printer The following illustrations show the standard Dell™ Color Laser Printer 1320c. 1 Operator panel 2 Front cover 3 Single sheet feeder 4 Tray 1 5 Belt unit 6 Button (right side) Provide enough room to open the printer tray - Dell 1320c | User Guide - Page 8
operator panel, see "Operator Panel." Protecting Your Printer To protect your printer from theft, you can use the optional Kensington lock. Attach the Kensington lock to the security slot of your printer. For details, see the operating instructions supplied with the Kensington lock. back to contents - Dell 1320c | User Guide - Page 9
Device) Unit Installing the Toner Cartridges Installing the PHD (Print Head Device) Unit CAUTION: Before performing any of the following procedures, read and follow the safety instructions in your Product Information Guide. NOTICE: To protect the drums of the toner cartridges against bright light - Dell 1320c | User Guide - Page 10
Installing the PHD (Print Head Device) Unit 1. Press the button (right side) and open the front cover. 2. Turn the four PHD lock levers counterclockwise to unlock the unit. NOTICE: Do not touch the belt unit. 3. Pull the PHD unit out of the printer. NOTICE: Do not remove the protective sheet on the - Dell 1320c | User Guide - Page 11
5. Use the small gray tabs to place the PHD unit back into the printer completely. 6. Turn the four PHD lock levers clockwise to lock the PHD, and then remove the protective sheet. 7. Close the front cover. back to contents page - Dell 1320c | User Guide - Page 12
the Right Cable Your Dell™ Color Laser Printer 1320c interconnection cable must meet the following requirements: Connection type Connection specifications USB USB 2.0 Ethernet* 10 Base-T/100 Base-TX * If your printer is type A, an optional Network Adapter for Dell 1320c is required to connect - Dell 1320c | User Guide - Page 13
Microsoft® Windows® 2000, Windows XP, Windows XP 64-bit Edition, Windows Server® 2003, Windows Server 2008, Windows Vista®, and Windows Vista 64bit Edition support USB connections. See your computer operating system documentation to see if your system supports USB. To attach the printer to a - Dell 1320c | User Guide - Page 14
, computer, and any other attached devices are turned off and unplugged. 2. Remove the network cover. 3. Insert the Network Adapter for Dell 1320c. 4. Connect the printer to the network using an Ethernet cable. 1 Ethernet port To connect the printer to the network, plug one end of an Ethernet cable - Dell 1320c | User Guide - Page 15
of the Network Adapter for Dell 1320c lights. Print and Check the Printer Settings Page Print the Printer Settings page. When the Ready/Data indicator lights (ready status), press and hold the Continue button on the printer's operator panel until the Ready/Data indicator blinks. Advanced Funtions - Dell 1320c | User Guide - Page 16
when installing the printer drivers with installer. When you use the Network Installation feature, you can set the IP address from 0.0.0.0 to the desired IP address on the printer selection window. Verify the IP Settings 1. Print another Printer Settings page. 2. Look under the TCP/IP heading on the - Dell 1320c | User Guide - Page 17
the Dell Printer Configuration Web Tool, type your network printer's IP address in your Web browser. If you do not know the IP address of your printer, print a printer settings page, which lists the IP address: 1. Click Start® All Programs® Dell Printers® Additional Color Laser Software® Status - Dell 1320c | User Guide - Page 18
, such as paper usage and types of jobs being printed, and limit which users use the color mode and the maximum number of pages they can print. Printer Information Use the Printer Information menu to get the information on service calls, inventory reports, or the status of current memory and engine - Dell 1320c | User Guide - Page 19
Dell Support website, and see the User's Guide on that page to verify configured settings. Order Supplies at: www.dell.com/supplies Contact Dell Support at: support.dell.com Using the Dell Printer fr] English [en] or English (United States) [en-us] Setting the Printer's IP Address to Non-Proxy 1. - Dell 1320c | User Guide - Page 20
. The interval can be changed in the Basic Information on Print Server Settings page. Links to the Dell web page. See the User's Guide on the Dell Support website, support.dell.com for help on this product. Shows the printer bitmap. The Printer Status menu appears in the Right Frame by clicking the - Dell 1320c | User Guide - Page 21
the Print Server Settings menu. Set Password Links to the Other Features menu. Online Help Links to the Dell Support website. See the User's Guide on that page. Order Supplies at: Links to the Dell web page. Contact Dell Support at: Links to the Dell support page web address: support.dell.com - Dell 1320c | User Guide - Page 22
trays. Values: Cyan Cartridge Level Magenta Cartridge Level Yellow Cartridge Level Black Cartridge Level Displays the percentage of toner remaining in each toner cartridge. When a cartridge is empty, a message appears. The text Print Cartridge is linked to the Dell Printer Supplies website, www - Dell 1320c | User Guide - Page 23
the printer error occurred. Details Displays the details of the printer fault. Printer Information Purpose: To verify the printer details such as hardware configuration and software version. This page can also be displayed by clicking Printer Information in the Left Frame. Values: Dell Service Tag - Dell 1320c | User Guide - Page 24
the status of the host interface. Job Submitted Time Displays the date the print job was submitted. Printer Settings Use the Printer Settings menu to display the printer settings report and to configure printer settings. The following tabbed pages are displayed at the top of the Right Frame - Dell 1320c | User Guide - Page 25
premier.dell.com) that can be linked from Order Supplies at in the left frame. Reports Purpose: To print various types of reports and lists. Values: Printer Settings Click the Start button to print the printer settings page. Device Settings Click the Start button to print the device settings page. - Dell 1320c | User Guide - Page 26
the Start button to print the job history report. Error History Click the Start button to print the error history report. Color Test Page Click the Start button to print the color test page. Printer Settings The Printer Settings tab includes System Settings page. System Settings Purpose: To - Dell 1320c | User Guide - Page 27
Sets the paper density in Light for the label. Normal Sets the paper density in Normal for the label. Adjust BTR Purpose: To specify the reference voltage settings for the transfer - Dell 1320c | User Guide - Page 28
by using the chart. This function is required after the printer is set up or moved. Values: Auto Correct Click Start to adjust color registration automatically. Color Regi Chart Click Start to print the color registration chart. 1 (Lateral) - Enter Number Yellow Specifies the values for - Dell 1320c | User Guide - Page 29
non-Dell-brand toner cartridges may make some printer features unusable, reduce print quality and decrease the reliability of your printer. Dell recommends only new Dell-brand toner cartridges for your printer. Dell does not provide warranty coverage for problems caused by using accessories, parts - Dell 1320c | User Guide - Page 30
premier.dell.com Print Server Settings Use the Print Server Settings menu to set the type of printer interface and necessary conditions for communications. The following tabbed pages are displayed in the top of the Right Frame. Print Server Reports The Print Server Reports tab includes Print - Dell 1320c | User Guide - Page 31
an E-Mail Alert for Service Calls. The Print Server Settings tab includes Basic Information, Port Settings, TCP/IP, E-Mail Alert, and SNMP pages. Basic Information Purpose: To configure the printer's basic information. Values: System Settings Printer Name Location Contact Person Specifies - Dell 1320c | User Guide - Page 32
auto refresh feature is effective for the contents of the Top Frame, Printer Status page, Job List page, and Completed Jobs page. Port Settings Purpose: To specify whether to enable or disable printing ports and management protocol features. Values: Ethernet Port Status Ethernet Settings Auto - Dell 1320c | User Guide - Page 33
Dell Printer Configuration Web Tool to set the IP address manually. Set IP Address Sets the IP address allocated to the printer in the nnn.nnn.nnn.nnn format, where nnn is a variable between 0 and 255. Note that values 127 and 224 IP Filter page is User Name*1 Specifies the POP3 account user - Dell 1320c | User Guide - Page 34
values 127 and 224-254 are not valid for the first three-digits only. IP socket mmmmm is a variable value between 0 and 65535. Authenticate Error Select the check box to notify Authenticate Error Trap. Trap *1 The default value of each items can be changed by using Dell Printer Configuration Web - Dell 1320c | User Guide - Page 35
Printing from Network Addresses You can enable printing from the "192.168" network address and disable printing from the "192.168.200" network address. However, the example below describes how to enable printing from the "192.168.200.10 Set Password, and Reset Print Server pages. Set Password - Dell 1320c | User Guide - Page 36
the factory default settings and reboot printer. the network capability. Restart Printer Click the Start button to reboot the printer. Copy Printer Settings The Copy Printer Settings menu includes the Copy Printer Settings and Copy Printer Settings Report pages. Copy Printer Settings Purpose - Dell 1320c | User Guide - Page 37
Displays the number of pages for each paper size. Dell ColorTrack Purpose: To specify which users have access to color printing and to limit print volume per user. Values: Print User Limitation Select the check box to restrict users from using the printer. Permit printing without Select the - Dell 1320c | User Guide - Page 38
back to contents page Print Media Guidelines Print media is paper, labels, envelopes, and coated paper among others. Your printer provides high-quality printing on a variety of print media. Selecting the appropriate print media for your printer helps avoid printing troubles. This section describes - Dell 1320c | User Guide - Page 39
whether the paper you have chosen is acceptable for laser printers. Always print several samples before buying large quantities of any type of print media. When choosing any print media, you should consider the weight, fiber content, and color. Unacceptable Paper The following paper types are not - Dell 1320c | User Guide - Page 40
meet these requirements; latex inks might not. If you are in doubt, contact your paper supplier. Printing on Letterhead Check with the manufacturer or vendor to determine whether the pre-printed letterhead you have selected is acceptable for laser printers. Page orientation is important when - Dell 1320c | User Guide - Page 41
any print media, Dell recommends trying a sample first. See "Loading Print Media in Tray 1" or "Loading the Single Sheet Feeder" for instructions on loading an envelope. When printing on envelopes: l Use only high-quality envelopes that are designed for use in laser printers. l Set the print media - Dell 1320c | User Guide - Page 42
label sheets. Partial sheets may cause labels to peel off during printing, resulting in a jam. Partial sheets also contaminate your printer and your cartridge with adhesive, and could void your printer and cartridge warranties. l Use labels that can withstand temperatures of 205°C (401°F) without - Dell 1320c | User Guide - Page 43
Monarch (3.875x7.5 in) Y Y Envelope #10 (4.125x9.5 in) Y Y DL(110x220mm) .00 inches. Print Media Supported Media Single sided printing Duplex printing Single sheet feeder * Values marked by an asterisk (*) are the factory default menu settings. Setup Paper Type Paper type Weight (gsm - Dell 1320c | User Guide - Page 44
Coated Coated Thick Coated JPN Label Envelopes 106-163 (Low Speed) Inkjet printer paper cannot be used. 164-216 (Low Speed) Inkjet printer paper cannot be used. 95-105 (Mid Speed) - 3R7408 Inkjet printer paper cannot be used. - - back to contents page - Dell 1320c | User Guide - Page 45
.0 mm (8.66 inches) l Length - 127 mm (5.00 inches) to 355.6 mm (14.00 inches) Loading Print Media in Tray 1 NOTE: To avoid paper jams, do not remove the tray while a printing is in progress. NOTE: Use only laser print media. Do not use ink jet paper in the printer. 1. Remove the paper tray from the - Dell 1320c | User Guide - Page 46
: When loading user-specified print media, adjust the width guides and slide the extendable part of the tray by down the length guide until it rests lightly against the edge of the stack of paper. 6. After confirming that the guides are securely adjusted, insert the tray into the printer and extend - Dell 1320c | User Guide - Page 47
of the envelopes enter the printer, or with the flaps open when the long-edges of the envelopes enter the printer. Single Sheet Feeder Capacity The and types of print media such as an envelope. 1. Adjust the paper guides to the print media's width. 2. Hold both sides of the print media facing down - Dell 1320c | User Guide - Page 48
letterhead face-down, with the top of the sheet entering the printer first. l If you experience problems with paper feed, turn the paper around. Using the Manual Duplex Function Manual Duplex printing (or two-sided printing) allows you to print on both sides of a sheet of paper. For sizes that are - Dell 1320c | User Guide - Page 49
the Advanced tab in your printer driver, you may not print document in the right order. In this case, print the document again. Manual Duplex Printing from Tray 1 Setting Method for Manual Duplex from Tray 1 When you start manual duplex printing, the instruction windows appears. Note that you cannot - Dell 1320c | User Guide - Page 50
. Print pages in the order page 1 (rear of page 2), page 3 (rear of page 4), then page 5 (rear of page 6). Example: When duplex printing a four page document onto two sheets. Set one page at a time in the manual feed tray in the order page 2 (rear) ® page 4 (rear) ® page 1 (front) ® page 3 (front - Dell 1320c | User Guide - Page 51
. Green on The printer is ready. Green blinks Processing or printing or Warming up. Orange on The Power saver mode or Standby mode. Orange on The PHD (Print Head Device), or belt unit, life is coming to an end. Clean the CTD sensor. Orange blinks An error occurred. Orange blinks The PHD, or - Dell 1320c | User Guide - Page 52
printer conditions such as printer status, intervention (for example, out of paper), or service. Off On Blink - - Common Light Sequences The following table shows the most common light status. 1 2 3 4 5 6 7 Printer status - - - - - - Ready - - - - - - Processing - - - - - - Printing - Dell 1320c | User Guide - Page 53
loaded in the single sheet feeder. -- - - - - The toner is low in the specified toner cartridge. -- - * - - Non Dell toner is used in the toner cartridge. -- - - - - Life warning in the PHD unit -- - - - - Life warning in the belt unit -- - - - - Clean the CTD sensor. * Orange on in all - Dell 1320c | User Guide - Page 54
for side 2 in the Tray 1. See "Manual Duplex Printing from Tray 1." - - - - Press the Continue key. See "Manual Duplex Printing from Tray 1." - - - - Load Sheet Feeder." When an Error Occurred The following table shows the location where an error occurred. 1 2 3 4 5 6 7 Printer status -- - - - - Dell 1320c | User Guide - Page 55
cartridge. See "Replacing Toner Cartridges." -- - - - - The toner is empty in the specified toner cartridge. See "Replacing Toner Cartridges." -- - - - - The life of the PHD unit is over. -- - - - - The life of the belt unit is over. -- - - - - Clean the CTD sensor. Operator Call Errors - Dell 1320c | User Guide - Page 56
is not installed. - - - The low toner in the specified toner cartridge. - - - The CRUM ID error in the specified toner cartridge. Errors in the PHD Unit, Belt Unit, Fuser Unit, and CTD Sensor 1 2 3 4 5-K 5-C 5-M 5-Y 6 7 Error status - - - The PHD unit is removed. - - - The life of - Dell 1320c | User Guide - Page 57
- - - CTD (Conductivity Temperature Depth) sensor failure - - - - - - Fan motor failure - - - - - - Motor failure - - - - - - MCU (Machine Control Unit) error - - - - - - Environmental sensor failure - - - - - Solenoid error in the K mode. - - - - - PageC timeout error ESS - Dell 1320c | User Guide - Page 58
, Error, and Ready/Data indicators go out, close the side cover. The printer automatically: l Initializes the non-volatile memory (NVM). CAUTION: Never attempt to turn off the printer. The printer will cease to function. l Restarts. l Prints the Printer Settings and Device Settings pages. 6. Check - Dell 1320c | User Guide - Page 59
system settings by printing a printer settings page. 1. Click Start® All Programs® Dell Printers® Additional Color Laser Software® Status Monitor Console. The Printer Selection dialog box opens. 2. Click Dell Color Laser 1320c listed in Printer Name. The Dell Color Laser 1320c Launcher window opens - Dell 1320c | User Guide - Page 60
network, choose Copy Printer Settings from the topics list, and then type the other printer's IP address. If you do not know your printer IP address, see the printer settings page. To print a printer settings page: 1. Click Start® All Programs® Dell Printers® Additional Color Laser Software® Status - Dell 1320c | User Guide - Page 61
back to contents page - Dell 1320c | User Guide - Page 62
details such as hardware configuration and software version. Values: Dell Service Tag Number Displays Dell's service tag number. Printer Serial Number Displays the printer's serial number. Printer Type Displays the type of printing for the printer. Color Laser is displayed normally. Asset Tag - Dell 1320c | User Guide - Page 63
automatically. Adjust Altitude Displays whether to adjust the height of the installation location of the printer. Non-Dell Toner Displays whether to use a refilled toner cartridge. Select Regular* Displays the URL (accessories.us.dell.com/sna). Reorder URL Premier Displays the URL (premier - Dell 1320c | User Guide - Page 64
button to print the printer settings page. Device Settings Click the Start (2) button to print the detailed settings page. Job History Click the Start (3) button to print the job history report. Error History Click the Start (4) button to print the error history report. Color Test Page Click - Dell 1320c | User Guide - Page 65
On Sounds an alert when toner becomes low. Time-Out 0 Disables the job timeout. 5-300 sec 30 sec* Specifies the amount of time the printer waits to receive additional bytes of data from the computer. When this timeout expires, the print job is canceled. Device Language English* Determines the - Dell 1320c | User Guide - Page 66
Label Normal* Light Apply New Settings After you complete the settings, press the Apply New Settings button to apply the changes. Restart printer to apply new settings Press the Restart printer to apply the new settings button to apply the changes. Adjust BTR NOTE: The print quality changes - Dell 1320c | User Guide - Page 67
apply the new settings button to apply the changes. Registration Adjustment Purpose: To print the color registration chart and to adjust the color registration by using the chart. This function is required after the printer is set up or moved. Values: Auto Registration Adjustment Off Does not - Dell 1320c | User Guide - Page 68
. Click Start to initialize the non-volatile memory (NVM) memory. Non-Dell Toner When Non-Dell toner is used, the printer may be severely damaged and may not be covered by your warranty. Purpose: To specify whether to use the refilled toner cartridge or not. When this setting is on, you can use - Dell 1320c | User Guide - Page 69
Non-Dell Toner Off* Disables the use of refilled toner cartridges. On Enables the use of refilled toner cartridges. Apply New Settings After you complete the settings, press the Apply New Settings button to apply the changes. Restart printer to apply new settings Press the Restart printer to - Dell 1320c | User Guide - Page 70
Restart printer to apply the new settings button to apply the changes. Diagnosis The Diagnosis tab includes the Chart Print, Machine Check, Paper Wrinkle Check Mode, Environment Sensor Info, Developer Stir Mode, and Refresh Mode pages. NOTE: Values marked by an asterisk (*) are the factory default - Dell 1320c | User Guide - Page 71
Prints the chart to confirm the light fatigue of the PHD (Print Head Device) unit in A4 or Letter. Machine Check Purpose: To check the mechanical operations of the printer for each toner cartridge. Dispense Motor Check(Magenta) Dispense Motor Check(Cyan) Dispense Motor Check(Black) Play of - Dell 1320c | User Guide - Page 72
to print in color. Black Specifies to print in black and white. Environment Sensor Info Purpose: To display the information on the environment sensor in the printer by pressing the Get Environment Sensor Info button. Developer Stir Mode Purpose: To stir the toner inside the toner cartridge - Dell 1320c | User Guide - Page 73
clean the toner cartridges and PHD unit. CAUTION: Using the Refresh Mode consumes extra toner. Values: Toner Refresh Mode Yellow Click Start (1) to clean the yellow cartridge. Magenta Click Start (2) to clean the magenta cartridge. Cyan Click Start (3) to clean the cyan cartridge. Black Click - Dell 1320c | User Guide - Page 74
the Printing Status window, the All Programs menu, or the desktop icon. You can also launch it from the Status Window when a toner error occurs. You can order consumables by phone or from the web. 1. Click Start® All Programs® Dell Printers® Additional Color Laser Software® Dell Supplies Management - Dell 1320c | User Guide - Page 75
driver updates can be downloaded from the Dell Support website located at support.dell.com. Printer Settings Utility Using the Dell Color Laser 1320c Launcher window, you can open Printing Status Window, Tool Box, Updater, and Troubleshooting. When you install the Dell software, the Dell Color Laser - Dell 1320c | User Guide - Page 76
The Updater button updates the settings for the print driver. Troubleshooting The Troubleshooting button opens the Troubleshooting Guide, which allows you to recover printer problems by yourself. back to contents page - Dell 1320c | User Guide - Page 77
" If you experience a jam, see "Clearing Jams" for instructions. Sending a Job to Print To support all of the printer features, use the printer driver. When you choose Print from a software program, a window representing the printer driver opens. Select the appropriate settings for the specific job - Dell 1320c | User Guide - Page 78
print a printer settings page. See "Understanding Tool Box Menus" to identify the display if you need help. 1. Click Start® All Programs® Dell Printers® Additional Color Laser Software® Status Monitor Console. The Printer Selection dialog box opens. 2. Click Dell Color Laser 1320c listed in Printer - Dell 1320c | User Guide - Page 79
the following. l Press and hold the Continue button on the printer until the Ready/Data indicator blinks. NOTE: You cannot print a printer settings page by pressing and holding the Continue button if the password is specified in Set Password of the Tool Box (because the operator panel is locked). If - Dell 1320c | User Guide - Page 80
printer on the network, you need to share the printer, and then install the shared printer on network clients: For Windows® XP, Windows XP 64-bit Edition, Windows Server® 2003, and Windows 2000: 1. Click Start® Settings® Printers and Faxes (Printers for Windows 2000). 2. Right-click this printer - Dell 1320c | User Guide - Page 81
the print job processing. For Windows® XP, Windows XP 64-bit Edition, Windows Server® 2003, and Windows 2000: 1. Click Start® Settings® Printers and Faxes (Printers for Windows 2000). 2. Click Add Printer to launch the Add Printer wizard. 3. Click Next. 4. Select A network printer, or a printer - Dell 1320c | User Guide - Page 82
to install a printer driver. If no system driver is available, then you will need to provide a path to available drivers. 5. Select whether you want this printer to be the default printer for the client, click Next. 6. If you want to verify printer installation then click Print a test page. 7. Click - Dell 1320c | User Guide - Page 83
buying large quantities of any print media, Dell recommends trying a sample first. Avoiding Jams l Use only recommended print media. See "Print Media Guidelines" for more information. l See "Loading Print Media in Tray 1" and "Loading the Single Sheet Feeder" to load printer media properly. l Do not - Dell 1320c | User Guide - Page 84
drums of the toner cartridges against bright light, close the front cover within three minutes. If the front cover remains open for more than three minutes, print quality may deteriorate. NOTE: To resolve the error the jammed paper from the inside of the printer. 3. Open the front cover by pushing - Dell 1320c | User Guide - Page 85
Jams From the Tray 1 NOTICE: To protect the drums of the toner cartridges against bright light, close the front cover within three minutes. If the front cover remains open for more than three minutes, print quality may deteriorate. NOTE: To resolve the error displayed on the operator panel, you must - Dell 1320c | User Guide - Page 86
Ensure nothing touches or scratches the surface (black-colored film) of the belt unit. Scratches, dirt, or oil from your hands on the film of the belt unit may reduce print quality. NOTICE: To protect the drums of the toner cartridges against bright light, close the front cover within three minutes - Dell 1320c | User Guide - Page 87
of the fuser and press down the levers at both ends of the fuser. 6. Confirm that there are no scraps of paper remaining inside the printer, and then close the front cover. back to contents - Dell 1320c | User Guide - Page 88
to contents page Troubleshooting Guide Basic Printer Problems Printing Problems Print Quality Problems Other Problems Contacting Service Basic Printer Problems Some printer problems can be easy to resolve. If a problem occurs with your printer, check each of the following: l The printer power cable - Dell 1320c | User Guide - Page 89
printer driver. Paper is curled in Load the paper into the single sheet the Tray 1. feeder. Print Quality Problems Print is too light. Is part or all of the print too light? All of the print is too light. Part of the print is too light. All of the print is too light. The toner cartridges may - Dell 1320c | User Guide - Page 90
with A4(3) or Print with Letter(C) button. Is the problem recovered? Yes. The PHD unit is old or damaged. Replace the PHD unit. No. Contact Dell. Contact Dell. 1. Contact Dell. Part of the print is too light. When you are printing many images with low density, do the Toner Refresh Mode. 1. Click - Dell 1320c | User Guide - Page 91
Letter(C) button. Is the problem recovered? Yes. The PHD unit is old or damaged. Replace the PHD unit. No. Contact Dell. Contact Dell. Toner smears or print comes off page. If you are printing on an uneven print surface, change the paper type setting in the printer driver. For example, change the - Dell 1320c | User Guide - Page 92
(A). "Printing" appears. Is the problem recovered? Yes. The PHD unit is old or damaged. Replace the PHD unit. No. Contact Dell. Contact Dell. Entire page is white. The toner cartridges may be low or need to be replaced. Confirm the amount of toner in each toner cartridge. 1. Press [Printer Status - Dell 1320c | User Guide - Page 93
tab in the printer driver. Ensure Non-Dell Toner is not selected in the Printer Maintenance tab in the Tool Box. 1. Click the Tool Box button. 2. Select Non-Dell Toner from the list. Try the spare PHD unit, if possible. 1. Replace the PHD unit. See "Replacing the PHD (Print Head Device) Unit" and - Dell 1320c | User Guide - Page 94
Setup tab in the printer driver. 1. Press [Printing Preferences], and then click the Print Setup tab. Try the spare PHD unit, if possible. 1. Replace the PHD unit. See "Replacing the PHD (Print Head Device) Unit" and "Installing the PHD Unit". 2. After you replace the PHD unit, click the Tool Box - Dell 1320c | User Guide - Page 95
Replacing the PHD (Print Head Device) Unit". 2. Check the light path, and then remove the shielding. 3. Reinstall the PHD unit. See "Installing the PHD Unit". 4. Click the Tool Box button. 5. Press the Print with A4(1) or Print with Letter(A) button. "Printing" appears. Is the problem recovered? Yes - Dell 1320c | User Guide - Page 96
Box button, and then press the Print with A4(3), or Print with Letter(C) button. "Printing" appears. Is the problem recovered? Yes. The task is complete. No. Replace the PHD unit. See "Replacing the PHD (Print Head Device) Unit" and "Installing the PHD Unit". No. Contact Dell. Fog Do the PHD Refresh - Dell 1320c | User Guide - Page 97
the printer. Is the problem recovered? Yes. The task is complete. No. Replace the PHD unit, if possible. See "Replacing the PHD (Print Head Device) Unit" and "Installing the PHD Unit". Is the problem recovered? Yes. The PHD unit is old or damaged. Replace the PHD unit. No. Contact Dell. Banding - Dell 1320c | User Guide - Page 98
the PHD (Print Head Device) Unit" and "Installing the PHD Unit". No. Replace the PHD unit. See "Replacing the PHD (Print Head Device) Unit" and "Installing the PHD Unit". Contact Dell. Abnormal noise Locate the cause of the problem by removing the toner cartridges, fuser, and PHD unit. 1. Remove the - Dell 1320c | User Guide - Page 99
2. Press the Start button for Color Regi Chart. Is the problem recovered? Yes. The task is complete. No. Try the spare PHD unit, if possible. 1. Replace the PHD unit. See "Replacing the PHD (Print Head Device) Unit" and "Installing the PHD Unit". 2. After you replace the PHD unit, click the Tool Box - Dell 1320c | User Guide - Page 100
before loading it. No. Use the other envelope. Is the problem recovered? Yes. The task is complete. No. Flex print media before loading it. No. Face the short-edge of the envelope into the printer. Transparency Transparency cannot be used. Manual Duplex Is paper curled? Yes. The paper is curled - Dell 1320c | User Guide - Page 101
. No. Replace the toner cartridge. Is the problem recovered? Yes. The task is complete. No. Contact Dell. Regi jam Ensure the PHD unit is installed correctly. 1. Replace the PHD unit. See "Replacing the PHD (Print Head Device) Unit" and "Installing the PHD Unit". Is the problem recovered? Yes. The - Dell 1320c | User Guide - Page 102
toner cartridge. Creased/stained paper Verify that the correct print media is being used. 1. See "Print Media Sizes and Support". If you use paper that Dell does not recommend, use the standard paper. Is the problem recovered? Yes. Use the other type of paper because your printer does not support - Dell 1320c | User Guide - Page 103
or relocate the printer to an appropriate environment. Clean the CTD sensor. See "Cleaning the CTD Sensor Inside the Printer." "092-310 Printer error." or "092-910 Clean the CTD sensor." is displayed on the Status Monitor. Contacting Service When you call for printer service, be prepared to - Dell 1320c | User Guide - Page 104
Toner Cartridges Replacing the PHD (Print Head Device) Unit Replacing the Fuser Replacing Separator Roller Cleaning the CTD Sensor Inside the Printer Adjusting Color Registration Determining the Status of Supplies If your printer is connected to the network, the Dell™ Printer Configuration - Dell 1320c | User Guide - Page 105
the safety instructions in your Product Information Guide. NOTICE: To protect the drums of the toner cartridges against bright light, close the front cover within three minutes. If the front cover remains open for more than three minutes, print quality may deteriorate. Dell toner cartridges are - Dell 1320c | User Guide - Page 106
and then pull out the toner cartridge. CAUTION: Do not shake the toner cartridge as it may spill some toner. Installing a New Toner Cartridge 1. Ensure that the color of the new toner cartridge matches that on the handle before replacing it. Shake the toner cartridge five or six times to distribute - Dell 1320c | User Guide - Page 107
3. Close the side cover. Replacing the PHD (Print Head Device) Unit 1. Ensure that the printer is turned off. 2. Press the button (right side) and open the front cover. 3. Turn the four PHD lock levers counterclockwise. 4. Pull the PHD unit out of the printer. - Dell 1320c | User Guide - Page 108
Installing the PHD Unit 1. Open the PHD packaging. 2. Pull out the PHD unit from the packaging. 3. Completely remove the eight yellow ribbons from the PHD unit. 4. Remove the rear protective cover from the PHD unit. - Dell 1320c | User Guide - Page 109
unit. 6. Carefully remove the front protective cover from the PHD unit. printer and disconnect the power cable from the grounded outlet before performing maintenance. CAUTION: Before performing any of the following procedures, read and follow the safety instructions in your Product Information Guide - Dell 1320c | User Guide - Page 110
Dell™" on page 215. Dell recommends Dell fuser for your printer. Dell does not provide warranty coverage for problems caused by using accessories, parts, or components not supplied by Dell. Removing the Used Fuser CAUTION: To avoid burns, do not replace the fuser immediately after printing - Dell 1320c | User Guide - Page 111
Separator Roller Keeping the separator roller in the paper tray clean helps ensure the best possible copies. Dell recommends cleaning the separator at regular intervals. CAUTION: To prevent electric shock, always turn off the printer and disconnect the power cable from the grounded outlet before - Dell 1320c | User Guide - Page 112
are available only through Dell. To order by phone, see "Contacting Dell™" on page 215. Dell recommends Dell separator rollers for your printer. Dell does not provide warranty coverage for problems caused by using accessories, parts, or components not supplied by Dell. Removing the Used Separator - Dell 1320c | User Guide - Page 113
Roller Inside the Printer Clean the separator roller inside the printer if print media does not feed correctly. 1. Ensure that the printer is turned off. 2. Push the button (right side) and open the front cover. 3. Turn the four PHD lock levers counterclockwise, and then pull the PHD unit out of the - Dell 1320c | User Guide - Page 114
NOTE: Keep the PHD unit in the dark place. 4. Clean the separator roller inside the printer with a clean dry cotton swab. 5. Insert the PHD unit until it stops and turn the four PHD lock levers clockwise to lock the PHD unit. - Dell 1320c | User Guide - Page 115
front cover. Cleaning the CTD Sensor Inside the Printer Clean the CTD sensor only when an alert for the CTD sensor is shown on the Status Monitor or operator panel. 1. Ensure that the printer is turned off. 2. Push the button (right side) and open the front cover. 3. Clean the CTD sensor inside the - Dell 1320c | User Guide - Page 116
Box to print the color registration chart. 1. Click Start® All Programs® Dell Printers® Additional Color Laser Software® Status Monitor Console. The Printer Selection dialog box opens. 2. Click Dell Color Laser 1320c listed in Printer Name. The Dell Color Laser 1320c Launcher window opens. 3. Click - Dell 1320c | User Guide - Page 117
CAUTION: After printing the color registration chart, do not turn off the printer until the printer motor has stopped running. NOTE: If 0 is not next to the straightest lines, determine the values and adjust the printer again. back to contents page - Dell 1320c | User Guide - Page 118
Cables OS Compatibility Your Dell™ Color Laser Printer 1320c is compatible with Windows® (Windows XP, Windows XP 64-bit Edition, Windows Vista®, Windows Server® 2003, Windows Server 2008, and Windows 2000). 1 Dell technical phone support only supports factory-installed operating systems - Dell 1320c | User Guide - Page 119
(MIB) is a database containing information about network devices (such as adapters, bridges, routers, or computers). This information helps network administrators manage the network (analyze performance, traffic, errors, and so on). Dell Color Laser Printer 1320c complies with standard industry MIB - Dell 1320c | User Guide - Page 120
back to contents page - Dell 1320c | User Guide - Page 121
Information Regulatory Notices FCC Notice (U.S. Only) Noise Emissions Levels Laser Notice Energy Star Perchlorate Material MSDS Materials for Dell Printer Safety Information CAUTION: Read and follow all safety instructions in your Product Information Guide prior to setting up and operating your - Dell 1320c | User Guide - Page 122
suggestions. The following information is provided on the device or devices covered in this document in compliance with the FCC regulations: l Product name: Dell™ Color Laser Printer l Model number: 1320c l Company name: Dell Inc. Worldwide Regulatory Compliance & Environmental Affairs One - Dell 1320c | User Guide - Page 123
A "Declaration of Conformity" in accordance with the preceding directives and standards has been made and is on file at Dell Inc. Products Europe BV, Limerick, Ireland. - Dell 1320c | User Guide - Page 124
- Dell 1320c | User Guide - Page 125
CE Mark Notice This equipment complies with the essential requirements of the European Union Directive 1999/5/EC. Información para NOM (únicamente para México) - Dell 1320c | User Guide - Page 126
Entrada Frecuencia Dell™ Color Laser Printer 1320c 10A 110-127 laser system and printer are designed so there is never any human access to laser radiation above a Class I level during normal operation, user maintenance, or prescribed service condition. Energy Star ENERGY STAR® Compliance Any Dell - Dell 1320c | User Guide - Page 127
- special handling may apply. See www.dtsc.ca.gov/hazardouswaste/perchlorate. MSDS Materials for Dell Printer All MSDS materials for Dell Printers can be found at the following URL: http://www1.us.dell.com/content/topics/global.aspx/corp/environment/en/prod_design?c=us&l=en&s=corp&~section=001 back - Dell 1320c | User Guide - Page 128
customer in the troubleshooting process and provides for restoration of the operating system, software program and hardware drivers to the original default configuration as shipped from Dell, as well as the verification of appropriate functionality of the printer and all Dell-installed hardware. In - Dell 1320c | User Guide - Page 129
manufactures its hardware products from parts and components that are new or equivalent to new in accordance with industry-standard practices. For information about the Dell warranty for your printer, see the Product Information Guide. Recycling Information Dell recommends that customers dispose of - Dell 1320c | User Guide - Page 130
- Dell 1320c | User Guide - Page 131
for sales, technical support, or customer service issues: 1. Visit support.dell.com. 2. Verify your country or region in the Choose A Country/Region drop-down menu at the bottom of the page. 3. Click Contact Us on the left side of the page. 4. Select the appropriate service or support link based on - Dell 1320c | User Guide - Page 132
163. Network Printer Setup Printing and Checking the System Settings Page Before installing the printer driver on your computer, print the System Settings page to check your printer's IP address. 1. Print the Printer Settings page. a. Click Start® All Programs® Dell Printers® Additional Color Laser - Dell 1320c | User Guide - Page 133
the printer software does not limit the use of your network printer. 1. Click the Start button and click Help and Support. 2. In the Search box, type firewall and then press Enter. In the list, click Turn Windows Firewall on or off and then follow the instructions on the screen. Local Printer Setup - Dell 1320c | User Guide - Page 134
Print Spooler to accept client connections and select Properties. 6. From the Setting tab, select Enabled, and then click OK. 7. Restart the computer. Share the Firewall File and Printer NOTE: This step is required for Windows XP 32-bit Edition, Windows XP 64-bit Edition, Windows Vista, and Windows - Dell 1320c | User Guide - Page 135
and devices are not visible. Click to change. 3. Click Turn on network discovery and file sharing. 4. Click Yes, turn on network discovery and file sharing for all public networks. Disable Simple File Sharing NOTE: This step is required for Windows XP 32-bit Edition, and Windows XP 64-bit Edition - Dell 1320c | User Guide - Page 136
until an error occurs. Setup Security 1. Click Start® All Programs® Dell Printers® Additional Color Laser Software® Status Monitor Console. The Printer Selection dialog box opens. 2. Click Dell Color Laser 1320c listed in Printer Name. The Dell Color Laser 1320c Launcher window opens. 3. Click - Dell 1320c | User Guide - Page 137
and set the password. Troubleshooting Instructions Use the Customer Mode to locate the unit in the printer that causes a problem. Checking the printer operations 1. Click Start® All Programs® Dell Printers® Additional Color Laser Software® Status Monitor Console. The Printer Selection dialog box
-
 1
1 -
 2
2 -
 3
3 -
 4
4 -
 5
5 -
 6
6 -
 7
7 -
8
-
9
-
10
-
11
-
12
-
13
-
14
-
15
-
16
-
17
-
18
-
19
-
20
-
21
-
22
-
23
-
24
-
25
-
26
-
27
-
28
-
29
-
30
-
31
-
32
-
33
-
34
-
35
-
36
-
37
-
38
-
39
-
40
-
41
-
42
-
43
-
44
-
45
-
46
-
47
-
48
-
49
-
50
-
51
-
52
-
53
-
54
-
55
-
56
-
57
-
58
-
59
-
60
-
61
-
62
-
63
-
64
-
65
-
66
-
67
-
68
-
69
-
70
-
71
-
72
-
73
-
74
-
75
-
76
-
77
-
78
-
79
-
80
-
81
-
82
-
83
-
84
-
85
-
86
-
87
-
88
-
89
-
90
-
91
-
92
-
93
-
94
-
95
-
96
-
97
-
98
-
99
-
100
-
101
-
102
-
103
-
104
-
105
-
106
-
107
-
108
-
109
-
110
-
111
-
112
-
113
-
114
-
115
-
116
-
117
-
118
-
119
-
120
-
121
-
122
-
123
-
124
-
125
-
126
-
127
-
128
-
129
-
130
-
131
-
132
-
133
-
134
-
135
-
136
-
137
 |
 |
Dell™ Color Laser Printer 1320c User's Guide
Notes, Notices, and Cautions
Information in this document is subject to change without notice.
©
2008 Dell Inc. All rights reserved.
Reproduction in any manner whatsoever without the written permission of Dell Inc. is strictly forbidden.
Dell Color Laser Printer 1320c User's Guide
Finding Information
About Your Printer
Installing the Toner Cartridges and PHD (Print Head Device) Unit
Connecting Your Printer
Dell Printer Configuration Web Tool
Print Media Guidelines
Loading Print Media
Operator Panel
Printer Settings
Understanding Tool Box Menus
Understanding Your Printer Software
Printing
Setting Up for Shared Printing
Clearing Jams
Troubleshooting Guide
Installing Printer Drivers
Maintaining Your Printer
Printer Specifications
Safety and Regulatory Information
Appendix
NOTE:
A
NOTE
indicates important information that helps you make better use of your printer.
NOTICE:
A
NOTICE
indicates either potential damage to hardware or loss of data and tells you how to avoid the problem.
CAUTION:
A CAUTION indicates a potential for property damage, personal injury, or death.
Dell
, the
DELL
logo,
Dell Precision
,
Dimension
,
Inspiron
,
Latitude
,
OptiPlex
,
PowerConnect
,
PowerEdge
,
PowerVault
, and
XPS
are trademarks of Dell Inc.;
Microsoft,
Windows, Windows Server, and Windows Vista are either trademarks or registered trademarks of Microsoft Corporation in the United States and/or other countries;
EMC
is the registered trademark of EMC Corporation;
ENERGY STAR
is a registered trademark of the U.S. Environmental Protection Agency. As an ENERGY STAR
Partner, Dell Inc. has determined that this product meets the ENERGY STAR guidelines for energy efficiency; Adobe and Photoshop are registered trademarks
or trademarks of Adobe Systems Incorporated in the United States and/or other countries.
Other trademarks and trade names may be used in this document to refer to either the entities claiming the marks and names of their products. Dell Inc.
disclaims any proprietary interest in trademarks and trade names other than its own.
UNITED STATES GOVERNMENT RESTRICTED RIGHTS
This software and documentation are provided with RESTRICTED RIGHTS. Use, duplication or disclosure by the Government is subject to restrictions as set
forth in subparagraph (c)(1)(ii) of the Rights in Technical Data and Computer Software clause at DFARS 252.227-7013 and in applicable FAR provisions: Dell
Inc., One Dell Way, Round Rock, Texas, 78682, USA.
This equipment has been tested and found to comply with the limits for a Class B digital device, pursuant to Part 15 of the FCC rules.
November 2008 Rev. A00