Dell 2405FPW User Manual
Dell 2405FPW - UltraSharp - 24" LCD Monitor Manual
 |
View all Dell 2405FPW manuals
Add to My Manuals
Save this manual to your list of manuals |
Dell 2405FPW manual content summary:
- Dell 2405FPW | User Manual - Page 1
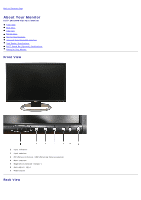
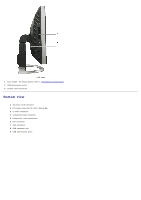
™ 2405FPW Flat Panel Monitor About Your Monitor Front View Back View Side View Bottom View Monitor Specifications Universal Serial Bus(USB) Interface Card Reader Specifications Dell™ Sound Bar (Optional) Specifications Caring for Your Monitor Using Your Adjustable Monitor Stand Attaching the Stand - Dell 2405FPW | User Manual - Page 2
Card Reader Specifications Dell™ Sound Bar (Optional) Specifications Caring for Your Monitor Front View 1 Input indicators 2 Input selection 3 PIP (Picture In Picture) / PBP (Picture By Picture) selection 4 Menu selection 5 Brightness & Contrast / Down(-) 6 Auto-Adjust / Up(+) 7 Power button - Dell 2405FPW | User Manual - Page 3
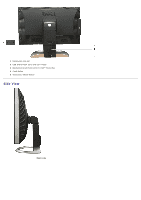
1 Kensington lock slot 2 USB downstream ports and card reader 3 Mechanical attachment point for Dell™ Sound Bar 4 Cable holder 5 Stand lock release button Side View Right side - Dell 2405FPW | User Manual - Page 4
Left side 1 Card reader: for details please refer to Card Reader Specifications 2 USB downstream ports 3 Display removal button Bottom View 1 AC power cord connector 2 DC power connector for Dell™ Sound Bar 3 S-Video connector 4 Composite video connector 5 Component video connectors 6 DVI connector - Dell 2405FPW | User Manual - Page 5
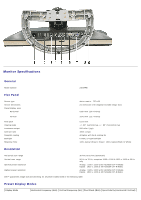
Monitor Specifications General Model number 2405FPW Flat Panel Screen type Screen dimensions Preset display area: Horizontal Vertical Pixel pitch Viewing angle Luminance output Contrast ratio Faceplate coating Backlight Response Time Active matrix - TFT LCD 24 inches (24-inch diagonal viewable - Dell 2405FPW | User Manual - Page 6
input signals AC input voltage / frequency / current Inrush current Physical Characteristics Signal cable type Dimensions (with stand): Height (fully extended in portrait mode) Height (compressed/locked in landscape mode) Width Depth Weight Monitor (Stand and Head) Monitor Flat panel only (VESA - Dell 2405FPW | User Manual - Page 7
(maximum) 201.2 BTU/hour (typical) Power Management Modes If you have VESA's DPMS compliance display card or software installed in your PC, the monitor can automatically reduce its power consumption when not in use. This is referred to as 'Power Save Mode'*. If input from keyboard, mouse or other - Dell 2405FPW | User Manual - Page 8
2 3 4 5 6 7 8 9 10 11 12 13 14 15 16 17 18 19 20 21 22 23 24 24-pin Side of the Connected Signal Cable TMDS RX2TMDS RX2+ TMDS Ground Floating Floating DDC Clock DDC Data Floating TMDS RX1TMDS RX1+ TMDS Ground Floating Floating +5V / +3.3V power - Dell 2405FPW | User Manual - Page 9
the Connected Signal Cable (Cable not included) Y (Luminance signal) Pb (Color differential signal) Pr (Color differential signal) Universal Serial Bus (USB) Interface This monitor supports High-Speed Certified USB 2.0 interface. Data Rate Power Consumption High speed 480 Mbps 2.5W (Max., each port - Dell 2405FPW | User Manual - Page 10
's USB interface works only when the monitor is on or in power save mode, If you switch the monitor off and then on, attached peripherals may take a few seconds to resume normal functionality. Card Reader Specifications Overview The Flash Memory Card Reader is a USB storage device that allows - Dell 2405FPW | User Manual - Page 11
type Supported OS Performance Transfer Speed USB 2.0 High Speed Device (USB Full Speed Device compatible) Windows 2000 and XP Read: 480 Mb/s (max.) Write: 480 Mb/s (max.) Dell™Sound Bar (Optional) Specifications System Frequency Response Total Power Output Headphone Jack Output Power Input - Dell 2405FPW | User Manual - Page 12
Power Cord Length 305 mm ± 15 mm AWG22 black cable attached to enclosure, with DC plug (5.5 x 2.1 x 12 mm) Operating Temperature Range 10°C to 40°C Humidity, Non-condensing 95% RH @ 40 °C Plug and Play Capability You can install the monitor in any Plug and Play-compatible system. The monitor - Dell 2405FPW | User Manual - Page 13
Back to Contents Page Using Your Adjustable Monitor Stand Dell™ 2405FPW Flat Panel Monitor Attaching the Stand Organizing Your Cables Using the Tilt, Swivel, Vertical Extension Removing the Stand Attaching the Stand 1. Place the stand on a flat surface. 2. Fit the groove on the back of the - Dell 2405FPW | User Manual - Page 14
Tilt/Swivel With the built-in pedestal, you can tilt and/or swivel the monitor for the most comfortable viewing angle. NOTE: Stand is detached and extended when the monitor is shipped from the factory. Vertical Extension Stand extends vertically up to 100mm via the stand lock release button. - Dell 2405FPW | User Manual - Page 15
: If locked in the down position, press the stand lock release button on the bottom rear of stand. Lift the front panel up and extend the stand to the desired height. NOTICE: Before relocating/moving the monitor to a different location, make sure that the stand is LOCKED DOWN. To lock it down, lower - Dell 2405FPW | User Manual - Page 16
stand. NOTE: To prevent scratches on the LCD screen while removing the stand, ensure that the monitor is placed on a clean surface. Back to Contents Page - Dell 2405FPW | User Manual - Page 17
Dell™ 2405FPW Flat Panel Monitor Connecting Your Monitor Using the Front Panel Buttons Using the OSD Using the Dell™ Sound Bar (Optional) Using the Card Reader Connecting Your Monitor CAUTION: Before you begin any of the procedures in this section, follow the Safety Information. 1 Power - Dell 2405FPW | User Manual - Page 18
. Using the Front Panel Buttons Use the control buttons on the front of the monitor to adjust the characteristics of the image being displayed. As you use these buttons to adjust the controls, an OSD shows their numeric values as they change. A Use Input Select button to select between five - Dell 2405FPW | User Manual - Page 19
is turned off, the screen will be turned off, when any button except power button is pressed. The monitor displays "No Input Signal" for the corresponding connection . B Use this button to activate PIP (Picture-in-Picture)/PBP (Picture-by-Picture) mode adjustment. Pressing this button continually - Dell 2405FPW | User Manual - Page 20
-screen display(OSD) and select the OSD Menu. See Accessing the Menu System. OSD menu & select D, Use these buttons for navigating and adjusting the slider-bar(decrease/increase ranges) controls in the OSD. E Minus (- ) and Plus (+) D Use this button to activate Brightness/Contrast adjustment - Dell 2405FPW | User Manual - Page 21
Input', the contrast adjustment is not available. E Use this button to activate automatic setup and adjustment. The following dialog will appear on a black screen as the monitor self- adjusts to the current input: Auto Adjust In Progress Auto Adjust Auto Adjustment button allows the monitor - Dell 2405FPW | User Manual - Page 22
D Menu and Sub Menu name E Selected Input F Current resolution G Selected PIP / PBP 2. Push the and buttons to move between the function icons. As for a complete list of all the functions available for the monitor. 3. Push the MENU button once to activate the highlighted function; Push / to select - Dell 2405FPW | User Manual - Page 23
specific area will let you see the details easier. After activating the zoom in function, you can also move the zoom lens around through zoom left/right/up/down functions. Using the and keys. Image settings: Auto Adjust Even though your computer system can recognize your new flat panel monitor - Dell 2405FPW | User Manual - Page 24
1:1: Turns off Scaling feature and displays an image size based on the input resolution. b. Fill: Image size up-scaled to fill the entire screen, image maybe distorted or elongated due to non-proportional scaling of height and width. c. Aspect: Increases Vertical image size to fit screen and adjusts - Dell 2405FPW | User Manual - Page 25
the 'User Preset' option to customize the color settings to your exact choice. OSD Settings: Each time the OSD opens, it displays in the same location on the screen. 'OSD Settings' (horizontal/vertical) provides control over this location. Horizontal Position and buttons move OSD to the left and - Dell 2405FPW | User Manual - Page 26
user adjustments are allowed. All buttons are locked except the menu button. OSD Rotation OSD Rotation: Rotates the OSD by 90 ° counter-clockwise. Your can djust according to your Display Rotation. NOTE: When the OSD is locked, pressing the menu button will take the user directly to the OSD settings - Dell 2405FPW | User Manual - Page 27
an input signal for PBP. (VGA/DVI/S-video/Composite/Component) Use and to select. Swap : To switch the main-screen and sub-screen in PBP mode. Brightness: Adjust the brightness level of the picture in PIP/PBP Mode. decreases the brightness increases the brightness Contrast: Adjust the contrast level - Dell 2405FPW | User Manual - Page 28
the image looks more colorful Audio NOTE: The sub-menu adjusts per the type of the input signal. Audio for the Dell™ Sound Bar (Optional) can be turned on or off when the monitor is 'Power Saving' mode. - Yes: Enables Audio to be turned on when computer is in Power Saving mode. - No: Disables - Dell 2405FPW | User Manual - Page 29
Green and Blue Color Control settings to their original factory settings and sets to the default setting of Normal Preset. All Settings returns your monitor settings to those that were set at the time of manufacture. This includes color, position, clock frequency, phase, brightness, contrast and OSD - Dell 2405FPW | User Manual - Page 30
See Solving Problems for more information. Using the Dell™ Sound Bar (Optional) The Dell™Sound Bar is a four-speaker, two-channel system adaptable to mount on Dell™ Flat Panel Displays. The Sound Bar has a rotary volume and on/off control to adjust the overall - Dell 2405FPW | User Manual - Page 31
1. Attach mechanism 2. Headphone connectors 3. Power indicator 4. Power/Volume control Sound Bar Attachment to the Monitor - Dell 2405FPW | User Manual - Page 32
sound Bar with the DC power connector. 4. Insert the lime green mini stereo plug from the rear of the Sound Bar into the computer's audio output jack. Using the Card Reader Installation (Windows® 2000 and XP) The Flash Memory Card Reader adheres to the USB Mass Storage Class specifications. Windows - Dell 2405FPW | User Manual - Page 33
Back to Contents Page Setting Up Your Monitor Dell™ 2405FPW Flat Panel Monitor Important instructions and graphic drivers to set the display resolution to 1920x1200 (Optimal) For optimal display performance while using the Microsoft Windows® operating systems, set the display resolution to 1920 x - Dell 2405FPW | User Manual - Page 34
the "Display Rotation" function (Landscape versus Portrait view) an updated graphics driver is required for your Dell™ Computer not included with this monitor. Please download the graphics driver from support.dell.com and refer to the "download" section for "Video Drivers" for latest driver updates - Dell 2405FPW | User Manual - Page 35
- Dell 2405FPW | User Manual - Page 36
to Contents Page Solving Problems Dell™ 2405FPW Flat Panel Monitor Monitor Specific Troubleshooting Common Problems Video Problems Product Specific Problems Universal Serial Bus (USB) Specific Problems Dell™ Sound Bar (Optional) Troubleshooting Card Reader Troubleshooting CAUTION: Before you begin - Dell 2405FPW | User Manual - Page 37
occurs in LCD technology Cycle power on-off These are pixels that are permanently on and is a natural defect that occurs in LCD technology Perform monitor reset on "All Settings" Push Auto Adjust button Adjust brightness & contrast controls NOTE: When using '2: DVI-D', the contrast adjustment is not - Dell 2405FPW | User Manual - Page 38
Problems SPECIFIC SYMPTOMS Screen image is too small Cannot adjust the monitor with the buttons on the front panel WHAT YOU EXPERIENCE Image is centered on screen, but does not fill entire viewing area OSD does not appear on the screen POSSIBLE SOLUTIONS Perform monitor reset on "All Settings - Dell 2405FPW | User Manual - Page 39
in plug. Troubleshoot the computer's sound card. Test the Sound Bar using another audio source (i.e. portable CD player). Clear any obstructions between the Sound Bar and the user. Turn the Power/Volume knob on the Sound Bar clockwise to the maximum volume setting. Set all Windows volume controls to - Dell 2405FPW | User Manual - Page 40
media. Write protect switch is enabled. Back to Contents Page media is unlocked. - Dell 2405FPW | User Manual - Page 41
Back to Contents Page Appendix Dell™ 2405FPW Flat Panel Monitor Warranty Information Safety Information Safety Information: Card Reader Contacting Dell™ Regulatory Notices Your Monitor Set-up Guide Warranty Information U.S. Terms and Conditions of Sale These terms and conditions (" - Dell 2405FPW | User Manual - Page 42
described in a specification sheet or catalog are possible. Parts used in repairing or servicing Product may be new, equivalent-tonew, or reconditioned. 8. Service and Support. Service offerings may vary from Product to Product. If you purchase optional services and support from Dell™, Dell™ and/or - Dell 2405FPW | User Manual - Page 43
the product instructions or failure to perform preventive maintenance Problems caused by using accessories, parts, or components not supplied by us Products with missing or altered service tags or serial numbers Products for which we have not received payment THIS WARRANTY GIVES YOU SPECIFIC LEGAL - Dell 2405FPW | User Manual - Page 44
on how to obtain service. How will you fix my product? We use new and refurbished parts made by various manufacturers in performing warranty repairs and in building replacement parts and systems. Refurbished parts and systems are parts or systems that have been returned to Dell™, some of which were - Dell 2405FPW | User Manual - Page 45
™ for a credit or a refund of the purchase price paid, less shipping and handling and applicable return fees as follows: New Hardware Products and Accessories - Unless you have a separate agreement with Dell™, all hardware, accessories, peripherals, parts, and unopened software still in its /their - Dell 2405FPW | User Manual - Page 46
the product instructions or failure to perform preventive maintenance Problems caused by using accessories, parts, or components not supplied by us Products with missing or altered service tags or serial numbers Products for which we have not received payment THIS WARRANTY GIVES YOU SPECIFIC LEGAL - Dell 2405FPW | User Manual - Page 47
on how to obtain service. How will you fix my product? We use new and refurbished parts made by various manufacturers in performing warranty repairs and in building replacement parts and systems. Refurbished parts and systems are parts or systems that have been returned to Dell™, some of which were - Dell 2405FPW | User Manual - Page 48
be in as-new condition, and all of the manuals, floppy disk(s), CD(s), power cables, and other Dell™-Branded Peripheral Products Dell™ does provide a limited warranty for new Dell™-branded peripheral products (products for which Dell™ is listed as the manufacturer) such as monitors, batteries, memory - Dell 2405FPW | User Manual - Page 49
original purchase date. Products for which proper claims are made will, at Dell™'s option, be repaired or replaced at Dell™'s expense. Dell™ owns all parts removed from repaired products. Dell™ uses new and reconditioned parts by contacting the Dell™ point of sale within the guarantee period - Dell 2405FPW | User Manual - Page 50
AC power available in your location. NOTE: This monitor does not need or have a voltage selection switch for setting the AC voltage input. It will automatically accept any AC input voltage according to the ranges defined in the "Electrical Specifications" section. Do not store or use the LCD monitor - Dell 2405FPW | User Manual - Page 51
in this documentation may result in exposure to shock, electrical and/or mechanical hazards. Read and understand all instructions before using the Flash Memory Card Reader. Never disassemble or touch the inside of this product. Such actions could result in electrical shock, fire, and/or malfunction - Dell 2405FPW | User Manual - Page 52
and portable computers: [email protected] E-mail for servers and EMC: [email protected] Customer Care Tech Support Tech Support Services Sales General Support E-mail (Australia): [email protected] E-mail (New Zealand): [email protected] Home and Small Business Government - Dell 2405FPW | User Manual - Page 53
Support (Home Sales/Small Business) Technical Support (med./large bus., government) Sales (Home Sales/Small Business) Sales (med./large bus., government) Spare Parts Sales & Extended Service Sales General Support Sales, Customer Support, and Technical Support Technical Support website: support.dell - Dell 2405FPW | User Manual - Page 54
Accounts Spare Parts General Support General Support Website: support.euro.dell.com E-mail: [email protected] Technical Support Technical Support Fax Customer Care Customer Care Fax Switchboard Website: support.euro.dell.com E-mail Support (portable computers): [email protected] E-mail - Dell 2405FPW | User Manual - Page 55
Fax Fax (calls from outside of France) Corporate Technical Support Customer Care Switchboard Sales Fax Website: support.euro.dell.com E-mail: [email protected] Technical Support Home/Small Business Customer Care Global Segment Customer Care Preferred Accounts Customer Care Large - Dell 2405FPW | User Manual - Page 56
Code: 00 Country Code: 39 Gold Service Technical Support Switchboard Gold Service Switchboard Sales Fax General Support General Support General Support Website: support.ap.dell.com E-mail: [email protected] Technical Support (Dimension™ and Inspiron™) Technical Support (OptiPlex™, Latitude™, and - Dell 2405FPW | User Manual - Page 57
™) Technical Support outside of Japan (Dell™ Precision, OptiPlex, and Latitude) Technical Support (PDAs, projectors, printers, routers) Technical Support outside of Japan (PDAs, projectors, printers, routers) Faxbox Service 24-Hour Automated Order Service Customer Care Business Sales Division - Dell 2405FPW | User Manual - Page 58
(Dimension and Inspiron) Technical Support (PowerEdge and PowerVault) Customer Service Transaction Sales Corporate Sales Customer Technical Support Sales Customer Service Main General Support General Support Website: support.euro.dell.com Technical Support Technical Support Fax Home/Small Business - Dell 2405FPW | User Manual - Page 59
Business Customer Care Switchboard Fax Switchboard General Support General Support Website: support.euro.dell.com E-mail: [email protected] Customer Service Phone Customer Care Sales Customer Service Fax Reception Desk Fax Switchboard Website: support.euro.dell.com 020 674 50 00 020 674 - Dell 2405FPW | User Manual - Page 60
) Transaction Sales Corporate Sales Website: support.euro.dell.com E-mail: [email protected] Gold Queue Technical Support Customer Care Sales Fax Switchboard Customer Technical Support, Customer Service, and Sales (Penang, Malaysia) Website: support.euro.dell.com E-mail: support.euro.dell.com - Dell 2405FPW | User Manual - Page 61
(servers and storage) Corporate Sales Technical Support (Optiplex, Latitude, and Precision) Technical Support (PowerEdge and PowerVault) Customer Service (Penang, Malaysia) Sales General Support General Support Website: support.euro.dell.com Customer Care website: support.euro.dell.com/uk/en/ECare - Dell 2405FPW | User Manual - Page 62
, education, and healthcare) Customer Service and Technical Support Employee Purchase Program (EPP) Customers Dell™ Sales Dell™ Outlet Store (Dell™ refurbished computers) Software and Peripherals Sales Spare Parts Sales Extended Service and Warranty Sales Fax Dell™ Services for the Deaf, Hard-of - Dell 2405FPW | User Manual - Page 63
Support General Support Regulatory Notices TCO'03 (DualTone Gray 2405FPW) (1 - 877- 335- 5889) 1-877-673-3355 8001-3605 If the display you have just purchased carries the TCO'03 display label: This means that your display strain problems. Important parameters are luminance, contrast, resolution - Dell 2405FPW | User Manual - Page 64
TCO'99 (Midnight Gray 2405FPW) If the display you have just purchased carries the TCO'99 display label: You have just purchased a TCO'99 established method for encouraging the adaptation of goods and services to the environment. The main problem, as far as computers and other electronics equipment - Dell 2405FPW | User Manual - Page 65
The proper operation of the function requires a computer with VESA® DPMS power management capabilities. When used with a computer equipped with VESA® DPMS, the monitor is ENERGY STAR®-compliant. As an ENERGY STAR® Partner, Dell™ Computer Corporation has determined that this product meets the ENERGY - Dell 2405FPW | User Manual - Page 66
user's authority to operate the equipment. FCC Declaration of Conformity According to 47 CFR, Part 15 of the FCC Rules * For the following named product : COLOR MONITOR (Category Name) 2405FPW / DELL™ - BenQ (Model No / Brand Name) (Basic Model) * Manufactured at : BenQ Corporation We hereby - Dell 2405FPW | User Manual - Page 67
EU Declaration of Conformity (LVD, EMC) For the following product: COLOR MONITOR (category name) 2405FPW (model name) Manufactured at : BenQ Co., Ltd. New District 169 Zhujiang Rd Suzhou Jiangsu, China (factory name,address) We hereby declare, that all major safety requirements, concerning to CE- - Dell 2405FPW | User Manual - Page 68
the standards for information technology equipment that are set by the Voluntary Control Council for Interference for preventing radio frequency interference All equipment that works together (computer, monitor, printer, and so on) should have the same power supply source. The phasing conductor of - Dell 2405FPW | User Manual - Page 69
in compliance with the requirements of the official Mexican standards (NOM): Exporter: Importer: Ship to: Supply voltage: Frequency: Dell™ Computer Corporation One Dell™ Way Round Rock, TX 78682 Dell™ Computer de México, S.A. de C.V. Rio Lerma No. 302 - 4º Piso Col. Cuauhtemoc 16500 México - Dell 2405FPW | User Manual - Page 70
: Importador: Embarcar a: Dell™ Computer Corporation One Dell™ Way Round Rock, TX 78682 Dell™ Computer de México, contrast.) 2. Graphics controller and monitor are recommended to be used in the following conditions: Vertical frequency : 60 Hz or higher. Display mode : Dark characters in bright - Dell 2405FPW | User Manual - Page 71
in an environmentally sound manner, Potential methods include reuse of parts or whole products and recycling of product, components, and/or materials. For more information, please visit www.dell.com/environment. Your Monitor Set-up Guide To view PDF files (files with an extension of .pdf), click the - Dell 2405FPW | User Manual - Page 72
Dell™ 2405FPW Flat Panel Monitor User Guide Important instructions and graphic drivers to set the display resolution to 1920x1200 (Optimal) Notes, Notices, and Cautions Throughout this guide, blocks of text may be accompanied by an icon and printed in bold type or in italic type. These blocks are - Dell 2405FPW | User Manual - Page 73
Back to Contents Page Setting Up Your Monitor Dell™ 2405FPW Flat Panel Monitor If you have a Dell™ desktop with no internet access 1. Right-click on the desktop and click Properties. 2. Select the Settings tab. 3. Select Advanced. if you are using Windows XP, click the Adapter tab. 4. Identify your - Dell 2405FPW | User Manual - Page 74
Back to Contents Page Setting Up Your Monitor Dell™ 2405FPW Flat Panel Monitor If you have a Dell™ desktop or a Dell™ portable computer with internet access 1. Go to http://support.dell.com, enter your service tag, and download the latest driver for your graphics card. 2. After installing the - Dell 2405FPW | User Manual - Page 75
Back to Contents Page Setting Up Your Monitor Dell™ 2405FPW Flat Panel Monitor If you have non Dell™ desktop, portable computer, or graphic card 1. Right-click on the desktop and click Properties. 2. Select the Settings tab. 3. Select Advanced. 4. Identify your graphics controller supplier from the - Dell 2405FPW | User Manual - Page 76
- Dell 2405FPW | User Manual - Page 77
-
 1
1 -
 2
2 -
 3
3 -
 4
4 -
 5
5 -
 6
6 -
 7
7 -
8
-
9
-
10
-
11
-
12
-
13
-
14
-
15
-
16
-
17
-
18
-
19
-
20
-
21
-
22
-
23
-
24
-
25
-
26
-
27
-
28
-
29
-
30
-
31
-
32
-
33
-
34
-
35
-
36
-
37
-
38
-
39
-
40
-
41
-
42
-
43
-
44
-
45
-
46
-
47
-
48
-
49
-
50
-
51
-
52
-
53
-
54
-
55
-
56
-
57
-
58
-
59
-
60
-
61
-
62
-
63
-
64
-
65
-
66
-
67
-
68
-
69
-
70
-
71
-
72
-
73
-
74
-
75
-
76
-
77
 |
 |
Dell™ 2405FPW Flat Panel Monitor
About Your Monitor
Front View
Back View
Side View
Bottom View
Monitor Specifications
Universal Serial Bus(USB) Interface
Card Reader Specifications
Dell™ Sound Bar (Optional) Specifications
Caring for Your Monitor
Using Your Adjustable Monitor Stand
Attaching the Stand
Organizing Your Cables
Using the Tilt, Swivel, Vertical Extension
Removing the Stand
Setting Up Your Monitor
Connecting Your Monitor
Using the Front Panel Buttons
Using the OSD
Setting the Optimal Resolution
Using the Dell™ Sound Bar (Optional)
Using the Card Reader
Rotating Your Monitor
Changing the Rotation of Your Monitor
Rotating Your Operating System
Solving Problems
Monitor Specific Troubleshooting
Common Problems
Video Problems
Product Specific Problems
Universal Serial Bus (USB) Specific Problems
Dell™ Sound Bar (Optional) Troubleshooting
Card Reader Troubleshooting
Appendix
Warranty Information
Safety Information
Safety Information: Card Reader
Contacting Dell™
Regulatory Notices
Your Monitor Set-up Guide
Notes, Notices, and Cautions
Throughout this guide, blocks of text may be accompanied by an icon and printed in bold type or in italic type. These
blocks are notes, notices, and cautions, and they are used as follows:
NOTE: A NOTE indicates important information that helps you make better use of your computer.
NOTICE: A NOTICE indicates either potential damage to hardware or loss of data and tells you how to avoid the
problem.
CAUTION: A CAUTION indicates the potential for property damage, personal injury, or death.
Some warnings may appear in alternate formats and may be unaccompanied by an icon. In such cases, the specific
presentation of the caution is mandated by regulatory authority.
Information in this document is subject to change without notice.
© 2005 Dell™ Inc. All rights reserved.
Reproduction in any manner whatsoever without the written permission of Dell Inc.
is strictly forbidden.
Trademarks used in this text:
Dell
, the
DELL
logo,
Inspiron
,
Dell Precision
,
Dimension
,
OptiPlex
,
Latitude, PowerEdge, PowerVault, PowerApp,
and Dell OpenManage
are trademarks of DellInc;
Microsoft
and
Windows
are registered trademarks of Microsoft Corporation;
ENERGY STAR
is
a registered trademark of the U.S. Environmental Protection Agency. As an ENERGY STAR partner, Dell Inc. has determined that this product
meets the ENERGY STAR guidelines for energy efficiency. CompactFlash is a trademark of The CompactFlash Association (CFA). Secure Digital is
a trademark of The Secure Digital Association. SmartMedia is a trademark of Toshiba Corporation. MultiMediaCard is a trademark of
MultiMediaCard Association. Microdrive is a trademark of International Business Machines Corporation. Memory Stick and MagicGate are
trademarks of Sony Corporation.
Other trademarks and trade names may be used in this document to refer to either the entities claiming the marks and names or their
products. Dell Inc. disclaims any proprietary interest in trademarks and trade names other than its own.
April 2005
Rev. A01