Dell 510D User Guide
Dell 510D Manual
 |
View all Dell 510D manuals
Add to My Manuals
Save this manual to your list of manuals |
Dell 510D manual content summary:
- Dell 510D | User Guide - Page 1
mode. NOTICE: To avoid losing data, turn off your computer by performing a Microsoft® Windows® operating system shutdown rather than by pressing the power button. If the computer stops responding, press and hold the power button until the computer turns off completely (which may take several seconds - Dell 510D | User Guide - Page 2
is low. l Solid orange: The battery charge is critically low. keyboard - The keyboard includes a numeric keypad as well as the Windows logo key. For information on supported keyboard shortcuts, see "Using the Keyboard and Touch Pad." touch pad - Provides the functionality of a mouse. See "Using the - Dell 510D | User Guide - Page 3
the computer gets hot. Fan noise is normal and does not indicate a problem with the fans or the computer. security cable slot - Lets you attach available antitheft device to the computer. For more information, see the instructions included with the device. NOTICE: Before you buy an antitheft device, - Dell 510D | User Guide - Page 4
infrared-compatible device without using cable connections. When you receive your computer, the sensor is disabled. You can use the system setup program to enable the sensor. For information on transferring data, see Windows Help, the Help and Support Center, or the documentation that came with your - Dell 510D | User Guide - Page 5
You can install devices such as an optical drive or a Dell TravelLite™ module in the module bay. For more information, see "Using the Module Bay." device latch release - Releases the module bay device. See "Using the Module Bay" for instructions. USB connectors Connect USB devices, such as a mouse - Dell 510D | User Guide - Page 6
the online modem documentation supplied with your computer. See "Finding Information." network connector (RJ network communications. For information on using the network adapter, see the device user's guide supplied with your computer. See "Finding Information." S-video TV-out connector Connects your - Dell 510D | User Guide - Page 7
power connectors and power strips vary among countries. Using an incompatible cable or improperly connecting the cable to the power does not indicate a problem with the fan or fire. Bottom View 1 memory module cover 2 battery-bay memory module cover - Covers the compartment that contains the memory - Dell 510D | User Guide - Page 8
settings in the Power Options control panel do not prohibit the computer from going into standby mode. If you change the Power Options control panel when the computer gets hot. Fan noise is normal and does not indicate a problem with the fans or the computer. CAUTION: Do not block, push objects into - Dell 510D | User Guide - Page 9
changes or modifications not expressly approved by Dell could void your authority to operate this l This device must accept any interference received, including interference that may cause undesired operation in accordance with the manufacturer's instruction manual, may cause interference with radio - Dell 510D | User Guide - Page 10
Company name: Dell Inc. One Dell Way Round Rock, Texas 78682 USA 512-338-4400 - Dell 510D | User Guide - Page 11
instructions located in the Product Information Guide. NOTE: For information about the Dell warranty for your computer, see the Product Information Guide Checking the Battery Charge The Dell QuickSet Battery Meter, the Microsoft® Windows® Power Meter window and battery warning provide information - Dell 510D | User Guide - Page 12
-click the icon in the taskbar, and click Help. Microsoft Windows Power Meter The Windows Power Meter indicates the remaining battery charge. To check the Power Meter, double-click the about the Power Meter tab, see "Power Management." icon on the taskbar. For more information If the computer - Dell 510D | User Guide - Page 13
replacing the battery. See "Specifications" for more information about of power, hibernate mode begins automatically. A pop-up window warns resolving problems with a battery, see "Power Problems." documentation that came with your docking device for instructions. 3. Slide and hold the battery-bay - Dell 510D | User Guide - Page 14
Installing a Battery Slide the battery into the bay until the latch release clicks. For information about installing the second battery, see "Using the Module Bay." Storing a Battery Remove the battery when you store your computer for an extended period of time. A battery discharges during prolonged - Dell 510D | User Guide - Page 15
of the procedures in this section, follow the safety instructions located in the Product Information Guide. You can install devices such as a floppy drive, unless you want to prevent the module from being easily removed. Your Dell™ computer may ship with a device security screw, which is not - Dell 510D | User Guide - Page 16
. NOTICE: If you are running on battery power and you have received a message that the battery operating time is very low, turn off the computer or connect to AC power before removing the device. 1. Before ejecting the device, in Microsoft® Windows® XP, double-click the Safely Remove Hardware icon - Dell 510D | User Guide - Page 17
4. Push the new device into the bay until it clicks. The operating system automatically recognizes the device. 5. If necessary, enter your password to unlock your computer. - Dell 510D | User Guide - Page 18
, you need to install the drivers and software necessary to play DVDs or write data. For more information, see the Drivers and Utilities CD. 4. Push or Multimedia), and then click Volume Control. 2. In the Volume Control window, click and drag the bar in the Volume Control column and slide it - Dell 510D | User Guide - Page 19
much memory and preventing In the Display Properties window, click and drag the Dell), enables you to connect the computer to a TV. 1 S-video TV-out connector 2 standard S-video cable connector Your TV has either an S-video input connector or a composite video-input connector. Depending on what type - Dell 510D | User Guide - Page 20
the computer (without the TV/digital audio adapter cable) if your TV or audio device supports S-video but not S/PDIF digital audio. 2. Plug one end of the S-video Display Settings for a TV in Microsoft® Windows® XP" to ensure that the computer recognizes and works properly with the TV. Composite - Dell 510D | User Guide - Page 21
any audio device that you connected (if applicable), and then turn on the computer. 8. See Enabling the Display Settings for a TV in Microsoft® Windows® XP to ensure that the computer recognizes and works properly with the TV. Setting Up the Cyberlink (CL) Headphones NOTE: The CL headphone feature - Dell 510D | User Guide - Page 22
Back button once, and then click the Back button again to return to the main menu screen. Enabling the Display Settings for a TV in Microsoft® Windows® XP NOTE: Ensure that you properly connect the TV before you enable the display settings. 1. Click the Start button and click Control Panel. 2. Click - Dell 510D | User Guide - Page 23
follow the safety instructions located in the Product Information Guide. Computer, Only use products specifically designed for cleaning LCDs, and follow the instructions that are included the instructions that come with the compressed air. Never touch the lens in the drive. If you notice problems, - Dell 510D | User Guide - Page 24
in this section, follow the safety instructions located in the Product Information Guide. When to Use the Dell Diagnostics If you experience a problem with your computer, perform the checks in "Solving Problems" and run the Dell Diagnostics before you contact Dell for technical assistance. It is - Dell 510D | User Guide - Page 25
error code and problem description and follow the instructions on the screen. If you cannot resolve the error condition, contact Dell. NOTE: The Service Tag for your computer is located at the top of each test screen. If you contact Dell, technical support will ask for your Service Tag. 3. If you - Dell 510D | User Guide - Page 26
the external device simultaneously. NOTE: You cannot switch the video image when using extended desktop mode. Setting Display Resolution To display a program at a specific resolution, both the video adapter and the display must support the program, and the necessary video drivers must be installed. - Dell 510D | User Guide - Page 27
Dell-installed video drivers, which are designed to offer the best performance with your Dell- supports, the settings adjust automatically to the closest possible values. For more information, see your operating system documentation. 4. Click the monitor 2 icon, click the Extend my Windows desktop - Dell 510D | User Guide - Page 28
8. Click Apply. 9. Click OK. - Dell 510D | User Guide - Page 29
Drivers and Utilities NOTICE: The Dell Support website at support.dell.com and your Drivers and Utilities CD provide approved drivers for Dell™ computers. If you install drivers obtained from other sources, your computer might not work correctly. Using Windows XP Device Driver Rollback If a problem - Dell 510D | User Guide - Page 30
or click Extract, follow the extracting instructions, and then read the readme file. If instructed to navigate to the driver files, click the CD directory on the driver information window to display the files associated with that driver. Manually Reinstalling Drivers NOTE: If you are reinstalling an - Dell 510D | User Guide - Page 31
Troubleshooting and Maintenance on the Contents tab, click Windows 2000 troubleshooters, and then click Hardware. 3. In the Hardware Troubleshooter list, click I need to resolve a hardware conflict on my computer and click Next. Using Microsoft® Windows® XP System Restore The Microsoft® Windows® XP - Dell 510D | User Guide - Page 32
must use Windows XP Service Pack 1 (SP1) or later when you reinstall Windows XP. Before You Begin If you are considering reinstalling the Windows XP operating system to correct a problem with a newly installed driver, first try using Windows XP Device Driver Rollback. If Device Driver Rollback does - Dell 510D | User Guide - Page 33
reinstalling Windows XP Professional and Download Category, select System and Configuration Utilities, select your operating system and language, and then follow the instructions. NSS provides critical updates for your operating system and support for Dell™ 3.5-inch USB floppy drives, Intel® Pentium - Dell 510D | User Guide - Page 34
.dell.com. Dell™ Product Information Guide User's Guide Microsoft® Windows® XP Help and Support Center 1. Click the Start button and click Help and Support. 2. Click User's and system guides and click User's guides. The User's Guide is also available on the optional Drivers and Utilities CD. Service - Dell 510D | User Guide - Page 35
information l Service and support - Service call status and support history, service contract, online discussions with technical support l Reference - Computer documentation, details on my computer configuration, product specifications, and white papers l Downloads - Certified drivers, patches - Dell 510D | User Guide - Page 36
- Dell 510D | User Guide - Page 37
and fill it out. 4. Use Dell's extensive suite of online services available at Dell Support (support.dell.com) for help with installation and troubleshooting procedures. 5. If the preceding steps have not resolved the problem, contact Dell. NOTE: Call technical support from a telephone near or at - Dell 510D | User Guide - Page 38
.com (Canada only) l Electronic Information Service [email protected] AutoTech Service Dell's automated technical support service-AutoTech-provides recorded answers to the questions most frequently asked by Dell customers about their portable and desktop computers. When you call AutoTech, use your touch - Dell 510D | User Guide - Page 39
computer, read the safety instructions in your Product Information Guide. Diagnostics Checklist Name: Date: Address: Phone number: Service Tag (bar code on the back of the computer): Express Service Code: Return Material Authorization Number (if provided by Dell support technician): Operating system - Dell 510D | User Guide - Page 40
Code: 54 City Code: 11 E-mail: [email protected] E-mail for desktop and portable computers: [email protected] E-mail for servers and EMC: [email protected] Customer Care Tech Support Tech Support Services Sales Aruba General Support Australia (Sydney) E-mail (Australia - Dell 510D | User Guide - Page 41
Technical Support website: support.dell.com.cn Technical Support E-mail: [email protected] Customer Care E-mail: [email protected] Technical Support Fax Technical Support (Dell™ Dimension™ and Inspiron™) Technical Support (OptiPlex™, Latitude™, and Dell Precision™) Technical Support (servers - Dell 510D | User Guide - Page 42
General Support Guatemala General Support Guyana General Support Hong Kong Website: support.ap.dell.com Technical Support E-mail: [email protected] International Access Code: 001 Technical Support (Dimension and Inspiron) Country Code: 852 Technical Support (OptiPlex, Latitude, and Dell - Dell 510D | User Guide - Page 43
: 81 Technical Support (Dimension and Inspiron) City Code: 44 Technical Support outside of Japan (Dimension and Inspiron) Technical Support (Dell Precision, OptiPlex, and Latitude) Technical Support outside of Japan (Dell Precision, OptiPlex, and Latitude) Technical Support (PDAs, projectors - Dell 510D | User Guide - Page 44
Code: 853 Customer Service (Xiamen, China) Transaction Sales (Xiamen, China) Malaysia (Penang) Website: support.ap.dell.com International Access Code: 00 Country Code: 60 Technical Support (Dell Precision, OptiPlex, and Latitude) Technical Support (Dimension, Inspiron, and Electronics and - Dell 510D | User Guide - Page 45
: support.ap.dell.com Technical Support (Dimension, Inspiron, and Electronics and Accessories) International Access Code: 005 Technical Support (OptiPlex, Latitude, and Dell Precision) Country Code: 65 Technical Support (PowerApp, PowerEdge, PowerConnect, and PowerVault) Customer Service (Penang - Dell 510D | User Guide - Page 46
support.ap.dell.com E-mail: [email protected] International Access Code: 002 Technical Support (OptiPlex, Latitude, Inspiron, Dimension, Business Fax Uruguay General Support U.S.A. (Austin, Texas) Automated Order-Status Service AutoTech (portable and desktop computers) International Access - Dell 510D | User Guide - Page 47
Purchase Program (EPP) Customers Dell Sales Dell Outlet Store (Dell refurbished computers) Software and Peripherals Sales Spare Parts Sales Extended Service and Warranty Sales Fax Dell Services for the Deaf, Hard-of-Hearing, or Speech-Impaired General Support General Support (1-877-335-5638) toll - Dell 510D | User Guide - Page 48
- alternating current - The form of electricity that powers your computer when you plug the AC adapter power cable in to an electrical outlet. ACPI - advanced configuration and power interface - A power management specification that enables Microsoft® Windows® operating systems to put a computer in - Dell 510D | User Guide - Page 49
common rules and procedures for use by a specific group of users. A user logs on to the domain to gain access to the resources. DRAM - dynamic random-access memory - Memory that stores information in integrated circuits containing capacitors. driver - Software that allows the operating system to - Dell 510D | User Guide - Page 50
- A specific location where data is temporarily stored in RAM. memory mapping - The process by which the computer assigns memory addresses to physical locations at start-up. Devices and software can then identify information that the processor can access. memory module - A small circuit board - Dell 510D | User Guide - Page 51
RTC - real time clock - Battery-powered clock on the system board that keeps the date and time after you shut down the computer. RTCRST - real-time clock reset - A jumper on the system board of some computers that can often be used for troubleshooting problems. S ScanDisk - A Microsoft utility that - Dell 510D | User Guide - Page 52
that supports resolutions up to 1400 x 1050. system board - The main circuit board in your computer. Also known as the motherboard. supply 66 W of power for 1 hour or 33 W for 2 hours. wallpaper - The background pattern or picture on the Windows desktop. Change your wallpaper through the Windows - Dell 510D | User Guide - Page 53
X XGA - extended graphics array - A video standard for video adapters and controllers that supports resolutions up to 1024 x 768. Z ZIF - zero insertion force - A type of socket or connector that allows a computer chip to be installed or removed with no stress applied to either the chip or its - Dell 510D | User Guide - Page 54
and symbols are marked in blue on the right of the keypad keys. To type a number or symbol, hold down and press the desired key. l Shift> Opens the Task Manager window Enables and disables the scroll lock Battery Displays the Dell™ QuickSet Battery Meter CD or - Dell 510D | User Guide - Page 55
Management Activates Standby mode. You can reprogram this keyboard shortcut to activate a different power management mode using the Advanced tab in the Power Options Properties window. Places your computer in hibernation. Speaker Functions Increases the volume - Dell 510D | User Guide - Page 56
twice. Customizing the Touch Pad You can use the Mouse Properties window to disable the touch pad or adjust its settings. 1. Open the Control Panel and double-click the Mouse icon. 2. In the Mouse Properties window: l Click the Device Select tab to disable the touch pad. l Click - Dell 510D | User Guide - Page 57
About Passwords NOTE: Passwords are disabled when you receive your computer. A primary password, an administrator NOTE: Only hard drives purchased from Dell for use with the Dell™ Latitude™ D-Family computers support hard drive passwords. NOTICE: Passwords provide specifically prompt you for the - Dell 510D | User Guide - Page 58
system administrators or service technicians access to them both, contact your system administrator or contact Dell. Using a Hard Drive Password The hard drive password following message appears each time you turn on the computer: Please type in the hard-disk drive password and press . To - Dell 510D | User Guide - Page 59
the primary password prompt. Go to support.dell.com to obtain the Asset Tag utility Windows® desktop, and then shut down the computer and try again. c. Press the arrow keys to select Diskette Drive and press . 2. Type type y. The computer displays the new or modified asset tag and the Service - Dell 510D | User Guide - Page 60
the asset tag options (see the following table): 1. Boot the computer using the bootable floppy you created in "Assigning an Asset Tag." 2. Type asset and a space followed by the option, and then press . Asset Tag Option /d /o owner tag /o /d /? Description Deletes the asset tag Specifies - Dell 510D | User Guide - Page 61
read and follow the safety instructions in the Product Information Guide. PC Card Types See "Specifications" for information on supported PC Cards. NOTE: an installed card. Striking the end of the card can damage the system board. l Always remove an extended PC Card before you pack the computer in - Dell 510D | User Guide - Page 62
The computer recognizes most PC Cards and automatically loads the appropriate device driver. If the configuration program tells you to load the manufacturer's drivers, use the floppy disk or CD that came with the PC Card. Removing a PC Card NOTICE: Before you remove a PC Card from the computer, - Dell 510D | User Guide - Page 63
close the display: ¡ Choose no action. ¡ Enter standby mode. ¡ Enter hibernate mode. l Select how the computer will respond when you press the power button: ¡ Choose no action. ¡ Enter standby mode. ¡ Enter hibernate mode. ¡ Shut down the operating system and turn off the computer. ¡ Prompt a user - Dell 510D | User Guide - Page 64
. ¡ Enter standby mode. ¡ Enter hibernate mode. ¡ Shut down Windows and turn off the computer. Completing the Power Management Wizard The screen summarizes the QuickSet power scheme, sleep mode, and battery alarm settings for your computer. Review the settings you have selected and click Finish. For - Dell 510D | User Guide - Page 65
Start button® Control Panel® Performance and Maintenance® Power Options. Power Schemes Tab The Power schemes drop-down menu displays the selected preset power scheme. Keep the default Portable/Laptop power scheme to maximize battery power. Windows XP controls the performance level of the processor - Dell 510D | User Guide - Page 66
tab lets you enable hibernate mode by clicking the Enable hibernate support check box. Intel SpeedStep® Technology Tab NOTE: Windows XP controls the performance level of the processor depending on the power scheme that you select. See "Power Schemes Tab." NOTE: To use Intel SpeedStep technology - Dell 510D | User Guide - Page 67
using the Power Management Wizard. Right-Clicking the QuickSet Icon Right-click the icon to perform the following tasks: l Enable or disable the Brightness Meter on the screen. l Enable or disable the Volume Meter on the screen. l Turn wireless activity indicator on or off. l View Dell QuickSet Help - Dell 510D | User Guide - Page 68
Memory scribe l Flash BIOS update program floppy instructions in the Product Information Guide. NOTICE: Only a certified service technician should perform repairs on your computer. Damage due to servicing that is not authorized by Dell tabs; if you are disconnecting this type of cable, press in on the - Dell 510D | User Guide - Page 69
can increase your computer memory by installing memory modules on the system board. See "Specifications" for information on the memory supported by your computer. Be sure to add only memory modules that are intended for your computer. NOTE: Memory modules purchased from Dell are covered under your - Dell 510D | User Guide - Page 70
the computer boots, it detects the additional memory and automatically updates the system configuration information. Keyboard CAUTION: Before performing the following procedures, read the safety instructions in your Product Information Guide. NOTICE: To avoid electrostatic discharge, ground yourself - Dell 510D | User Guide - Page 71
to allow access to the keyboard connector. d. Pull up on the keyboard connector tab to disconnect the keyboard connector from the system board. 1 M2.5 x 5-mm screws (2) 2 keyboard tabs 3 keyboard connector NOTE: When you replace the keyboard, ensure that the keyboard tabs are completely in place - Dell 510D | User Guide - Page 72
Before working inside your computer, read the safety instructions in your Product Information Guide. 1. Ensure that the work surface is flat and out of the system board connector. 9. Pull the cable to remove the Bluetooth card from the computer. 1 Bluetooth card 2 system board connector 3 Bluetooth - Dell 510D | User Guide - Page 73
Under no circumstances should the user install such a device. Only trained Dell service personnel are authorized to install a 5-GHz Wireless LAN Mini PCI card. Before working inside your computer, read the safety instructions in your Product Information Guide. 1. Turn the computer over, and remove - Dell 510D | User Guide - Page 74
hard drive. CAUTION: Before working inside your computer, read the safety instructions in your Product Information Guide. NOTE: Dell does not guarantee compatibility or provide support for hard drives from sources other than Dell. 1. Turn the computer over. Use a small screwdriver to loosen the two - Dell 510D | User Guide - Page 75
packaging. See "Protecting Against Electrostatic Discharge" in your Product Information Guide." 4. Pull the hard drive out of the computer. 5. Remove computer. 10. Use the Drivers and Utilities CD to install the drivers and utilities for your computer. NOTE: The Drivers and Utilities CD is optional - Dell 510D | User Guide - Page 76
® 2000) or the Windows Help and Support Center (Windows XP). You can use system setup as follows: l To set or change user-selectable features-for example, your computer password l To verify information about the computer's current configuration, such as the amount of system memory After you set up - Dell 510D | User Guide - Page 77
instructions. 3. Connect the computer to an electrical outlet. 4. Turn on the computer. When the DELL logo appears, press immediately. If you wait too long and the Windows logo appears, continue to wait until you see the Windows desktop option according to the type of printer or device - Dell 510D | User Guide - Page 78
can use it to establish a link to an infrared device. To set up and use an infrared device, see the infrared device documentation and the Windows Help and Support Center. - Dell 510D | User Guide - Page 79
Memory Problems Network Problems PC Card Problems Power Problems Printer Problems Scanner Problems Sound and Speaker Problems Touch Pad or Mouse Problems Video and Display Problems Drive Problems CAUTION: Before you begin any of the procedures in this section, follow the safety instructions - Dell 510D | User Guide - Page 80
return to room temperature before turning it on. Run Check Disk - Windows XP 1. Click the Start button and click My Computer. 2. Right-click and Internet Problems CAUTION: Before you begin any of the procedures in this section, follow the safety instructions in the Product Information Guide. NOTE: - Dell 510D | User Guide - Page 81
information, go to support.dell.com and search for the keyword spyware. Error Messages Fill out the Diagnostics Checklist as you complete these checks. CAUTION: Before you begin any of the procedures in this section, follow the safety instructions in the Product Information Guide. If the message - Dell 510D | User Guide - Page 82
the error appears again contact Dell. Gate A20 failure - A memory module may be loose. Reinstall the memory modules and, if necessary, replace them. General failure - The operating system is unable to carry out the command. The message is usually followed by specific information-for example, Printer - Dell 510D | User Guide - Page 83
cannot find a specific track on the hard drive. Shutdown failure - A chip on the system board may be malfunctioning. Run the System Set tests as described in "Using the Dell Diagnostics." Time-of-day clock lost power - System configuration settings are corrupted. If the problem persists, try to - Dell 510D | User Guide - Page 84
, Windows recognizes the device. If you have problems with an IEEE 1394 device not provided by Dell - Contact Dell or the IEEE 1394 device manufacturer. Keyboard Problems CAUTION: Before you begin any of the procedures in this section, follow the safety instructions in the Product Information Guide - Dell 510D | User Guide - Page 85
or moving your mouse, press and hold the power button for at least 8 to 10 seconds until the computer turns off. Then restart your computer. Other software problems Check the software documentation or contact the software manufacturer for troubleshooting information - l Ensure that the program is - Dell 510D | User Guide - Page 86
related to a software problem. Memory Problems Fill out the Diagnostics Checklist as you complete these checks. CAUTION: Before you begin any of the procedures in this section, follow the safety instructions in the Product Information Guide. If you receive an insufficient memory message - l Save and - Dell 510D | User Guide - Page 87
in the Windows taskbar. Ensure that the card is listed. Reinstall any software (drivers) required for the PC Card - If you have problems with a Dell-provided PC Card - Contact Dell. If you have problems with a PC Card not provided by Dell - Contact the PC Card manufacturer. Power Problems Fill out - Dell 510D | User Guide - Page 88
section, follow the safety instructions in the Product Information Guide. NOTE: If you need technical assistance for your printer, contact the printer's manufacturer. Check the printer documentation - See the printer documentation for setup and troubleshooting information. Ensure that the printer - Dell 510D | User Guide - Page 89
and Other Hardware. 2. Click Scanners and Cameras. If your scanner is listed, Windows recognizes the scanner. Reinstall the scanner driver - See the scanner documentation for instructions. Sound and Speaker Problems NOTE: This computer uses digital sound, and contains no analog audio lines. PCMCIA - Dell 510D | User Guide - Page 90
lamps to check for interference. Reinstall the audio driver Run the Dell Diagnostics No sound from headphones Check the headphone that the problem is with the mouse, check the touch pad - 1. Shut down the computer. 2. Disconnect the mouse. 3. Turn on the computer. 4. At the Windows desktop, use - Dell 510D | User Guide - Page 91
the touch pad driver - See "Reinstalling Drivers and Utilities." Video and Display Problems Fill out the Diagnostics Checklist as you complete these checks. CAUTION: Before you begin any of the procedures in this section, follow the safety instructions in the Product Information Guide. If the - Dell 510D | User Guide - Page 92
the monitor and adjust the monitor brightness and contrast controls. If the external monitor works, the computer display or video controller may be defective. Contact Dell. - Dell 510D | User Guide - Page 93
connector size Data width (maximum) Memory Memory module connector Memory module capacities Memory type Minimum memory Maximum memory Display Keyboard Touch Pad Battery AC Adapter Physical Environmental Intel® Pentium® M or Intel Celeron M 64KB (internal); 32-KB instruction and 32-KB writeback data - Dell 510D | User Guide - Page 94
type: Data bus Video controller Video memory LCD interface TV support Color output Audio Audio type Audio controller Stereo conversion Interfaces: Internal External Speaker Internal speaker amplifier Volume controls Display Type (active-matrix TFT) Dimensions LAN on system board internal Mini PCI - Dell 510D | User Guide - Page 95
sensor-active area 48.88-mm (1.92-inch) rectangle Battery Type Dimensions: Depth Height Width Weight Voltage Charge time with computer off ( depending on operating conditions and can be significantly reduced under certain power-intensive conditions See "Using a Battery" for more information on - Dell 510D | User Guide - Page 96
Input current (maximum) Input frequency Output current: 90 W 65 W Output power Rated output voltage Dimensions: Height Width Length Weight (with cables) Temperature range: Operating Storage 1.7 A (both) 47-63 Hz (both) 4.62 A (maximum at 4-second pulse); 4.62 A (continuous) 3.34 A (maximum at 4- - Dell 510D | User Guide - Page 97
- Dell 510D | User Guide - Page 98
the problem. CAUTION: A CAUTION indicates a potential for property damage, personal injury, or death. Abbreviations and Acronyms For a complete list of abbreviations and acronyms, see the Glossary. If you purchased a Dell™ n Series computer, any references in this document to Microsoft® Windows - Dell 510D | User Guide - Page 99
Dell, the DELL logo, Inspiron, Dell Precision, Dimension, OptiPlex, Latitude, Dell TravelLite, PowerEdge, PowerVault, PowerApp, and Dell OpenManage are trademarks of Dell Inc.; Intel, Intel SpeedStep, and Pentium are registered trademarks of Intel Corporation; Microsoft, MS-DOS, Outlook, and Windows - Dell 510D | User Guide - Page 100
Use the Service Tag if you need to report a loss or theft to law enforcement officials and to Dell. l Create a file on the Microsoft® Windows® desktop called if_found wireless activity, press . l Consider changing your power management options to maximize battery operating time. l If you - Dell 510D | User Guide - Page 101
used in the countries you will visit, and have appropriate power cords. l Check with your credit card company for information about the security office of the company. l Contact Dell customer service to report the missing computer. Provide the computer Service Tag, the case number, and the name, - Dell 510D | User Guide - Page 102
a Wireless Network in Microsoft® Windows® XP Your wireless network card requires specific software and drivers in order to connect to a network. The software is already installed. If the software is removed or corrupted, follow the instructions included in the user's guide for your wireless network - Dell 510D | User Guide - Page 103
a secure network (identified by a icon), you must enter a WEP or WPA password when prompted. NOTE: Network security settings are unique to your network. Dell cannot provide this information. NOTE: Your computer can take up to 1 minute to connect to the network. After your computer is configured for - Dell 510D | User Guide - Page 104
Support Center provides help with Windows XP and offers other support and educational tools. With the Help and Support Center, you can: l Access user's guides written for the Windows default view, so they may not work if you set your Dell™ computer to the Windows classic view. Desktop 1. Click the - Dell 510D | User Guide - Page 105
list of shortcuts, deselect any shortcuts you want to leave on the desktop and click Next. 6. Click Finish to remove the shortcuts and close the wizard. Transferring Information to a New Computer The Microsoft® Windows® XP operating system provides a Files and Settings Transfer wizard to move data - Dell 510D | User Guide - Page 106
is running Windows XP Professional and is a member of a computer domain, or if your computer has less than 128 MB of memory. Fast User not work with Fast User Switching. For more information, see the Help and Support Center. Setting Up a Home and Office Network 1. Connect the network cable to - Dell 510D | User Guide - Page 107
connector. Network Setup Wizard The Microsoft® Windows® XP operating system provides a Network Setup Wizard to guide you through the process of sharing Windows XP. 4. Complete the checklist and required preparations. 5. Return to the Network Setup Wizard and follow the instructions Support Center.
-
 1
1 -
 2
2 -
 3
3 -
 4
4 -
 5
5 -
 6
6 -
 7
7 -
8
-
9
-
10
-
11
-
12
-
13
-
14
-
15
-
16
-
17
-
18
-
19
-
20
-
21
-
22
-
23
-
24
-
25
-
26
-
27
-
28
-
29
-
30
-
31
-
32
-
33
-
34
-
35
-
36
-
37
-
38
-
39
-
40
-
41
-
42
-
43
-
44
-
45
-
46
-
47
-
48
-
49
-
50
-
51
-
52
-
53
-
54
-
55
-
56
-
57
-
58
-
59
-
60
-
61
-
62
-
63
-
64
-
65
-
66
-
67
-
68
-
69
-
70
-
71
-
72
-
73
-
74
-
75
-
76
-
77
-
78
-
79
-
80
-
81
-
82
-
83
-
84
-
85
-
86
-
87
-
88
-
89
-
90
-
91
-
92
-
93
-
94
-
95
-
96
-
97
-
98
-
99
-
100
-
101
-
102
-
103
-
104
-
105
-
106
-
107
 |
 |

About Your Computer
Front View
Left View
Right View
Back View
Bottom View
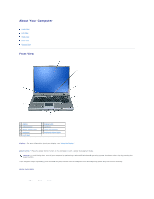
Front View
display
—
For more information about your display, see "
Using the Display
."
power button
—
Press the power button to turn on the computer or exit a power management mode.
If the computer stops responding, press and hold the power button until the computer turns off completely (which may take several seconds).
device status lights
1
display
6
display latch
2
power button
7
speakers
3
device status lights
8
touch pad buttons
4
keyboard
9
keyboard status lights
5
touch pad
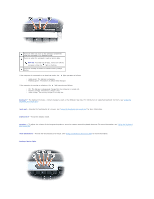
NOTICE:
To avoid losing data, turn off your computer by performing a Microsoft
®
Windows
®
operating system shutdown rather than by pressing the
power button.