Dell 540 Photo Printer Dell™ Photo Printer 540 User's Guide
Dell 540 Photo Printer Manual
 |
View all Dell 540 Photo Printer manuals
Add to My Manuals
Save this manual to your list of manuals |
Dell 540 Photo Printer manual content summary:
- Dell 540 Photo Printer | Dell™ Photo Printer 540 User's Guide - Page 1
Dell™ Photo Printer 540 User's Guide Click the links to the left for information on the features and operation of your printer. For information on other documentation included with your printer, see Finding Information. To order supplies from Dell, double-click the (www.dell.com/supplies), or order - Dell 540 Photo Printer | Dell™ Photo Printer 540 User's Guide - Page 2
INSTRUCTIONS Use the following safety guidelines to help ensure your own personal safety and to help protect your Dell™ Photo Printer 540 and working environment from potential damage. CAUTION: Do not set up this product or make any electrical or cabling connections, such as the power supply cord - Dell 540 Photo Printer | Dell™ Photo Printer 540 User's Guide - Page 3
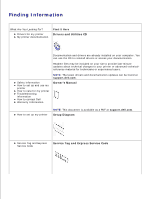
my printer Troubleshooting information How to contact Dell Warranty Information NOTE: The latest drivers and documentation updates can be found at support.dell.com. Owner's Manual How to set up my printer NOTE: This document is available as a PDF at support.dell.com. Setup Diagram Service Tag - Dell 540 Photo Printer | Dell™ Photo Printer 540 User's Guide - Page 4
the Service Tag to identify your printer when you use support.dell.com or contact technical support. Dell Support Website - support.dell.com NOTE: Select your region to view the appropriate support site. The Dell Support website provides several online tools, including: Solutions - Troubleshooting - Dell 540 Photo Printer | Dell™ Photo Printer 540 User's Guide - Page 5
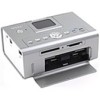
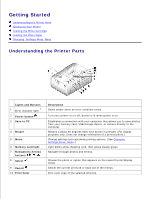
Up Your Printer Loading the Photo Cartridge Loading the Photo Paper Changing Settings-Press Menu Understanding the Printer Parts Lights and Buttons 1 Error indicator light 2 Power button 3 Save to PC 4 Rotate 5 Menu 6 Memory card light 7 Navigation (Arrow) buttons 8 Select 9 Cancel 10 Print Color - Dell 540 Photo Printer | Dell™ Photo Printer 540 User's Guide - Page 6
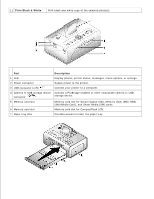
11 Print Black & White Print black and white copy of the selected photo(s). Part Description 1 LCD Display photos, printer status, messages, menu options, or settings. 2 Power connector Supply power to the printer. 3 USB connector to PC Connect your printer to a computer. 4 Camera or USB - Dell 540 Photo Printer | Dell™ Photo Printer 540 User's Guide - Page 7
The Dell Photo Printer 540 supports Microsoft® Windows® 2000 and Windows XP. Follow the instructions on your Setting Up Your Printer poster to install the hardware (and software, if using your printer with a computer). For setup troubleshooting, see Setup Problems. Loading the Photo Cartridge NOTE - Dell 540 Photo Printer | Dell™ Photo Printer 540 User's Guide - Page 8
may lock in place if there is a paper jam. Do not attempt to remove the photo cartridge without first clearing the paper jam. NOTE: Warning messages and reorder instructions are displayed on the LCD when the photo cartridge is low. When there are 5 or fewer prints remaining, the error light blinks - Dell 540 Photo Printer | Dell™ Photo Printer 540 User's Guide - Page 9
the Photo Paper NOTE: Use only the perforated photo paper from a Dell Photo Print Pack. Do not use inkjet paper or any other photo paper. Do not remove perforated tabs from the photo paper until a photo is printed. 1. If the paper tray is in the printer, pull it out. 2. Open the top paper tray cover - Dell 540 Photo Printer | Dell™ Photo Printer 540 User's Guide - Page 10
Open the paper tray door. 8. With the top paper tray cover open, insert the paper tray into the printer. Changing Settings-Press Menu Press the Menu button to customize your photo and printer settings. LCD. NOTE: The option currently selected is noted with a checkmark. Print Options Menu - Dell 540 Photo Printer | Dell™ Photo Printer 540 User's Guide - Page 11
x 13 cm) photo/sheet 2 photos/sheet (54 x 85 mm) 4 photos/sheet (wallet setting, 51 x 76 mm) 9 photos/sheet (34 x 50.7 mm) PRINT INDEX PRINT ALL Prints an index (thumbnail) of all photos on your card (maximum 25 thumbnails per sheet). Print all photos on your memory card. Photo Quality Menu From - Dell 540 Photo Printer | Dell™ Photo Printer 540 User's Guide - Page 12
NOTE: To print any photo while it is displayed, press Print Color or Print Black and White photos from your memory card, USB storage device, or camera directly to the computer. Same functionality as pressing the Save to PC button. For details, see Saving and Copying Photos to Your Computer. Printer - Dell 540 Photo Printer | Dell™ Photo Printer 540 User's Guide - Page 13
CHANGE CARTRIDGE Display directions for changing the photo cartridge. ADD PHOTO PAPER Display directions for adding photo paper. PRINTER DIAGNOSTICS Help diagnose print quality problems and provide printer identification information. Test Print Service Tag-display your printer's service tag - Dell 540 Photo Printer | Dell™ Photo Printer 540 User's Guide - Page 14
compatible camera. Printing Tips Before you print, make sure the power is connected, and the photo cartridge and photo paper are loaded. For help, see your Setting Up Your Printer poster. Printing starts when you press Print. The photo paper cycles 4 times during the printing process. The first - Dell 540 Photo Printer | Dell™ Photo Printer 540 User's Guide - Page 15
deselects the photo for printing. 3. To select more photos to print, repeat Steps 1 and 2. To deselect all photos, press Cancel for 2 seconds. 4. Press Print Color or Print Black and White to begin printing all selected photos. After the print job is complete, all photos are deselected. Choosing - Dell 540 Photo Printer | Dell™ Photo Printer 540 User's Guide - Page 16
. The layout then reverts to the default 1-up 4x6 photo. Printing a Print Order (Pre-Selected Photos) When you pre-select, or tag, photos for printing on your camera, you create a print order (DPOF: Digital Print Order File). Your printer detects the print order and automatically displays the set of - Dell 540 Photo Printer | Dell™ Photo Printer 540 User's Guide - Page 17
, then use your printer LCD.) Canceling Printing To stop printing, press Cancel and follow the directions on the LCD. Printing is canceled upon completion of the current printing pass. The unfinished print is ejected into the paper tray. Removing Perforated Tabs From Prints NOTE: Remove perforated - Dell 540 Photo Printer | Dell™ Photo Printer 540 User's Guide - Page 18
display [16 bit] Windows XP Professional and Professional, Service Pack 1 Pentium IV processor 2.0 GHz 256 MB RAM 500 MB available free space USB port CD-ROM 1024 x 768 (32 bit) Installing Printer Drivers and Software 1. Make sure the power cable is connected to the printer and the printer is on - Dell 540 Photo Printer | Dell™ Photo Printer 540 User's Guide - Page 19
the printer drivers and printer documentation. Select Typical to install all components. Select Custom to install specific components. 6. Insert the remaining two CDs, one at a time, to install your photo editing software programs. Follow the on-screen instructions on the printer. Printing From - Dell 540 Photo Printer | Dell™ Photo Printer 540 User's Guide - Page 20
the Cancel button on the printer. Canceling Printing From a Computer: 1. Double-click the Printer icon in the system tray. 2. Click the print job you want to cancel. 3. Select Document, then select Cancel. Saving and Copying Photos to Your Computer 1. With the printer turned on, insert a memory - Dell 540 Photo Printer | Dell™ Photo Printer 540 User's Guide - Page 21
2. If you have loaded Photo Manager software, the Photo Manager Wizard launches. Follow the prompts to transfer photos to your computer using the Photo Manager software. If Using Windows Explorer 1. Double-click the My Computer icon on your desktop (or right-click the Start button and select Explore - Dell 540 Photo Printer | Dell™ Photo Printer 540 User's Guide - Page 22
misfeeds and to make sure your photos are the best quality, keep the feed roller clean. Inspect the roller weekly for debris particles, and clean if necessary. 1. Unplug the AC power adapter. 2. Remove the paper tray from the printer, and leave the paper tray door open. 3. Lightly moisten a lint - Dell 540 Photo Printer | Dell™ Photo Printer 540 User's Guide - Page 23
, handle the photo cartridge by the spool ends. To avoid fingerprints on your prints, handle the photo paper by the edges or by the perforated tabs. Do not touch the glossy side of the paper. When storing the printer, remove the paper tray, then close the paper tray cover and paper tray door to keep - Dell 540 Photo Printer | Dell™ Photo Printer 540 User's Guide - Page 24
is compatible with your printer. The Dell Photo Printer 540 supports Windows XP and 2000. Printer Does Not Print Make sure the photo cartridge is properly installed and there is photo paper in the tray. Use an undamaged USB cable. Check your printer status to make sure your photo is not being held - Dell 540 Photo Printer | Dell™ Photo Printer 540 User's Guide - Page 25
mode. See your camera Owner's Manual. General Problems Anytime your printer has a problem, make sure: Your printer is on. The photo paper is loaded correctly. For help, see Loading the Photo Paper. Unplug the power supply from the electrical outlet. Reconnect the power supply (see your Setup Diagram - Dell 540 Photo Printer | Dell™ Photo Printer 540 User's Guide - Page 26
Print to resume printing. Printer is jammed NOTE: Use only Dell photo paper from a Dell Photo Print Pack for your printer. Do not use inkjet paper or any other photo paper. If the Error indicator light is lit: 1. Remove the paper tray (Loading the Photo Paper). 2. Disconnect the AC power adapter - Dell 540 Photo Printer | Dell™ Photo Printer 540 User's Guide - Page 27
: Use only Dell photo paper from a Dell Photo Print Pack for your printer. Do not use inkjet paper or any other photo paper. Check the photo paper: 1. Remove the paper tray. 2. Check the paper slot on the back of the printer. 3. Remove loose paper from the printer. 4. Inspect the paper supply: make - Dell 540 Photo Printer | Dell™ Photo Printer 540 User's Guide - Page 28
your camera user's guide for details. Adjust cropped photos using Dell Photo Imaging software on your computer. If you are printing from an application on your computer, select the proper paper size in print options. A selected photo does not print The image file may be corrupt. Review the photo on - Dell 540 Photo Printer | Dell™ Photo Printer 540 User's Guide - Page 29
advancement of the print ribbon as a result of removing ribbon slack or clearing jams Supply mismatch is likely to occur as you continue to use your printer. If you wish to keep your photo cartridge and photo paper supply synchronized, discard unused photo cartridge or photo paper when one or - Dell 540 Photo Printer | Dell™ Photo Printer 540 User's Guide - Page 30
, then reinstall Drivers and Utilities software (Installing Printer Drivers and Software). Make sure your computer meets the minimum system requirements (Windows-Based Operating System Requirements). Upgrade your system if necessary. More Troubleshooting Options Go to support.dell.com for help - Dell 540 Photo Printer | Dell™ Photo Printer 540 User's Guide - Page 31
optimum photo quality) Power Print speed Size (Depth, width, height) Weight Print size Photo paper size Photo resolution Thermal dye transfer Temperature: 50 to 95 °F (10 to 35 °C) Humidity: 10% to 86% RH Output: 24V DC Input: 90V to 132V AC @ 50/60 Hz, connection via in-line AC power adapter (US - Dell 540 Photo Printer | Dell™ Photo Printer 540 User's Guide - Page 32
the possibility of interference with radio communications services. Using shielded cables ensures that you maintain the appropriate Electromagnetic Compatibility classification for the intended environment. For parallel printers, a cable is available from Dell. If you prefer, you can order a cable - Dell 540 Photo Printer | Dell™ Photo Printer 540 User's Guide - Page 33
your computer: Dell Printer Owner's Manual Modem Regulatory Information service. If you experience trouble with this telephone equipment, see "Getting Help" in your computer's troubleshooting documentation or, for some computers, the section titled "Contacting Dell" in your computer's online guide - Dell 540 Photo Printer | Dell™ Photo Printer 540 User's Guide - Page 34
changes or modifications not expressly approved by Dell could void your authority to operate this may not prevent degradation of service in some situations. Repairs to user to disconnect the equipment. Users should ensure for their own protection, that the electrical ground connections of the power - Dell 540 Photo Printer | Dell™ Photo Printer 540 User's Guide - Page 35
information is provided in compliance with IC regulations: Dell Inc. One Dell Way Round Rock, TX 78682 USA 512-338-4400 3: Limitation of Voltage Fluctuations and Flicker in Low-Voltage Supply Systems for Equipment With Rated Current Up to and Including user may be required to take adequate measures. - Dell 540 Photo Printer | Dell™ Photo Printer 540 User's Guide - Page 36
If the FCC or ICES information on the label indicates a Class B rating, the following Class B statement applies to your computer: This Dell device is classified for use in a typical Class B domestic environment. A "Declaration of Conformity" in accordance with the preceding directives and standards - Dell 540 Photo Printer | Dell™ Photo Printer 540 User's Guide - Page 37
to make automatic calls to the Telecom `111' Emergence Service." "If a charge for local calls is unacceptable, telephone, not dependent on local power, is available for emergency use." same number within any 30-minute period for any single manual call initiation, and the equipment shall go on-hook - Dell 540 Photo Printer | Dell™ Photo Printer 540 User's Guide - Page 38
(VCCI) for information technology equipment. If this equipment is used in a domestic environment, radio disturbance may arise. When such trouble occurs, the user may be required to take corrective actions. VCCI Class A ITE Regulatory Mark If the regulatory label includes the following marking, your - Dell 540 Photo Printer | Dell™ Photo Printer 540 User's Guide - Page 39
cause radio interference. Install and use the equipment according to the instruction manual. VCCI Class B ITE Regulatory Mark If the regulatory label includes (MIC) registration labels located on your computer (or other Dell digital device). The MIC label may be located separately from - Dell 540 Photo Printer | Dell™ Photo Printer 540 User's Guide - Page 40
Please note that this device has been approved for business purposes with regard to electromagnetic interference. If you find that this device is not suitable for your use, you may exchange it for a nonbusinesspurpose device. MIC Class A Regulatory Label If the regulatory label includes the - Dell 540 Photo Printer | Dell™ Photo Printer 540 User's Guide - Page 41
NOM Information (Mexico Only) The following information is provided on the device(s) described in this document in compliance with the requirements of the official Mexican standards (NOM): - Dell 540 Photo Printer | Dell™ Photo Printer 540 User's Guide - Page 42
with these requirements and all ENERGY STAR® power management features of the computer are enabled. NOTE: Any Dell computer bearing the ENERGY STAR® emblem on estimates that use of ENERGY STAR® computer products can save computer users up to two billion dollars annually in electricity costs. In turn
-
 1
1 -
 2
2 -
 3
3 -
 4
4 -
 5
5 -
 6
6 -
 7
7 -
8
-
9
-
10
-
11
-
12
-
13
-
14
-
15
-
16
-
17
-
18
-
19
-
20
-
21
-
22
-
23
-
24
-
25
-
26
-
27
-
28
-
29
-
30
-
31
-
32
-
33
-
34
-
35
-
36
-
37
-
38
-
39
-
40
-
41
-
42
 |
 |
Dell™ Photo Printer 540 User's Guide
Click the links to the left for information on the features and operation of your printer. For information on
other documentation included with your printer, see
Finding Information
.
To order supplies from Dell, double-click the
icon on your desktop, visit Dell's website
(www.dell.com/supplies), or order by phone.
For the best service, make sure you have the Dell printer Service Tag available. See
Express Service Code
.
Notes, Notices, and Cautions
NOTE:
A NOTE indicates important information that helps you make better use of your printer.
NOTICE:
A NOTICE indicates either potential damage to hardware or loss of data and tells you how to
avoid the problem.
CAUTION:
A CAUTION indicates a potential for property damage, personal injury, or death.
Information in this document is subject to change without notice.
© 2004 Dell Inc. All rights reserved.
Reproduction in any manner whatsoever without the written permission of Dell Inc.
is strictly forbidden.
Trademarks used in this text:
Dell and
the
DELL
logo are trademarks of Dell Inc.;
Microsoft
and
Windows
are registered
trademarks of Microsoft Corporation.
Other trademarks and trade names may be used in this document to refer to either the entities claiming the marks and names or
their products. Dell Inc. disclaims any proprietary interest in trademarks and trade names other than its own.
Model 540
March 2004
P/N 4J1412
Rev. A00