Dell DR2000v Symantec Backup Exec - Setting Up the DR Series System on Symante
Dell DR2000v Manual
 |
View all Dell DR2000v manuals
Add to My Manuals
Save this manual to your list of manuals |
Dell DR2000v manual content summary:
- Dell DR2000v | Symantec Backup Exec - Setting Up the DR Series System on Symante - Page 1
Setting Up the Dell™ DR Series System on Symantec™ Backup Exec™ Dell Engineering July 2015 A Dell Technical White Paper - Dell DR2000v | Symantec Backup Exec - Setting Up the DR Series System on Symante - Page 2
third party products does not necessarily constitute Dell's recommendation of those products. Please consult your Dell representative for additional information. Trademarks used in this text: Dell™, the Dell logo, and PowerVault™ are trademarks of Dell Inc. Other Dell trademarks may be used in this - Dell DR2000v | Symantec Backup Exec - Setting Up the DR Series System on Symante - Page 3
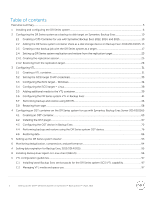
for Backup Exec 2012/2014/2015...95 B Installing Backup Exec Agent on Linux client (RALUS)...96 C VTL configuration guidelines ...97 C.1 Installing latest Backup Exec service packs for the DR Series system iSCSI VTL capability 97 C.2 Managing VTL media and space use...97 3 Setting Up the - Dell DR2000v | Symantec Backup Exec - Setting Up the DR Series System on Symante - Page 4
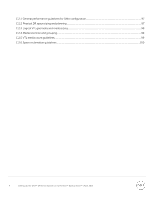
...97 C.2.3 Logical VTL geometry and media sizing...98 C.2.4 Media retention and grouping...99 C.2.5 VTL media count guidelines...99 C.2.6 Space reclamation guidelines...100 4 Setting Up the Dell™ DR Series System on Symantec™ Backup Exec™ | April 2015 - Dell DR2000v | Symantec Backup Exec - Setting Up the DR Series System on Symante - Page 5
DR Series system documentation and other data management application best practices whitepapers for your specific DR Series system at: http://www.dell.com/powervaultmanuals Note: The DR Series system/Symantec Backup Exec build version and screenshots used for this paper may vary slightly, depending - Dell DR2000v | Symantec Backup Exec - Setting Up the DR Series System on Symante - Page 6
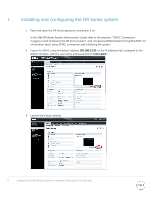
and power it on. In the Dell DR Series System Administrator Guide, refer to the sections, "iDRAC default address 192.168.0.120, or the IP address that is assigned to the iDRAC interface, with the user name and password of "root/calvin". 3. Launch the virtual console. 6 Setting Up the Dell - Dell DR2000v | Symantec Backup Exec - Setting Up the DR Series System on Symante - Page 7
on to the system as the user administrator with the password St0r@ge! (The "0" in the password is the numeral zero). 5. Set the user-defined networking preferences. 6. View the summary of preferences and confirm that it is correct. 7 Setting Up the Dell™ DR Series System on Symantec™ Backup Exec - Dell DR2000v | Symantec Backup Exec - Setting Up the DR Series System on Symante - Page 8
do not want to add the DR Series system to Active Directory, see the DR Series System Owner's Manual for guest logon instructions. a. Select Active Directory from the left navigation area of the DR Series system GUI. 8 Setting Up the Dell™ DR Series System on Symantec™ Backup Exec™ | April 2015 - Dell DR2000v | Symantec Backup Exec - Setting Up the DR Series System on Symante - Page 9
b. Enter your Active Directory credentials. Enter Active Directory Credentials 9 Setting Up the Dell™ DR Series System on Symantec™ Backup Exec™ | April 2015 - Dell DR2000v | Symantec Backup Exec - Setting Up the DR Series System on Symante - Page 10
the left navigation area, and then clicking Create at the top of the page. 2. Enter a Container Name, and then click Next. 10 Setting Up the Dell™ DR Series System on Symantec™ Backup Exec™ | April 2015 - Dell DR2000v | Symantec Backup Exec - Setting Up the DR Series System on Symante - Page 11
3. Select NAS (NFS, CIFS) and click Next. 4. For the CIFS access protocol, select CIFS and click Next. 5. Select Open to allow all clients access or enter client details for client access. Click Next. 11 Setting Up the Dell™ DR Series System on Symantec™ Backup Exec™ | April 2015 - Dell DR2000v | Symantec Backup Exec - Setting Up the DR Series System on Symante - Page 12
6. Click Create a New Container on the summary page. 7. Verify the container creation. 12 Setting Up the Dell™ DR Series System on Symantec™ Backup Exec™ | April 2015 - Dell DR2000v | Symantec Backup Exec - Setting Up the DR Series System on Symante - Page 13
/2014/2015 1. Open the Backup Exec console. In the Storage pane, click Configure Storage. 2. Select Disk-based storage, and click Next. 13 Setting Up the Dell™ DR Series System on Symantec™ Backup Exec™ | April 2015 - Dell DR2000v | Symantec Backup Exec - Setting Up the DR Series System on Symante - Page 14
3. Select Disk Storage, and click Next. 4. Enter a name for the DR Series system disk device, add a description, and click Next. 14 Setting Up the Dell™ DR Series System on Symantec™ Backup Exec™ | April 2015 - Dell DR2000v | Symantec Backup Exec - Setting Up the DR Series System on Symante - Page 15
Exec 2014/2015 - set how many concurrent write operations are allowed. Click Next. Note: The DR Series system supports the following number of concurrent writes to CIFS Storage: DR4x00 - 32 DR6000 - 64 DR2000V - 8 To change this number later at any time, go to the Storage tab, select the required - Dell DR2000v | Symantec Backup Exec - Setting Up the DR Series System on Symante - Page 16
6. In the Storage Configuration Summary window, click Finish. For Backup Exec 2014/2015, the summary page will include additional details. 16 Setting Up the Dell™ DR Series System on Symantec™ Backup Exec™ | April 2015 - Dell DR2000v | Symantec Backup Exec - Setting Up the DR Series System on Symante - Page 17
added in Backup Exec, it can be added by selecting the Backup and Restore pane and then clicking the Add button. 17 Setting Up the Dell™ DR Series System on Symantec™ Backup Exec™ | April 2015 - Dell DR2000v | Symantec Backup Exec - Setting Up the DR Series System on Symante - Page 18
2. Follow the wizard by selecting the required type of server and continue. 3. In the Backup and Restore pane, click Backup > Back Up to Disk. 18 Setting Up the Dell™ DR Series System on Symantec™ Backup Exec™ | April 2015 - Dell DR2000v | Symantec Backup Exec - Setting Up the DR Series System on Symante - Page 19
, backup data sets can be selected from multiple servers within the same job. To add an additional server, click the "+" button. 19 Setting Up the Dell™ DR Series System on Symantec™ Backup Exec™ | April 2015 - Dell DR2000v | Symantec Backup Exec - Setting Up the DR Series System on Symante - Page 20
6. For Backup Exec 2014/2015, follow the wizard and add the Server with the selected backup data. The Source Dataset will appear. Click OK to continue. The final backup selection with two servers is displayed. 20 Setting Up the Dell™ DR Series System on Symantec™ Backup Exec™ | April 2015 - Dell DR2000v | Symantec Backup Exec - Setting Up the DR Series System on Symante - Page 21
strategy. 8. Click Schedule. Define the backup mode and select schedule options. For Backup Exec 2014/2015 the screen includes additional information. 21 Setting Up the Dell™ DR Series System on Symantec™ Backup Exec™ | April 2015 - Dell DR2000v | Symantec Backup Exec - Setting Up the DR Series System on Symante - Page 22
9. Click Storage and then select the Disk Storage Device pointing to the DR container share. Define other backup options as needed, and then click OK. 10. Enter a job Name, and click OK. 22 Setting Up the Dell™ DR Series System on Symantec™ Backup Exec™ | April 2015 - Dell DR2000v | Symantec Backup Exec - Setting Up the DR Series System on Symante - Page 23
11. To run the job, select an Agent, and click OK. The Jobs window shows the job queue status. 23 Setting Up the Dell™ DR Series System on Symantec™ Backup Exec™ | April 2015 - Dell DR2000v | Symantec Backup Exec - Setting Up the DR Series System on Symante - Page 24
12. For Backup Exec 2014, select the required server from the drop down, select the job recently created, and click Run Now. 24 Setting Up the Dell™ DR Series System on Symantec™ Backup Exec™ | April 2015 - Dell DR2000v | Symantec Backup Exec - Setting Up the DR Series System on Symante - Page 25
CIFS container 'target' on DR2. For each of the containers, on the Backup Exec media server, configure a corresponding Disk Storage Device. 25 Setting Up the Dell™ DR Series System on Symantec™ Backup Exec™ | April 2015 - Dell DR2000v | Symantec Backup Exec - Setting Up the DR Series System on Symante - Page 26
. Set the 'source' container as the replication source, set the DR2 'target' container as the replication target. Start the replication session. 26 Setting Up the Dell™ DR Series System on Symantec™ Backup Exec™ | April 2015 - Dell DR2000v | Symantec Backup Exec - Setting Up the DR Series System on Symante - Page 27
4. Schedule and run backup jobs to the source Disk Storage Device. For Backup Exec 2014/2015, view the Job History screen. 27 Setting Up the Dell™ DR Series System on Symantec™ Backup Exec™ | April 2015 - Dell DR2000v | Symantec Backup Exec - Setting Up the DR Series System on Symante - Page 28
Operations, right-click the replication target device, and select Inventory and Catalog. For Backup Exec 2014/2015, the following screen appears. 28 Setting Up the Dell™ DR Series System on Symantec™ Backup Exec™ | April 2015 - Dell DR2000v | Symantec Backup Exec - Setting Up the DR Series System on Symante - Page 29
2. After the Inventory and Catalog job is done, check the Backup Sets shown in target storage device. 3. Disable source storage under Storage > State, right-click the source storage device, and select Disable. 29 Setting Up the Dell™ DR Series System on Symantec™ Backup Exec™ | April 2015 - Dell DR2000v | Symantec Backup Exec - Setting Up the DR Series System on Symante - Page 30
4. Schedule and run a restore job from the target device. 30 Setting Up the Dell™ DR Series System on Symantec™ Backup Exec™ | April 2015 - Dell DR2000v | Symantec Backup Exec - Setting Up the DR Series System on Symante - Page 31
The latest release of the DR Series system (v3.2) adds Virtual Tape Library (VTL) support. This functionality can be accessed by Backup Exec via iSCSI. Basic workflow includes: 1. Library (VTL) option, and click Next. 31 Setting Up the Dell™ DR Series System on Symantec™ Backup Exec™ | April 2015 - Dell DR2000v | Symantec Backup Exec - Setting Up the DR Series System on Symante - Page 32
. For NetVault, you must also specific Auto as the Marker Type. Click Next. 4. Finalize VTL creation by clicking Create a New Container. 32 Setting Up the Dell™ DR Series System on Symantec™ Backup Exec™ | April 2015 - Dell DR2000v | Symantec Backup Exec - Setting Up the DR Series System on Symante - Page 33
: iscsi_user The default iSCSI password is "St0r@ge!iscsi" 1. You can modify the password by navigating to Clients Edit CHAP Password and enter the new password as needed. NOTE: iSCSI CHAP Passwords must be " CLI command to change the iSCSI CHAP Password setting. For example: > iscsi --setpassword - Dell DR2000v | Symantec Backup Exec - Setting Up the DR Series System on Symante - Page 34
field. Click Quick Connection to open the Quick Connect dialog box, which indicates a connection was made but is set as inactive. 34 Setting Up the Dell™ DR Series System on Symantec™ Backup Exec™ | April 2015 - Dell DR2000v | Symantec Backup Exec - Setting Up the DR Series System on Symante - Page 35
Target from the list, click the Connect button, and then in the Connect To Target dialog box, click the Advanced button. 35 Setting Up the Dell™ DR Series System on Symantec™ Backup Exec™ | April 2015 - Dell DR2000v | Symantec Backup Exec - Setting Up the DR Series System on Symante - Page 36
3. In Advanced Settings, select to Enable CHAP log on and enter the User Name and Target Secret / Password. Select OK. Refer to Appendix A for further details about accounts and credentials. 36 Setting Up the Dell™ DR Series System on Symantec™ Backup Exec™ | April 2015 - Dell DR2000v | Symantec Backup Exec - Setting Up the DR Series System on Symante - Page 37
article at http://catalog.update.microsoft.com/v7/site/home.aspx for information about acquiring Microsoft Device Drivers, e.g., StorageTek Library Drivers. 37 Setting Up the Dell™ DR Series System on Symantec™ Backup Exec™ | April 2015 - Dell DR2000v | Symantec Backup Exec - Setting Up the DR Series System on Symante - Page 38
b. Modify the following lines: # To set a CHAP username and password for initiator # authentication by the target(s), uncomment the following lines: node.session.auth.username = iscsi_user node.session.auth.password = St0r@ge!iscsi 2. Set the Discovery Target Node(s) by using - Dell DR2000v | Symantec Backup Exec - Setting Up the DR Series System on Symante - Page 39
-m session = tcp: [8] 10.8.230.108:3260,1 iqn.198405.com.dell:dr4000.3071067.interoprhel52n1.30 5. Review dmesg or /var/log/messages for Backup Exec. Check the Backup Exec recommendations for the maximum number of tapes supported. 1. To add media to an existing VTL container click Containers in - Dell DR2000v | Symantec Backup Exec - Setting Up the DR Series System on Symante - Page 40
40 Setting Up the Dell™ DR Series System on Symantec™ Backup Exec™ | April 2015 - Dell DR2000v | Symantec Backup Exec - Setting Up the DR Series System on Symante - Page 41
more information. After the DR Series system VTL has been connected to the Windows host running Backup Exec, do the following steps. 1. Restart Backup Exec Services to discover the newly attached VTL container. 2. Go to the Storage tab to monitor the VTL discovery. ' 41 Setting Up the - Dell DR2000v | Symantec Backup Exec - Setting Up the DR Series System on Symante - Page 42
the VTL and all drives are listed on the Storage tab. There are four supported VTL types supported in the DR Series system, and they can be configured with Backup Exec. The container name and clicking the Library tab. 42 Setting Up the Dell™ DR Series System on Symantec™ Backup Exec™ | April 2015 - Dell DR2000v | Symantec Backup Exec - Setting Up the DR Series System on Symante - Page 43
43 Setting Up the Dell™ DR Series System on Symantec™ Backup Exec™ | April 2015 - Dell DR2000v | Symantec Backup Exec - Setting Up the DR Series System on Symante - Page 44
Or, on the Backup Exec Server, on the Storage Tab go to Library > Details. 4. Run the Inventory to mount the media in the drive and read the media label by right-clicking Library > Inventory > Inventory Now. 44 Setting Up the Dell™ DR Series System on Symantec™ Backup Exec™ | April 2015 - Dell DR2000v | Symantec Backup Exec - Setting Up the DR Series System on Symante - Page 45
5. To see slot level details before running Inventory, on the Storage tab, select Details > Select Slots. After Inventory - 45 Setting Up the Dell™ DR Series System on Symantec™ Backup Exec™ | April 2015 - Dell DR2000v | Symantec Backup Exec - Setting Up the DR Series System on Symante - Page 46
addition, you need to install the RALUS package. See Appendix B for information about installing the RALUS package on the Linux client. 46 Setting Up the Dell™ DR Series System on Symantec™ Backup Exec™ | April 2015 - Dell DR2000v | Symantec Backup Exec - Setting Up the DR Series System on Symante - Page 47
3. Using the Default settings, click Next to proceed. 4. Provide the access credentials for the server you want to add. Select from the drop drown or create new logon details as required. 47 Setting Up the Dell™ DR Series System on Symantec™ Backup Exec™ | April 2015 - Dell DR2000v | Symantec Backup Exec - Setting Up the DR Series System on Symante - Page 48
5. Using the default settings, click Next to proceed. 48 Setting Up the Dell™ DR Series System on Symantec™ Backup Exec™ | April 2015 - Dell DR2000v | Symantec Backup Exec - Setting Up the DR Series System on Symante - Page 49
6. On the final summary screen, click Install. The following screen shows the successful installation of a Remote Backup Exec Agent on the server. 49 Setting Up the Dell™ DR Series System on Symantec™ Backup Exec™ | April 2015 - Dell DR2000v | Symantec Backup Exec - Setting Up the DR Series System on Symante - Page 50
The Backup and Restore tab shows the newly added server and details as shown in following screen. 7. On the Backup and Restore tab, select the server that contains the data to back up and go to Details. 50 Setting Up the Dell™ DR Series System on Symantec™ Backup Exec™ | April 2015 - Dell DR2000v | Symantec Backup Exec - Setting Up the DR Series System on Symante - Page 51
8. Select Backup > Back up to Tape. 51 Setting Up the Dell™ DR Series System on Symantec™ Backup Exec™ | April 2015 - Dell DR2000v | Symantec Backup Exec - Setting Up the DR Series System on Symante - Page 52
9. Enter a name for the policy and click Edit to select the server file systems. 10. Browse and select the data to back up and click OK to continue. 52 Setting Up the Dell™ DR Series System on Symantec™ Backup Exec™ | April 2015 - Dell DR2000v | Symantec Backup Exec - Setting Up the DR Series System on Symante - Page 53
11. Click the Edit button to update backup settings and provide the storage location. 53 Setting Up the Dell™ DR Series System on Symantec™ Backup Exec™ | April 2015 - Dell DR2000v | Symantec Backup Exec - Setting Up the DR Series System on Symante - Page 54
Series system provides an encryption mechanismm which should be enabled from within the DR Series system GUI or CLI. See the DR Series System Administration Guide for more information about enabling encryption. 13. Review the final selections and click OK. 54 Setting Up the - Dell DR2000v | Symantec Backup Exec - Setting Up the DR Series System on Symante - Page 55
14. To run a backup job, select the backup policy (FULL schedule) and click Run Now. The backup progress can be seen in the Backup and Restore as well as the tape drive being used for the job. 55 Setting Up the Dell™ DR Series System on Symantec™ Backup Exec™ | April 2015 - Dell DR2000v | Symantec Backup Exec - Setting Up the DR Series System on Symante - Page 56
15. Go to the Storage tab to see the tape drive in use and the media ID used for writing data. The capacity details can also be seen on the Storage tab against Slots. 56 Setting Up the Dell™ DR Series System on Symantec™ Backup Exec™ | April 2015 - Dell DR2000v | Symantec Backup Exec - Setting Up the DR Series System on Symante - Page 57
16. Go to Slots > Details to see the media available and media loaded in drive 17. You can monitor the job status on the Job Monitor tab. 57 Setting Up the Dell™ DR Series System on Symantec™ Backup Exec™ | April 2015 - Dell DR2000v | Symantec Backup Exec - Setting Up the DR Series System on Symante - Page 58
3.8 Restoring from tape 1. On the Backup and Restore tab, click the Restore button. 2. Using the default options, click Next. 58 Setting Up the Dell™ DR Series System on Symantec™ Backup Exec™ | April 2015 - Dell DR2000v | Symantec Backup Exec - Setting Up the DR Series System on Symante - Page 59
3. Using the default options or settings, click Next. 4. Select the data to restore from the appropriate snapshot and click Next to proceed. 59 Setting Up the Dell™ DR Series System on Symantec™ Backup Exec™ | April 2015 - Dell DR2000v | Symantec Backup Exec - Setting Up the DR Series System on Symante - Page 60
5. Select the default settings if you are restoring to the original location of the data, or specify the new location and click Next. 60 Setting Up the Dell™ DR Series System on Symantec™ Backup Exec™ | April 2015 - Dell DR2000v | Symantec Backup Exec - Setting Up the DR Series System on Symante - Page 61
6. Using the default settings, click Next. 7. Using the default settings, click Next to proceed. 61 Setting Up the Dell™ DR Series System on Symantec™ Backup Exec™ | April 2015 - Dell DR2000v | Symantec Backup Exec - Setting Up the DR Series System on Symante - Page 62
8. Using the default settings, click Next to proceed. 62 Setting Up the Dell™ DR Series System on Symantec™ Backup Exec™ | April 2015 - Dell DR2000v | Symantec Backup Exec - Setting Up the DR Series System on Symante - Page 63
9. Enter a name for the restore job and schedule it as required, or select Run now to start the restore job immediately. Click Next. 10. On the Restore Summary page, click Finish. 63 Setting Up the Dell™ DR Series System on Symantec™ Backup Exec™ | April 2015 - Dell DR2000v | Symantec Backup Exec - Setting Up the DR Series System on Symante - Page 64
11. On the Job Monitor tab you can see the restore status. 64 Setting Up the Dell™ DR Series System on Symantec™ Backup Exec™ | April 2015 - Dell DR2000v | Symantec Backup Exec - Setting Up the DR Series System on Symante - Page 65
DR Series system GUI, and then click Create at the top of the page. 2. Enter a Container Name and then click Next. 65 Setting Up the Dell™ DR Series System on Symantec™ Backup Exec™ | April 2015 - Dell DR2000v | Symantec Backup Exec - Setting Up the DR Series System on Symante - Page 66
3. Select Symantec OpenStorage (OST) as the access protocol and click Next. 4. Set the capacity of the OST LSU as needed, and click Next. 66 Setting Up the Dell™ DR Series System on Symantec™ Backup Exec™ | April 2015 - Dell DR2000v | Symantec Backup Exec - Setting Up the DR Series System on Symante - Page 67
then click Create a New Container. 4.2 Installing the OST plugin 1. Launch the Backup Exec Admin Console. Click Home, and then select Configuration and Settings > Backup Exec Services. 67 Setting Up the Dell™ DR Series System on Symantec™ Backup Exec™ | April 2015 - Dell DR2000v | Symantec Backup Exec - Setting Up the DR Series System on Symante - Page 68
can install the OST Plugin (after all Backup Exec services have been stopped). You can get the installation packages from the list of binaries provided by Dell, Inc. 3. In the Dell Storage Plugin Installation dialog box, click Next. 68 Setting Up the Dell™ DR Series System on Symantec™ Backup Exec - Dell DR2000v | Symantec Backup Exec - Setting Up the DR Series System on Symante - Page 69
4. Accept the License agreement and click Next. 5. Click the Install button to proceed with installation. 69 Setting Up the Dell™ DR Series System on Symantec™ Backup Exec™ | April 2015 - Dell DR2000v | Symantec Backup Exec - Setting Up the DR Series System on Symante - Page 70
OST plugin. 4.3 Configuring the OST device in Backup Exec 1. Launch the Backup Exec Admin Console. Click Home, and then select Configuration and Settings > Backup Exec Services. 70 Setting Up the Dell™ DR Series System on Symantec™ Backup Exec™ | April 2015 - Dell DR2000v | Symantec Backup Exec - Setting Up the DR Series System on Symante - Page 71
2. On the Services Manager page, click Start all Services. 3. On the Storage tab, select Configure Storage. 71 Setting Up the Dell™ DR Series System on Symantec™ Backup Exec™ | April 2015 - Dell DR2000v | Symantec Backup Exec - Setting Up the DR Series System on Symante - Page 72
4. Select Network Storage, and click Next. 5. Select OpenStorage, and click Next. 72 Setting Up the Dell™ DR Series System on Symantec™ Backup Exec™ | April 2015 - Dell DR2000v | Symantec Backup Exec - Setting Up the DR Series System on Symante - Page 73
6. Enter the name and description for the configured OST device, and click Next. 7. Select Dell as the provider and click Next. 73 Setting Up the Dell™ DR Series System on Symantec™ Backup Exec™ | April 2015 - Dell DR2000v | Symantec Backup Exec - Setting Up the DR Series System on Symante - Page 74
8. Enter the Server name (IP or FQDN) and select the Backup_user as the logon account. 9. Select the created OST container from the list and click Next. 74 Setting Up the Dell™ DR Series System on Symantec™ Backup Exec™ | April 2015 - Dell DR2000v | Symantec Backup Exec - Setting Up the DR Series System on Symante - Page 75
10. Enter the number of concurrent operations to run on the OST device and click Next. 11. Click Finish on the configuration summary page. 12. When prompted, click Yes to restart the Backup Exec Services. 75 Setting Up the Dell™ DR Series System on Symantec™ Backup Exec™ | April 2015 - Dell DR2000v | Symantec Backup Exec - Setting Up the DR Series System on Symante - Page 76
add as Windows/Linux/NDMP. Note: If you are adding a Linux client, you need to install the RALUS package before adding. 76 Setting Up the Dell™ DR Series System on Symantec™ Backup Exec™ | April 2015 - Dell DR2000v | Symantec Backup Exec - Setting Up the DR Series System on Symante - Page 77
3. With the Default settings, click Next to proceed. 4. Provide the access credentials for the server you want to add. Select from the drop drown or create new logon details if required. 77 Setting Up the Dell™ DR Series System on Symantec™ Backup Exec™ | April 2015 - Dell DR2000v | Symantec Backup Exec - Setting Up the DR Series System on Symante - Page 78
78 Setting Up the Dell™ DR Series System on Symantec™ Backup Exec™ | April 2015 - Dell DR2000v | Symantec Backup Exec - Setting Up the DR Series System on Symante - Page 79
5. With Default settings, click Next to proceed. 6. Click Install on the final summary screen. 79 Setting Up the Dell™ DR Series System on Symantec™ Backup Exec™ | April 2015 - Dell DR2000v | Symantec Backup Exec - Setting Up the DR Series System on Symante - Page 80
A notification appears of the successful installation of Remote Backup Exec Agent on the server. The Backup and Restore tab shows the newly added server and related details. 80 Setting Up the Dell™ DR Series System on Symantec™ Backup Exec™ | April 2015 - Dell DR2000v | Symantec Backup Exec - Setting Up the DR Series System on Symante - Page 81
7. On the Backup and Restore tab, select the server with the data to back up and go to Details. 8. Select Backup > Back up to Deduplication Disk Storage. 81 Setting Up the Dell™ DR Series System on Symantec™ Backup Exec™ | April 2015 - Dell DR2000v | Symantec Backup Exec - Setting Up the DR Series System on Symante - Page 82
9. Enter a name for the policy and click Edit to select the server file systems. 10. Browse and select the data to back up and click OK to continue. 82 Setting Up the Dell™ DR Series System on Symantec™ Backup Exec™ | April 2015 - Dell DR2000v | Symantec Backup Exec - Setting Up the DR Series System on Symante - Page 83
11. Click Edit to update backup settings and to provide the storage location. 12. Click Storage in the left pane and select the required tape library for the storage unit. 83 Setting Up the Dell™ DR Series System on Symantec™ Backup Exec™ | April 2015 - Dell DR2000v | Symantec Backup Exec - Setting Up the DR Series System on Symante - Page 84
13. Review the final selections and click OK to proceed. 14. To run a backup job, select the backup policy (FULL schedule) and click Run Now. 84 Setting Up the Dell™ DR Series System on Symantec™ Backup Exec™ | April 2015 - Dell DR2000v | Symantec Backup Exec - Setting Up the DR Series System on Symante - Page 85
You can view the backup progress in the Backup and Restore tab. You can see the job status on the Job Monitor tab. 85 Setting Up the Dell™ DR Series System on Symantec™ Backup Exec™ | April 2015 - Dell DR2000v | Symantec Backup Exec - Setting Up the DR Series System on Symante - Page 86
4.6 Restoring data 1. On the Backup and Restore tab, click Restore backup sets created by this job. 2. With the default options, click Next. 86 Setting Up the Dell™ DR Series System on Symantec™ Backup Exec™ | April 2015 - Dell DR2000v | Symantec Backup Exec - Setting Up the DR Series System on Symante - Page 87
3. With the default options, click Next to proceed. 4. Select the data to restore from the appropriate snapshot and click Next to proceed. 87 Setting Up the Dell™ DR Series System on Symantec™ Backup Exec™ | April 2015 - Dell DR2000v | Symantec Backup Exec - Setting Up the DR Series System on Symante - Page 88
5. Select the default setting if restoring to the original location or specify a different location as needed, and click Next. 6. With the default settings, click Next to proceed. 88 Setting Up the Dell™ DR Series System on Symantec™ Backup Exec™ | April 2015 - Dell DR2000v | Symantec Backup Exec - Setting Up the DR Series System on Symante - Page 89
7. With the default settings, click Next to proceed. 8. With the default settings, click Next to proceed. 89 Setting Up the Dell™ DR Series System on Symantec™ Backup Exec™ | April 2015 - Dell DR2000v | Symantec Backup Exec - Setting Up the DR Series System on Symante - Page 90
9. Enter a name for the restore job and schedule it if required; or select Run now to start the restore job immediately. Click Next to proceed. 90 Setting Up the Dell™ DR Series System on Symantec™ Backup Exec™ | April 2015 - Dell DR2000v | Symantec Backup Exec - Setting Up the DR Series System on Symante - Page 91
10. Click Finish on the Restore Summary page. On the Job Monitor tab, you can view the restore status. 91 Setting Up the Dell™ DR Series System on Symantec™ Backup Exec™ | April 2015 - Dell DR2000v | Symantec Backup Exec - Setting Up the DR Series System on Symante - Page 92
92 Setting Up the Dell™ DR Series System on Symantec™ Backup Exec™ | April 2015 - Dell DR2000v | Symantec Backup Exec - Setting Up the DR Series System on Symante - Page 93
at least 40 hours per week when backups are not taking place, and generally after a backup job has completed. Schedule Cleaner 93 Setting Up the Dell™ DR Series System on Symantec™ Backup Exec™ | April 2015 - Dell DR2000v | Symantec Backup Exec - Setting Up the DR Series System on Symante - Page 94
backup jobs are completed, the ratios will increase. Backup jobs with a 12-week retention will average a 15x ratio, in most cases. 94 Setting Up the Dell™ DR Series System on Symantec™ Backup Exec™ | April 2015 - Dell DR2000v | Symantec Backup Exec - Setting Up the DR Series System on Symante - Page 95
). Refer to the following article for more information: http://www.symantec.com/business/support/index?page=content&id=TECH187957 For more information about image expiration, refer to the Backup Exec 2012 Administration Guide chapter, "About Backup Job Settings." If you want to keep the backup set - Dell DR2000v | Symantec Backup Exec - Setting Up the DR Series System on Symante - Page 96
B Installing Backup Exec Agent on Linux client (RALUS) Detailed information is available at following Symantec's link - http://www.symantec.com/business/support/index?page=content&id=tech46461 96 Setting Up the Dell™ DR Series System on Symantec™ Backup Exec™ | April 2015 - Dell DR2000v | Symantec Backup Exec - Setting Up the DR Series System on Symante - Page 97
2 from Symantec is required on the Backup Exec 2014 Server for smooth integration between Dell DR's iSCSI-VTL and the BE server: Backup Exec 2014 revision 1786 Service Pack 2 Backup Exec 2015 server by default supports the Dell DR Series system iSCSI-VTL capability. Managing VTL media and space use - Dell DR2000v | Symantec Backup Exec - Setting Up the DR Series System on Symante - Page 98
as needed. Media cannot however be deleted so care must be taken in order to avoid creating too many media items. 98 Setting Up the Dell™ DR Series System on Symantec™ Backup Exec™ | April 2015 - Dell DR2000v | Symantec Backup Exec - Setting Up the DR Series System on Symante - Page 99
expire the logical space can be reconciled thus enabling the physical space to be reclaimed. C.2.5 VTL media count guidelines Type Capacity Max number of Tapes supported LTO-4 800GiB 2000 LTO-3 400GiB 4000 99 Setting Up the Dell™ DR Series System on Symantec™ Backup Exec™ | April 2015 - Dell DR2000v | Symantec Backup Exec - Setting Up the DR Series System on Symante - Page 100
Backup Exec. Check the Backup Exec recommendations for the maximum number of tapes supported. C.2.6 Space reclamation guidelines The DR Series system v3.2 Virtual Tape Library feature guidelines regarding tape reuse. 100 Setting Up the Dell™ DR Series System on Symantec™ Backup Exec™ | April 2015
-
 1
1 -
 2
2 -
 3
3 -
 4
4 -
 5
5 -
 6
6 -
 7
7 -
8
-
9
-
10
-
11
-
12
-
13
-
14
-
15
-
16
-
17
-
18
-
19
-
20
-
21
-
22
-
23
-
24
-
25
-
26
-
27
-
28
-
29
-
30
-
31
-
32
-
33
-
34
-
35
-
36
-
37
-
38
-
39
-
40
-
41
-
42
-
43
-
44
-
45
-
46
-
47
-
48
-
49
-
50
-
51
-
52
-
53
-
54
-
55
-
56
-
57
-
58
-
59
-
60
-
61
-
62
-
63
-
64
-
65
-
66
-
67
-
68
-
69
-
70
-
71
-
72
-
73
-
74
-
75
-
76
-
77
-
78
-
79
-
80
-
81
-
82
-
83
-
84
-
85
-
86
-
87
-
88
-
89
-
90
-
91
-
92
-
93
-
94
-
95
-
96
-
97
-
98
-
99
-
100
 |
 |

A Dell Technical White Paper
Setting Up the Dell
™
DR Series System on
Symantec
™
Backup Exec
™
Dell Engineering
July 2015