Dell OptiPlex 3010 User Manual
Dell OptiPlex 3010 Manual
 |
View all Dell OptiPlex 3010 manuals
Add to My Manuals
Save this manual to your list of manuals |
Dell OptiPlex 3010 manual content summary:
- Dell OptiPlex 3010 | User Manual - Page 1
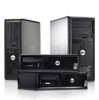
Dell OptiPlex 390/3010 Setup And Features Information About Warnings WARNING: A WARNING indicates a potential for property damage, personal injury, or death. Mini-Tower - Front And Back View Figure 1. Front And Back View Of Mini-Tower 1. power button 2. optical drive bay 3. headphone connector 4. - Dell OptiPlex 3010 | User Manual - Page 2
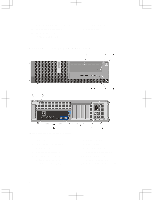
3. power button 4. USB 2.0 connectors (2) 5. microphone connector 6. headphone connector 7. hard-drive activity light 8. diagnostic lights (4) 9. padlock ring 10. security cable slot 11. power cable connector 12. back panel connectors 13. expansion card slots (4) 14. power-supply diagnostic light - Dell OptiPlex 3010 | User Manual - Page 3
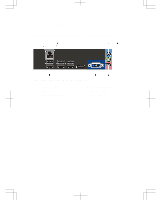
15. power-supply diagnostic button Mini-Tower And Desktop - Back Panel Figure 3. Back Panel View of Mini-Tower And Desktop 1. link integrity light 2. network connector 3. network activity light 4. line-in connector 5. line-out connector 6. USB 2.0 connectors (6) 7. HDMI connector 8. VGA connector - Dell OptiPlex 3010 | User Manual - Page 4
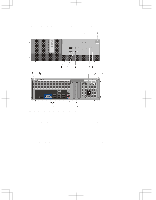
(2) 5. microphone connector 6. headphone connector 7. diagnostic lights (4) 8. hard-drive activity light 9. padlock ring 10. security cable slot 11. power cable connector 12. power-supply diagnostic button 13. power-supply diagnostic light 14. back panel connectors 15. expansion card slots (2) 4 - Dell OptiPlex 3010 | User Manual - Page 5
3. network activity light 4. line-out connector 5. HDMI connector 6. VGA connector 7. USB 2.0 connectors (6) 8. line-in/microphone connector Quick Setup WARNING: Before you begin any of the procedures in this section, read the safety information that shipped with your computer. For additional - Dell OptiPlex 3010 | User Manual - Page 6
Figure 7. VGA Connector 2. Connect the USB keyboard or mouse (optional). Figure 8. USB Connection 3. Connect the network cable (optional). Figure 9. Network Connection 4. Connect the power cable(s). Figure 10. Connecting Power 5. Press the power buttons on the monitor and the computer. 6 - Dell OptiPlex 3010 | User Manual - Page 7
and current listing of the specifications for your computer, go to support.dell.com. Power Coin-cell battery Voltage Desktop/Mini-Tower/ Small Form Factor Wattage Desktop Mini-Tower Small Form Factor Maximum heat dissipation Desktop Mini-Tower Small Form Factor 3 V CR2032 lithium coin cell 100 - Dell OptiPlex 3010 | User Manual - Page 8
Physical Depth Weight (Minimum) Mini-Tower (6.89 inches) 417.00 mm (16.42 inches) 8.87 kg (19.55 lb) Desktop (4.01 inches) 410.00 mm (16.14 and regulatory documents that shipped with your computer and the regulatory compliance website at www.dell.com/regulatory_compliance for more information on: • - Dell OptiPlex 3010 | User Manual - Page 9
strictly forbidden. Trademarks used in this text: Dell™, the DELL logo, Dell Precision™, Precision ON™, ExpressCharge™, Latitude™, Latitude ON™, OptiPlex™, Vostro™, and Wi-Fi Catcher™ are trademarks of Dell Inc. Intel®, Pentium®, Xeon®, Core™, Atom™, Centrino®, and Celeron® are registered trademarks
-
 1
1 -
 2
2 -
 3
3 -
 4
4 -
 5
5 -
 6
6 -
 7
7 -
8
-
9
 |
 |
Dell OptiPlex 390/3010
Setup And Features Information
About Warnings
WARNING: A WARNING indicates a potential for property damage, personal injury,
or death.
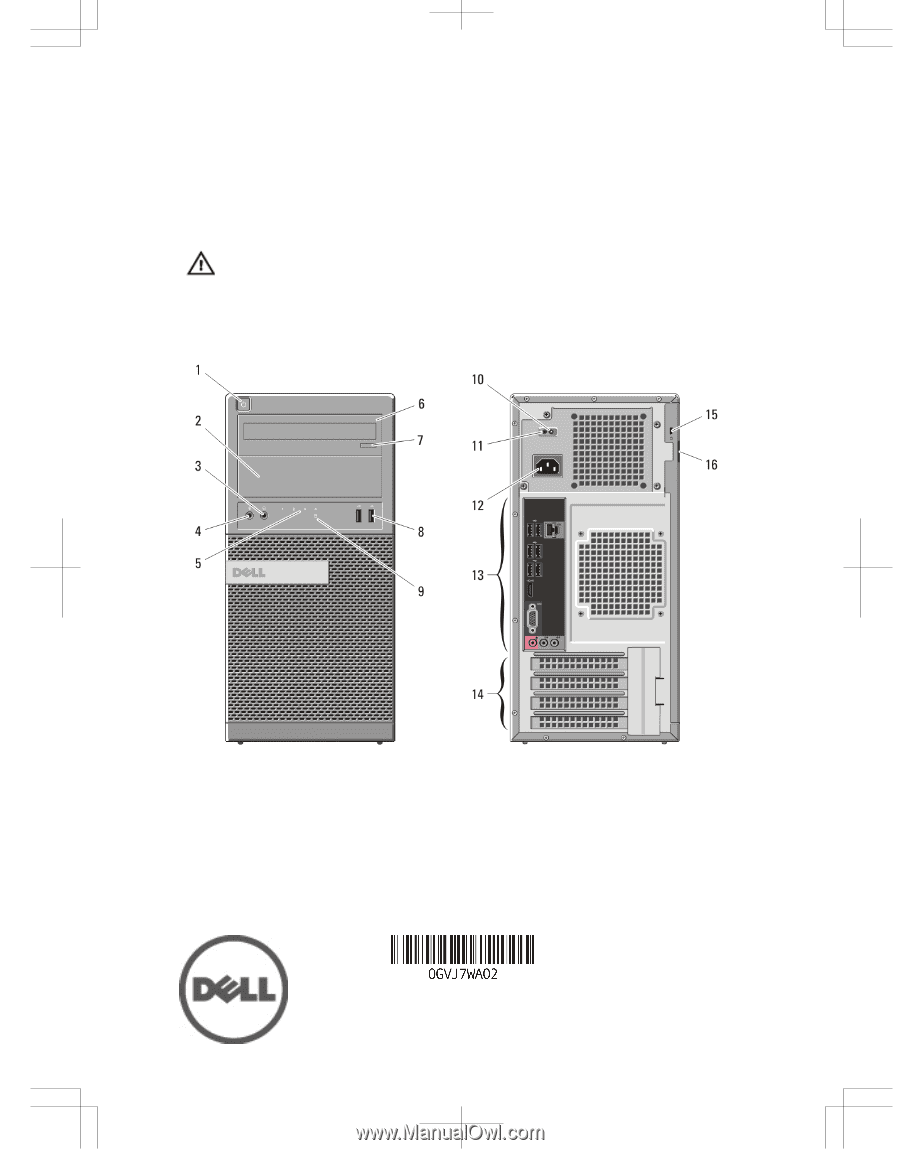
Mini-Tower — Front And Back View
Figure 1. Front And Back View Of Mini-Tower
1.
power button
2.
optical drive bay
3.
headphone connector
4.
microphone connector
5.
diagnostic lights (4)
6.
optical drive
7.
optical-drive eject button
8.
USB 2.0 connectors (2)
9.
hard-drive activity light
10.
power-supply diagnostic light
Regulatory Model: D04S, D07D, D12M
Regulatory Type: D04S001, D07D001,
D12M001
2012 - 05