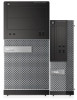
Dell OptiPlex 3020 Dell OptiPlex 3020-Small Form Factor Owners Manual
Dell OptiPlex 3020 Manual
 |
View all Dell OptiPlex 3020 manuals
Add to My Manuals
Save this manual to your list of manuals |
Dell OptiPlex 3020 manual content summary:
- Dell OptiPlex 3020 | Dell OptiPlex 3020-Small Form Factor Owners Manual - Page 1
Dell OptiPlex 3020-Small Form Factor Owner's Manual Regulatory Model: D08S Regulatory Type: D08S001 - Dell OptiPlex 3020 | Dell OptiPlex 3020-Small Form Factor Owners Manual - Page 2
to avoid the problem. WARNING: A WARNING indicates a potential for property damage, personal injury, or death. © 2013 Dell Inc. All Rights Reserved. Trademarks used in this text: Dell™, the DELL logo, Dell Precision™, Precision ON™,ExpressCharge™, Latitude™, Latitude ON™, OptiPlex™, Venue™, Vostro - Dell OptiPlex 3020 | Dell OptiPlex 3020-Small Form Factor Owners Manual - Page 3
...20 Installing the Memory...20 Removing the System Fan...20 Installing the System Fan...21 Removing the Power Switch...21 Installing the Power Switch...22 Removing the I/O Panel...23 Installing the I/O Panel...24 Removing the Power Supply...24 Installing the Power Supply...27 Removing the Coin - Dell OptiPlex 3020 | Dell OptiPlex 3020-Small Form Factor Owners Manual - Page 4
System and/or Setup Password 46 Disabling a System Password...47 4 Diagnostics...49 Enhanced Pre-Boot System Assessment (ePSA) Diagnostics 49 5 Troubleshooting Your Computer 51 Power LED Diagnostics...51 Beep Code...52 Error Messages...52 6 Technical Specifications 57 7 Contacting Dell...63 - Dell OptiPlex 3020 | Dell OptiPlex 3020-Small Form Factor Owners Manual - Page 5
only perform troubleshooting and simple repairs as authorized in your product documentation, or as directed by the online or telephone service and support team. Damage due to servicing that is not authorized by Dell is not covered by your warranty. Read and follow the safety instructions that came - Dell OptiPlex 3020 | Dell OptiPlex 3020-Small Form Factor Owners Manual - Page 6
Press and hold the power button while the computer is unplugged to ground the system board. 6. Remove the cover. CAUTION: Before touching anything inside your computer, ground yourself by touching an unpainted metal surface, such as the metal at the back of the computer. While you work, periodically - Dell OptiPlex 3020 | Dell OptiPlex 3020-Small Form Factor Owners Manual - Page 7
the network device and then plug it into the computer. 2. Connect any telephone or network cables to your computer. 3. Connect your computer and all attached devices to their electrical outlets. 4. Turn on your computer. 5. If required, verify that the computer works correctly by running the Dell - Dell OptiPlex 3020 | Dell OptiPlex 3020-Small Form Factor Owners Manual - Page 8
8 - Dell OptiPlex 3020 | Dell OptiPlex 3020-Small Form Factor Owners Manual - Page 9
scribe System Overview The figure below displays the inside view of the Small Form Factor after the base cover has been removed. The call outs show the names and the layout of the components inside the computer. Inside view 1. optical drive 2. front bezel 3. power supply unit 4. expansion card 9 - Dell OptiPlex 3020 | Dell OptiPlex 3020-Small Form Factor Owners Manual - Page 10
heatsink cover 7. heatsink 8. drive cage 1. front I/O 2. system fan 3. system board 4. memory module 5. coin cell 6. speaker Removing the Cover 1. Follow the procedures in Before Working Inside Your Computer. 2. Remove the thumbscrews that secure the cover to the computer. Slide the cover from the - Dell OptiPlex 3020 | Dell OptiPlex 3020-Small Form Factor Owners Manual - Page 11
angle and remove it from the computer. Installing the Cover 1. Place the cover on the computer. 2. Slide the computer cover towards the front of the chassis until it is fully engaged. 3. Tighten the thumbscrew in clockwise direction to secure the computer cover. 4. Follow the procedures in After - Dell OptiPlex 3020 | Dell OptiPlex 3020-Small Form Factor Owners Manual - Page 12
edge of the front bezel into the slots on the chassis front. 2. Push the bezel toward the computer to engage the front bezel retention clips until in After Working Inside Your Computer. Removing The Expansion Card 1. Follow the procedures in Before Working Inside Your Computer. 2. Remove the cover - Dell OptiPlex 3020 | Dell OptiPlex 3020-Small Form Factor Owners Manual - Page 13
4. Perform the following steps as shown in the illustration: a) Pull the release lever away from the expansion card until you release the securing tab from the dent in the card. [1]. b) Ease the card up and out of its connector and remove it from the computer. [2]. 13 - Dell OptiPlex 3020 | Dell OptiPlex 3020-Small Form Factor Owners Manual - Page 14
Install the cover 3. Follow the procedures in After Working Inside Your Computer. Removing the Optical Drive 1. Follow the procedures in Before Working Inside Your Computer. 2. Remove the cover. 3. Disconnect the data and power cables from the back of the optical drive. 4. Lift the tab and slide the - Dell OptiPlex 3020 | Dell OptiPlex 3020-Small Form Factor Owners Manual - Page 15
the cover. 5. Follow the procedures in After Working Inside Your Computer. Removing the Drive Cage 1. Follow the procedures in Before Working Inside Your Computer. 2. Remove the: a) cover b) front bezel c) optical drive 3. Disconnect the data and the power cables from the back of the hard drive. 15 - Dell OptiPlex 3020 | Dell OptiPlex 3020-Small Form Factor Owners Manual - Page 16
the edge of the computer to allow access to the cable connectors on the hard drive. 2. Connect the data and power cables to the back of the hard drive . 3. Flip over the drive cage and insert it into the chassis. The drive cage tabs are secured by the slots - Dell OptiPlex 3020 | Dell OptiPlex 3020-Small Form Factor Owners Manual - Page 17
Removing the Hard Drive 1. Follow the procedures in Before Working Inside Your Computer. 2. Remove the: a) cover b) optical drive c) drive cage the hard drive from the bracket. 5. Remove the screws that secure the mini hard drive to the hard-drive bracket and remove the hard drive from its bracket. NOTE - Dell OptiPlex 3020 | Dell OptiPlex 3020-Small Form Factor Owners Manual - Page 18
the Hard Drive 1. Tighten the screws to secure the mini hard drive (if available) to the hard-drive bracket 5. Follow the procedures in After Working Inside Your Computer. Removing the Speaker 1. Follow the procedures in Before Working Inside Your Computer. 2. Remove: a) cover b) optical drive c) - Dell OptiPlex 3020 | Dell OptiPlex 3020-Small Form Factor Owners Manual - Page 19
speaker towards the left of the computer to secure it. 3. Guide the speaker cable through the securing tab memory sockets in your computer may be labeled differently depending on the hardware configuration. For example, A1, A2 or 1,2,3. • If the quad-rank memory modules are mixed with single or dual - Dell OptiPlex 3020 | Dell OptiPlex 3020-Small Form Factor Owners Manual - Page 20
1. Align the notch on the memory-card with the tab in the system-board connector. 2. Press down on the memory module until the release tabs spring back to secure them in place. 3. Install the cover. 4. Follow the procedures in After Working Inside Your Computer. Removing the System Fan 1. Follow - Dell OptiPlex 3020 | Dell OptiPlex 3020-Small Form Factor Owners Manual - Page 21
b) drive cage c) optical drive d) cover 5. Follow the procedures in After Working Inside Your Computer. Removing the Power Switch 1. Follow the procedures in Before Working Inside Your Computer. 2. Remove the: a) cover b) front bezel c) optical drive d) drive cage 3. Perform the following steps - Dell OptiPlex 3020 | Dell OptiPlex 3020-Small Form Factor Owners Manual - Page 22
the clips on both side of the power switch [1]. b) Release it from the chassis [2]. c) Remove the power switch along with its cable from the computer Installing the Power Switch 1. Slide the power switch in through the front of the computer. 2. Connect the power-switch cable to the system board - Dell OptiPlex 3020 | Dell OptiPlex 3020-Small Form Factor Owners Manual - Page 23
bezel 3. Perform the following steps as shown in the illustration: a) Disconnect the I/O cable the computer [1]. b) Disconnect the audio cable the computer [2]. c) Disconnect the HDD LED cable the computer [3]. 4. Perform the following steps as shown in the illustration: a) Remove the screw that - Dell OptiPlex 3020 | Dell OptiPlex 3020-Small Form Factor Owners Manual - Page 24
to the chassis. 4. Connect the I/O panel, audio cable, and fan shelter clip to the system board. 5. Install the: a) drive cage b) optical drive c) front bezel d) cover 6. Follow the procedures in After Working Inside Your Computer. Removing the Power Supply 1. Follow the procedures in Before Working - Dell OptiPlex 3020 | Dell OptiPlex 3020-Small Form Factor Owners Manual - Page 25
4. Release the blue latch from the system. 5. Remove the screws that secure the power supply to the back of the computer 25 - Dell OptiPlex 3020 | Dell OptiPlex 3020-Small Form Factor Owners Manual - Page 26
6. Perform the following steps as shown in the illustration: a) Press the latch downwards to release the power supply unit [1]. b) Slide the power supply unit from the computer [2]. 7. Lift the power supply out of the computer. 26 - Dell OptiPlex 3020 | Dell OptiPlex 3020-Small Form Factor Owners Manual - Page 27
Installing the Power Supply 1. Place the power supply in the chassis and slide towards the back of the computer to secure it. 2. Tighten the screws securing the power supply to the back of the computer. 3. Connect the 4-pin and 8-pin power cables to the system board. 4. Thread the power cables into - Dell OptiPlex 3020 | Dell OptiPlex 3020-Small Form Factor Owners Manual - Page 28
cell battery into its slot on the system board. 2. Press the coin-cell battery downward until the release latch springs back into place and secures it. 3. Install the: a) drive cage b) front bezel c) cover 4. Follow the procedures in After Working Inside Your Computer. Removing the Heatsink Assembly - Dell OptiPlex 3020 | Dell OptiPlex 3020-Small Form Factor Owners Manual - Page 29
push to click in place. 5. Install the cover 6. Follow the procedures in After Working Inside Your Computer. Removing the Processor 1. Follow the procedures in Before Working Inside Your Computer. 2. Remove the cover. 3. Remove the heat sink assembly. 4. Press the release lever down and then move - Dell OptiPlex 3020 | Dell OptiPlex 3020-Small Form Factor Owners Manual - Page 30
the intrusion-switch cable from the system board. 4. Slide the intrusion switch toward the bottom of the chassis and remove it from the computer. Installing the Intrusion Switch 1. Insert the intrusion-switch into the chassis rear and slide it outward to secure it. 2. Connect the intrusion-switch - Dell OptiPlex 3020 | Dell OptiPlex 3020-Small Form Factor Owners Manual - Page 31
System Board Components The following image displays the system board layout. 1. PCI Express x16 connector 2. PCI Express x1 connector 3. intrusion-switch connector 4. PS/2, serial connector 5. power connector 6. processor socket 7. CPU fan connector 8. memory module connectors 9. HDD LED & chassis - Dell OptiPlex 3020 | Dell OptiPlex 3020-Small Form Factor Owners Manual - Page 32
Removing the System Board 1. Follow the procedures in Before Working Inside Your Computer. 2. Remove the: a) cover b) front bezel c) optical drive d) drive cage e) memory f) heat sink assembly g) expansion card(s) h) power supply 3. Disconnect all the cables connected to the system board, and move - Dell OptiPlex 3020 | Dell OptiPlex 3020-Small Form Factor Owners Manual - Page 33
5. Lift the cover upward to a 45-degree angle and remove it from the computer. 6. Remove the system board from the chassis. 33 - Dell OptiPlex 3020 | Dell OptiPlex 3020-Small Form Factor Owners Manual - Page 34
2. Tighten the screws securing the system board to the chassis. 3. Connect the cables to the system board. 4. Install the: a) power supply b) expansion card(s) c) heat sink assembly d) memory e) drive cage f) optical drive g) front bezel h) cover 5. Follow the procedures in After Working Inside Your - Dell OptiPlex 3020 | Dell OptiPlex 3020-Small Form Factor Owners Manual - Page 35
Setup System Setup enables you to manage your computer hardware and specify BIOS‐level options. From the System Setup, you can: • Change the NVRAM settings after you add or remove hardware • View the system hardware configuration • Enable or disable integrated devices • Set performance and power - Dell OptiPlex 3020 | Dell OptiPlex 3020-Small Form Factor Owners Manual - Page 36
to the previous page till you view the main screen. Pressing in the main screen displays a message that prompts you to save any unsaved changes and restarts the system. Displays the System Setup help file. System Setup Options NOTE: Depending on your computer and its installed devices, the - Dell OptiPlex 3020 | Dell OptiPlex 3020-Small Form Factor Owners Manual - Page 37
network controller. The options are: • Disabled • Enable UEFI Network Stack • Enabled • Enabled w/PXE (Default) • Enabled w/Cloud Desktop Default Setting: All drives are enabled. This field controls if the hard drive errors for the integrated drives are reported during system startup. This technology - Dell OptiPlex 3020 | Dell OptiPlex 3020-Small Form Factor Owners Manual - Page 38
USB configuration. The options are: • Enable Boot Support • Enable Front USB Ports • Enable USB 3.0 Ports • Enable Rear Dual USB 2.0 Ports • Enable Dual USB 2.0 Ports (Under LAN ports) Allows you enable or disable the audio feature. Default Setting: Audio is enabled Description Allows you to enables - Dell OptiPlex 3020 | Dell OptiPlex 3020-Small Form Factor Owners Manual - Page 39
internal HDD passwords when powered on from the off option lets you control whether the Trusted TPM ACPI Support TPM PPI setup program's default values. Changes to this option take effect immediately. This field lets you activate or disable the BIOS module interface of the optional Computrace Service - Dell OptiPlex 3020 | Dell OptiPlex 3020-Small Form Factor Owners Manual - Page 40
the execute disable mode of the processor. • Enable CPU XD Support - This option is enabled by default. Admin Setup Lockout Allows you to enable or disable the option to enter setup when an admin password is set. • Enable Admin Setup Lockout - This option is not set by default. HDD Protection - Dell OptiPlex 3020 | Dell OptiPlex 3020-Small Form Factor Owners Manual - Page 41
restore to default settings. Table 7. Performance Option Multi Core Support Power Management Option AC Recovery Description Specifies how the computer will respond when AC power is applied after a AC power loss. You can set the AC Recovery to: • Power Off (Default) • Power On • Last Power - Dell OptiPlex 3020 | Dell OptiPlex 3020-Small Form Factor Owners Manual - Page 42
Control Allows you to define the controls when Deep Sleep is enabled. • Disabled • Enabled in S5 only • Enabled in S4 and S5 Enabled Fan Speed Control Controls computer is connected to AC power supply. The options differ based on the form factor. • Disabled - Does not allow the system to power on - Dell OptiPlex 3020 | Dell OptiPlex 3020-Small Form Factor Owners Manual - Page 43
Tag SERR Messages Description Displays the service tag of your computer. Allows you to create a system asset tag if an asset tag is not already set. This option is not set by default. Controls the SERR message mechanism. This option is not set by default. Some graphics cards require that the SERR - Dell OptiPlex 3020 | Dell OptiPlex 3020-Small Form Factor Owners Manual - Page 44
to update your BIOS (system setup), on replacing the system board or if an update is available. For laptops, ensure that your computer battery is fully charged and connected to a power outlet 1. Re-start the computer. 2. Go to dell.com/support. 3. Enter the Service Tag or Express Service Code and - Dell OptiPlex 3020 | Dell OptiPlex 3020-Small Form Factor Owners Manual - Page 45
Save to save the file on your computer. 12. Click Run to install the updated BIOS settings on your computer. Follow the instructions on the screen. Clearing Forgotten Password The system's software security features include a system password and a setup password. The password jumper disables any - Dell OptiPlex 3020 | Dell OptiPlex 3020-Small Form Factor Owners Manual - Page 46
is deleted and you need not provide the system password to log on to the computer. To enter a system setup, press immediately after a power-on or re-boot. 1. In the System BIOS or System Setup screen, select System Security and press . The System Security screen appears. 2. In the System - Dell OptiPlex 3020 | Dell OptiPlex 3020-Small Form Factor Owners Manual - Page 47
Setup, press immediately after a power-on or reboot. 1. In the System BIOS or System Setup screen, select System Security and press . The System Security screen is displayed the computer boots without the jumper. 5. Install the cover. NOTE: If you assign a new system and/or setup password - Dell OptiPlex 3020 | Dell OptiPlex 3020-Small Form Factor Owners Manual - Page 48
48 - Dell OptiPlex 3020 | Dell OptiPlex 3020-Small Form Factor Owners Manual - Page 49
Dell for technical assistance. The purpose of running diagnostics is to test your computer's hardware without requiring additional equipment or risking data loss. If you are unable to fix the problem yourself, service and support , error codes are displayed. Note the error code and contact Dell. 49 - Dell OptiPlex 3020 | Dell OptiPlex 3020-Small Form Factor Owners Manual - Page 50
50 - Dell OptiPlex 3020 | Dell OptiPlex 3020-Small Form Factor Owners Manual - Page 51
5 Troubleshooting Your Computer You can troubleshoot your computer using indicators like Diagnostic Lights, Beep Codes, and Error Messages during the operation of the computer. Power LED Diagnostics The power button LED located on the front of the chassis also functions as a bicolored diagnostic - Dell OptiPlex 3020 | Dell OptiPlex 3020-Small Form Factor Owners Manual - Page 52
is 3 sec, and the beep sound lasts 300 ms. After each beep and each set of beeps, the BIOS should detect if the user presses the power button. If so, BIOS will jump out from looping and execute the normal shutdown process and power system. Code Cause 1-3-2 Memory failure NOTE: 1. If the system - Dell OptiPlex 3020 | Dell OptiPlex 3020-Small Form Factor Owners Manual - Page 53
hard drive failed initialization. Invalid configuration informationplease run SETUP program The computer configuration information does not match the hardware configuration. Invalid Memory configuration, DIMM1 slot does not recognize a memory module. The module should be reseated or installed - Dell OptiPlex 3020 | Dell OptiPlex 3020-Small Form Factor Owners Manual - Page 54
match the memory installed in the computer. Memory tests terminated by keystroke A keystroke interrupted the memory test. No boot device available The computer cannot find the floppy disk or hard drive. No boot sector on The computer configuration information in System Setup may be incorrect - Dell OptiPlex 3020 | Dell OptiPlex 3020-Small Form Factor Owners Manual - Page 55
interrupt in protected mode The keyboard controller may be malfunctioning or a memory module may be loose. WARNING: Dell's During initial startup, the drive detected possible error conditions. When your Disk Monitoring computer finishes booting, immediately back up your data and replace your - Dell OptiPlex 3020 | Dell OptiPlex 3020-Small Form Factor Owners Manual - Page 56
Error Message drive by calling your support desk or Dell. Description Write fault The operating system cannot write to the floppy or hard drive. Write fault on selected drive The operating system cannot write to the floppy or hard drive. 56 - Dell OptiPlex 3020 | Dell OptiPlex 3020-Small Form Factor Owners Manual - Page 57
® G3220 Processor (Dual Core, 3.0GHz, 3MB w/ HD Graphics) Cache Core™ I5-4570 Processor (6MB)/Core™ i3-4130 Processor ( 3MB )/Pentium® G3220 Processor (3MB) Table 16. System Information Feature Chipset BIOS chip (NVRAM) Specification Intel H81 Chipset 64Mbit (8MB) Table 17. Memory Feature - Dell OptiPlex 3020 | Dell OptiPlex 3020-Small Form Factor Owners Manual - Page 58
chipset DMA Channels Interrupt Levels BIOS Chip (NVRAM) Table 22. Expansion Bus Feature Bus Type Bus Speed: Table 23. Drives Feature Externally accessible: Internally accessible Table 24. External Connectors Feature Audio Front Panel Back Panel Network Adapter Serial Parallel USB 58 Specification - Dell OptiPlex 3020 | Dell OptiPlex 3020-Small Form Factor Owners Manual - Page 59
drive: SATA Power Table 26. Controls and Lights Feature Front of the computer: Power button light Drive activity light Back of the computer: Link integrity light on integrated network adapter Network activity light on integrated network adapter Power supply diagnostic light Specification VGA and - Dell OptiPlex 3020 | Dell OptiPlex 3020-Small Form Factor Owners Manual - Page 60
connector (at the back of the computer) and the electrical outlet. Table 27. Power Feature Coin-cell battery Voltage Wattage Maximum heat dissipation Specification 3V Lithium CR2032 100 VAC to 240 VAC 255 W N/A NOTE: Heat dissipation is calculated by using the power supply wattage rating. Table - Dell OptiPlex 3020 | Dell OptiPlex 3020-Small Form Factor Owners Manual - Page 61
Feature Airborne contaminant level Specification G1 or lower as defined by ANSI/ISA-S71.04-1985 61 - Dell OptiPlex 3020 | Dell OptiPlex 3020-Small Form Factor Owners Manual - Page 62
62 - Dell OptiPlex 3020 | Dell OptiPlex 3020-Small Form Factor Owners Manual - Page 63
menu at the top left corner of the page. 3. Select your support category: Technical Support, Customer Support, Sales, or International Support Services. 4. Select the appropriate service or support link based on your requirement. NOTE: If you have purchased a Dell system, you may be asked for the
-
 1
1 -
 2
2 -
 3
3 -
 4
4 -
 5
5 -
 6
6 -
 7
7 -
8
-
9
-
10
-
11
-
12
-
13
-
14
-
15
-
16
-
17
-
18
-
19
-
20
-
21
-
22
-
23
-
24
-
25
-
26
-
27
-
28
-
29
-
30
-
31
-
32
-
33
-
34
-
35
-
36
-
37
-
38
-
39
-
40
-
41
-
42
-
43
-
44
-
45
-
46
-
47
-
48
-
49
-
50
-
51
-
52
-
53
-
54
-
55
-
56
-
57
-
58
-
59
-
60
-
61
-
62
-
63
 |
 |

Dell OptiPlex 3020–Small Form Factor
Owner's Manual
Regulatory Model: D08S
Regulatory Type: D08S001