Dell OptiPlex 320 Quick Reference Guide
Dell OptiPlex 320 Manual
 |
UPC - 683728237738
View all Dell OptiPlex 320 manuals
Add to My Manuals
Save this manual to your list of manuals |
Dell OptiPlex 320 manual content summary:
- Dell OptiPlex 320 | Quick Reference
Guide - Page 1
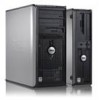
Dell™ OptiPlex™ 320 Quick Reference Guide Models DCSM, DCNE www.dell.com | support.dell.com - Dell OptiPlex 320 | Quick Reference
Guide - Page 2
of data and tells you how to avoid the problem. CAUTION: A CAUTION indicates a potential for property damage, personal injury, or death. If you purchased a Dell™ n Series computer, any references in this document to Microsoft® Windows® operating systems are not applicable. Information in this - Dell OptiPlex 320 | Quick Reference
Guide - Page 3
Mini Tower Computer 21 Desktop Computer 23 Inside Your Computer 24 Mini Tower Computer 24 Desktop Computer 27 Solving Problems 30 Dell Diagnostics 30 System Lights 33 Diagnostic Lights 34 Beep Codes 37 Resolving Software and Hardware Incompatibilities 38 Using Microsoft Windows XP System - Dell OptiPlex 320 | Quick Reference
Guide - Page 4
4 Contents - Dell OptiPlex 320 | Quick Reference
Guide - Page 5
and may not ship with your computer. Documentation and drivers are already installed on your computer. You can use the CD to reinstall drivers (see "Reinstalling Drivers and Utilities" in your online User's Guide), to run the Dell Diagnostics (see "Dell Diagnostics" on page 30), or to access - Dell OptiPlex 320 | Quick Reference
Guide - Page 6
• Specifications • How to configure system settings • How to troubleshoot and solve problems • Service Tag and Express Service Code • Microsoft Windows License Label • How to reinstall my operating system 6 Quick Reference Guide Find It Here Dell™ OptiPlex™ User's Guide Microsoft Windows XP Help - Dell OptiPlex 320 | Quick Reference
Guide - Page 7
status and support history, service contract, online discussions with technical support • Reference - Computer documentation, details on my computer configuration, product specifications, and white papers • Downloads - Certified drivers, patches, and software updates • Desktop System Software - Dell OptiPlex 320 | Quick Reference
Guide - Page 8
: Before performing any of the procedures in this section, follow the safety instructions in Product Information Guide. NOTICE: If your computer has an expansion card installed (such as a modem card), connect the appropriate cable to the card, not to the connector on the back panel. NOTICE: To help - Dell OptiPlex 320 | Quick Reference
Guide - Page 9
white DVI cable or the blue VGA cable (do not connect both cables). Align and gently insert the monitor cable to avoid bending connector pins. Tighten the thumbscrews on the cable connectors. NOTE: Some monitors have the video connector underneath the back of the screen. See the documentation that - Dell OptiPlex 320 | Quick Reference
Guide - Page 10
, and devices and connect the other ends of the power cables to electrical outlets. Power Connections NOTICE: To avoid damaging a computer with a manual voltage-selection switch, set the switch for the voltage that most closely matches the AC power available in your location. NOTICE: In Japan, the - Dell OptiPlex 320 | Quick Reference
Guide - Page 11
Tag Use the Service Tag to identify your computer when you access the Dell Support website or call technical support. 2 CD/DVD drive Insert a CD or DVD (if supported) into this drive. 3 floppy drive Insert a floppy disk into this drive. 4 hard-drive activity light This light flickers when the - Dell OptiPlex 320 | Quick Reference
Guide - Page 12
if it is configured as a wake device in the Windows Device Manager. For more information about sleep modes and exiting from a power-saving mode, see your online User's Guide. For a description of light codes that can help you troubleshoot problems with your computer, see "System Lights" on page 33 - Dell OptiPlex 320 | Quick Reference
Guide - Page 13
Mini Tower Computer - Back View 1 2 3 4 5 6 1 cover release latch 2 padlock ring 3 power connector This latch allows you to open the computer cover. Insert a padlock to lock the computer cover. Insert the power cable into this connector. Quick Reference Guide 13 - Dell OptiPlex 320 | Quick Reference
Guide - Page 14
. NOTE: The integrated parallel connector is automatically disabled if the computer detects an installed card containing a parallel connector configured to the same address. For more information, see your online User's Guide. • Green - A good connection exists between a 10-Mbps network and the - Dell OptiPlex 320 | Quick Reference
Guide - Page 15
A high volume of network traffic may make this light appear to be in a steady "on" state. Use the blue line-in connector to attach a record/playback device such as a cassette player, CD player, or VCR. On computers with a sound card, use the connector on the card. Use the green line-out connector to - Dell OptiPlex 320 | Quick Reference
Guide - Page 16
1 USB 2.0 connectors (2) Use the USB connectors on the front of the computer for devices that you connect occasionally, such as joysticks or cameras, or for bootable USB devices (see your online User's Guide for more information about booting to a USB device). It is recommended that you use the USB - Dell OptiPlex 320 | Quick Reference
Guide - Page 17
"Power Problems" in your online User's Guide. To exit from a power-saving mode, press the power button or use the keyboard or the mouse if it is configured as a wake device in the Windows Device Manager. For a description of light codes that can help you troubleshoot problems with your computer see - Dell OptiPlex 320 | Quick Reference
Guide - Page 18
. NOTE: The integrated parallel connector is automatically disabled if the computer detects an installed card containing a parallel connector configured to the same address. For more information, see your online User's Guide. • Green - A good connection exists between a 10-Mbps network and the - Dell OptiPlex 320 | Quick Reference
Guide - Page 19
A high volume of network traffic may make this light appear to be in a steady "on" state. Use the blue line-in connector to attach a record/playback device such as a cassette player, CD player, or VCR. On computers with a sound card, use the connector on the card. Use the green line-out connector to - Dell OptiPlex 320 | Quick Reference
Guide - Page 20
guidelines to help protect your computer from potential damage and to help ensure your own personal safety. CAUTION: Before you begin any of the procedures in this section, follow the safety instructions in the Product Information Guide. CAUTION: Handle components and cards with care. Do not touch - Dell OptiPlex 320 | Quick Reference
Guide - Page 21
begin any of the procedures in this section, follow the safety instructions in the Product Information Guide. CAUTION: To guard against electrical shock, always unplug your computer from the electrical outlet before removing the computer cover. 1 Follow the procedures in "Before You Begin" on page - Dell OptiPlex 320 | Quick Reference
Guide - Page 22
1 2 3 1 security cable slot 2 cover release latch 3 padlock ring 22 Quick Reference Guide - Dell OptiPlex 320 | Quick Reference
Guide - Page 23
Desktop Computer CAUTION: Before you begin any of the procedures in this section, follow the safety instructions in the Product Information Guide. CAUTION: To guard against electrical shock, always unplug your computer from the electrical outlet before removing the computer cover. 1 Follow the - Dell OptiPlex 320 | Quick Reference
Guide - Page 24
Inside Your Computer Mini Tower Computer 3 2 1 1 CD/DVD drive 2 floppy drive 3 power supply 6 4 system board 5 heat sink assembly 6 hard drive 4 5 24 Quick Reference Guide - Dell OptiPlex 320 | Quick Reference
Guide - Page 25
System Board Components 1 2 17 16 15 14 13 12 11 10 9 3 4 5 6 7 8 Quick Reference Guide 25 - Dell OptiPlex 320 | Quick Reference
Guide - Page 26
(CPU) 3 processor power connector (12VPOWER) 4 front-panel connector (FNT_PANEL) 5 memory module connectors (DIMM_1, DIMM_2) 6 SATA drive connectors (SATA0, SATA1) 7 power connector (POWER) 8 CD/DVD drive connector (IDE) 9 SATA drive connectors (SATA2, SATA3) Jumper Settings Mini Tower Computer 10 - Dell OptiPlex 320 | Quick Reference
Guide - Page 27
enabled (default setting). The real-time clock is being reset (jumpered temporarily). jumpered Desktop Computer unjumpered 2 1 3 4 6 5 1 drive bay (CD/DVD, floppy, 4 card slots and hard drive) 2 power supply 5 heat sink assembly 3 system board 6 front I/O panel Quick Reference Guide 27 - Dell OptiPlex 320 | Quick Reference
Guide - Page 28
System Board Components 1 2 17 16 15 14 13 12 11 10 9 3 4 5 6 7 8 28 Quick Reference Guide - Dell OptiPlex 320 | Quick Reference
Guide - Page 29
12VPOWER) 4 front-panel connector (FNT_PANEL) 5 memory module connectors (DIMM_1, DIMM_2) 6 serial ATA drive connectors (SATA0, SATA1) 7 power connector (POWER) 8 CD/DVD drive connector (IDE) 9 serial ATA drive connectors (SATA2, SATA3) Jumper Settings Desktop Computer 10 internal buzzer (SPKR1) 11 - Dell OptiPlex 320 | Quick Reference
Guide - Page 30
troubleshooting information available for your computer, see the Dell Support website at support.dell.com. If computer problems occur that require help from Dell, write a detailed description of the error, beep codes, or diagnostics light patterns, record your Express Service Code and Service - Dell OptiPlex 320 | Quick Reference
Guide - Page 31
Setup" in your online User's Guide for instructions), review your computer's configuration information, and ensure that the device you want to test displays in system setup and is active. Start the Dell Diagnostics from either your hard drive or from the optional Drivers and Utilities CD (also known - Dell OptiPlex 320 | Quick Reference
Guide - Page 32
a description of the problem. Write down the error code and problem description and follow the instructions on the screen. If you cannot resolve the error condition, contact Dell. For information on contacting Dell, see your online User's Guide. NOTE: The Service Tag for your computer is located at - Dell OptiPlex 320 | Quick Reference
Guide - Page 33
see if the specific problem is identified (see "Diagnostic Lights" on page 34). See "Power Problems" in your online User's Guide. Solid green and a beep code during POST A problem was detected while the BIOS was executing. For instructions on diagnosing the beep code see "Beep Codes" on page 37 - Dell OptiPlex 320 | Quick Reference
Guide - Page 34
Diagnostic Lights CAUTION: Before you begin any of the procedures in this section, follow the safety instructions in the Product Information Guide. To help you troubleshoot a problem, your computer has four lights labeled "1," "2," "3," and "4" on the front or back panel. The lights can be "off" or - Dell OptiPlex 320 | Quick Reference
Guide - Page 35
, install properly working memory of the same type into your computer. • If the problem persists, contact Dell. For information on contacting Dell, see your online User's Guide. A possible graphics card failure has occurred. • If the computer has a graphics card, remove the card, reinstall it, and - Dell OptiPlex 320 | Quick Reference
Guide - Page 36
CD drive, and DVD drive. • Check the computer message that appears on your monitor screen. • If the problem persists, contact Dell. For information on contacting Dell, see your online User's Guide. After POST is complete, all four None. diagnostic lights turn green briefly before turning off to - Dell OptiPlex 320 | Quick Reference
Guide - Page 37
the computer encountered a memory problem. If your computer beeps during start-up: 1 Write down the beep code. 2 See "Dell Diagnostics" on page 30 to identify a more serious cause. 3 Contact Dell for technical assistance. For information on contacting Dell, see your online User's Guide. Code Cause - Dell OptiPlex 320 | Quick Reference
Guide - Page 38
start the search. 3 Click Hardware Troubleshooter in the Search Results list. 4 In the Hardware Troubleshooter list, click I need to resolve a hardware conflict on my computer, and click Next. Using Microsoft Windows XP System Restore The Microsoft Windows XP operating system provides System Restore - Dell OptiPlex 320 | Quick Reference
Guide - Page 39
differ if you set your Dell computer to the Windows Classic view or are using Windows XP Professional. If you are considering reinstalling the Windows XP operating system to correct a problem with a newly installed driver, first try using Windows XP Device Driver Rollback. 1 Click the Start button - Dell OptiPlex 320 | Quick Reference
Guide - Page 40
XP unless a Dell technical support representative instructs you to do so. NOTICE: To prevent conflicts with Windows XP, disable any virus protection software installed on your computer before you reinstall Windows XP. See the documentation that came with the software for instructions. Booting - Dell OptiPlex 320 | Quick Reference
Guide - Page 41
, wait until you see the Windows desktop, and then shut down the computer and try again. 5 Press the arrow keys to select CD-ROM, and press . 6 When the Press any key to boot from CD message appears, press any key. Windows XP Setup 1 When the Windows XP Setup screen appears, press to - Dell OptiPlex 320 | Quick Reference
Guide - Page 42
of device drivers for your system configuration is displayed on the screen. 2 Click the appropriate driver and follow the instructions to download the driver to your computer. To view all available drivers for your computer, click Drivers from the Topic drop-down menu. 42 Quick Reference Guide - Dell OptiPlex 320 | Quick Reference
Guide - Page 43
, 6 Service Tag, 6 lights diagnostic, 34 power, 17 system, 33 M motherboard. See system board O operating system reinstalling, 6 reinstalling Windows XP, 39 Operating System CD, 6 P power light, 17 power light diagnosing problems with, 33 problems. See troubleshooting Product Information Guide - Dell OptiPlex 320 | Quick Reference
Guide - Page 44
information, 5 Windows XP Hardware Troubleshooter, 38 Help and Support Center, 7 reinstalling, 6, 39 setup, 41 System Restore, 38 T troubleshooting beep codes, 37 conflicts, 38 Dell Diagnostics, 30 diagnostic lights, 34 Hardware Troubleshooter, 38 Help and Support Center, 7 restore computer to
-
 1
1 -
 2
2 -
 3
3 -
 4
4 -
 5
5 -
 6
6 -
 7
7 -
8
-
9
-
10
-
11
-
12
-
13
-
14
-
15
-
16
-
17
-
18
-
19
-
20
-
21
-
22
-
23
-
24
-
25
-
26
-
27
-
28
-
29
-
30
-
31
-
32
-
33
-
34
-
35
-
36
-
37
-
38
-
39
-
40
-
41
-
42
-
43
-
44
 |
 |

www.dell.com | support.dell.com
Dell™ OptiPlex™ 320
Quick Reference Guide
Models DCSM, DCNE