Dell PowerConnect W Clearpass 100 Software Trendnet Integration Guide
Dell PowerConnect W Clearpass 100 Software Manual
 |
View all Dell PowerConnect W Clearpass 100 Software manuals
Add to My Manuals
Save this manual to your list of manuals |
Dell PowerConnect W Clearpass 100 Software manual content summary:
- Dell PowerConnect W Clearpass 100 Software | Trendnet Integration Guide - Page 1
Guides - Trendnet TEW-453APB Dated Tested: AmigoPod Version: Plugins Required: Trendnet Version: Integration: 10 April 2007 EngineÆ0.99.35, Radius Services platform for managed temporary Guest accounts. UAM is intended for supports both internal and external authentication, this integration guide - Dell PowerConnect W Clearpass 100 Software | Trendnet Integration Guide - Page 2
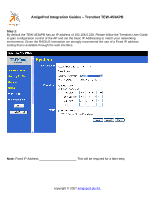
- Trendnet TEW-453APB Step 1: By default the TEW-453APB has an IP address of 192.168.0.228. Please follow the Trendnet User Guide to gain configuration control of the AP and set the basic IP Addressing to match your networking environment. Given the RADIUS interaction we strongly recommend - Dell PowerConnect W Clearpass 100 Software | Trendnet Integration Guide - Page 3
AmigoPod Integration Guides - Trendnet TEW-453APB Step 2: Now that a fixed IP Address has been defined the Trendnet AP, this needs to be defined within the AmigoPod configuration. Typically, the AmigoPod software is installed on an appliance or server with a fixed IP Address and potentially a - Dell PowerConnect W Clearpass 100 Software | Trendnet Integration Guide - Page 4
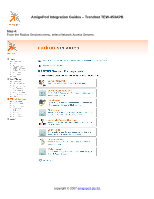
AmigoPod Integration Guides - Trendnet TEW-453APB Step 3: Once successfully logged into the AmigoPod administration interface, you will be presented with the AmigoPod Home Page where the RADIUS Services section can be accessed. Click on RADIUS Services on the screen shown below: copyright © 2007 - Dell PowerConnect W Clearpass 100 Software | Trendnet Integration Guide - Page 5
AmigoPod Integration Guides - Trendnet TEW-453APB Step 4: From the Radius Services menu, select Network Access Servers: copyright © 2007 amigopod pty ltd. - Dell PowerConnect W Clearpass 100 Software | Trendnet Integration Guide - Page 6
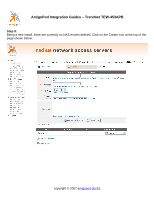
AmigoPod Integration Guides - Trendnet TEW-453APB Step 5: Being a new install, there are currently no NAS entries defined. Click on the Create icon at the top of the page shown below: copyright © 2007 amigopod pty ltd. - Dell PowerConnect W Clearpass 100 Software | Trendnet Integration Guide - Page 7
AmigoPod Integration Guides - Trendnet TEW-453APB Step 6: Fill out the details of the Create NAS form based on the IP Addressing details defined for the Trendnet AP in - Dell PowerConnect W Clearpass 100 Software | Trendnet Integration Guide - Page 8
AmigoPod Integration Guides - Trendnet TEW-453APB Step 7: Once the NAS has been created, the screen and the button below should be clicked to initiate a restart of the RADIUS services. Once the RADIUS services have restarted the next step is to create the customized Web Login pages that the wireless - Dell PowerConnect W Clearpass 100 Software | Trendnet Integration Guide - Page 9
AmigoPod Integration Guides - Trendnet TEW-453APB Step 8: Being a new install, there are currently no web logins defined. Click on the Create a new web login page option listed below the table: copyright © 2007 amigopod pty ltd. - Dell PowerConnect W Clearpass 100 Software | Trendnet Integration Guide - Page 10
AmigoPod Integration Guides - Trendnet TEW-453APB Step 9: Complete the following Web Login form based on your local deployment to ensure the correct descriptions and HTML customization is configured in both the Header and Footer section to match the brand and messaging of the wireless service being - Dell PowerConnect W Clearpass 100 Software | Trendnet Integration Guide - Page 11
AmigoPod Integration Guides - Trendnet TEW-453APB Step 9: Once the Web Login page has been created and saved, it should be tested to ensure it has the correct look and feel for your wireless clients. This can be done by clicking on the newly created Web Login page once and selected the Test option - Dell PowerConnect W Clearpass 100 Software | Trendnet Integration Guide - Page 12
AmigoPod Integration Guides - Trendnet TEW-453APB Step 10: Once the Test button has been clicked, the new Web around what to do in the event of a login failure. Again the URL displayed in the final testing step will need to be recorded for a future step. Note: Web Login URL This will be required - Dell PowerConnect W Clearpass 100 Software | Trendnet Integration Guide - Page 13
AmigoPod Integration Guides - Trendnet TEW-453APB Step 12: Returning the web administration interface of the TrendNet AP, the next step is to setup the wireless network for the - Dell PowerConnect W Clearpass 100 Software | Trendnet Integration Guide - Page 14
AmigoPod Integration Guides - Trendnet TEW-453APB Step 13: At this point you have the opportunity to rename the Profile to a name that is significant to your deployment and also define the SSID that is going to be used by your wireless client. Given we are creating a Hot Spot style service you can - Dell PowerConnect W Clearpass 100 Software | Trendnet Integration Guide - Page 15
AmigoPod Integration Guides - Trendnet TEW-453APB Step 14: Enable the UAM feature by selecting the first Check Box at the top of the page. This example is based - Dell PowerConnect W Clearpass 100 Software | Trendnet Integration Guide - Page 16
AmigoPod Integration Guides - Trendnet TEW-453APB Step 15: Returning to the Security Profiles screen, click on the Apply/Restart button for the couple of minutes but at this point the configuration of the AP is complete and the next step is to test the solution. copyright © 2007 amigopod pty ltd. - Dell PowerConnect W Clearpass 100 Software | Trendnet Integration Guide - Page 17
AmigoPod Integration Guides - Trendnet TEW-453APB Step 16: Using the Wireless Driver software that comes with the wireless adaptor in your laptop or the default Windows Zero Configuration Utility as shown below connect to the AmigoPod SSID (or - Dell PowerConnect W Clearpass 100 Software | Trendnet Integration Guide - Page 18
AmigoPod Integration Guides - Trendnet TEW-453APB A successful connection to the AmigoPod Wireless with either the setup of the wireless card or potentially support for DHCP on the local LAN. Please refer to the manufacturers instructions for configuration of the wireless card and/or consult the - Dell PowerConnect W Clearpass 100 Software | Trendnet Integration Guide - Page 19
AmigoPod Integration Guides - Trendnet TEW-453APB Step 17: Now that the test laptop is successfully connected to the Wireless LAN, the only step remaining is to login as a guest user. To do this a test user must exist in the AmigoPod database. Returning back to the AmigoPod Web interface, select - Dell PowerConnect W Clearpass 100 Software | Trendnet Integration Guide - Page 20
details of the test user including how long the user should have access to the internet from the Account Expiry drop down box and also the Role that the account should be assigned to (For more information on creating and defining roles, please see the AmigoPod User Guide). copyright © 2007 amigopod - Dell PowerConnect W Clearpass 100 Software | Trendnet Integration Guide - Page 21
AmigoPod Integration Guides - Trendnet TEW-453APB Step 19: After clicking on the Create Account button, the new user account will be more information on creating and defining Print Receipt Templates please see the AmigoPod User Guide). Note: Guest Username This will be required at a later step. Note - Dell PowerConnect W Clearpass 100 Software | Trendnet Integration Guide - Page 22
AmigoPod Integration Guides - Trendnet TEW-453APB Step 20: Returning back to the test laptop now, open up a web browser such as Internet Explorer or Firefox and assuming a Home Page is configured the browser will automatically attempt to connect - Dell PowerConnect W Clearpass 100 Software | Trendnet Integration Guide - Page 23
's account as shown below: If you have experienced any issues setting up this integration with AmigoPod please step back through the document and verify the configuration. If the problem has not been resolved, please contact AmigoPod on [email protected] with the details of the issue. We value
-
 1
1 -
 2
2 -
 3
3 -
 4
4 -
 5
5 -
 6
6 -
 7
7 -
8
-
9
-
10
-
11
-
12
-
13
-
14
-
15
-
16
-
17
-
18
-
19
-
20
-
21
-
22
-
23
 |
 |
AmigoPod Integration Guides – Trendnet TEW-453APB
copyright © 2007
amigopod pty ltd.
Dated Tested:
10 April 2007
AmigoPod Version:
Engine
0.99.35, Radius Services
0.6.10
Plugins Required:
Standard build only
Trendnet Version:
2.0 Release 39
Integration:
HTTP Captive Portal
Overview:
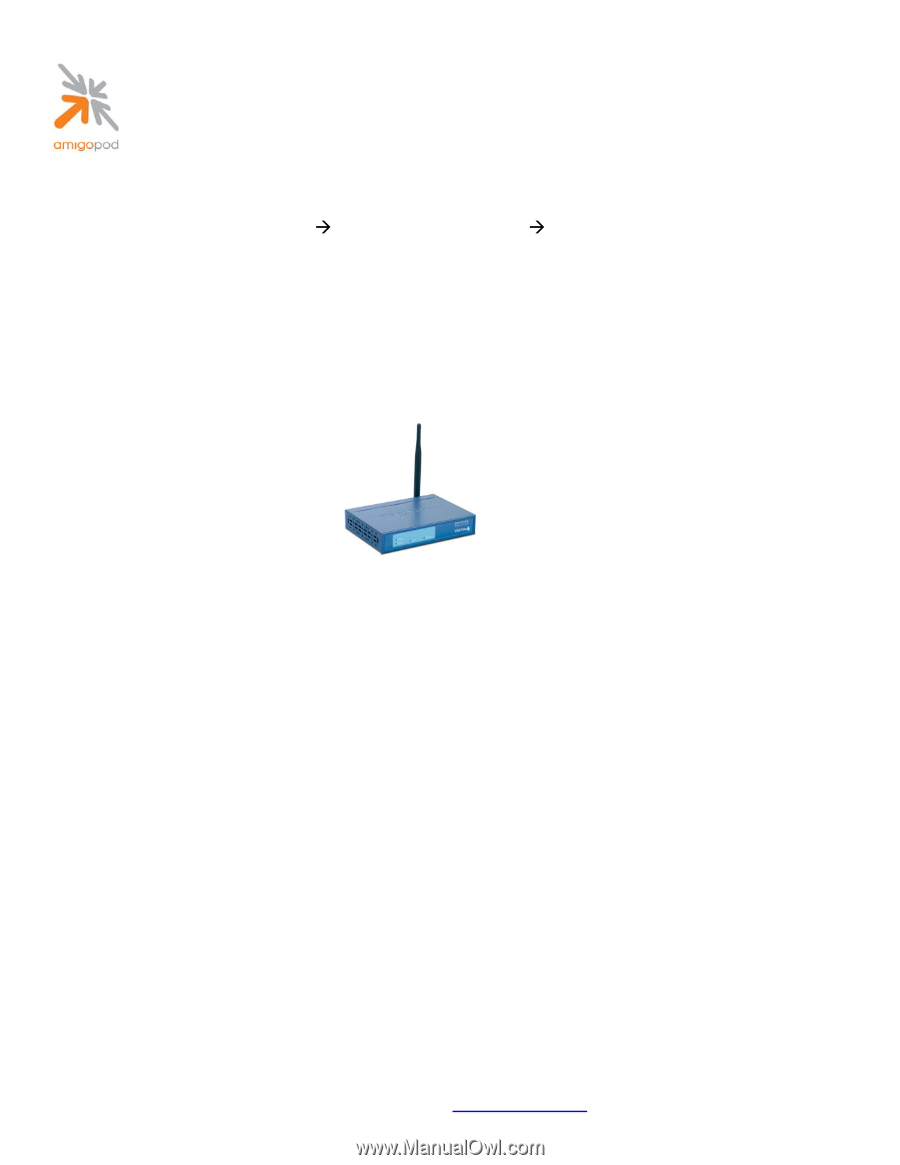
The TEW-453APB is a 108Mbps high speed 802.11g Hot Spot Wireless Access Point that offers
advanced wireless security, network management, and Power-over-Ethernet capabilities. Wireless
security features include TKIP and AES algorithms for WPA, and also Radius based MAC authentication.
Integration:
The key feature of the TEW-453APB is its Hot Spot or Universal Access Manager (UAM) functionality
that allows AmigoPod to provide the required RADIUS platform for managed temporary Guest accounts.
UAM is intended for use in Internet cafes, Hot Spots, and other sites where the Access Point is used to
provide Internet Access. If enabled, then HTTP (TCP, port 80) connections are checked. (UAM only
works on HTTP connections; all other traffic is ignored.) If the user has not been authenticated, Internet
access is blocked, and the user is re-directed to another web page – in this case the AmigoPod Web
logins facility.
Although the TEW-453APB supports both internal and external authentication, this integration guide will
focus on the later as the internal authentication dictates the use of the internal Login Page resident on
the AP itself. The Login page is very basic and doesn’t allow for significant customization as is possible
with the AmigoPod Web Logins feature.