Dell PowerEdge 650 Updating the Kernel for the Red Hat Linux 9 Operatin
Dell PowerEdge 650 Manual
 |
View all Dell PowerEdge 650 manuals
Add to My Manuals
Save this manual to your list of manuals |
Dell PowerEdge 650 manual content summary:
- Dell PowerEdge 650 | Updating the
Kernel for the Red Hat Linux 9 Operatin - Page 1
Dell™ PowerEdge™ 650 Systems Replacing the System and Backplane Board Assemblies www.dell.com | support.dell.com - Dell PowerEdge 650 | Updating the
Kernel for the Red Hat Linux 9 Operatin - Page 2
Troubleshooting Guide. Information in this document is subject to change without notice. © 2003 Dell Inc. All rights reserved. Reproduction in any manner whatsoever without the written permission of Dell Inc. is strictly forbidden. Trademarks used in this text: Dell, the DELL logo, and PowerEdge - Dell PowerEdge 650 | Updating the
Kernel for the Red Hat Linux 9 Operatin - Page 3
(connectors JP1, JP2, IDE0 and IDE1). 9 Disconnect the power supply cable from the back of the backplane board (connector J2). See "Replacing the Power Supply" in your Installation and Troubleshooting Guide. 10 If the hard-drive interface cables are routed through the backplane to a PCI controller - Dell PowerEdge 650 | Updating the
Kernel for the Red Hat Linux 9 Operatin - Page 4
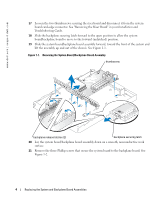
www.dell.com | support.dell.com 17 Loosen the two thumbscrews securing the riser board and disconnect it from the system board card-edge connector. See "Removing the Riser Board" in your Installation and Troubleshooting Guide. 18 Slide the backplane securing latch forward to the open position to - Dell PowerEdge 650 | Updating the
Kernel for the Red Hat Linux 9 Operatin - Page 5
discharge. NOTE: It is not necessary to remove the hard drives or the CD/diskette drive from the system during this procedure. To install the system board/backplane board assembly, perform the following steps: 1 Connect the four-conductor power cable to the back of the backplane (connector U3 - Dell PowerEdge 650 | Updating the
Kernel for the Red Hat Linux 9 Operatin - Page 6
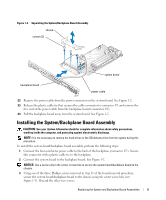
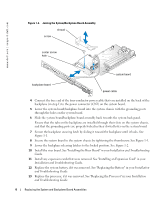
www.dell.com | support.dell.com Figure 1-3. Joining the System/Backplane Board Assembly shroud screw center screw hole system board backplane board power cable 4 Connect the free end of the four-conductor power cable that you installed on the back of the backplane (in step 1) to the power - Dell PowerEdge 650 | Updating the
Kernel for the Red Hat Linux 9 Operatin - Page 7
to the hard drives. See "Installing a Hard Drive" in your Installation and Troubleshooting Guide. 19 Connect the CD/diskette drive interface cable to the backplane connector CN1. 20 Install the power supply. See "Replacing the Power Supply" in your Installation and Troubleshooting Guide. 21 Connect - Dell PowerEdge 650 | Updating the
Kernel for the Red Hat Linux 9 Operatin - Page 8
www.dell.com | support.dell.com 8 Replacing the System and Backplane Board Assemblies - Dell PowerEdge 650 | Updating the Kernel for the Red Hat Linux 9 Operatin - Page 9
- Dell PowerEdge 650 | Updating the
Kernel for the Red Hat Linux 9 Operatin - Page 10
Printed in the U.S.A. 0G3929A00 www.dell.com | support.dell.com - Dell PowerEdge 650 | Updating the Kernel for the Red Hat Linux 9 Operatin - Page 11
- Dell PowerEdge 650 | Updating the
Kernel for the Red Hat Linux 9 Operatin - Page 12
Printed in Malaysia. 0G3929A00 www.dell.com | support.dell.com - Dell PowerEdge 650 | Updating the Kernel for the Red Hat Linux 9 Operatin - Page 13
- Dell PowerEdge 650 | Updating the
Kernel for the Red Hat Linux 9 Operatin - Page 14
Printed in China. 0G3929A00 www.dell.com | support.dell.com - Dell PowerEdge 650 | Updating the Kernel for the Red Hat Linux 9 Operatin - Page 15
- Dell PowerEdge 650 | Updating the
Kernel for the Red Hat Linux 9 Operatin - Page 16
Printed in Ireland. 0G3929A00 www.dell.com | support.dell.com
-
 1
1 -
 2
2 -
 3
3 -
 4
4 -
 5
5 -
 6
6 -
 7
7 -
8
-
9
-
10
-
11
-
12
-
13
-
14
-
15
-
16
 |
 |
www.dell.com | support.dell.com
Dell™ PowerEdge™ 650 Systems
Replacing the System and
Backplane Board
Assemblies