Dell PowerEdge R610 Getting Started Guide
Dell PowerEdge R610 Manual
 |
View all Dell PowerEdge R610 manuals
Add to My Manuals
Save this manual to your list of manuals |
Dell PowerEdge R610 manual content summary:
- Dell PowerEdge R610 | Getting Started Guide - Page 1
Dell™ PowerEdge™ R610 Systems Getting Started With Your System Guide de mise en route Primeiros passos com o sistema Procedimientos iniciales con el sistema - Dell PowerEdge R610 | Getting Started Guide - Page 2
- Dell PowerEdge R610 | Getting Started Guide - Page 3
Dell™ PowerEdge™ R610 Systems Getting Started With Your System - Dell PowerEdge R610 | Getting Started Guide - Page 4
Dell Inc. is strictly forbidden. Dell, the DELL logo, and PowerEdge are trademarks of Dell Inc.; Citrix and XenServer are trademarks of Citrix Systems, Inc. and/or more of its subsidiaries, and may be registered in the United States Patent and Trademark Office and in other countries. Intel and Xeon - Dell PowerEdge R610 | Getting Started Guide - Page 5
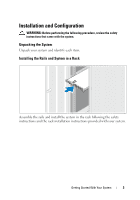
Installation and Configuration WARNING: Before performing the following procedure, review the safety instructions that came with the system. Unpacking the System Unpack your system and identify each item. Installing the Rails and System in a Rack Assemble the rails and install the system in the rack - Dell PowerEdge R610 | Getting Started Guide - Page 6
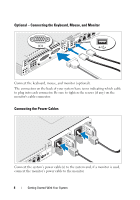
(optional). The connectors on the back of your system have icons indicating which cable to plug into each connector. Be sure to tighten the screws (if any) on the monitor's cable connector. Connecting the Power Cables Connect the system's power cable(s) to the system and, if a monitor is used - Dell PowerEdge R610 | Getting Started Guide - Page 7
the Power Cord Bend the system power cable into a loop as shown in the illustration and secure the cable with the provided strap. Plug the other end of the power cables into a grounded electrical outlet or a separate power source such as an uninterruptible power supply (UPS) or a power distribution - Dell PowerEdge R610 | Getting Started Guide - Page 8
time, see the installation and configuration documentation for your operating system. Be sure the operating system is installed before installing hardware or software not purchased with the system. • Citrix® XenServer™ 5.0 with hotfix 1 or later • Microsoft® Windows Server® 2008 Hyper-V™ • Microsoft - Dell PowerEdge R610 | Getting Started Guide - Page 9
your rack solution describes how to install your system into a rack. • The Hardware Owner's Manual provides information about system features and describes how to troubleshoot the system and install or replace system components. This document is available online at support.dell.com. • Any media that - Dell PowerEdge R610 | Getting Started Guide - Page 10
sockets Memory module capacities One or two quad- or dual-core Intel® Xeon® processors PCI Express Generation 2 (Slot 1) One full-height, half-length x8 link (Slot 2) One full-height, half-length x8 link NOTE: Both slots support up to 25 W, but only one 25-W card can be installed in the system at - Dell PowerEdge R610 | Getting Started Guide - Page 11
RAM Maximum RAM 1 GB with a single CPU 96 GB (with 8 GB RDIMMs) or 24 GB (with 2 GB UDIMMs) Drives Hard drives Diskette Drive Optical drive Flash Drive Up to six 2.5-inch, internal, hot-swappable SAS or SATA hard drives with backplane support Optional external USB 1.44-MB drive One optional - Dell PowerEdge R610 | Getting Started Guide - Page 12
Video type Video memory Integrated Matrox G200 8 MB shared Power AC Power Supply (per power supply) Wattage 717 W (High Output) 502 W (Energy Smart) Voltage 90-264 VAC, autoranging, 47-63 Hz Heat dissipation 2446.5 BTU/hr maximum (High Output) 1712.9 BTU/hr maximum (Energy Smart) Maximum - Dell PowerEdge R610 | Getting Started Guide - Page 13
Environmental NOTE: For additional information about environmental measurements for specific system configurations, see www.dell.com/environmental_datasheets Temperature Operating 10° to 35°C (50° to 95°F) with a maximum temperature gradation of 10°C per hour NOTE: For altitudes above 2950 feet, - Dell PowerEdge R610 | Getting Started Guide - Page 14
Environmental (continued) Altitude Operating Storage -16 to 3,048 m (-50 to 10,000 ft) NOTE: For altitudes above 2950 feet, the maximum operating temperature is derated 1ºF/550 ft. -16 to 10,600 m (-50 to 35,000 ft) 12 Getting Started With Your System - Dell PowerEdge R610 | Getting Started Guide - Page 15
Systèmes Dell™ PowerEdge™ R610 Guide de mise en route - Dell PowerEdge R610 | Getting Started Guide - Page 16
, le logo DELL et PowerEdge sont des marques de Dell Inc. ; Citrix et XenServer sont des marques de Citrix Systems, Inc. et/ou de plusieurs de ses filiales et peuvent être déposées au Bureau des brevets et des marques commerciales aux Etats Unis ou dans d'autres pays. Intel et Xeon sont des marques - Dell PowerEdge R610 | Getting Started Guide - Page 17
système de son emballage et identifiez chaque élément. Installation des rails et du système dans un rack Assemblez les rails et installez le système dans le rack en suivant les consignes de sécurité et les instructions d'installation du rack fournies avec votre système. Guide de mise en route 15 - Dell PowerEdge R610 | Getting Started Guide - Page 18
équipé. Connexion des câbles d'alimentation Connectez le(s) câble(s) d'alimentation au système et, si vous utilisez un moniteur, connectez son câble d'alimentation à celui-ci. 16 Guide de mise en route - Dell PowerEdge R610 | Getting Started Guide - Page 19
l'alimentation). Mise sous tension du système Appuyez sur le bouton d'alimentation du système et sur celui du moniteur. Les voyants d'alimentation doivent s'allumer. Guide de mise en route 17 - Dell PowerEdge R610 | Getting Started Guide - Page 20
installation et la configuration du système d'exploitation. Veillez à installer le système d'exploitation avant tout élément matériel ou logiciel acheté séparément. • Citrix® XenServer™ 5.0 avec correctif 1 ou version ultérieure • Microsoft® Windows Server® 2008 Hyper SP2 18 Guide de mise en route - Dell PowerEdge R610 | Getting Started Guide - Page 21
• Le document Hardware Owner's Manual (Manuel du propriétaire) présente les caractéristiques du système et contient des informations de dépannage et des instructions d'installation ou de remplacement des composants. Il est disponible en ligne sur le site support.dell.com. Guide de mise en route 19 - Dell PowerEdge R610 | Getting Started Guide - Page 22
guide ou si le système ne réagit pas comme prévu, reportez-vous au document Hardware Owner's Manual (Manuel du propriétaire). Dell ur ou quadruple coeur Intel® Xeon® PCI Express x16 2è maximum de 25 W, mais une seule carte de 25 W peut être installée sur le système à la fois. Avec deux cartes install - Dell PowerEdge R610 | Getting Started Guide - Page 23
Supports de modules de mémoire Capacité des modules de mémoire RAM minimale RAM maximale DIMM pouvant être supportés par le fond de panier. Un lecteur de disquette de 1,44 Mo USB externe, en USB externe, en option REMARQUE : Les périphériques DVD sont uniquement des périphériques de données. USB - Dell PowerEdge R610 | Getting Started Guide - Page 24
USB Internes USB Mode Secure Digital (SD) interne Quatre prises Ethernet RJ-45 de 10/100/1000 Mbps Connecteur DTE à 9 broches, compatible 16550 Deux connecteurs à 4 broches, compatibles USB à 4 broches, compatibles USB 2.0 Un connecteur à 4 broches, compatible USB 2.0 Un logement pour carte - Dell PowerEdge R610 | Getting Started Guide - Page 25
tension en vigueur) Puissance 717 W (sortie supérieure) 502 W (consommation d'énergie intelligente) Tension 90-264 VAC, avec sélection automatique de la tension, 47-63 Hz Dissipation thermique 2446,5 BTU/heure au maximum (sortie supérieure) 1712.9 BTU/heure au maximum (consommation d'énergie - Dell PowerEdge R610 | Getting Started Guide - Page 26
: Pour plus d'informations concernant les mesures d'exploitation liées à différentes configurations spécifiques, voir www.dell.com/environmental_datasheets. Température En fonctionnement De 10 ° à 35 °C (de ) 1,54 Gms de 10 à 250 Hz pendant 10 mn (toutes positions) 24 Guide de mise en route - Dell PowerEdge R610 | Getting Started Guide - Page 27
fonctionnement) Une impulsion de choc demi-sinusoïdal sur les six côtés de 71 G à plus ou moins 5 % pendant un maximum de 2 ms à plus ou moins 10 % Choc d'ondes carrées sur les six côtés de 27 G avec un changement de (550 pieds). De -16 à 10 600 m (de -50 à 35 000 pieds) Guide de mise en route 25 - Dell PowerEdge R610 | Getting Started Guide - Page 28
26 Guide de mise en route - Dell PowerEdge R610 | Getting Started Guide - Page 29
Sistemas Dell™ PowerEdge™ R610 Primeiros passos com o sistema - Dell PowerEdge R610 | Getting Started Guide - Page 30
da Dell Inc. Dell, o logotipo da DELL e PowerEdge são marcas comerciais da Dell Inc.; Citrix e XenServer são marcas comerciais da Citrix Systems, Inc. e/ou de uma ou mais de suas subsidiárias e podem ser registradas na United States Patent and Trademark Office e em outros países. Intel e Xeon - Dell PowerEdge R610 | Getting Started Guide - Page 31
Remoção do sistema da embalagem Remova o sistema da embalagem e identifique cada item. Instalação dos trilhos e do sistema no rack Monte os trilhos e instale o sistema no rack seguindo as instruções de segurança e as instruções de instalação fornecidas com o sistema. Primeiros passos com o sistema - Dell PowerEdge R610 | Getting Started Guide - Page 32
Opcional - Conexão de teclado, mouse e monitor Conecte o teclado, o mouse e o monitor (opcional). Os conectores na parte de trás do sistema têm ícones que indicam quais cabos devem ser ligados a cada conector. Aperte os parafusos (se houver) do conector do cabo do monitor. - Dell PowerEdge R610 | Getting Started Guide - Page 33
a uma tomada elétrica aterrada ou a uma fonte de energia separada como, por exemplo, uma UPS (Uninterruptible Power Supply ou Fonte de Alimentação Ininterrupta) ou uma PDU (Power Distribution Unit ou Unidade de Distribuição de Energia). Como ligar o sistema Pressione o botão liga/desliga do sistema - Dell PowerEdge R610 | Getting Started Guide - Page 34
Instalação do painel opcional Instale o painel (opcional). Conclua a configuração do sistema operacional Se voc sistema. • Citrix® XenServer™ 5.0 com hotfix 1 ou posterior • Microsoft® Windows Server® 2008 Hyper-V™ • Microsoft Windows Server 2008, edições Web, Standard, Enterprise (x86 de 32 bits) - Dell PowerEdge R610 | Getting Started Guide - Page 35
es mais recentes sobre os sistemas operacionais compatíveis, consulte o site www.dell.com (em inglês). Outras informações úteis ADVERTÊNCIA: Consulte as das com o rack descrevem como instalar o sistema em racks. • O Manual do proprietário de hardware fornece informações sobre os recursos do sistema - Dell PowerEdge R610 | Getting Started Guide - Page 36
ção de hardware. Consulte o site www.dell.com/training para obter mais informações. Esse serviço pode não ser oferecido em todos os locais. Especificações técnicas Processador Tipo de processador Um ou dois processadores de núcleo quádruplo ou duplo Intel® Xeon® Barramento de expansão Tipo de - Dell PowerEdge R610 | Getting Started Guide - Page 37
Error Correcting Code, ECC) DIMMs CPU simples 96 GB (com 8 GB RDIMMs) ou 24 GB (com 2 GB UDIMMs) Unidades Discos rígidos Unidade de disquete Unidade óptica Unidade flash Até seis unidades de disco rígido SAS ou SATA internas de 2,5 polegadas com conexão automática e suporte a backplane Unidade USB - Dell PowerEdge R610 | Getting Started Guide - Page 38
Conectores Traseiros Placa de rede Quatro conectores Ethernet RJ-45 10/100/1000 Mbps Serial DTE de 9 pinos, compatível com 16550 USB Duas unidades de 4 pinos, compatíveis com USB 2.0 Vídeo VGA de 15 pinos Cartão de memória VFlash externo Um slot de cartão de memória flash opcional - Dell PowerEdge R610 | Getting Started Guide - Page 39
ção Fonte de alimentação CA (por fonte de alimentação) Potência 717 W (alta potência) 502 W (Energy Smart) Voltagem 90-264 VCA, variação automática, 47-63 Hz Dissipação de calor 2446,5 BTU/hr máximo (alta potência) 1712,9 BTU/hr máximo (Energy Smart) Surtos máximos de corrente de entrada - Dell PowerEdge R610 | Getting Started Guide - Page 40
Ambientais NOTA: Para obter informações adicionais sobre os valores ambientais para configurações de sistema específicas, visite o site www.dell.com/environmental_datasheets (em inglês). Temperatura Operacional 10 °C a 35 °C com variação máxima de 10 °C por hora NOTA: Para altitudes acima de 2. - Dell PowerEdge R610 | Getting Started Guide - Page 41
Ambientais (continuação) Altitude Operacional Armazenamento -16 m a 3.048 m NOTA: Para altitudes acima de 2.950 pés (900 metros), a temperatura de operação máxima é avaliada em 1°F/550 pés (0,55 °C/167,6 m). -16 m a 10.600 m Primeiros passos com o sistema 39 - Dell PowerEdge R610 | Getting Started Guide - Page 42
40 Primeiros passos com o sistema - Dell PowerEdge R610 | Getting Started Guide - Page 43
Sistemas Dell™ PowerEdge™ R610 Procedimientos iniciales con el sistema - Dell PowerEdge R610 | Getting Started Guide - Page 44
Dell Inc. Dell, el logotipo de DELL y PowerEdge son marcas comerciales de Dell Inc.; Citrix y XenServer son marcas comerciales de Citrix Systems, Inc. o de una o varias de sus filiales, y puede estar registrada en la Oficina de Patentes y Marcas de los Estados Unidos y en otros países. Intel y Xeon - Dell PowerEdge R610 | Getting Started Guide - Page 45
Desembalaje del sistema Desembale el sistema e identifique cada elemento. Instalación de los rieles y del sistema en un rack Monte los rieles e instale el sistema en el rack siguiendo las instrucciones de seguridad y de instalación del rack incluidas con el sistema. Procedimientos iniciales con el - Dell PowerEdge R610 | Getting Started Guide - Page 46
Conexión del teclado, el ratón y el monitor (opcional) Conecte el teclado, el ratón y el monitor (opcional). Los conectores de la parte posterior del sistema incluyen iconos que indican qué cable debe enchufarse en cada conector. Asegúrese de apretar los tornillos (si los hay) del conector - Dell PowerEdge R610 | Getting Started Guide - Page 47
Fijación del cable de alimentación Doble el cable de alimentación del sistema en forma de bucle, como se muestra en la ilustración, y fíjelo con la correa proporcionada. Conecte el otro extremo del cable de alimentación a una toma eléctrica con conexión a tierra o a otra fuente de energía, como por - Dell PowerEdge R610 | Getting Started Guide - Page 48
Instalación del embellecedor opcional Instale el embellecedor (opcional). Finalización de la instalación del • Citrix® XenServer™ 5.0 con actualización 1 o posterior • Microsoft® Windows Server® 2008 Hyper-V™ • Microsoft Windows Server 2008 Web, Standard y Enterprise (x86 de 32 bits) Gold Edition - Dell PowerEdge R610 | Getting Started Guide - Page 49
ón de rack se describe cómo instalar el sistema en un rack. • En el Manual del propietario del hardware se proporciona información sobre las características del sistema y se describe . Este documento está disponible en línea en la página support.dell.com. Procedimientos iniciales con el sistema 47 - Dell PowerEdge R610 | Getting Started Guide - Page 50
haya adquirido con su sistema. NOTA: Compruebe si hay actualizaciones en support.dell.com y, si las hay, léalas antes de proceder a la si el sistema no funciona del modo esperado, consulte el Manual del propietario del hardware. Dell™ cuenta con una amplia oferta de formación y certificación de - Dell PowerEdge R610 | Getting Started Guide - Page 51
Uno o dos procesadores Intel® Xeon® de dos o la otra deberá ser de 15 W o menos. Memoria Arquitectura Módulos DIMM DDR3 ECC registrados o sin búfer a 800, 1 066 o 1 duales, no duales o cuádruples RAM mínima 1 GB con una única CPU RAM máxima 96 GB (con módulos RDIMM de 8 GB) o 24 GB (con - Dell PowerEdge R610 | Getting Started Guide - Page 52
Digital (SD) interna opcional Tarjeta de memoria SD externa opcional Conectores Parte posterior NIC Cuatro RJ-45 Ethernet 10/100/1000 Mbps Serie 9 patas, DTE, compatible con 16550 USB Dos de 4 patas compatibles con USB 2.0 Vídeo VGA de 15 patas Tarjeta VFlash externa opcional Una ranura - Dell PowerEdge R610 | Getting Started Guide - Page 53
) 502 W (uso inteligente de energía) Voltaje 90-264 V CA, autoajustable, 47-63 Hz Disipación de calor 2 446,5 BTU/h (717,00 W) como máximo (alto rendimiento) 1 712,9 BTU/h (502 W) como máximo (uso inteligente de energía) Corriente de conexión máxima En condiciones normales de línea y en todo - Dell PowerEdge R610 | Getting Started Guide - Page 54
Especificaciones ambientales NOTA: Para obtener información adicional sobre medidas ambientales relativas a configuraciones del sistema específicas, vaya a www.dell.com/environmental_datasheets. Temperatura En funcionamiento De 10 °C a 35 °C con una gradación de temperatura máxima de 10 °C por - Dell PowerEdge R610 | Getting Started Guide - Page 55
Especificaciones ambientales (continuación) Impacto máximo En funcionamiento Impacto en semionda sinusoidal en todas las orientaciones de funcionamiento de 31 G +/-5% con duración de pulso de 2,6 ms +/-10% Almacenamiento Impacto en semionda sinusoidal en los seis laterales de 71 G +/-5% con - Dell PowerEdge R610 | Getting Started Guide - Page 56
54 Procedimientos iniciales con el sistema
-
 1
1 -
 2
2 -
 3
3 -
 4
4 -
 5
5 -
 6
6 -
 7
7 -
8
-
9
-
10
-
11
-
12
-
13
-
14
-
15
-
16
-
17
-
18
-
19
-
20
-
21
-
22
-
23
-
24
-
25
-
26
-
27
-
28
-
29
-
30
-
31
-
32
-
33
-
34
-
35
-
36
-
37
-
38
-
39
-
40
-
41
-
42
-
43
-
44
-
45
-
46
-
47
-
48
-
49
-
50
-
51
-
52
-
53
-
54
-
55
-
56
 |
 |

Dell™ PowerEdge™ R610
Systems
Getting Started With
Your System
Guide de mise en route
Primeiros passos com o sistema
Procedimientos iniciales con el sistema