Dell PowerEdge Rack Enclosure 4820 Best Practices Guide for Rack Enclosures
Dell PowerEdge Rack Enclosure 4820 Manual
 |
View all Dell PowerEdge Rack Enclosure 4820 manuals
Add to My Manuals
Save this manual to your list of manuals |
Dell PowerEdge Rack Enclosure 4820 manual content summary:
- Dell PowerEdge Rack Enclosure 4820 | Best Practices Guide for
Rack Enclosures - Page 1
DELL™ BEST PRACTICES GUIDE FOR RACK ENCLOSURES A Dell Technical White Paper PE2420 & PE4220 By Danny Alvarado Dell │ Data Center Infrastructure - Dell PowerEdge Rack Enclosure 4820 | Best Practices Guide for
Rack Enclosures - Page 2
OF SUCH DAMAGES.THE CONTENT IS PROVIDED AS IS, WITHOUT EXPRESS OR IMPLIED WARRANTIES OF ANY KIND. DELL, the DELL logo, and PowerEdge are trademarks of Dell Inc. ©2009 Dell Inc. All rights reserved. Reproduction of this material in any manner whatsoever without the express written permission - Dell PowerEdge Rack Enclosure 4820 | Best Practices Guide for
Rack Enclosures - Page 3
...4 Size ...4 Strength...5 Cooling ...6 Rack Installation ...7 Removal from Pallet 7 Moving into Place 8 Coupling Racks 10 Power Distribution Unit (PDU) Installation 11 Rear Mount PDUs 11 Zero U Mount PDUs 12 Cabling ...14 Internal Cable Management 14 Dell Inc. | Data Center Infrastructure - Dell PowerEdge Rack Enclosure 4820 | Best Practices Guide for
Rack Enclosures - Page 4
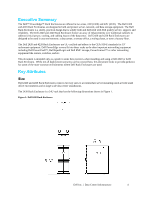
Dell 2420 and 4220 Rack Enclosures come in two key sizes to accommodate server mounting needs at both small office environments and in large scale data center installations. The 2420 Rack Enclosure is a 24U rack that has the following dimensions shown in Figure 1. Figure 1: Dell 2420 Rack Enclosure - Dell PowerEdge Rack Enclosure 4820 | Best Practices Guide for
Rack Enclosures - Page 5
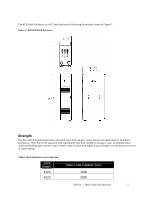
The 4220 Rack Enclosure is a 42U rack that has the following dimensions shown in Figure 2. Figure 2: Dell 4220 Rack Enclosure Strength The new Dell Rack Enclosures have increased static load capacity versus the previous generation of Dell Rack Enclosures. They have been upgraded with redesigned - Dell PowerEdge Rack Enclosure 4820 | Best Practices Guide for
Rack Enclosures - Page 6
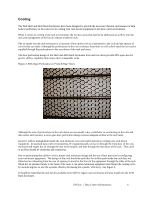
the cooling cycle by introducing hot air into the systems, thereby decreasing the systems' efficiency. See Figure 4. It should be noted that the rack fan kit available from Dell for legacy rack enclosures will also install into the 4220 Rack Enclosure. Dell Inc. | Data Center Infrastructure 6 - Dell PowerEdge Rack Enclosure 4820 | Best Practices Guide for
Rack Enclosures - Page 7
too low to allow the 4220 Rack Enclosure to pass through. Plan for an alternate route, or make provisions for dealing with getting the rack through any short doorway in a suitable manner prior to moving the rack. Never tilt a rack with equipment installed. Dell Inc. | Data Center Infrastructure 7 - Dell PowerEdge Rack Enclosure 4820 | Best Practices Guide for
Rack Enclosures - Page 8
rack from the pallet. The 2420 and 4220 Rack Enclosures are secured to their shipping pallet with L-brackets in the front and Z-brackets in the rear. In order to remove the rack attempt to move the rack alone. Always move the rack with assistance to help guide and position the rack as it is rolled - Dell PowerEdge Rack Enclosure 4820 | Best Practices Guide for
Rack Enclosures - Page 9
Figure 6: Leveling Feet Deployment Installing rack level stabilizers should be done next. The 4220 rack comes with a set of brackets in the rack that are used to provide stability when equipment is being loaded, unloaded, or serviced in the rack. Reach into the rack, grab a stabilizer bracket firmly - Dell PowerEdge Rack Enclosure 4820 | Best Practices Guide for
Rack Enclosures - Page 10
Installation Coupling Racks 4220 Rack Enclosures can be coupled using an interconnect accessory kit that can be purchased with the Dell Rack Enclosure. This kit can be used to couple the 4220 to another 4220 or to a previous generation Dell 4210 Rack Enclosure. Follow the steps in the instruction - Dell PowerEdge Rack Enclosure 4820 | Best Practices Guide for
Rack Enclosures - Page 11
use, large holes in the PDU trays allow cable-routing between racks. See Figure 10. Figure 10: Rear Mount PDUs Another benefit of the PDU trays in the Dell 2420 and 4220 Rack Enclosures is that the rear-mount PDUs are placed further back and away from the server equipment than is the case for other - Dell PowerEdge Rack Enclosure 4820 | Best Practices Guide for
Rack Enclosures - Page 12
Zero U Mount PDUs The 2420 and 4220 racks still support the Dell zero U mount PDUs that mount in the sides of the rack. For PDUs with detachable input cables, simply mount the PDU from the side of the rack and then plug the cable in and route it back into the rack through the opening between the - Dell PowerEdge Rack Enclosure 4820 | Best Practices Guide for
Rack Enclosures - Page 13
the gap between the rear mounting rail and the PDU tray. Installation should be from the inside of the rack. 2. From the side of the rack, snap the PDU tray into the mounting rail. Ensure that the cable is tucked back into the rack so that there's no interference between either a side panel or with - Dell PowerEdge Rack Enclosure 4820 | Best Practices Guide for
Rack Enclosures - Page 14
: Installing Hardwired Zero U PDUs Cabling The Dell 2420 and 4220 Rack Enclosures have been designed with improved internal and external cable management features. Internal Cable Management The Dell 2420 and 4220 Rack Enclosures are 2.7" (70mm) deeper than the older Dell 4210 Rack Enclosures. This - Dell PowerEdge Rack Enclosure 4820 | Best Practices Guide for
Rack Enclosures - Page 15
sides of the rack, then PDUs would be mounted in one PDU tray and the data cables can be routed into the PDU tray on the opposite side. When using Dell Cable Management Arms (CMAs), all cables will exit the CMA on one side. Dell CMAs can mount on either side of the system giving the user - Dell PowerEdge Rack Enclosure 4820 | Best Practices Guide for
Rack Enclosures - Page 16
point. The system CMAs can be balanced, half mounted on one side, and the other half mounted on the other side of the rack. All cables can then be routed up or down their respective sides. See Figure 16. Figure 16: Rear-Mount PDU with Adjacent Data Cables Dell Inc. | Data Center Infrastructure - Dell PowerEdge Rack Enclosure 4820 | Best Practices Guide for
Rack Enclosures - Page 17
(top or bottom), and the tail bars can be reinstalled quickly for a substitute to routing cables through holes in the rack. It is recommended to remove the rear doors when removing and reinstalling the tail bars. See Figure 17. Figure 17: Tailbar Removal Dell Inc. | Data Center Infrastructure 17
-
 1
1 -
 2
2 -
 3
3 -
 4
4 -
 5
5 -
 6
6 -
 7
7 -
8
-
9
-
10
-
11
-
12
-
13
-
14
-
15
-
16
-
17
 |
 |

DELL
™
BEST PRACTICES GUIDE
FOR RACK ENCLOSURES
PE2420 & PE4220
By Danny Alvarado
Dell
│
Data Center Infrastructure
A Dell Technical White Paper