Dell PowerEdge T610 Installing the Optional Casters on your System
Dell PowerEdge T610 Manual
 |
View all Dell PowerEdge T610 manuals
Add to My Manuals
Save this manual to your list of manuals |
Dell PowerEdge T610 manual content summary:
- Dell PowerEdge T610 | Installing the Optional Casters on your
System - Page 1
FILE LOCATION: C:\Windchill Projects\Sneetch\TS\Casters\A00\EN\Source\casters.fm Template Last Updated -8/26/2008 About Warning WARNING: A WARNING indicates a potential for 8 Turn on the system and attached peripherals. December 2008 Rev. A00 DELL CONFIDENTIAL - PRELIMINARY 12/17/08 - FOR PROOF ONLY - Dell PowerEdge T610 | Installing the Optional Casters on your
System - Page 2
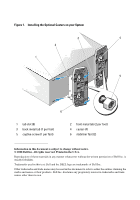
FILE LOCATION: C:\Windchill Projects\Sneetch\TS\Casters\A00\EN\Source\casters.fm Figure 1. Installing the Optional Casters without the written permission of Dell Inc. is strictly forbidden. Trademarks used in this text: Dell and the DELL logo are trademarks of Dell Inc. Other trademarks and trade
-
 1
1 -
 2
2
 |
 |

FILE LOCATION:
C:\Windchill Projects\Sneetch\TS\Casters\A00\EN\Source\casters.fm
DELL CONFIDENTIAL – PRELIMINARY 12/17/08 – FOR PROOF ONLY
Template Last Updated -8/26/2008
About Warning
WARNING:
A WARNING indicates a potential for property damage, personal injury,
or death.
Installing the Optional Casters on
your System
The optional casters for your system come preinstalled in two stabilizer feet (two
casters per foot), which attach to the bottom of your system.
1
Turn off the system, including any attached peripherals, and disconnect the
system from the electrical outlet.
2
Rotate the four system feet inward.
WARNING:
Whenever you need to lift the system, get others to assist you. To avoid
injury, do not attempt to lift the system by yourself.
3
Lay the system on its side on a flat work surface with the bottom of the system
overhanging the surface edge as shown in Figure 1.
4
Remove the four system feet by removing the Phillips screws securing the feet
(one screw per foot).
5
Install the stabilizer feet:
a
Holding the stabilizer foot at an angle, slide the two front metal tabs on
the foot into the tab slots in the bottom of the system. See Figure 1.
b
Rotate the foot towards the system, inserting the back metal tab into the
tab slot on the chassis. See Figure 1.
c
Secure the foot to the system using the Phillips captive screw.
d
Repeat step a through step c to install the remaining stabilizer foot.
6
Carefully place the system upright and on its feet on a flat, stable surface.
7
Reattach any peripherals, then connect the system to the electrical outlet.
8
Turn on the system and attached peripherals.
December 2008
Rev. A00