Dell Vostro 1200 Setup Diagram
Dell Vostro 1200 Manual
 |
View all Dell Vostro 1200 manuals
Add to My Manuals
Save this manual to your list of manuals |
Dell Vostro 1200 manual content summary:
- Dell Vostro 1200 | Setup Diagram - Page 1
CAUTION: Before you set up and operate your Dell™ computer, see the safety instructions in the Product Information Guide. See your Owner's Manual for a complete list of features. NOTE: Because the battery may not be fully charged, use the AC adapter to connect your new computer to an electrical - Dell Vostro 1200 | Setup Diagram - Page 2
© 2007 Dell Inc 未經 Dell Inc Dell、DELL 徽標和 Vostro 均為 Dell Inc Dell 2007 年 11 月 © 2007 Dell Inc. All rights reserved. Dell Inc Dell、DELL Vostro は、Dell Inc 2007 年 11 月 © 2007 Dell Inc Dell Inc Dell, DELL 로고 및 Vostro 는 Dell Inc Dell 2007년 11월 www.dell.com | support.dell.com
-
 1
1 -
 2
2
 |
 |

1
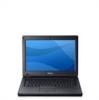
Connect the AC Adapter
±²
AC
适³器
連²´µ¶·¸器
AC
アダプタを±²します
AC
±²³´ µ¶·¸¹
±²¹制º¹器
連²數»¼
モデムを±²します
º»¼ µ¶·¸¹
±²½¾
連²¿À
ネットワークを±²します
½¾¿À´ µ¶·¸¹
按电Á按Â
按öÁ按鈕
³´ボタンをµします
Á ÃÄ´ ÅƸ¹
CAUTION:
Before you set up and operate your
Dell™ computer, see the safety
instructions in the
Product Information
Guide
. See your
Owner's Manual
for a
complete list of features.
NOTE:
Because the battery may not be
fully charged, use the AC adapter to
connect your new computer to an
electrical outlet the first time you use
the computer.
ÄÅ:
在ÆÇÈÉÊË的
Dell™
ÌÍ
ÎÏÐ,ÑÒ阅《
ÓÔÕÖ指南
》
×的Æ全ØÙ。有关Ú全ÛÜ列
表,ÑÒ阅《
用户ÝÞ
》。
ß:
首àá用ÌÍÎâ,由ã电
äåÜæ有Ú全充电,Ñá用
AC
适³器çË的èÌÍα²
到电Áéê。
Äë:
ÆìÈÉÊ
Dell™
¶腦Ð,íî
考
產Ôïð指南
×的Æ全ñÙ。
íîòË的
ó有者Ýô
õö÷Ú
整ÛÜøù。
ú:
由û¶äåÜü充ý¶,þ
ÿ,在Āāàá用è¶腦時,í
á用´µ¶·¸器Ăă¶腦連²
Ą¶Áéê。
¶·:
お持ちの
Dell™
コンピュータを
セットアップして¸¹させるº
に、『»¼½報ガイド』にある
¾全に¿するÀÁÂ項をおÃみ
ください。ÄÅなÆÇのÈÉに
ついては『オーナーズマニュア
ル』をÊ照してください。
メモ:
バッテリーはフル充³され
ていない場合がありますので、
コンピュータをËめてÌ用する
ときは、
AC
アダプタをÌって
Íしいコンピュータをコンセン
トに±²してください。
ÇÈ:
Dell™
Éʳ´ ËÌÍÎ ÏÐ
ÍÑ ÁÒ
ÓÔ ÌÕ Ö×Ø
ÒÙ
Ú ÖÁ Ûܼ ÝÞÍßàá. â
ã,
äåæ çèé
ÒØ Áê Ñë
ìí¼ ÝÞÍßàá.
Ç:
ÁÛî ïÁð ñÁòÛ ó¼
ô Ùõö÷ Éʳ´ øù
úûà
AC
±²³´ úûÍÎ
ü ÉÊ³Ò Á¼ µ¶Íßàá.
Setting Up Your Computer
ÆÇË的ÌÍÎ
|
ąĆË的¶腦
|
コンピュータのセットアップ
|
Éʳ ËÌ
1.
AC adapter connector
2.
modem connector
3.
network connector
4.
USB connectors (2)
5.
optical drive
6.
ExpressCard slot
7.
3-in-1 media card reader
8.
power button
9.
device status lights
10.
touch pad buttons (2)
11.
touch pad
12.
USB connector
13.
audio connectors (2)
14.
video connector
15.
security cable slot
16.
media control buttons (5)
1.
AC
适³器±²器
2.
¹制º¹器±²器
3.
½¾±²器
4.
USB
±²器
(2)
5.
光ćĈĉ器
6.
ExpressCard
éĊ
7.
ċ合āČč卡Ďö器
8.
电Á按Â
9.
ď备Đ态指ëđ
10.
Ē摸ē按Â
(2)
11.
Ē摸ē
12.
USB
±²器
13.
Ĕ频±²器
(2)
14.
ĕ频±²器
15.
Æ全ĖėéĊ
16.
ČčĘ制按Â
(5)
1.
´µ¶·¸器連²器
2.
數»¼連²器
3.
¿À連²器
4.
USB
連²器 (
2
)
5.
光ę¼
6.
ExpressCard
éĊ
7.
3-in-1
ĚěĜ卡器
8.
¶Á按鈕
9.
ìĝĞğ指ëĠ
10.
ġĘĢ按鈕 (
2
)
11.
ġĘĢ
12.
USB
連²器
13.
Ĕ效連²器 (
2
)
14.
ģĤ連²器
15.
Æ全ĥĦħ
16.
ĚěĘ制按鈕 (
5
)
1.
AC
アダプタコネクタ
2.
モデムコネクタ
3.
ネットワークコネクタ
4.
USB
コネクタ(
2
)
5.
オプティカルドライブ
6.
ExpressCard
スロット
7.
3-in-1
メディアカード
リーダー
8.
³´ボタン
9.
デバイスステータスライト
10.
タッチパッドボタン(
2
)
11.
タッチパッド
12.
USB
コネクタ
13.
オーディオコネクタ(
2
)
14.
ビデオコネクタ
15.
セキュリティケ
ーブルスロット
16.
メディアコントロール
ボタン(
5
)
1.
AC
±²³ ýþ³
2.
º» ýþ³
3.
½¾¿À ýþ³
4.
USB
ýþ³ (
2
)
5.
ÿĀ āĂăĄ
6.
ExpressCard
ąĆ
7.
3-in-1
çê ćā Ĉĉ
8.
ÁÂ ÃÄ
9.
Ċċ Čč Ďàď
10.
³ċ Đā ÃÄ (
2
)
11.
³ċ Đā
12.
USB
ýþ³
13.
áđá ýþ³ (
2
Ē)
14.
ēđá ýþ³
15.
ÕÖ Ĕăĕ ąĆ
16.
çê Ó± ÃÄ (
5
)
About Your Computer |
关ãÌÍÎ
|
ĨûË的¶腦
|
コンピュータについて
|
Éʳ ÌÕ
2
Connect
the Modem
3
Connect the Network
4
Press the Power Button
1
4
5
6
7
2
3
12
14
15
8
9
10
11
13
16