Dymo LabelWriter® 450 Duo Label Printer User Guide 1
Dymo LabelWriter® 450 Duo Label Printer Manual
 |
View all Dymo LabelWriter® 450 Duo Label Printer manuals
Add to My Manuals
Save this manual to your list of manuals |
Dymo LabelWriter® 450 Duo Label Printer manual content summary:
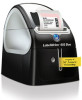
- Dymo LabelWriter® 450 Duo Label Printer | User Guide 1 - Page 1
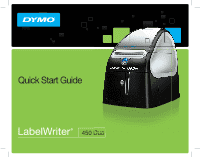
Quick Start Guide LabelWriter® 450 Duo - Dymo LabelWriter® 450 Duo Label Printer | User Guide 1 - Page 2
12/10. No part of this document or the software may be reproduced or transmitted in any form or by any means, or translated into another language without the prior written consent of Sanford, L.P. Trademarks DYMO, LabelWriter, and DYMO Label are registered marks in the United States and other - Dymo LabelWriter® 450 Duo Label Printer | User Guide 1 - Page 3
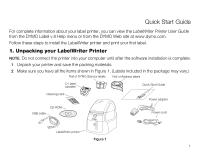
Printer User Guide from the DYMO Label v.8 Help menu or from the DYMO Web site at www.dymo.com. Follow these steps to install the LabelWriter printer and print your first label. 1. Unpacking your LabelWriter Printer NOTE Do not connect the printer into your computer until after the software - Dymo LabelWriter® 450 Duo Label Printer | User Guide 1 - Page 4
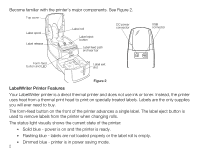
Form-feed button and LED Label exit slot Figure 2 LabelWriter Printer Features Your LabelWriter printer is a direct thermal printer and does not use ink or toner. Instead, the printer uses heat from a thermal print head to print on specially treated labels. Labels are the only supplies you - Dymo LabelWriter® 450 Duo Label Printer | User Guide 1 - Page 5
appears. 3 Click Install and follow the instructions in the installer. QuickBooks If you have QuickBooks 2007 or later, you will be prompted to install the DYMO Label Add-in for QuickBooks. (US Only.) To install the software on a Mac OS system 1 Insert the DYMO LabelWriter CD into the CD-ROM/DVD - Dymo LabelWriter® 450 Duo Label Printer | User Guide 1 - Page 6
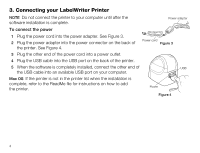
When the software is completely installed, connect the other end of USB the USB cable into an available USB port on your computer. Mac OS If the printer is not in the printer list when the installation is complete, refer to the ReadMe file for instructions on how to add the printer. Power Figure - Dymo LabelWriter® 450 Duo Label Printer | User Guide 1 - Page 7
4. Loading Labels The LabelWriter Duo printer prints two types of labels: die-cut paper labels (such as Address or Shipping labels) and D1 label cassettes. Important! In order for the labels to feed properly during printing, pay attention to the following when loading labels on the spool and into - Dymo LabelWriter® 450 Duo Label Printer | User Guide 1 - Page 8
spool. See Figure 6. NOTE To ensure proper feeding of labels during printing, the label roll must fit snugly against both sides of the label spool, with no gaps. 6 Insert the label spool into the slot in the printer cover with the labels extending from underneath the roll. See Figure 7. 7 Align the - Dymo LabelWriter® 450 Duo Label Printer | User Guide 1 - Page 9
tray. NOTE The first time you use the printer, remove the protective cardboard insert from the label exit slot. See Figure 9. 2 Make sure the label and ribbon are taut across the mouth of the cassette and that the label passes between the label guides. If necessary, turn the ribbon rewind spool - Dymo LabelWriter® 450 Duo Label Printer | User Guide 1 - Page 10
number for your label printer. The serial number is located on the bottom of the printer. To print your first label 1 Start DYMO Label software by doing one of the following: • For Windows, click Start, then Programs>DYMO>DYMO Label v.8. • For Macintosh, double-click the DYMO Label icon in the - Dymo LabelWriter® 450 Duo Label Printer | User Guide 1 - Page 11
Stamps software. Verify and correct addresses on your label. Select a printer to print your labels. Figure 11 For complete details on using the software, refer to the online Help. From the Help menu, you can view the following: • DYMO Label v.8 Help • DYMO Label v.8 User Guide • LabelWriter Printer - Dymo LabelWriter® 450 Duo Label Printer | User Guide 1 - Page 12
10 - Dymo LabelWriter® 450 Duo Label Printer | User Guide 1 - Page 13
postage right from your desktop using your LabelWriter Duo label printer. All you need is DYMO Stamps software, your LabelWriter printer, DYMO Stamps labels, and an Internet connection. To install DYMO Stamps and print postage 1 Sign up for your USPS account with Endicia. Go to: www.endicia.com - Dymo LabelWriter® 450 Duo Label Printer | User Guide 1 - Page 14
5 Select DYMO LabelWriter 450 Duo Label from the Printer list under Printer Selection. 6 Click Test Print to print a voided postage label. You are now ready to start printing actual postage whenever you need it. Refer to the DYMO Stamps online Help for more information about using the software. You - Dymo LabelWriter® 450 Duo Label Printer | User Guide 1 - Page 15
- Dymo LabelWriter® 450 Duo Label Printer | User Guide 1 - Page 16
Distributed by: DYMO, Atlanta, GA 30328 800-426-7827: www.dymo.com © 2010 Sanford, L.P. W008045 12/10 DIS-83
-
 1
1 -
 2
2 -
 3
3 -
 4
4 -
 5
5 -
 6
6 -
 7
7 -
8
-
9
-
10
-
11
-
12
-
13
-
14
-
15
-
16
 |
 |
LabelWriter
®
450 Duo
Quick Start Guide