Dynex DX-L15-10A User Manual (English)
Dynex DX-L15-10A - 15" LCD TV Manual
 |
View all Dynex DX-L15-10A manuals
Add to My Manuals
Save this manual to your list of manuals |
Dynex DX-L15-10A manual content summary:
- Dynex DX-L15-10A | User Manual (English) - Page 1
15", 19", and 22" LCD TVs DX-L15-10A/DX-L19-10A/DX-L22-10A USER GUIDE - Dynex DX-L15-10A | User Manual (English) - Page 2
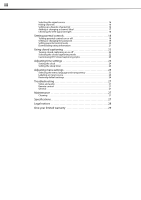
ii Dynex DX-L15-L19-L22-10A 15", 19", and 22" LCD TVs Contents Child Safety 1 Important safety instructions 2 Warnings 2 Cautions 2 Installing and removing the stand 3 Installing the stand 3 Adjusting the viewing angle of the TV 4 Removing the stand 4 Installing a wall-mount bracket 4 TV - Dynex DX-L15-10A | User Manual (English) - Page 3
the sleep timer 24 Adjusting menu settings 25 Selecting the menu language and transparency 25 Labeling an input source 26 Restoring default settings 26 Troubleshooting 27 Video and audio 27 Remote control 27 General 27 Maintenance 27 Cleaning 27 Specifications 27 Legal notices 28 One - Dynex DX-L15-10A | User Manual (English) - Page 4
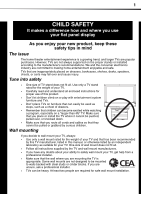
for the weight of your TV and that has been recommended by this TV manufacturer, listed in this manual, or otherwise listed by an independent laboratory as suitable for your TV. One size of wall mount does not fit all. • Follow all instructions supplied by the TV and wall mount manufacturers. • If - Dynex DX-L15-10A | User Manual (English) - Page 5
17 Remote control batteries power supply cord or plug is damaged or frayed. • If liquid has been spilled or objects have fallen into your TV. • If your TV has been exposed to rain or water. • If your TV does not operate normally by following the operating instructions. Adjust only those controls - Dynex DX-L15-10A | User Manual (English) - Page 6
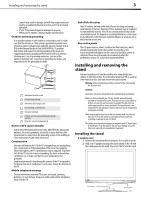
flat surface. If you intend to mount your TV on a wall or other vertical surface, you must remove the stand column. Warning: Before attempting assembly or removal of the stand, unplug the AC power cord. Cautions: Read these instructions thoroughly before attempting this installation. Make sure that - Dynex DX-L15-10A | User Manual (English) - Page 7
holding the stand column to your TV, then remove the stand and the stand column. Note: The appearance of this product in these illustrations may differ from your actual product, and is for comparative purposes only. To attach your TV to a wall-mount bracket: Warning: These servicing instructions are - Dynex DX-L15-10A | User Manual (English) - Page 8
TV components 5 TV components Back Front Model DX-L15-10A is used in this manual for illustration purposes. # Component Description 1 Remote sensor Receives signals from the remote control. Do not block. 2 Power indicator Lights blue when your TV is turned on. Lights red when your TV is in - Dynex DX-L15-10A | User Manual (English) - Page 9
TV components Remote control INFO # Button Description 1 (Power) Press to turn on your TV. Press again to put your TV in Standby mode. 2 COMP/HDMI/ VIDEO/TV . 10 GUIDE Press to open the DTV program guide (if PICTURE 21 AUDIO Press to set the sleep timer. For more information, see "Setting - Dynex DX-L15-10A | User Manual (English) - Page 10
• If your universal remote control has a code search feature, run a code search to identify a code that matches your TV. See your universal remote control's instructions for details. • If your universal remote control has a "Learn" feature, you can manually program it using your TV remote to "teach - Dynex DX-L15-10A | User Manual (English) - Page 11
picture. To connect a camcorder or game: 1 Make sure that your TV's power cord is unplugged and the camcorder or game is turned off. 2 Connect an AV cable to the AV OUT VIDEO, AUDIO-L, and AUDIO-R jacks on the camcorder or game. Side of TV Camcorder or game Note: Cables are often color-coded - Dynex DX-L15-10A | User Manual (English) - Page 12
press VIDEO twice for AV2. 3 Turn on the camcorder or game, and set it to the correct output mode. See the camcorder's or game's user guides for more information. Connecting an HDMI device To connect an HDMI device: 1 Make sure that your TV's power cord is unplugged and the HDMI device is turned off - Dynex DX-L15-10A | User Manual (English) - Page 13
use the lowest volume setting that still lets you hear the sound. Turning on your TV for the first time To configure your TV: 1 Make sure that you have inserted the batteries in the remote control, connected the antenna to the TV, and connect the AC power. 2 Press (Power), then wait several seconds - Dynex DX-L15-10A | User Manual (English) - Page 14
input source using the following remote control buttons: • COMP-Press to select Component. • HDMI-Press to select HDMI. • VIDEO-Press once to select AV1. Press twice to select AV2. Press three times to select S-Video. • TV-Press to select TV. On-screen menu overview Picture menu Notes: Depending on - Dynex DX-L15-10A | User Manual (English) - Page 15
the sound. Adjusting basic settings To adjust basic settings: 1 Press MENU. The on-screen menu opens with the Picture menu displayed. Selecting a channel • Parental Controls-Lets you control which programs/movies your children can watch, based on industry ratings. • Time-Lets you set the clock - Dynex DX-L15-10A | User Manual (English) - Page 16
(a bright and vivid picture), Standard (a standard picture), Sports (a dynamic picture), Theater (a finely detailed picture), Energy Saving (the backlight brightness is decreased), or Custom (customized picture). You can also press PICTURE on the remote control to select the picture mode. • Contrast - Dynex DX-L15-10A | User Manual (English) - Page 17
this On to optimize the picture display for a more vivid image. • Auto Zoom-In TV mode, setting Auto Zoom to On lets you set the Zoom Mode to Auto. Controls 2 Press or to highlight Audio, then press . The Audio menu opens. 4 Press or to highlight VGA Settings, then press . The VGA settings menu - Dynex DX-L15-10A | User Manual (English) - Page 18
. If an audio track is available, it plays. Playing TV audio only You can turn off the picture on your TV and listen to only the program audio. To play only the TV audio: 1 Press MENU. The on-screen menu opens. Changing channel settings Automatically scanning for channels To auto scan for channels - Dynex DX-L15-10A | User Manual (English) - Page 19
menu. Hiding channels You can delete channels from the channel list so that your TV skips the channels when you press CH /CH . You can still tune to the or to scroll through the pages. 5 Press EXIT to close the menu. Setting up a favorite channel list You can create a favorite channel list so you - Dynex DX-L15-10A | User Manual (English) - Page 20
that is already labeled. To label a channel: 1 Press MENU. The on-screen menu opens. 3 Select the signal source of the channel you want to set up on the favorites list. 4 Press or to highlight Favorite, then press ENTER. The favorite channel list opens. 2 Press or to highlight Channel, then press - Dynex DX-L15-10A | User Manual (English) - Page 21
less likely you are to experience picture degradation. To check the DTV signal strength: 1 Press MENU. The on-screen menu opens. Setting parental controls Parental controls let you prevent your children from watching inappropriate material on TV. When set, parental controls read the rating of the - Dynex DX-L15-10A | User Manual (English) - Page 22
the password to a number you can remember. The Parental Controls sub-menu opens. 5 Press or to highlight System Lock, then press or to select On (to enable the blocking scheme you set up and to set up the blocking scheme (otherwise the rating setting can not be accessed) or Off (to disable the - Dynex DX-L15-10A | User Manual (English) - Page 23
20 Setting parental controls Setting parental control levels You can set parental controls for the U.S. and Canada. The following procedure shows how to set controls for U.S. TV ratings. You use similar steps for controlling U.S. movie and Canadian TV ratings. To set parental controls: 1 Press - Dynex DX-L15-10A | User Manual (English) - Page 24
Setting parental controls 21 9 Press EXIT to close the menu. U.S. TV ratings (age-based) TV-Y All children. TV-Y7 Suitable for children 7 and older. TV-G General audiences. TV-PG Parental guidance suggested. TV-14 Parental guidance strongly suggested. TV-MA Mature audiences only. - Dynex DX-L15-10A | User Manual (English) - Page 25
. The closed caption menu opens. 6 Press or to highlight RRT Setting, then press ENTER. If the program is broadcast with RRT5 rating information, the information is downloaded automatically and can be used for parental controls. Note: If you want to clear the downloaded rating information, select - Dynex DX-L15-10A | User Manual (English) - Page 26
Closed Caption, then press or ENTER. The closed caption menu opens. 23 2 Press or to highlight Setup, then press . The Setup menu opens. Parental Controls 4 Press or to highlight CC Mode, then press or to select On. 5 Press or to highlight Basic Selection. 3 Press or to highlight Closed Caption - Dynex DX-L15-10A | User Manual (English) - Page 27
This information is based on a digital channel and does not need to be set manually. 6 Press EXIT to close the menu. Setting the sleep timer You can specify the amount of time you want your TV to wait before it automatically turns off. To set the sleep timer: 1 Press MENU. The on-screen menu opens. - Dynex DX-L15-10A | User Manual (English) - Page 28
or to select the amount of time you want your TV to wait before it automatically turns off. Note: To turn off the sleep timer, select Off. 5 Press EXIT to close the menu. Note: You can also press SLEEP on the remote control to set the sleep timer. 2 Press or to highlight Setup, then - Dynex DX-L15-10A | User Manual (English) - Page 29
customized are reset. To restore default settings: 1 Press MENU. The on-screen menu opens. 2 Press or to highlight Setup, then press . The Setup menu opens. Parental Controls 2 Press or to highlight Setup, Reset Label and press ENTER, then follow the on-screen instructions. 8 Press MENU to exit. - Dynex DX-L15-10A | User Manual (English) - Page 30
the instructions that came with the cloth. Specifications Design and specifications are subject to change without notice. Dimensions and weight are approximate. TV type LCD TV panel 15-inch (DX-L15-10A) TFT LCD 19-inch (DX-L19-10A) TFT LCD TV system Channels 22-inch (DX-L22-10A) TFT LCD NTSC - Dynex DX-L15-10A | User Manual (English) - Page 31
kg) - 19" 10 lbs. (4.5 kg) - 22" Composite video/left and right audio (2) S-Video (1) Component video/left and right audio (1) HDMI (1) VGA/audio (1) Antenna (1) Headphone jack (1) RS-232 (1) Service Port (1) Legal notices FCC Part 15 This device complies with Part 15 of the FCC Rules. Operation of - Dynex DX-L15-10A | User Manual (English) - Page 32
APPLY TO YOU. THIS WARRANTY GIVES YOU SPECIFIC LEGAL RIGHTS, AND YOU MAY ALSO HAVE OTHER RIGHTS, WHICH VARY FROM STATE TO STATE OR PROVINCE TO PROVINCE. Contact Dynex: For customer service please call 1-800-305-2204 www.dynexproducts.com Distributed by Best Buy Purchasing, LLC 7601 Penn Avenue South - Dynex DX-L15-10A | User Manual (English) - Page 33
www.dynexproducts.com (800) 305-2204 Distributed by Best Buy Purchasing, LLC 7601 Penn Ave. South, Richfield, MN 55423 U.S.A. © 2009 Best Buy Enterprise Services, Inc. All rights reserved. DYNEX is a trademark of Best Buy Enterprise Services, Inc. Registered in some countries. All other products and
-
 1
1 -
 2
2 -
 3
3 -
 4
4 -
 5
5 -
 6
6 -
 7
7 -
8
-
9
-
10
-
11
-
12
-
13
-
14
-
15
-
16
-
17
-
18
-
19
-
20
-
21
-
22
-
23
-
24
-
25
-
26
-
27
-
28
-
29
-
30
-
31
-
32
-
33
 |
 |

15", 19", and 22" LCD TVs
DX-L15-10A/DX-L19-10A/DX-L22-10A
USER GUIDE