Dynex dx-b4port Quick Setup Guide (English)
Dynex dx-b4port - USB 2.0 Hub Manual
 |
UPC - 600603120510
View all Dynex dx-b4port manuals
Add to My Manuals
Save this manual to your list of manuals |
Dynex dx-b4port manual content summary:
- Dynex dx-b4port | Quick Setup Guide (English) - Page 1
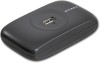
USB 4 and 7 Port hub DX-B4PORT • DX-B7PORT Introduction Congratulations on your purchase of a high-quality Dynex product. Your DX-B4PORT or DX-B7PORT is designed for reliable and troublefree performance. Use this guide for initial setup of your hub. Package contents • USB plus hub • AC power - Dynex dx-b4port | Quick Setup Guide (English) - Page 2
Dynex Products ("Dynex") warrants to you, the original purchaser of this new DX-B4PORT or DX cover? This warranty does not cover: • Customer instruction • Installation • Set up adjustments • Cosmetic damage anyone other than a facility authorized by Dynex to service the Product • Products sold as is
-
 1
1 -
 2
2
 |
 |
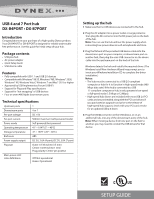
SETUP GUIDE
USB 4 and 7 Port hub
DX-B4PORT • DX-B7PORT
Introduction
Congratulations on your purchase of a high-quality Dynex product.
Your DX-B4PORT or DX-B7PORT is designed for reliable and trouble-
free performance. Use this guide for initial setup of your hub.
Package contents
• USB plus hub
• AC power adapter
•
Quick Setup Guide
• USB device cable
Features
•
Fully compatible with USB 1.1 and USB 2.0 devices
•
Compatible with Windows® 98 SE, Windows® ME, Windows® 2000,
Windows® XP, Windows Vista®,
Windows 7
and Mac® OS X or higher
• Approved by USB Implementers Forum (USB-IF)
• Support for Plug-and-Play specifications
•
Support for “hot swapping” of USB devices
•
Four or seven 480 Mpbs downstream ports
Technical specifications
Upstream ports
1
Downstream ports
4 or 7
Per-port voltage
DC +5V
Per-port current
500mA maximum (self-powered mode)
Power mode
Self-powered/bus-powered
Operating temperature
41° ~ 104°F (5° ~ 40°C)
Storage temperature
-4° ~ 140°F (-20° ~ 60°C)
Enclosure
ABS
Power supply output
DC 5V, 2.6A (4-port); DC 5V, 3.
8
A (7-port)
Plug size
Outer: 0.138 inches (3.5 mm)
Center: 0.039 inches (1 mm)
Plug polarity: Center-pin positive
Main-power-LED
color definitions
Off: Not operational
Green: Operational
Setting up the hub
1
Make sure that no USB devices are connected to the hub.
2
Plug the AC adapter into a power outlet or surge protector,
then plug the DC connector into the DC power jack on the back
of the hub.
Note:
You can use the hub without the power supply when
connecting low-power devices such as keyboards and mice.
3
Plug the flat end of the provided USB device cable into the
downstream port on your computer, or downstream port on
another hub, then plug the mini-USB connector on the device
cable into the upstream port on the back of the hub.
Windows detects the hub and installs the required driver. (The
Windows
Install New Hardware Wizard
may prompt you to
insert your Windows Installation CD to complete the driver
installation.)
Notes:
• The hub must be connected to a USB 2.0-compliant
computer or hub for it to function in high-speed mode (480
Mbps data rate). If the hub is connected to a USB
1.1-compliant computer or hub, it only operates in low-speed
or full-speed mode (1.5 Mbps or 12 Mbps).
• High-speed hub drivers are included with most USB 2.0 PCI
cards and are preinstalled along with the PCI card drivers. If
you purchased an upgrade card prior to the release of
high-speed hub support, check with your PCI card vendor
for an updated USB 2.0 driver.
4
Plug the USB
A
connector on the USB device, or on an
additional hub, into any of the downstream ports of the hub.
Note:
When moving a device from one port on the hub to
another, you may need to reinstall the USB drivers for that
device.