Electrolux E36DF76GPS Owners Guide
Electrolux E36DF76GPS - 36" Pro-Style Dual-Fuel Range Manual
 |
UPC - 057112098548
View all Electrolux E36DF76GPS manuals
Add to My Manuals
Save this manual to your list of manuals |
Electrolux E36DF76GPS manual content summary:
- Electrolux E36DF76GPS | Owners Guide - Page 1
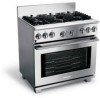
Use & Care Guide 30" & 36" Dual Fuel Ranges 318 203 963 (1001) Rev. A - Electrolux E36DF76GPS | Owners Guide - Page 2
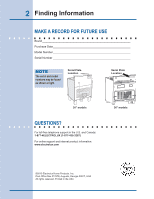
and model numbers may be found as shown at right. Serial Plate Location Serial Plate Location 30" models Questions? For toll-free telephone support in the U.S. and Canada: 1-877-4ELECTROLUX (1-877-435-3287) For online support and internet product information: www.electrolux.com 36" models ©2010 - Electrolux E36DF76GPS | Owners Guide - Page 3
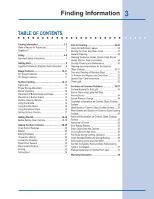
Instructions 4 Getting Start 9 Liquefied Petroleum (Propane) Gas Conversion...... 9 Range Features 10-11 30" Range Features 10 36" Range the Oven Controls 20-25 Oven Control Features 20 Baking 20 Baking Problems 21 Convection Baking 22 Convection Roasting 22 Bread Proof Feature 23 Warm - Electrolux E36DF76GPS | Owners Guide - Page 4
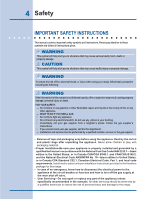
Part 1, and local code requirements. Install and/or adjust only per installation instructions provided in the literature package for this range valve. • User Servicing-Do not repair or replace any part of the appliance unless specifically recommended in the manuals. All other servicing should be done - Electrolux E36DF76GPS | Owners Guide - Page 5
/screws, or any other part of the product. ! Warning • All ranges can tip. • Injury to persons could result. • Install anti-tip device packed with range. • See Installation Instructions. To reduce the risk of tipping, the range must be secured by properly installed anti-tip bracket(s) provided - Electrolux E36DF76GPS | Owners Guide - Page 6
burst and result in injury. • Remove the oven door from any unused range if it is to be stored or discarded. IMPORTANT-Do not attempt to at least 3 hours before connecting it to the power supply. IMPORTANT INSTRUCTIONS FOR USING YOUR COOKTOP • Know which knob controls each surface heating unit - Electrolux E36DF76GPS | Owners Guide - Page 7
glazed utensils are suitable for rangetop service without breaking due to the sudden change will be blocked from the burner and cause combustion problems. • Do not clean or operate a broken cooktop IMPORTANT INSTRUCTIONS FOR CLEANING YOUR RANGE • Clean the range regularly to keep all parts free - Electrolux E36DF76GPS | Owners Guide - Page 8
In the self-Cleaning cycle only clean the parts listed in this Use and Care Guide. Before self cleaning the oven, remove the the fumes given off during the self-cleaning cycle of the range. Move the birds to another well ventilated room. IMPORTANT SAFETY safety instructions for future reference. - Electrolux E36DF76GPS | Owners Guide - Page 9
for use with natural gas. A kit for converting to LP gas is supplied with your cooktop. The kit is marked "FOR LP/ PROPANE GAS CONVERSION". Follow the installation instructions which are inside the envelope. The conversion must be performed by a qualified service technician in accordance with the - Electrolux E36DF76GPS | Owners Guide - Page 10
10 Range Features 30" Range FEATURES 123 5 4 6 10 11 12 13 78 9 14 15 16 17 18 Window Opening 16. Stainless Steel Trim 17. Burner Grates 18. 14 000BTU Burner 19. 5 000BTU Simmer Burner 20. Glass Cooktop 21. 18 000BTU Dual Flame Burner 22. 18 000 BTU Dual Flame Burner 23. Broiler Pan Cover - Electrolux E36DF76GPS | Owners Guide - Page 11
11 36" RANGE FEATURES Handle 17. Stainless Steel Oven Door With Large Window Opening 18. Stainless Steel Trim 19. Burner Grates 20. 14 000 BTU Burner 21. 9 500 BTU . Glass Cooktop 24. 18 000 BTU Dual Flame Burner 25. 14 000 BTU Burner 26. 18 000 BTU Dual Flame Burner 27. Broiler Pan Cover 28 - Electrolux E36DF76GPS | Owners Guide - Page 12
as a guide for determining proper on using medium-weight aluminum pans with instructions under General Care & Cleaning. burner locations Fig. 1 - 30" models Fig. 2 - 36" models Dual Flame (natural gas) burners at the right and left front positions. The surface burners are located on the 36" models - Electrolux E36DF76GPS | Owners Guide - Page 13
cap is properly aligned and level. Turn the burner on to determine if it will light. If the burner does not light, contact a Service Center. Do not service the sealed burner yourself. Electrode Figure 1 Burner Head Figure 2 PLACEMENT OF BURNER GRATES Place grates on the Ceramic Glass Cooktop. Be - Electrolux E36DF76GPS | Owners Guide - Page 14
Tight fitting lids. • Pan overhangs unit by more than 2.5 cm (1"). • Weight of handle does not tilt pan. Pans should have flat bottoms. Check for a utensil for its intended purpose. Follow manufacturer's recommended cookware instructions. Some utensils were not made to be used in the oven - Electrolux E36DF76GPS | Owners Guide - Page 15
without the Wok Stand. If unstable, DO NOT use the flat-bottom wok without the Wok Stand. Round-bottom woks (with a support ring) should NOT be used (See Figure 3). The supporting ring was not designed for proper or stable use on the Surface Burner Grates. Proper use of flat-bottom wok on - Electrolux E36DF76GPS | Owners Guide - Page 16
16 Surface Cooking using the simmer plate The simmer plate (Figure 1) is intended to diffuse lower temperature of the burner to help cooking delicate aliment such as chocolate, milk, bechamel, etc. It can also be use for cooking sauce during long period. With the grate in position over the burner, - Electrolux E36DF76GPS | Owners Guide - Page 17
control knobs do not have to be set at a particular mark. Use the guides and adjust the flame as needed. DO NOT cook with the Surface Control knob In the event of an electrical power outage, the surface burners can be lit manually. To light a surface burner, hold a lit match to the burner head, - Electrolux E36DF76GPS | Owners Guide - Page 18
not removed, the self-clean cycle won't start. Always remove the left side support first. To install oven rack supports insert the rack supports into the rack support brackets on the oven side as shown (36" range: put back screws at their original location). To remove from sliders To place on - Electrolux E36DF76GPS | Owners Guide - Page 19
roroasatsotr ohramham 11 11 NNootete::AAllwwaayyssuusseeccaautuiotinonwhwehnernemreomvinogvifnogodfo. od. Rack positions 8 7 6 5 4 3 2 1 30" Range Oven Rack Positions Rack positions 10 98 76 54 3 2 1 1 Oven Rack 36" Range Oven Rack Positions Multiple Oven Racks Air Circulation in the Oven - Electrolux E36DF76GPS | Owners Guide - Page 20
the oven as described below. Detailed instructions for each feature and function follow later in this Use & Care Guide. SELECTOR CONTROL KNOB- Use to the unit is first plugged in, or when the power supply to the range has been interrupted, the indicator lights will flash and the control will beep. - Electrolux E36DF76GPS | Owners Guide - Page 21
Problems Cookies and biscuits burn on the bottom. Causes Baking Problems the oven. • Use a medium-weight aluminum baking sheet. Cakes too dark sides of pan. Cakes not level. • Range not level. • Pan too close to is uneven, refer to the installation instructions for leveling the appliance. • - Electrolux E36DF76GPS | Owners Guide - Page 22
slower in Convection Bake than in Convection Roast. General Convection Bake Instructions 1. Adjust the cook time for desired doneness as needed. Time the Convection Roast mode is recommended to produce meats that are deliciously seared on the outside and succulently juicy on the inside in less time. - Electrolux E36DF76GPS | Owners Guide - Page 23
pan to a different rack position to suit for doneness. If the food you are broiling is not listed in the table, follow the instructions provided in your cookbook and watch the item closely. Electric Wall Oven Broiling Table Recommendations Food Item Rack position Knob Setting Cook Time 1st - Electrolux E36DF76GPS | Owners Guide - Page 24
24 Setting the oven controls Grid setting broil When broiling, heat radiates downward from the oven broiler for even coverage. The broil pan and broil pan insert used together allow dripping grease to drain and be kept away from the high heat of the oven broiler. DO NOT use the broil pan without - Electrolux E36DF76GPS | Owners Guide - Page 25
gloves when cleaning any exterior parts of the oven manually. During the self-cleaning cycle, the outside of the range can become very hot to the cannot withstand high cleaning temperatures. 4. Oven racks and oven rack supports must be removed. If they are not removed the selfcleaning cycle cannot - Electrolux E36DF76GPS | Owners Guide - Page 26
to complete. ! warning During the self-cleaning cycle, the outside of the range can become very hot to the touch. DO NOT leave small children unattended the clean mode is initiated, the oven racks and rack glides with supports have not been removed. It will continue flashing, once the selector knob - Electrolux E36DF76GPS | Owners Guide - Page 27
as soon as possible. Regular cleanings will reduce the number of major cleanings later Surfaces Aluminum (Trim Pieces) & Vinyl Painted and Plastic, Control Panel, Body Parts, and Decorative Trim Stainless Steel, Chrome, Control Panel, Decorative Trim Porcelain Enamel, Broiler Pan and Insert, Door - Electrolux E36DF76GPS | Owners Guide - Page 28
& Cleaning section in this Use & Care Manual. cLEANING BURNER GRATES, BURNER CAPS and BURNER HEADS ! Caution Do not remove any parts from the cooktop until they have completely cooled be sure to: ● Follow installation instructions before operating. ● Remove all packing tape from cooktop area. - Electrolux E36DF76GPS | Owners Guide - Page 29
soils located in the slots, use a small-gauge wire or needle to clean. Should you experience ignition problems it may be that an ignition port hole is partially blocked with soil (see figs 1 & 2). Double ring burner) Figure 2 - Double ring burner head (Models equipped with double ring burner only) - Electrolux E36DF76GPS | Owners Guide - Page 30
30 General Care & Cleaning cOOKTOP cleaning AND MAINTENANCE Consistent and proper cleaning is essential to maintaining your ceramic glass cooktop Prior to using your cooktop for the first time, apply the recommended Cleaning Creme to the ceramic surface. A sample of that cleaning creme is supplied - Electrolux E36DF76GPS | Owners Guide - Page 31
the utensil be destroyed, but it may fuse to, break or mark the ceramic glass surface, permanently damaging the cooktop surface. Special Door care instructions Most oven doors contain glass that can break. Read the following recommendations: 1. Do not close the oven door until all the oven racks are - Electrolux E36DF76GPS | Owners Guide - Page 32
2. Pull up the lock located on each hinge support toward front of range. You may have to apply a little upward in reverse to re-install the door. Make sure the hinge supports are fully engaged before The glass shield can be remove to be cleaned manually or to change oven light. THIS GLASS SHIELD - Electrolux E36DF76GPS | Owners Guide - Page 33
Problems 33 Important Before calling for service, review electric ignition models only). Burners can be lit manually. See Setting Surface Controls in this Use and Care Guide. burner until flame is full. Dry the burners thoroughly following instructions in the General Cleaning section. burner flame is - Electrolux E36DF76GPS | Owners Guide - Page 34
. • Short in cord/plug. Replace cord/plug. • Controls are not set properly. See instructions under Setting Oven Controls to set the controls. • House fuse has blown or circuit breaker has tripped immediately following installation. House fuse may not be fully engaged. Check fuse and screw or engage - Electrolux E36DF76GPS | Owners Guide - Page 35
Problems 35 OVEN LIGHT DOES NOT WORK • Burned-out or loose bulb. Follow the instructions under Changing Oven Light to replace or tighten the bulb. fan noise during cooking operation • A cooling fan may automatically turn on and off to cool internal parts element for quick searing operation. • Meat - Electrolux E36DF76GPS | Owners Guide - Page 36
the appliance accessible for servicing, such as removal of trim, cupboards, shelves, etc., which are not a part of the appliance when it was shipped from the factory. 5. Damages to finish after installation. 6. Replacement of light bulbs and/or fluorescent tubes (on models with these features
-
 1
1 -
 2
2 -
 3
3 -
 4
4 -
 5
5 -
 6
6 -
 7
7 -
8
-
9
-
10
-
11
-
12
-
13
-
14
-
15
-
16
-
17
-
18
-
19
-
20
-
21
-
22
-
23
-
24
-
25
-
26
-
27
-
28
-
29
-
30
-
31
-
32
-
33
-
34
-
35
-
36
 |
 |

318 203 963 (1001) Rev. A
Use & Care Guide
30” & 36” Dual Fuel Ranges