Electrolux E36EC65ESS Installation Instructions
Electrolux E36EC65ESS - Icon 36"Drop-in Electric Cooktop Manual
 |
View all Electrolux E36EC65ESS manuals
Add to My Manuals
Save this manual to your list of manuals |
Electrolux E36EC65ESS manual content summary:
- Electrolux E36EC65ESS | Installation Instructions - Page 1
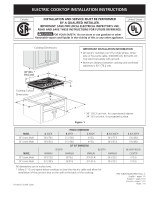
ELECTRIC COOKTOP INSTALLATION INSTRUCTIONS Canada INSTALLATION AND SERVICE MUST BE PERFORMED BY A QUALIFIED INSTALLER. IMPORTANT: SAVE FOR LOCAL ELECTRICAL INSPECTOR'S USE. READ AND SAVE THESE INSTRUCTIONS FOR FUTURE REFERENCE. WARNING FOR YOUR SAFETY: Do not store or use gasoline or other - Electrolux E36EC65ESS | Installation Instructions - Page 2
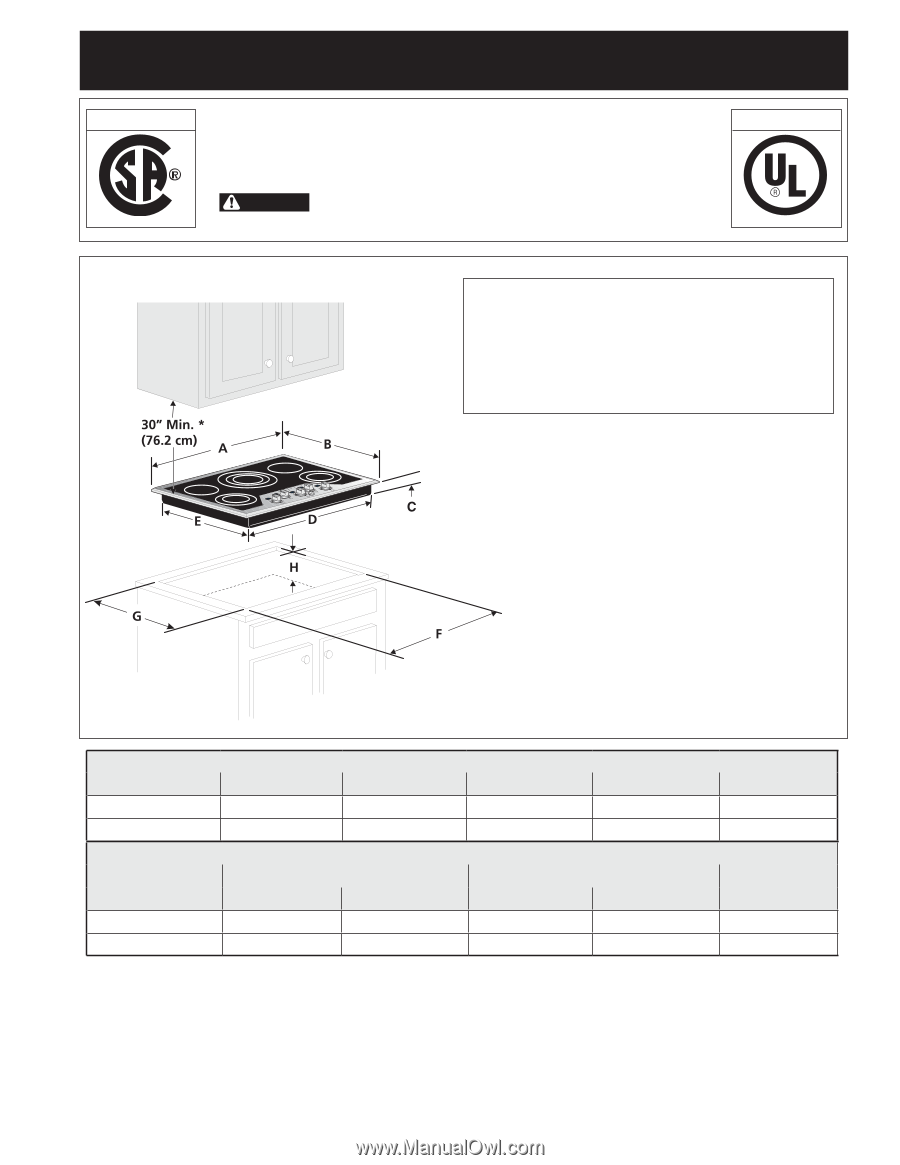
ELECTRIC COOKTOP INSTALLATION INSTRUCTIONS Overhead Cabinet Should Not Exceed a Maximum Depth of 13" (33 cm) 30" (76.2 cm) Min. Clearance Between the Top of the Cooking Platform and the - Electrolux E36EC65ESS | Installation Instructions - Page 3
to the Consumer Keep these instructions with your Use and Care Guide for future reference. IMPORTANT SAFETY INSTRUCTIONS • Be sure your cooktop is installed and grounded properly by a qualified installer or service technician. • These cooktops must be electrically grounded in accordance with local - Electrolux E36EC65ESS | Installation Instructions - Page 4
ELECTRIC COOKTOP INSTALLATION INSTRUCTIONS Electrical connection It is the responsibility and obligation of the consumer to contact a qualified installer to assure that the electrical installation is adequate and is in conformance with the National Electrical Code ANSI/NFPA No. 70-latest edition, - Electrolux E36EC65ESS | Installation Instructions - Page 5
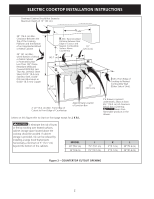
ELECTRIC COOKTOP INSTALLATION INSTRUCTIONS Cooktop Installation 1. Visually inspect the cooktop for damage. Also make sure all cooktop screws are tight (see Figure 6). 3. Set the cooktop into the countertop cutout. NOTE: Do not use caulking compound; cooktop should be removable for service when - Electrolux E36EC65ESS | Installation Instructions - Page 6
" (76.2 cm) mín. para un gabinete desprotegido. 24" (61 cm) mín. para una superficie protegida. Figura 1 mODELo Modelo 30'' Modelo 36'' mODEL Modelo 30'' Modelo 36'' DIMENSIONES de la estufa A. anchura B. profundidad c. altura D. largo de la caja 30 ¾ (78.1) 21 ½ (54.6) 4 (10.2) 28 5/8 (72 - Electrolux E36EC65ESS | Installation Instructions - Page 7
Si existe un armario, se pueden reducir los riesgos instalando una campana que se extienda horizontalmente en un mínimo de 5" (12.7 cm) por sobre la parte inferior de los armarios. ModelO 30'' (76.2 cm) 36'' (91.4 cm) J 7½'' (19.1 cm) 7½'' (19.1 cm). K 2'' (5.1 cm) 2'' (5.1 cm) L 30'' (72.6 cm - Electrolux E36EC65ESS | Installation Instructions - Page 8
podría resultar en daños serios o la muerte. Provea conexión eléctrica Instale la caja de empalmes debajo del armario y provea un cable de 120/240 de cerámico antes de utilizar. Ve la parte sobre Limpieza y Mantenimiento de la Cubierta en este Manual del usuario. Ubicación del número de modelo - Electrolux E36EC65ESS | Installation Instructions - Page 9
INSTRUCCIONES PARA LA INSTALACION DE LA ESTUFA ELECTRICA Riesgo de choque eléctrico (El no prestar atención a esta advertencia puede resultar en electrocución u otras lesiones graves.) Este electrodoméstico está equipado con alambre de cobre. Si se va a conectar con cableado de aluminio del hogar, - Electrolux E36EC65ESS | Installation Instructions - Page 10
6 espaciadores de nilón Tornillos Figura 6 2. Instale las ménsulas de sostén (ver Figura 7). la Norma CSA C22.1, Código Eléctrico Canadiense, Parte 1 (Figura 7). Estufa Superficie del armario Espaciador de ón Lista de Control de Averías en su Manual del Usuario. Esto le podrá ahorrar tiempo y - Electrolux E36EC65ESS | Installation Instructions - Page 11
Canada UN INSTALLATEUR QUALIFIÉ DOIT EFFECTUER L'INSTALLATION ET LE SERVICE. IMPORTANT: CONSERVEZ CES INSTRUCTIONS POUR LES INSPECTEURS LOCAUX. LISEZ CES INSTRUCTIONS 1 mODèleS mODÈLES 30'' mODÈLES 36'' mODèleS mODÈLES 30'' mODÈLES 36'' dimensions du PRODUiT A. largeur B. PROFONDEUR c. HAUTEUR - Electrolux E36EC65ESS | Installation Instructions - Page 12
INSTRUCTIONS D'INSTALLATION POUR PLAQUE DE CUISSON ÉLECTRIQUE L'armoire supérieure ne doit pas ) la base de l'armoire. ModÈLE 30'' (76.2 cm) 36'' (91.4 cm) J 7½'' (19.1 cm) 7½'' (19.1 cm). K 2'' (5.1 cm) 2'' (5.1 cm) L 30'' (72.6 cm) 36'' (91.4 cm) Figure 2 - OUVERTURE DU DÉCOUPAGE DE DESSUS DU - Electrolux E36EC65ESS | Installation Instructions - Page 13
. Consommateur Conservez ces instructions avec votre Guide de l'utilisateur pour références futures. DIRECTIVES IMPORTANTES DE SÉCURITÉ • Assurez‑vous que votre plaque de cuisson est installée et mise à la terre correctement par un installateur ou une technicien de service qualifié. • Cette plaque - Electrolux E36EC65ESS | Installation Instructions - Page 14
INSTRUCTIONS D'INSTALLATION POUR PLAQUE DE CUISSON ÉLECTRIQUE Connexions électriques Le consommateur est responsable et doit communiquer avec un installateur qualifié pour s'assurer que l'installation électrique est adéquate et conforme avec le National Electrical ou au Canada, débranchez les - Electrolux E36EC65ESS | Installation Instructions - Page 15
Installer les supports de fixation (voir figure 7) Les supports de fixation DOIVENT être installés conformément aux codes locaux ou, en leurs absen‑ ces, en conformité avec le National Electrical appeler le service d'entretien Consultez la liste des vérifications préventives et les instructions d'op - Electrolux E36EC65ESS | Installation Instructions - Page 16
INSTRUCTIONS D'INSTALLATION POUR PLAQUE DE CUISSON ÉLECTRIQUE NOTES/NOTAS: 16
-
 1
1 -
 2
2 -
 3
3 -
 4
4 -
 5
5 -
 6
6 -
 7
7 -
8
-
9
-
10
-
11
-
12
-
13
-
14
-
15
-
16
 |
 |
ELECTRIC COOKTOP INSTALLATION INSTRUCTIONS
All dimensions are in inches (cm).
* Allow 2" (5 cm) space below cooktop to clear the electric cable and allow for
installation of the junction box on the wall at the back of the cooktop.
P/N 318201428 (0901) Rev. C
English – pages 1-5
Español – pages 6-10
Français - pages 11-15
Notes - 16
Cooktop Dimensions
IMPORTANT INSTALLATION INFORMATION
• All electric cooktops run off a single phase, three-
wire or four-wire cable, 240/208 volt, 60 hertz, AC
only electrical supply with ground.
• Minimum distance between cooktop and overhead
cabinetry is 30" (76.2 cm).
* 30" (76.2 cm) min. for unprotected cabinet
24" (61 cm) min. for protected surface
Cooktop Cutout
Dimensions
Figure 1
Printed in United States
PRODUCT DIMENSIONS
MODEL
A.
WIDTH
B.
DEPTH
C.
HEIGHT
D.
BOX WIDTH
E.
BOX DEPTH
30’’
Ceramic Model
30 ¾ (78.1)
21 ½ (54.6)
4 (10.2)
28
5
/
8
(72.7)
19¼ (48.9)
36’’ Ceramic Model
36 ¾ (93.3)
21 ½ (54.6)
4 (10.2)
34
5
/
8
(87.9)
19¼ (48.9)
CUT OUT DIMENSIONS
F.
WIDTH
G.
DEPTH
H.
HEIGHT BELOW
MODEL
MINIMUM
MAXIMUM
MINIMUM
MAXIMUM
COOKTOP
30’’
Ceramic Model
29
5
/
8
(75.2)
30 (76.2)
20 ¼ (51.4)
20 ½ (52.1)
6 (15.2)
36’’ Ceramic Model
35
5
/
8
(90.5)
36 (91.4)
20 ¼ (51.4)
20 ½ (52.1)
6 (15.2)
INSTALLATION AND SERVICE MUST BE PERFORMED
BY A QUALIFIED INSTALLER.
IMPORTANT: SAVE FOR LOCAL ELECTRICAL INSPECTOR’S USE.
READ AND SAVE THESE INSTRUCTIONS FOR FUTURE REFERENCE.
WARNING
FOR YOUR SAFETY:
Do not store or use gasoline or other
flammable vapors and liquids in the vicinity of this or any other appliance.
Canada
United States