Electrolux ECCG3672AS Installation Instructions English
Electrolux ECCG3672AS Manual
 |
View all Electrolux ECCG3672AS manuals
Add to My Manuals
Save this manual to your list of manuals |
Electrolux ECCG3672AS manual content summary:
- Electrolux ECCG3672AS | Installation Instructions English - Page 1
governing codes and ordinances. Be sure to leave these instructions with the consumer. Important Note to the Customer Keep these instructions with your owner's guide for future reference. WARNING If the instructions contained in this manual are not followed precisely, a fire or explosion may result - Electrolux ECCG3672AS | Installation Instructions English - Page 2
INSTRUCTIONS IMPORTANT SAFETY INSTRUCTIONS This manual contains important safety symbols and instructions. Please pay attention to these symbols and follow all instructions Guide, please read it carefully. • Make sure your range is installed and grounded properly by a qualified installer or service - Electrolux ECCG3672AS | Installation Instructions English - Page 3
or property damage. Refer to this manual for guidance. All other servicing should be done by an authorized service provider. • The appliance should only be used if installed by a qualified technician in accordance with these installation instructions and all applicable regulations and codes. The - Electrolux ECCG3672AS | Installation Instructions English - Page 4
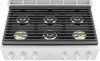
36" GAS RANGETOP INSTALLATION INSTRUCTIONS Product Dimensions Cabinet clearances A 912.4 mm B1 max: 688 mm min: 681.5 mm C 190.5 mm D 46.5 mm E 604 mm F 241 mm 35 15/16" max: - Electrolux ECCG3672AS | Installation Instructions English - Page 5
36" GAS RANGETOP INSTALLATION INSTRUCTIONS Countertop cutout for gas and electric 2. Divide the measurement in half and draw the connections midline on the surface of the cabinet. F 914 mm G max: - Electrolux ECCG3672AS | Installation Instructions English - Page 6
36" GAS RANGETOP INSTALLATION INSTRUCTIONS Location of the gas and electric outlets Island installation If the appliance is installed as an island: 1. Unscrew the screws indicated. 2. Remove the spacers (A) and - Electrolux ECCG3672AS | Installation Instructions English - Page 7
above this appliance. The hood must be installed according to the instructions provided with the hood. Electrical connection WARNING Electrical shock hazard • of ventilation system may cause ignition and combustion problems with the gas cooking appliance and may result in personal injury or - Electrolux ECCG3672AS | Installation Instructions English - Page 8
the appliance. It must be easily accessible in an emergency. Leak testing must be conducted by the installer according to the instructions in this manual. The appliance and its individual shutoff valve must be disconnected from the gas supply piping system during any pressure testing at pressures - Electrolux ECCG3672AS | Installation Instructions English - Page 9
of 10,000 ft. Exception: To use it with propane gas, the appliance must be converted in accordance with the propane conversion instructions. For Massachusetts installations: • Installation must be performed by a qualified or licensed contractor, plumber or gas fitter qualified or licensed by the - Electrolux ECCG3672AS | Installation Instructions English - Page 10
36" GAS RANGETOP INSTALLATION INSTRUCTIONS The technical data tables for the nozzles and burn- ers the gas supply line to the unit pressure regulator using a 1/2" flex gas line connector between the manual shut-off valve and the pressure regulator. A metal flex line or fixed metal pipe must be used - Electrolux ECCG3672AS | Installation Instructions English - Page 11
Since all cooktop burners are of the dual-flame type, the minimum gas setting must be adjusted for both the outer and inner rings. These instructions refer to a single burner. Repeat the following for each cooktop burner. 1. Push in the burner control knob and light it at the minimum position - Electrolux ECCG3672AS | Installation Instructions English - Page 12
36" GAS RANGETOP INSTALLATION INSTRUCTIONS When checking if the regulator is working properly, the inlet pressure must be at least 1" greater than the operating (manifold) pressure above. When converting for - Electrolux ECCG3672AS | Installation Instructions English - Page 13
shape of the openings in the burner base. CAUTION This procedure must be performed for every burner. 5. Refit the burner components following the above instructions in reverse. 6. Completely fill out the Nozzle Change Warning labels (part no. 92849A078) and attach it to the bottom of the appliance - Electrolux ECCG3672AS | Installation Instructions English - Page 14
- Electrolux ECCG3672AS | Installation Instructions English - Page 15
le fournisseur de gaz avec le téléphone du voisin. Suivez les instructions du fournisseur de gaz. • À défaut de joindre votre fournisseur ENTRETIEN DOIVENT ÊTRE EFFECTUÉS PAR UN INSTALLATEUR QUALIFIÉ, UNE AGENCE DE SERVICE OU LE FOURNISSEUR DE GAZ. Remarque : Pour les appareils installés dans - Electrolux ECCG3672AS | Installation Instructions English - Page 16
certaines précautions de sécurité. Vous les trouverez dans le Guide d'utilisation et d'entretien, veuillez le lire attentivement. • Assurez-vous de mise à la terre dans la section Exigences électriques de ces instructions d'installation. • Avant d'installer la cuisinière dans une zone recouverte - Electrolux ECCG3672AS | Installation Instructions English - Page 17
de service autorisé. • L'appareil ne doit être utilisé que s'il est installé par un technicien qualifié conformément à ces instructions d'installation doit pas s'incliner vers l'avant. Reportez-vous aux instructions d'installation du support anti-basculement fournies avec votre cuisinière pour une - Electrolux ECCG3672AS | Installation Instructions English - Page 18
INSTALLATION INSTRUCTIONS RACCORDEMENT DU GAZ 36'' Il est de la responsabilité du propriétaire et de l'installateur de déterminer si des exigences supplémentaires et/ou des - Electrolux ECCG3672AS | Installation Instructions English - Page 19
INSTALLATION INSTRUCTIONS RACCORDEMENT DU GAZ 36'' • J = 36" / 914 102 mm Q min. 305 mm 36" max : 24 3/8" min : 24 1/8" min. 4" min. 12" 4. Positionnez le support de sécurité centré par rapport au point d'intersection des deux lignes que vous venez de dessiner puis fixez-le avec les ATTENTION - Electrolux ECCG3672AS | Installation Instructions English - Page 20
INSTALLATION INSTRUCTIONS RACCORDEMENT DU GAZ 36'' deux vis fournies. Emplacement des branchements électriques et de gaz de l'appareil REMARQUES : • L'appareil doit reposer solidement dans la coupe et - Electrolux ECCG3672AS | Installation Instructions English - Page 21
Préparez la coupe de l'ameublement et du comptoir. 2. Installez le support de sécurité 3. Effectuez les branchements électriques et de gaz. 4. Dé cet appareil. La hotte doit être installée conformément aux instructions fournies avec la hotte. Branchement électrique AVERTISSEMENT Risque de choc é - Electrolux ECCG3672AS | Installation Instructions English - Page 22
de l'appareil. Il doit être facilement accessible en cas d'urgence. Les tests d'étanchéité doivent être effectués par l'installateur conformément aux instructions de ce manuel. L'appareil ainsi que la vanne d'arrêt individuelle devraient être débranchées du système d'approvisionnement en gaz pendant - Electrolux ECCG3672AS | Installation Instructions English - Page 23
sûr jusqu'à une hauteur de 10 000 pi. Exception : Pour l'utiliser avec du gaz propane, l'appareil doit être converti conformément aux instructions de conversion au propane. Pour l'installation au Massachusetts : • L'installation doit être effectuée par un entrepre- neur qualifié et accrédité, un - Electrolux ECCG3672AS | Installation Instructions English - Page 24
INSTALLATION INSTRUCTIONS RACCORDEMENT DU GAZ 36'' Les tableaux des données techniques des injecteurs et des brûleurs sont présentés ci-dessous : Tableau de puissance et - Electrolux ECCG3672AS | Installation Instructions English - Page 25
INSTALLATION INSTRUCTIONS RACCORDEMENT DU GAZ 36'' Test de fuites de gaz AVERTISSEMENT N' flamme, le réglage minimum du gaz doit être ajusté pour les anneaux extérieur et intérieur. Ces instructions se réfèrent à un seul brûleur. Répétez ce qui suit pour chaque brûleur de la table de cuisson - Electrolux ECCG3672AS | Installation Instructions English - Page 26
INSTALLATION INSTRUCTIONS RACCORDEMENT DU GAZ 36'' Le régulateur de pression situé à l'entrée du collecteur de la cuisinière doit rester dans la conduite d'alimentation. Utilisez un connecteur d' - Electrolux ECCG3672AS | Installation Instructions English - Page 27
brûleur. PRÉCAUTION Cette procédure doit être exé- cutée pour chaque brûleur. 5. Replacez les composants du brûleur en suivant les instructions ci-dessus en sens inverse. 6. Remplissez entièrement les étiquettes d'avertissement de changement d'injecteur (n° de pièce 92849A078) et collez-la au bas - Electrolux ECCG3672AS | Installation Instructions English - Page 28
- Electrolux ECCG3672AS | Installation Instructions English - Page 29
para el cliente Mantenga estas instrucciones con la guía del propietario para futuras referencias. ADVERTENCIA Si las instrucciones recogidas en este manual no se siguen con exactitud, podría producirse un incendio o una explosión, causando daños materiales, lesiones personales o la muerte. PARA SU - Electrolux ECCG3672AS | Installation Instructions English - Page 30
INSTRUCCIONES DE MONTAJE PLANO DE COCCIÓN DE GAS DE 36" INSTRUCCIONES IMPORTANTES DE SEGURIDAD Este manual contiene símbolos e instrucciones importantes con relación a la seguridad. Preste atención a estos símbolos y siga las instrucciones proporcionadas. ADVERTENCIA Este símbolo le alertará de - Electrolux ECCG3672AS | Installation Instructions English - Page 31
. La instalación, el servicio o el mantenimiento inadecuados pueden causar lesiones o daños a la propiedad. Utilice este manual como guía. Las demás operaciones de mantenimiento deben encargarse a un proveedor de servicios autorizado. • El aparato debería utilizarse solo si el montaje lo lleva - Electrolux ECCG3672AS | Installation Instructions English - Page 32
INSTRUCCIONES DE MONTAJE PLANO DE COCCIÓN DE GAS DE 36" La instalación debe realizarse en conformidad con los códigos locales o, en ausencia de ellos, con el Código Nacional de Gas Combustible, ANSI Z223.1/ NFPA 54 o, en Canadá, con el Código de Instalación de Gas Natural y Propano, CSA B149.1. El - Electrolux ECCG3672AS | Installation Instructions English - Page 33
INSTRUCCIONES DE MONTAJE PLANO DE COCCIÓN DE GAS DE 36" • J = 36" / 914 mm distancia mínima entre la superficie de cocción y la base de un armario de madera o metal sin protección. • J = 30" / 762 mm como mínimo cuando el fondo del armario de madera o metal está protegido por una madera resistente - Electrolux ECCG3672AS | Installation Instructions English - Page 34
INSTRUCCIONES DE MONTAJE PLANO DE COCCIÓN DE GAS DE 36" dos tornillos suministrados. Posición de las conexiones de gas y eléctricas del aparato NOTAS: • El aparato debe estar bien colocado en el hueco y no debe poder moverse (por ejemplo, durante la limpieza). • Para evitar daños estéticos, - Electrolux ECCG3672AS | Installation Instructions English - Page 35
INSTRUCCIONES DE MONTAJE PLANO DE COCCIÓN DE GAS DE 36" Desembalaje, desplazamiento y ubicación del aparato ATENCIÓN Esta unidad ha sido diseñada como aparato de cocción. Por motivos de seguridad, nunca debe utilizarse para calentar ambientes. • Utilice guantes para evitar cortarse los dedos con - Electrolux ECCG3672AS | Installation Instructions English - Page 36
en caso de emergencia. Las pruebas para controlar la presencia de escapes deben ser realizadas por el instalador de acuerdo con las instrucciones de este manual. El aparato y su válvula de cierre individual se deben desconectar del sistema de tuberías de suministro de gas durante cualquier prueba de - Electrolux ECCG3672AS | Installation Instructions English - Page 37
INSTRUCCIONES DE MONTAJE PLANO DE COCCIÓN DE GAS DE 36" La presión máxima de suministro no debe exceder de 14,0 pulgadas de columna de agua (34,9 milibares). ADVERTENCIA sobre la Propuesta 65 del Estado de California: Este producto puede contener una sustancia química que, conforme al Estado de - Electrolux ECCG3672AS | Installation Instructions English - Page 38
conector de línea de gas flexible de 1/2" entre la válvula de cierre manual y el regulador de presión. Se debe utilizar una línea metálica flexible tuberías de suministro de gas, cerrando la respectiva válvula de cierre manual durante las pruebas de presión del sistema de suministro de gas cuando - Electrolux ECCG3672AS | Installation Instructions English - Page 39
INSTRUCCIONES DE MONTAJE PLANO DE COCCIÓN DE GAS DE 36" Comprobación de fugas de gas ADVERTENCIA NUNCA utilice una llama para comprobar la existencia de fugas de gas. Se debe realizar la comprobación de fugas de gas antes de comprobar el encendido eléctrico de los quemadores: 1. Encienda el - Electrolux ECCG3672AS | Installation Instructions English - Page 40
INSTRUCCIONES DE MONTAJE PLANO DE COCCIÓN DE GAS DE 36" Utilice un conector flexible y metálico o una tubería rígida para conectar la estufa al suministro de gas. El conector debe tener un diámetro interior de 1/2" y una longitud de 5 pies (1,5 m) o menos. (Excepción: La longitud máxima del - Electrolux ECCG3672AS | Installation Instructions English - Page 41
INSTRUCCIONES DE MONTAJE PLANO DE COCCIÓN DE GAS DE 36" 4. Retire las boquillas internas (8) y externas (9) y sustitúyalas con las boquillas de gas propano (vea "Tabla de las boquillas de gas propano (Presión en c.d.a.: 10")"). Volver a montar los quemadores Para una instalación correcta, la forma - Electrolux ECCG3672AS | Installation Instructions English - Page 42
- Electrolux ECCG3672AS | Installation Instructions English - Page 43
- Electrolux ECCG3672AS | Installation Instructions English - Page 44
914780092-A-112021
-
 1
1 -
 2
2 -
 3
3 -
 4
4 -
 5
5 -
 6
6 -
 7
7 -
8
-
9
-
10
-
11
-
12
-
13
-
14
-
15
-
16
-
17
-
18
-
19
-
20
-
21
-
22
-
23
-
24
-
25
-
26
-
27
-
28
-
29
-
30
-
31
-
32
-
33
-
34
-
35
-
36
-
37
-
38
-
39
-
40
-
41
-
42
-
43
-
44
 |
 |

All rights reserved. Printed in Italy
INSTALLATION INSTRUCTIONS
36” GAS RANGETOP
INSTALLATION AND SERVICE MUST BE PERFORMED BY A QUALIFIED
INSTALLER.
IMPORTANT: SAVE FOR LOCAL ELECTRICAL INSPECTOR'S USE.
READ AND SAVE THESE INSTRUCTIONS FOR FUTURE REFERENCE.
WARNING
FOR YOUR SAFETY: Do not store or use gasoline or other flammable vapors or
liquids near this or any other appliance.
Table of Contents
IMPORTANT SAFETY INSTRUCTIONS
........
2
Product Dimensions
........................................
4
Cabinet clearances
..........................................
4
Location of the gas and electric outlets
...........
6
Island installation
.............................................
6
Unpacking, moving and positioning the appli-
ance
.................................................................
7
Electrical connection
.......................................
7
Gas safety
.......................................................
8
Gas connection
...............................................
9
Conversion to Propane gas (LPG)
................
11
Important Notes to the Installer
1. Read all instructions contained in these installa-
tion instructions before installing the range.
2. Remove all packing material from the oven and
the drawer compartments before connecting the
electrical and gas supplies to the range.
3. Observe all governing codes and ordinances. Be
sure to leave these instructions with the con-
sumer.
Important Note to the Customer
Keep these instructions with your owner's guide for
future reference.
WARNING
If the instructions contained in this manual are not followed precisely, a fire
or explosion may result causing property damage, personal injury or loss of life.
FOR YOUR SAFETY:
• Do not store or use gasoline or other flammable vapors or liquids near this or any other appliance.
WHAT TO DO IF YOU SMELL GAS:
• Do not try to light any appliance.
• Do not touch electrical switches; do not use any phone in the building.
• Immediately call your gas supplier from a neighbor's phone. Follow the gas supplier's instructions.
• If you cannot reach your gas supplier, call the fire department.
INSTALLATION AND SERVICE MUST BE PERFORMED BY A QUALIFIED INSTALLER,
SERVICE COMPANY OR GAS SUPPLIER.
Note: For appliances installed in the State of Massachusetts, go to page 9.
Note: When operating at elevations higher than 2000 ft. above sea level, the appliance rating
should be reduced by 4 percent for each additional 1000 ft.