Electrolux EFME417SIW Installation Instructions English Spanish French
Electrolux EFME417SIW Manual
 |
View all Electrolux EFME417SIW manuals
Add to My Manuals
Save this manual to your list of manuals |
Electrolux EFME417SIW manual content summary:
- Electrolux EFME417SIW | Installation Instructions English Spanish French - Page 1
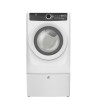
EN FRONT LOAD DRYER FR SÉCHEUSE Á CHARGEMENT FRONTAL ES SECADORA DE CARGA FRONTAL INSTALLATION INSTRUCTIONS INSTRUCTIONS D'INSTALLATION INSTRUCCIONES DE INSTALACIÓN A04173601A August 2015 - Electrolux EFME417SIW | Installation Instructions English Spanish French - Page 2
electrical code C22.1 part 1. • The gas service to the dryer must conform with local codes and ordinances and the latest edition of the National Fuel Gas Code ANSI Z223.1/NFPA 54, or in Canada, thw Natural Gas and Propane Installation Code, CSA B149.1. An individual manual shut-off valve must - Electrolux EFME417SIW | Installation Instructions English Spanish French - Page 3
read and save this guide Thank you for choosing Electrolux, the premium brand in home appliances. These Installation Instructions are part of our commitment to customer satisfaction and product quality throughout the life of your new appliance. Questions? For toll-free telephone support in the - Electrolux EFME417SIW | Installation Instructions English Spanish French - Page 4
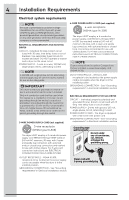
breakers. Use separately fused circuits for washer and dryer. DO NOT operate a washer and a dryer on the same circuit. POWER SUPPLY dryers. For 4-wire cord connection instructions see ELECTRICAL CONNECTIONS FOR A 4-WIRE SYSTEM. NOTE Dryers manufactured for sale in Canada have factory-installed - Electrolux EFME417SIW | Installation Instructions English Spanish French - Page 5
the gas supply must comply with the Standard for Connectors for Gas Appliances, instructions can create excessive drying times and fire hazards. CORRECT INCORRECT The following are specific requirements for proper and safe operation of your dryer. WARNING FIRE HAZARD Do not install a clothes dryer - Electrolux EFME417SIW | Installation Instructions English Spanish French - Page 6
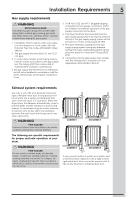
(2.4 m) duct length. EXHAUST DIRECTION Directional exhausting can be accomplished by installing a quick-turn 90° dryer vent elbow directly to exhaust outlet of dryer. Dryer vent elbows are available through your local parts distributor or hardware store. WARNING FIRE HAZARD Exceeding the length of - Electrolux EFME417SIW | Installation Instructions English Spanish French - Page 7
Part 280) or Standard CAN/CSAZ240 MH. 2. Dryer MUST be exhausted outside (outdoors, not beneath the mobile home) using metal ducting that will not support to previous sections in this guide for other important exhaust venting system requirements. 5. When installing a gas dryer into a mobile home, a - Electrolux EFME417SIW | Installation Instructions English Spanish French - Page 8
or closet, MUST be exhausted outdoors. 2. No other fuel burning appliance shall be installed in the same closet as the gas dryer. 3. Your dryer needs the space around it for proper ventilation. DO NOT install your dryer in a closet with a solid door. 4. Closet door ventilation required: A minimum of - Electrolux EFME417SIW | Installation Instructions English Spanish French - Page 9
41.0" (105 cm) *Connection of water inlet hose on steam dryer adds 3/4 in. (2 cm) to installation depth. 1Power supply cord length on gas dryer or electric Canadian dryer approximately 60 inches (152.5 cm). 2Drain hose length on washer approximately 59 inches (150 cm). 3Power supply cord length on - Electrolux EFME417SIW | Installation Instructions English Spanish French - Page 10
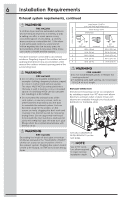
installation of your dryer. Failure to follow these instructions can create electrical shock and/or a fire hazard. WARNING ELECTRICAL SHOCK HAZARD ● This appliance MUST be properly grounded. Electrical shock can result if the dryer is not properly grounded. Follow the instructions in this manual - Electrolux EFME417SIW | Installation Instructions English Spanish French - Page 11
Installation Instructions 11 Grounding requirements - Electric dryer (Canada) WARNING ELECTRICAL SHOCK HAZARD Improper it will not fit the outlet, have a proper outlet installed by a qualified electrician. Grounding requirements - Gas dryer (USA and Canada) Grounding type wall receptacle Do not, - Electrolux EFME417SIW | Installation Instructions English Spanish French - Page 12
the screw securing the terminal block access cover in the lower corner on the back of the dryer. 3. Install a UL-approved strain relief according to the power cord/strain relief manufacturer's instructions in the power cord entry hole below the access panel. At this time, the strain relief should - Electrolux EFME417SIW | Installation Instructions English Spanish French - Page 13
the screw securing the terminal block access cover in the lower corner on the back of the dryer. 3. Install a UL-approved strain relief according to the power cord/strain relief manufacturer's instructions in the power cord entry hole below the access panel. At this time, the strain relief should - Electrolux EFME417SIW | Installation Instructions English Spanish French - Page 14
14 Installation Instructions Gas connection 1. Remove the shipping cap from gas pipe at the rear of the dryer. IMPORTANT DO NOT connect the dryer to L.P. gas service without converting the gas valve. An L.P. conversion kit must be installed by a qualified gas technician. 3. Open the shutoff valve - Electrolux EFME417SIW | Installation Instructions English Spanish French - Page 15
Installation Instructions Water connection (Steam Model only) WATER SUPPLY REQUIREMENTS Cold water faucet MUST be installed within 42 inches (107 cm) of your dryer rubber washer. Replace washer if it is torn or worn out. 15 RUBBER WASHER MUST BE PRESENT AND UNDAMAGED COLD INLET HOSE TO WASHER 3. - Electrolux EFME417SIW | Installation Instructions English Spanish French - Page 16
Installation Instructions Water connection, continued (Steam Model only) 5. If your installation with pliers. 8. Connect the COLD inlet hose for the washer to the "Y" connector and snug it by hand; then back of the dryer and snug it by hand. Tighten each connection of the dryer inlet hose another - Electrolux EFME417SIW | Installation Instructions English Spanish French - Page 17
and money. 8. If you have any questions during initial operation, please review the "Avoid Service Checklist" in your Use & Care Guide before calling for service. 9. Place these instructions in a location near the dryer for future reference. NOTE A wiring diagram and technical data sheet are located - Electrolux EFME417SIW | Installation Instructions English Spanish French - Page 18
Be sure dryer is unplugged from power source! WARNING ELECTRICAL SHOCK HAZARD Failure to disconnect power source before servicing could result in use a nanscratching plastic knife if you are unable to dislodge the plugs manually. B) Removing Door Assembly 1. Completely open the door to expose all - Electrolux EFME417SIW | Installation Instructions English Spanish French - Page 19
hole of the front panel. D) Reinstalling Latch Cover and Hole Plugs 1. Install door latch cover with screws removed earlier. 19 2. Reinstall and tighten , smooth swinging operation and secure latching when closed. 2. Plug in dryer and close the door. Start a test cycle: drum should tumble until - Electrolux EFME417SIW | Installation Instructions English Spanish French - Page 20
134709300 Gas dryers intended for use in a location supplied with LP must use a conversion kit prior to installation. MOBILE HOME INSTALLATION KIT P/N 137067200 Installations in mobile homes require use of MOBILE HOME INSTALLATION KIT. DRYING RACK P/N A04840701 Depending on the model you purchased - Electrolux EFME417SIW | Installation Instructions English Spanish French - Page 21
EN FRONT LOAD DRYER FR SÉCHEUSE Á CHARGEMENT FRONTAL ES SECADORA DE CARGA FRONTAL INSTALLATION INSTRUCTIONS INSTRUCTIONS D'INSTALLATION INSTRUCCIONES DE INSTALACIÓN - Electrolux EFME417SIW | Installation Instructions English Spanish French - Page 22
é présentées dans ce guide sont identifiées par le mot service ou le fournisseur de gaz. • Installez l'appareil conformément aux instructions du fabricant et aux codes locaux. • L'installation doit être installé à moins de 1,83 m (6 pi) de la sécheuse conformément au National Fuel Gas Code, ANSI Z223 - Electrolux EFME417SIW | Installation Instructions English Spanish French - Page 23
3 Veuillez lire et conserver ce guide Merci d'avoir choisi Electrolux, la marque de qualité en matière d'électroménager. Ces instructions d'installation font partie de notre engagement à vous satisfaire et à vous fournir un produit de qualité pendant toute la durée de vie de votre nouvel - Electrolux EFME417SIW | Installation Instructions English Spanish French - Page 24
différente de celle fournie par les services publics n'est pas recommandée. EXIGENCES É une utilisation avec une sécheuse. Pour les instructions de raccordement du cordon à 3 fils « Exigences de mise à la terre » dans la section d'installation électrique. Prise murale avec mise à la terre Ne coupez pas - Electrolux EFME417SIW | Installation Instructions English Spanish French - Page 25
en plastique pour l'alimentation en gaz. 1. L'installation DOIT être conforme aux codes locaux ou au code doivent être conformes à la norme Connectors for Gas Appliances (Raccords pour appareils au gaz) ANSI D'INCENDIE Le non-respect de ces instructions pourrait augmenter démesurément les temps - Electrolux EFME417SIW | Installation Instructions English Spanish French - Page 26
terminer la conduite à l'extérieur, et scellez tous les joints avec du ruban métallique. Toutes les extrémités mâles des conduites doivent être installées en aval relativement au sens de l'écoulement d'air. AVERTISSEMENT RISQUE D'INCENDIE Le fait de dépasser la longueur de conduites ou le nombre de - Electrolux EFME417SIW | Installation Instructions English Spanish French - Page 27
et être fixé solidement à la structure de la maison. 4. Reportez-vous aux sections précédentes de ce guide relativement aux autres exigences d'évacuation importantes. 5. Lors de l'installation d'une sécheuse à gaz dans une maison mobile, des dispositions doivent être prises pour permettre l'entr - Electrolux EFME417SIW | Installation Instructions English Spanish French - Page 28
Installation 1" (2.5 cm) * Pour toute installation autre qu'une évacuation directe, INSTALLATION DANS UN ENDROIT EN RETRAIT OU UNE ARMOIRE 1. Une sécheuse install install une porte est installée. Une porte installation avec un dégagement de 0 cm (0 po) à l'arrière de la sécheuse (pour une installation - Electrolux EFME417SIW | Installation Instructions English Spanish French - Page 29
Exigences d'Installation 9 Dimensions de sécheuse 53.5" (136 cm)* avec la porte grande ouverte d'arrivée d'eau sur les modèles à la vapeur ajoute 2 cm (3/4 po) à la profondeur d'installation. 1Longueur du cordon d'alimentation de la sécheuse à gaz ou la sécheuse électrique (Canada), environ 152,5 - Electrolux EFME417SIW | Installation Instructions English Spanish French - Page 30
cheuse pourrait entraîner des risques de choc électrique. Suivez les instructions de ce guide pour une mise à la terre adéquate. ● N'utilisez pas système de câblage, la fiche DOIT être branchée dans un réceptacle cuivré installé et mis à la terre conformément aux codes et règlements locaux. En cas de - Electrolux EFME417SIW | Installation Instructions English Spanish French - Page 31
Instructions d'Installation 11 Exigences de mise à la terre - Sécheuse électrique (Canada) prise à trois alvéoles correctement mise à la terre. 2. La fiche doit être branchée dans un réceptacle installé et mis à la terre conformément aux codes et règlements locaux. En cas de doute, faites appel à - Electrolux EFME417SIW | Installation Instructions English Spanish French - Page 32
12 Instructions d'Installation Connexion électrique (sauf au Canada) - cordon à 3 fils Prise à 3 alv ici Fente de récupération pour les vis des bornes REMARQUE Si une vis de borne tombe pendant l'installation du cordon, elle peut être récupérée dans la fente de récupération sous le panneau d'accès. - Electrolux EFME417SIW | Installation Instructions English Spanish French - Page 33
Instructions d'Installation Connexion électrique (sauf au Canada) - cordon à 4 fils Prise à 4 alv UL ici Fente de récupération pour les vis des bornes REMARQUE Si une vis de borne tombe pendant l'installation du cordon, elle peut être récupérée dans la fente de récupération sous le panneau d'accès. - Electrolux EFME417SIW | Installation Instructions English Spanish French - Page 34
Instructions d'Installation de gaz. Le nécessaire de conversion au propane liquide doit être installé par un technicien qualifié. 2. Branchez un tuyau semi-rigide ou au robinet d'arrêt de l'alimentation de gaz. IMPORTANT L'installation de gaz de la sécheuse doit être conforme aux codes et aux rè - Electrolux EFME417SIW | Installation Instructions English Spanish French - Page 35
Instructions d'Installation Raccordement d'eau (modèles à la vapeur uniquement) EXIGENCES RELATIVES A L'ALIMENTATION EN EAU Les robinets d'eau froide DOIVENT être installés à une distance de 107 cm (42 po) ou moins de l'arrivée d'eau de votre sécheuse. Les robinets DOIVENT être de 1,9 cm (3/4 po) et - Electrolux EFME417SIW | Installation Instructions English Spanish French - Page 36
16 Instructions d'Installation Raccordement d'eau, suite (modèles à la vapeur uniquement) 5. Si votre installation offre suffisamment d'espace pour installer directement un raccord en Y à votre tuyau d'arrivée d'eau FROIDE, vissez le raccord en Y à votre tuyau d'arrivée d'eau FROIDE et serrez-le à - Electrolux EFME417SIW | Installation Instructions English Spanish French - Page 37
Instructions d'Installation Installation (générale) 1. Branchez la conduite d'évacuation au système d'évacuation exté « Liste de vérification » de votre Guide d'Utilisation et d'Entretien avant d'effectuer une demande de service. 9. Laissez ces instructions à proximité de la sécheuse pour vous y - Electrolux EFME417SIW | Installation Instructions English Spanish French - Page 38
2 Couteau en plastique A) Dépose du Couvercle de Loquet et Bouchons 1. Ouvrir la porte. 2. Déposer les bouchons en plastique et mettre de côté pour réinstallation. Vous pourriez devoir utiliser un couteau en plastique qui n'égratigne pas si vous ne parvenez pas les dégager à la main. B) Dépôt de - Electrolux EFME417SIW | Installation Instructions English Spanish French - Page 39
Couvercle de Loquet et Bouchons 1. Insérer les bouchons en plastique retirés plus tôt. 19 2. Reposer les quatre vis retirées précédemment. x 4 x 2 2. Installer le couvercle du loquet de porte à l'aide des vis retirées précédemment. x 2 E) Vérifier le Fonctionnement de la Porte Inversée 1. Assurer - Electrolux EFME417SIW | Installation Instructions English Spanish French - Page 40
du propane liquide doivent recourir à un nécessaire de conversion avant l'installation. TROUSSE D'INSTALLATION DE MAISON MOBILE PIÈCE N° 137067200 Toute installation dans une maison mobile nécessite l'utilisation d'une TROUSSE D'INSTALLATION DE MAISON MOBILE. ÉTAGÈRE DE SÉCHAGE PIÈCE N° A04840701 - Electrolux EFME417SIW | Installation Instructions English Spanish French - Page 41
EN FRONT LOAD DRYER FR SÉCHEUSE Á CHARGEMENT FRONTAL ES SECADORA DE CARGA FRONTAL INSTALLATION INSTRUCTIONS INSTRUCTIONS D'INSTALLATION INSTRUCCIONES DE INSTALACIÓN - Electrolux EFME417SIW | Installation Instructions English Spanish French - Page 42
seguridad incluidas en este manual aparecen precedidas de un agencia de servicios o proveedor de gas. • Instale la secadora de ropa de acuerdo Canadá (Canadian Electrical Code) Parte 1. • El servicio de gas de la electrodoméstico debe cumplir Electrolux Major Appliances Todos los derechos - Electrolux EFME417SIW | Installation Instructions English Spanish French - Page 43
Electrolux, la marca de alta calidad de electrodomésticos para el hogar. Estas instrucciones de instalación forman parte Suministro de gas (secadora a gas) Válvula de cierre manual instalada en ● Instale todas las secadoras de ropa de acuerdo con las instrucciones de instalación de este manual. - Electrolux EFME417SIW | Installation Instructions English Spanish French - Page 44
sistema eléctrico NOTA Debido a posibles variaciones en el voltaje, no se recomienda utilizar esta secadora con electricidad generada a partir de generadores a gas, solares, eólicos ni de ninguna otra clase que no sean los empleados por su empresa de electricidad local. REQUISITOS ELÉCTRICOS DE LA - Electrolux EFME417SIW | Installation Instructions English Spanish French - Page 45
instalación DEBE realizarse de acuerdo con los códigos locales o, en ausencia de ellos, con el Código de Gas Nacional (National Fuel Gas Code), ANSI Z223.1 (última edición). 2. La línea de suministro de gas debe ser un tubo de 1,27 cm (1/2 pulgada). 3. Si los códigos lo permiten, se puede utilizar - Electrolux EFME417SIW | Installation Instructions English Spanish French - Page 46
de incendio. ● No bloquee los extremos de escape del sistema de ventilación, ni utilice tornillos, remaches ni otros sujetadores que se extiendan hacia la parte interna del conducto para ensamblarlo. Es posible que la pelusa quede atrapada en el filtro, los tornillos o los remaches, lo que puede - Electrolux EFME417SIW | Installation Instructions English Spanish French - Page 47
Norma de Seguridad y Construcción de Casas Rodantes, título 24 CFR, Parte 32-80 (que anteriormente se conocía como la Norma Federal de Seguridad escape, consulte las secciones anteriores de esta guía. 5. Cuando se instale una secadora a gas en una casa rodante, se debe dejar espacio en el exterior - Electrolux EFME417SIW | Installation Instructions English Spanish French - Page 48
la secadora a gas. 3. La secadora necesita espacio a su alrededor para que la ventilación sea adecuada. NO instale la secadora en (387.1cm²) NOTA Para lograr una instalación con 0 cm (0") de despeje en la parte trasera de la secadora (para otra que no sea la ventilación hacia atrás), se debe - Electrolux EFME417SIW | Installation Instructions English Spanish French - Page 49
)* to clear open door 31.5" (79.5 cm)* al frente de la puerta cerrada 53.25" (135.5 cm) tubería de suministro de gas en la parte trasera de la unidad de gas 1.5" (4 cm) 3.7" (9.5 cm) 17.0" (43 cm) 3.75" (9.5 cm) 13.5" (34.5 cm) 19.0" (48 cm) hacia el centro de la ventilación trasera altura - Electrolux EFME417SIW | Installation Instructions English Spanish French - Page 50
modificaciones al enchufe que se proporciona con este artefacto. Si no calza en el tomacorrientes, pídale a un electricista calificado que instale un tomacorrientes adecuado. Para una secadora conectada de forma permanente: 1. La secadora DEBE estar conectada a un sistema de cableado permanente de - Electrolux EFME417SIW | Installation Instructions English Spanish French - Page 51
se proporciona con este artefacto. Si no calza en el tomacorrientes, pídale a un electricista calificado que instale un tomacorrientes adecuado. Requisitos de conexión a tierra: secadora a gas (Estados Unidos y Canadá) Tomacorriente con puesta a tierra No corte, retire ni deshabilite la clavija de - Electrolux EFME417SIW | Installation Instructions English Spanish French - Page 52
el tornillo que sujeta la cubierta de acceso del bloque terminal que se encuentra en la esquina inferior de la parte trasera de la secadora. 3. Instale un dispositivo de liberación de tensión aprobado por U.L., de acuerdo con las instrucciones relativas al cable de alimentación/dispositivo de - Electrolux EFME417SIW | Installation Instructions English Spanish French - Page 53
el tornillo que sujeta la cubierta de acceso del bloque terminal que se encuentra en la esquina inferior de la parte trasera de la secadora. 3. Instale un dispositivo de liberación de tensión aprobado por U.L., de acuerdo con las instrucciones relativas al cable de alimentación/dispositivo de - Electrolux EFME417SIW | Installation Instructions English Spanish French - Page 54
és de la línea de suministro de gas. hacia la secadora desde el suministro de gas Válvula de cierre: posición abierta Válvula de cierre manual FLUJO DE GAS Conector doble Conector doble Cerrado Conector Abierto Conector flexible Tubo de admisión en la parte posterior de la secadora Todas las - Electrolux EFME417SIW | Installation Instructions English Spanish French - Page 55
Instrucciones de Instalación Conexión de agua (modelo al vapor solamente) REQUISITOS DE LA ENTRADA DE AGUA Los grifos de agua fría DEBEN instalarse a una distancia no mayor de 107 cm (42 pulgadas) de la entrada de agua de secadora. Los grifos DEBEN estar a 1,9 cm (3/4 pulgadas) con roscas para la - Electrolux EFME417SIW | Installation Instructions English Spanish French - Page 56
a la otra salida del conector en "Y" y apriételo a mano. Conecte el codo de 90° de la manguera a la admisión de agua de latón en la parte trasera de la secadora y apriételo a mano. Apriete todas las conecciones de la manguera de admisión de agua de la secadora 2/3 de vuelta más usando alicates - Electrolux EFME417SIW | Installation Instructions English Spanish French - Page 57
Instrucciones de Instalación Instalación general 1. Conecte el tubo de escape al sistema de escape exterior (consulte las páginas 46 a 50). Se recomienda usar una abrazadera (pieza A) de 4" (10,2 cm) para conectar las secadora al sistema de ventilación de escape. Utilice cinta de papel de aluminio - Electrolux EFME417SIW | Installation Instructions English Spanish French - Page 58
18 Inversión de la Puerta IMPORTANTE ANTES DE INVERTIR LA PUERTA DE SU SECADORA: 1. Asegúrese de que haya suficiente espacio de giro antes de invertir la puerta. 2. Reúna sus herramientas - incluso un destornillador con una punta cuadrada #2 y cuchillo de plástico (o pequeña herramienta chata para - Electrolux EFME417SIW | Installation Instructions English Spanish French - Page 59
1. Rote la puerta y cuelgue el gancho superior ubicado en la parte posterior de la bisagra en el agujero superior del panel frontal. D) . 19 x 2 2. Reinstale y apriete los cuatro tornillos que retiró antes. 2. Instale la tapa del cerrojo de la puerta con los tornillos que retiró antes. x 4 - Electrolux EFME417SIW | Installation Instructions English Spanish French - Page 60
un kit diferente, puede pedir uno. KIT DE CONVERSIÓN A GAS LP Pieza No. 134709300 Las secadoras a gas diseñadas para el uso en lugares con suministro de LP requieren para que se le indique el Distribuidor Autorizado de Piezas Electrolux más cercano a su domicilio. ADVERTENCIA PELIGRO DE DESCARGA EL - Electrolux EFME417SIW | Installation Instructions English Spanish French - Page 61
- Electrolux EFME417SIW | Installation Instructions English Spanish French - Page 62
- Electrolux EFME417SIW | Installation Instructions English Spanish French - Page 63
- Electrolux EFME417SIW | Installation Instructions English Spanish French - Page 64
electrolux.com/shop
-
 1
1 -
 2
2 -
 3
3 -
 4
4 -
 5
5 -
 6
6 -
 7
7 -
8
-
9
-
10
-
11
-
12
-
13
-
14
-
15
-
16
-
17
-
18
-
19
-
20
-
21
-
22
-
23
-
24
-
25
-
26
-
27
-
28
-
29
-
30
-
31
-
32
-
33
-
34
-
35
-
36
-
37
-
38
-
39
-
40
-
41
-
42
-
43
-
44
-
45
-
46
-
47
-
48
-
49
-
50
-
51
-
52
-
53
-
54
-
55
-
56
-
57
-
58
-
59
-
60
-
61
-
62
-
63
-
64
 |
 |
EN
FRONT LOAD DRYER
FR SÉCHEUSE Á CHARGEMENT FRONTAL
ES SECADORA DE CARGA FRONTAL
INSTALLATION INSTRUCTIONS
INSTRUCTIONS D’INSTALLATION
INSTRUCCIONES DE INSTALACIÓN
A04173601A August 2015