Electrolux EL7083ASG Installation Instructions (English, Spanish, French)
Electrolux EL7083ASG Manual
 |
View all Electrolux EL7083ASG manuals
Add to My Manuals
Save this manual to your list of manuals |
Electrolux EL7083ASG manual content summary:
- Electrolux EL7083ASG | Installation Instructions (English, Spanish, French) - Page 1
- Electrolux EL7083ASG | Installation Instructions (English, Spanish, French) - Page 2
Index Typical installations 2 Components of system 3 Seven Step Installation Step #1: Choose your system 3 Step #2: Plan number of inlets 4 Step #3: Plan placement of inlets 4 Step #4: Plan tubing installation 5 Step #5: Install inlet valves Existing home 5 New construction 8 Step - Electrolux EL7083ASG | Installation Instructions (English, Spanish, French) - Page 3
Typical Central Vacuum System Installations Ranch-style bungalow Single story on slab/crawlspace MAIN FLOOR 1 BASEMENT 2 3 GARAGE 3 MAIN FLOOR 1 2 CRAWLSPACE 3 3 GARAGE 4-level split UPPER LEVEL LOWER LEVEL MAIN FLOOR 1 3 GARAGE CRAWLSPACE 2 BASEMENT Large 4-level split UPPER - Electrolux EL7083ASG | Installation Instructions (English, Spanish, French) - Page 4
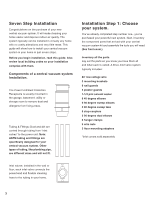
. Before you begin installation, read this guide. Also review local building codes so your installation complies Installation Step 1: Choose your system. You've already completed step number one...you've purchased your powerful new powerhead and flexible cleaning hose to the tubing in your home. 3 - Electrolux EL7083ASG | Installation Instructions (English, Spanish, French) - Page 5
place inlets behind doors or furniture. Existing home: The inlet valve must be within 6 feet (1.83m) of an electrical outlet to provide power to the powerhead. A switch on the handle sends a signal through "low-voltage" (24 volt) wiring to turn the power unit on and off. New construction: If your - Electrolux EL7083ASG | Installation Instructions (English, Spanish, French) - Page 6
plenty of room for air to circulate on either side of the unit. You'll need a dedicated 15- or 20-amp circuit. Check the owner's manual. Installation Step 4: Plan the tubing installation. Before you install tubing to carry dust and dirt to the power unit, plan your route. Run the tubing - Electrolux EL7083ASG | Installation Instructions (English, Spanish, French) - Page 7
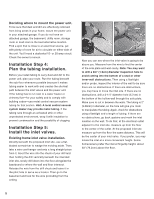
the tubing. This will prevent glue from creating obstructions which could clog your system. Run about 6" (15.24cm) of low-volt wire through the guide hole in the mounting bracket. Split the wire into two strands and strip 1" of insulation from each strand. Wrap the strands in a clockwise direction - Electrolux EL7083ASG | Installation Instructions (English, Spanish, French) - Page 8
the hole in floor, and through the wall to exterior of closet. Fig. 02 Inner-Wall Closet Assembly Pass low-voltage wire through the wire guide hole in the inner wall closet assembly (Fig. 02) and tape or cable tie low-voltage wire to this assembly immediately behind the bracket. Attach - Electrolux EL7083ASG | Installation Instructions (English, Spanish, French) - Page 9
oor inlets. If the inlet valve will be serviced from the attic, shorter pieces of tubing joined voltage wiring, bring approximately 6" (15.24cm) through top wire guide hole in stud bracket assembly and double it back into elbow manual for details. Stud-Mounting Bracket Assembly (New Construction) 8 - Electrolux EL7083ASG | Installation Instructions (English, Spanish, French) - Page 10
the tubing. See "Installation Step Six: Install the tubing" and complete tubing installation as much as possible. After the walls are fi the vertical tubing line to the main horizontal line. To avoid potential clogging problems when installing tubing and fittings: • Make straight cuts on tubing (pipe - Electrolux EL7083ASG | Installation Instructions (English, Spanish, French) - Page 11
is right, always attach wires of the same color to each other - typically copperto-copper and silver-to-silver. Proceed until the tubing system is complete. Hint: Create clamps from extra tubing to hold lowvoltage wire in place. Masonry or concrete walls. If you have to run tubing through masonry - Electrolux EL7083ASG | Installation Instructions (English, Spanish, French) - Page 12
/220/230/240V - 50/60 cycle electrical outlet. Be sure line voltage is sufficient to handle a 15- or 20-amp load. See your owner's guide. Check your installation to make sure it works properly. All that's left to do is check the quality of your installation. First, check to see - Electrolux EL7083ASG | Installation Instructions (English, Spanish, French) - Page 13
SHOCK COULD OCCUR IF USED ON WET SURFACES. GROUNDING INSTRUCTIONS This appliance must be grounded. If it should malfunction conductor can result in a risk of electric shock. Check with a qualified electrician or service person if you are in doubt as to whether the outlet is properly grounded. Do - Electrolux EL7083ASG | Installation Instructions (English, Spanish, French) - Page 14
use as described in the operating and maintenance manual. (Use of attachments not recommended by the has been dropped or damaged. Return to service center or have service person examine and repair. 5. Do not See grounding instructions. SAVE THESE INSTRUCTIONS Technical support is available at 1-866-
-
 1
1 -
 2
2 -
 3
3 -
 4
4 -
 5
5 -
 6
6 -
 7
7 -
8
-
9
-
10
-
11
-
12
-
13
-
14
 |
 |
