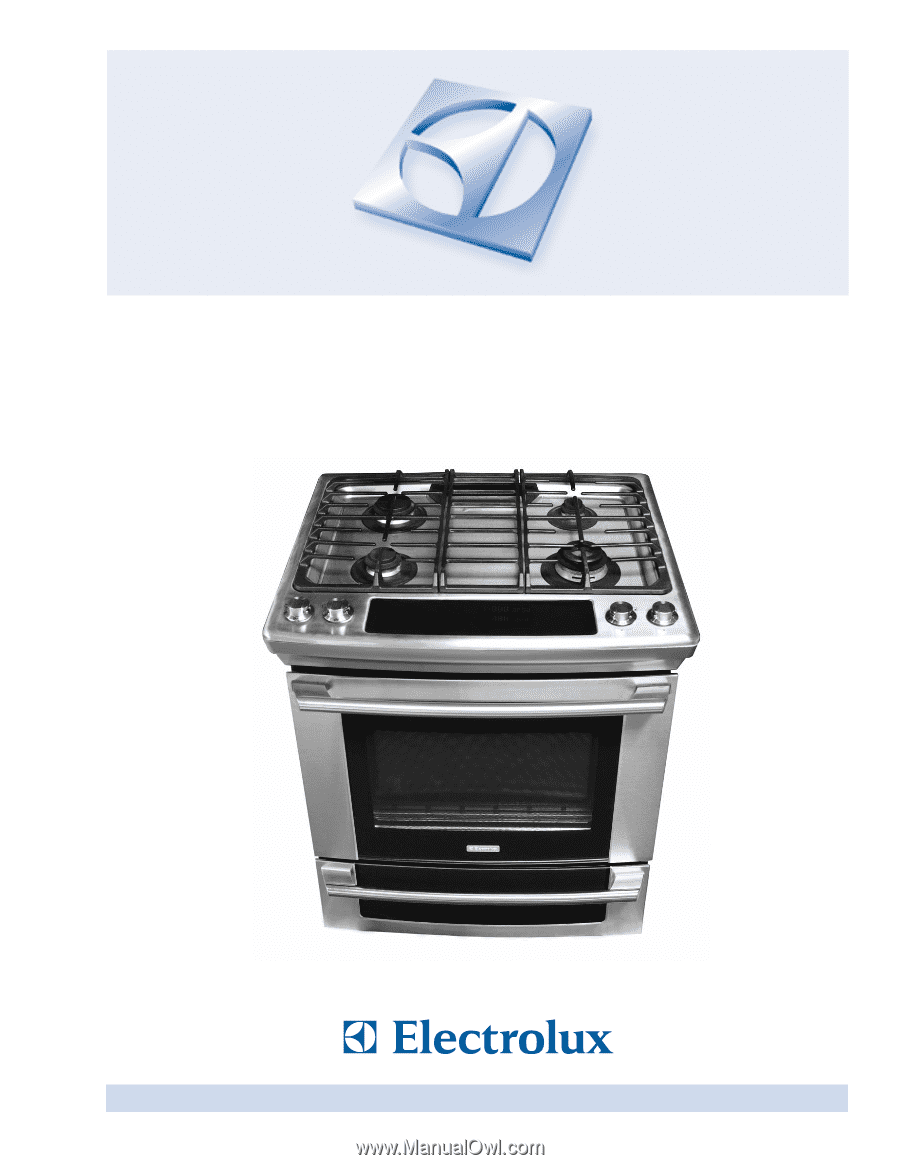
Electrolux EW30DS65GS Complete Owner's Guide (English)
Electrolux EW30DS65GS - 30" Slide-In Dual Fuel Range Manual
 |
UPC - 057112097015
View all Electrolux EW30DS65GS manuals
Add to My Manuals
Save this manual to your list of manuals |
Electrolux EW30DS65GS manual content summary:
- Electrolux EW30DS65GS | Complete Owner's Guide (English) - Page 1
Use & Care Guide Dual Fuel Slide-In Range 318 205 858 (1001) Rev. A - Electrolux EW30DS65GS | Complete Owner's Guide (English) - Page 2
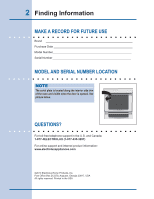
Brand Purchase Date Model Number Serial Number Model and Serial Number Location Note The serial plate is located along the interior side trim of the oven and visible when the door is opened. See picture below. Questions? For toll-free telephone support in the U.S. and Canada: 1-877-4ELECTROLUX - Electrolux EW30DS65GS | Complete Owner's Guide (English) - Page 3
Model and Serial Number Location 2 Questions 2 Table of Contents 3 Safety 4 Important Safety Instructions 4-7 Feature Overview 8 Your Slide-In Range 8-9 Oven Rack Supports Slow Cook 29 Dehydrating 30 Defrosting 30 Bread Proofing 31 Perfect Turkey 32 Temperature Probe 33 Multi Stage 34 - Electrolux EW30DS65GS | Complete Owner's Guide (English) - Page 4
and CAN/CGA B149.2 and Canadian Electrical Code, CSA C22.1 part 1, and local requirements. Install only per installation instructions provided in the literature package for this range. Ask your dealer to recommend a qualified technician and an authorized repair service. Know how to disconnect the - Electrolux EW30DS65GS | Complete Owner's Guide (English) - Page 5
weight of a child on an open door may cause the appliance to tip, appliance. Children climbing on the range to reach items could be seriously part of the appliance. • DO NOT TOUCH SURFACE BURNERS, AREAS NEAR THESE BURNERS, OVEN HEATING fire or gas leak, be sure to turn off the main gas shutoff • - Electrolux EW30DS65GS | Complete Owner's Guide (English) - Page 6
foil may result in a risk of electric shock or fire or a short circuit. • Air curtain or other overhead range hoods, which operate by blowing a downward air flow on to a range, shall not be used in conjunction with gas ranges other than when the hood and range have been designed, tested and listed - Electrolux EW30DS65GS | Complete Owner's Guide (English) - Page 7
do not place plastic or heat-sensitive items on or INSTRUCTIONS FOR CLEANING YOUR RANGE • Clean the range regularly to keep all parts parts of the oven listed in this owner's guide. Before self-cleaning the oven, remove all utensils stored in the oven. • Do not clean the oven door gasket. The door - Electrolux EW30DS65GS | Complete Owner's Guide (English) - Page 8
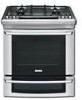
8 Feature Overview Your Slide-in Range Porcelain Grates Deep Drawn Cooktop touch activated glass control panel large metal handle curved glass oven door Warmer drawer door window glass POWER BURNER 14 000 BTU regular BURNER 9 500 BTU SIMMER burner 5 000 BTU DUAL FLAME BURNER 18 000 BTU - Electrolux EW30DS65GS | Complete Owner's Guide (English) - Page 9
Feature Overview 9 Your Slide-in Range Oven Door Latch Oven vent Broiling Element Oven Rack Support slideable Oven racks Convection Fan Oven Light Oven Rack support brackets lower oven rack BROILER PAN BROILER PAN Grid Convection Roasting rack - Electrolux EW30DS65GS | Complete Owner's Guide (English) - Page 10
10 Feature Overview oven rack supports & Oven Vents Installing Oven Rack Supports Always install oven rack support before turning on the oven (when the oven is cool). To install oven rack support, insert the supports by pushing them downward into the two brackets on each side of the oven interior, - Electrolux EW30DS65GS | Complete Owner's Guide (English) - Page 11
Feature Overview 11 removing and replacing oven racks Removing Sliding Oven Racks 1. With the rack in its follow the instructions above in reverse order. TOWARD FRONT OF OVEN TOWARD back OF OVEN 1st Bracket 2nd Bracket Oven Rack Oven Rack Slider Oven Rack Support Removing Non-Sliding Oven Rack - Electrolux EW30DS65GS | Complete Owner's Guide (English) - Page 12
my hydrate proof favorite 15 16 17 multi cook cook stage options time end time probe 1 Light Pad- Used to turn the oven light on and off. 2 Bake Pad- Used to enter the normal baking mode temperature. 3 Broil Pad- Used to select the variable broil mode. 4 Convection Bake Pad- Used to select - Electrolux EW30DS65GS | Complete Owner's Guide (English) - Page 13
start a 4 hours self-clean cycle. 28 Rapid Preheat Pad- Used to preheat the oven to the desired temperature. 29 Conv. Convert Pad- Used to convert a standard temperature to a convection temperature. 30 User Preference Pad- Used to bring the user preference menu in the display. 31 Timer Pads- Used to - Electrolux EW30DS65GS | Complete Owner's Guide (English) - Page 14
or when the power supply to the range has been interrupted, the timer in the set the clock (example for 1:30): 1. Press 1 3 0 + - pads to set the time of day to 1:30. The pads hi or lo its target temperature, a chime will sound to remind you to place the food in the oven. This feature will be - Electrolux EW30DS65GS | Complete Owner's Guide (English) - Page 15
both ovens at the same time at full intensity. To toggle the Oven Lights ON and OFF: 1. Press OVEN LIGHT . Control Lock The Control Lock feature automatically locks the upper oven door and the control panel. The Control Lock is only allowed when the oven is turned OFF (not active - Electrolux EW30DS65GS | Complete Owner's Guide (English) - Page 16
Burner Cap Burner Head Gas Opening For the 18 000 BTU burner : Place the burner head over the gas orifice (Figure 1). light. If the burner does not light, contact a Service Center. Do not service the sealed burner yourself. Figure 1 Figure 2 Proper instructions under General Care & Cleaning. - Electrolux EW30DS65GS | Complete Owner's Guide (English) - Page 17
be prepared and the size of burner. • Made of material that conducts heat well. • Easy to clean. • Heavy handle tilts pan. • Flame extends beyond unit. Note: Always use a utensil for its intended purpose. Follow manufacturer's instructions. Some utensils were not made to be used in the oven or on - Electrolux EW30DS65GS | Complete Owner's Guide (English) - Page 18
when bringing large quantities of liquid to temperature and when preparing larger quantities of food. to be set at a particular mark. Use the guides and adjust the flame as needed. DO NOT cook an electrical power outage, the surface burners can be lit manually. To light a surface burner, hold a lit - Electrolux EW30DS65GS | Complete Owner's Guide (English) - Page 19
turn on the burner. Always use potholders to remove the griddle from the grate. Allow the griddle to cool before removing. Do not set hot griddle on surfaces that cannot withstand high heat; such as countertops. Be sure the griddle is positioned correctly and stable before use to prevent hot spills - Electrolux EW30DS65GS | Complete Owner's Guide (English) - Page 20
feature to keep hot cooked foods at serving temperature. The lower oven can only be used with some cooking modes; Bake, Slow Cook and Keep Warm (read their sections for precise instructions raised sides to prevent food from sliding off. • DO NOT LINE ; this will minimize heat loss. Repeated opening - Electrolux EW30DS65GS | Complete Owner's Guide (English) - Page 21
oven has reached the set target temperature and the PRE-HEATING message disappear. 6. Cook Time, Timer and End Time features can be set to control your cooking time in both ovens (read their sections for directions). The Temperature Probe and Rapid Preheat features can be used only with the upper - Electrolux EW30DS65GS | Complete Owner's Guide (English) - Page 22
and will beep when the countdown is finished. This feature can be used with Bake, Convection Bake, Convection part of a Multi-Stage sequence. To set a timed cooking (example is a 450°F Bake for 30 minutes): 1. Select oven by pressing UPPER OVEN . UPPER OVEN 2. Press BAKE . The temperature - Electrolux EW30DS65GS | Complete Owner's Guide (English) - Page 23
heat under the broil element of the oven. The high heat cooks quickly and gives a rich, brown outer appearance. The temperature probe CANCEL to stop or cancel the Broil feature at any time. Figure 1 Broiler Pan Should an oven fire occur, close the oven door and turn off the oven. If the fire - Electrolux EW30DS65GS | Complete Owner's Guide (English) - Page 24
Place food in the oven when the chime signals and temperature display shows that the oven has reached the set target temperature and the PRE-HEATING message disappear. 6. The Temperature Probe, Cook Time, Timer, End Time and Rapid Preheat features can be set to control your cooking time (read their - Electrolux EW30DS65GS | Complete Owner's Guide (English) - Page 25
casseroles. The oven can be programmed to preheat at any temperature between 170°F to 550°F with some of the cooking modes; Bake, Convection Bake and Convection Roast. IMPORTANT: The rapid preheat feature is for single rack ONLY. The heat distribution with multiple rack will be uneven. To set - Electrolux EW30DS65GS | Complete Owner's Guide (English) - Page 26
by pressing UPPER OVEN . UPPER OVEN Roasting Rack Grid 3. Press CONVECTION ROAST . 4. Press START . 5. The Temperature Probe, Cook Time, Timer, End Time Figure 1 Broiler Pan and Rapid Preheat features can be set to control your cooking time (read their sections for directions). 6. Remove - Electrolux EW30DS65GS | Complete Owner's Guide (English) - Page 27
and a fan to circulate the oven's heat evenly and continuously within the oven. The temperature probe cannot be used in this cooking mode. Press CANCEL to stop or cancel the Convection Broil feature at any time. Should an oven fire occur, leave the oven door closed and turn off the oven. If the - Electrolux EW30DS65GS | Complete Owner's Guide (English) - Page 28
Do not use the Keep Warm feature to heat cold food. • Food in heat-safe glass and glass ceramic containers may need higher temperature settings compared to food in modes in the Setting Lower Oven section of this manual. To set a Keep Warm Temperature of 170°F: 1. Arrange interior oven racks (for - Electrolux EW30DS65GS | Complete Owner's Guide (English) - Page 29
Cook mode uses the hidden bake element to maintain a low temperature in the oven. The temperature probe cannot be used in this cooking mode. There are 2 settings available, high (HI) or low (LO). The maximum cook time for the Slow Cook feature is 12 hours unless the oven control has been changed - Electrolux EW30DS65GS | Complete Owner's Guide (English) - Page 30
, meats, vegetables and herbs. This mode holds an optimum low temperature while circulating the heated air to slowly remove moisture. The oven can directions). 6. Press CANCEL to stop or cancel the Defrost feature at any time. Note: This feature is not meant for thawing frozen meats, poultry, seafood - Electrolux EW30DS65GS | Complete Owner's Guide (English) - Page 31
the oven. • Limit frequent door openings to prevent losing heat and lengthening proofing time. To set a Bread Proof temperature of 100°F: 1. Arrange CANCEL to stop or cancel the Bread Proof feature at any time. To change a Bread Proof temperature while the function is active: 1. Select oven - Electrolux EW30DS65GS | Complete Owner's Guide (English) - Page 32
). if you wish to change the probe target temperature (see PROBE 5. Press START . 6. Remove food from the oven when the temperature probe chime signals that the oven has reached the set target temperature. 7. Press CANCEL to stop or cancel the Perfect Turkey feature at any time. Poultry Turkey - Electrolux EW30DS65GS | Complete Owner's Guide (English) - Page 33
For many foods, especially roasts and poultry, testing the internal temperature is the best method to insure properly cooked food. The Temperature Probe gets the exact temperature you desire without having to guess. This feature can be used with Bake, Convection Bake, Convection Roast and Perfect - Electrolux EW30DS65GS | Complete Owner's Guide (English) - Page 34
touch of a button. Its purpose is to program a queue of up to three cooking modes with individual cooking time and temperatures in a sequence. This feature can be used with most cooking modes; Baking, Broiling, Convection Baking, Convection Roasting, Convection Broiling, Keep Warm and Bread Proof - Electrolux EW30DS65GS | Complete Owner's Guide (English) - Page 35
Cooking Modes 35 multi stage (continued) Stage 3 14. Press KEEP WARM . "170" will start flashing in the display prompting to enter a temperature. 15. Enter a temperature using the numeric pads 0 to 9 . 16. Press START . "00:00" will start flashing in the display prompting to enter a cook time. 17. - Electrolux EW30DS65GS | Complete Owner's Guide (English) - Page 36
electronic controls. This menu features the Time of Day, Celsius or Fahrenheit display mode, Continuous Bake or 12 Hour Energy Saving modes, Clock display or No-Clock display, 12 Hours Time of Day or 24 Hours Time of Day, Audio Control, and Adjusting the oven temperature. The User Preferences menu - Electrolux EW30DS65GS | Complete Owner's Guide (English) - Page 37
The baking results should help you to decide how much of an adjustment is needed. Each oven can be individually adjusted. To adjust the oven temperature: 1. Press USER PREFERENCES until you get to the UPO menu page. 2. To select the oven you want to adjust, press USER PREFERENCES again to toggle - Electrolux EW30DS65GS | Complete Owner's Guide (English) - Page 38
11 hours and 59 minutes. The oven can be programmed to override this feature for Continuous Baking. Changing between 12 hour energy saving and continuous bake: 1. mode to 12h, Display mode to Fahrenheit, Setting the oven temperature adjustment to zero, Setting audio level to 5 and Enabling the - Electrolux EW30DS65GS | Complete Owner's Guide (English) - Page 39
feature will save the cooking mode, the target temperature features. To save a Favorite (example is a 450°F Bake for 30 minutes temperature needed; 4 5 0 . 4. Press COOK OPTIONS to bring up the cook options items. 5. Press COOK TIME . 6. Enter time needed; 3 0 . 7. Press START . 8. Press and hold - Electrolux EW30DS65GS | Complete Owner's Guide (English) - Page 40
for complete instructions. Remember the feature. Press and hold both + - the HI hi and LO lo pads for at least 3 seconds. SAb will disappear from the display and the oven may be used with all normal functions. For further assistance, guidelines for proper usage, and a complete list of models - Electrolux EW30DS65GS | Complete Owner's Guide (English) - Page 41
Area out- 3. Remove the broiler pan and insert, all side of the Door utensils and any foil. These items can not Gasket withstand high cleaning temperatures. 4. Oven racks and oven rack supports must be removed. If they are not removed the self-cleaning cycle can not start and Remove Racks will - Electrolux EW30DS65GS | Complete Owner's Guide (English) - Page 42
high temperatures (well above cooking temperatures) which and the racks supports. 2. Be sure the clock is set with the correct time of day and the oven door is closed. door lock to close. " indicator light will stop To set the controls for a delayed Self-Cleaning cycle: 1. Follow the instructions - Electrolux EW30DS65GS | Complete Owner's Guide (English) - Page 43
Parts soil for 30 to 60 Griddle heating and cannot be removed. Oven Racks Oven racks and oven rack supports must be removed from the oven during the self-clean cycle for cleaning. If they are not removed, the self-clean cycle will not start. Clean them as described above. Oven Door Oven Door - Electrolux EW30DS65GS | Complete Owner's Guide (English) - Page 44
of stainless parts. Please refer to the table provided at the beginning of the General Care & Cleaning section in this Use & Care Manual. To remove and replace oven door 1. Open the door to the fully opened position. 2. Pull up the lock located on each hinge support toward front of range. You may - Electrolux EW30DS65GS | Complete Owner's Guide (English) - Page 45
opened. The oven light may be turned on when the door is closed by using the oven light switch located on the control panel. The lamp is covered with a glass shield. The glass shield can be remove to be cleaned manually or to change the oven light. THIS GLASS SHIELD MUST BE - Electrolux EW30DS65GS | Complete Owner's Guide (English) - Page 46
gas burner are sealed, cleanups are easy when spillovers are cleaned up immediately. ! Caution Do not remove any parts porcelain cooktop may become damaged during future heating. Cleaning the grates The burner grates gas appliance be sure to: ● Follow installation instructions before operating. ● - Electrolux EW30DS65GS | Complete Owner's Guide (English) - Page 47
. Improper flame size and uneven heating may result when any surface burners be cleaned in place. For proper gas flow it may be necessary to clean wire or needle to clean. Should you experience ignition problems it may be that an ignition port hole is Models equipped with double ring burner only) - Electrolux EW30DS65GS | Complete Owner's Guide (English) - Page 48
the water level is uneven, refer to the installation instructions for leveling the range. • Be sure to allow 5.1cm to 10.2cm (2" to 4") of clearance on all sides of each pan in the oven. • Do not use pans that are dented or warped. • Set oven temperature 25°F/12°C higher than suggested and bake for - Electrolux EW30DS65GS | Complete Owner's Guide (English) - Page 49
to Common Problems 49 Important Before calling for service, review this list. It may save you both time and expense. This list includes common experiences that are not the result of defective workmanship or material in your cooktop. Oven Control Beeps and Displays an "F" ERROR COde • Electronic - Electrolux EW30DS65GS | Complete Owner's Guide (English) - Page 50
Electric Ignition Models only). Be sure cord is securely plugged into the outlet. • Electrical power outage (electric ignition models only). Burners can be lit manually. See Setting Surface Controls in this Use and Care Guide following instructions in the General Cleaning section. food not heating - Electrolux EW30DS65GS | Complete Owner's Guide (English) - Page 51
and parts under this warranty must be performed by Electrolux or an authorized service company. Product features or specifications as described or illustrated are subject to change without notice. USA 1-877-435-3287 Electrolux Major Appliances North America P.O. Box 212378 Augusta, GA 30907 Canada - Electrolux EW30DS65GS | Complete Owner's Guide (English) - Page 52
-
 1
1 -
 2
2 -
 3
3 -
 4
4 -
 5
5 -
 6
6 -
 7
7 -
8
-
9
-
10
-
11
-
12
-
13
-
14
-
15
-
16
-
17
-
18
-
19
-
20
-
21
-
22
-
23
-
24
-
25
-
26
-
27
-
28
-
29
-
30
-
31
-
32
-
33
-
34
-
35
-
36
-
37
-
38
-
39
-
40
-
41
-
42
-
43
-
44
-
45
-
46
-
47
-
48
-
49
-
50
-
51
-
52
 |
 |
318 205 858 (1001) Rev. A
Use & Care Guide
Dual Fuel Slide-In Range