Electrolux EWFLS70JIW Installation Instructions (All Languages)
Electrolux EWFLS70JIW Manual
 |
UPC - 012505382796
View all Electrolux EWFLS70JIW manuals
Add to My Manuals
Save this manual to your list of manuals |
Electrolux EWFLS70JIW manual content summary:
- Electrolux EWFLS70JIW | Installation Instructions (All Languages) - Page 1
Installation Instructions Electrolux Front-Load Washer Instructions d'installation Laveuse à chargement frontal Electrolux Instrucciones de Instalación Lavadora de carga frontal Electrolux 137064300 B (1004) - Electrolux EWFLS70JIW | Installation Instructions (All Languages) - Page 2
code C22.1 part 1. • To avoid back or other injury, have more than one person move or lift the washer. • Do not stack a dryer on top of washer already installed on pedestal. Do not stack washer on top of dryer. Do not stack washer on top of another washer. • The instructions in this manual and all - Electrolux EWFLS70JIW | Installation Instructions (All Languages) - Page 3
.com. Installation Checklist Shipping Hardware ‰ Foam shipping support (under wash tub) removed and stored ‰ Shipping bolts and spacers removed from rear of appliance and stored ‰ Hole plugs (shipped in bag in drum) installed in holes in backsheet Leveling ‰ Washer is level, side-to-side and front - Electrolux EWFLS70JIW | Installation Instructions (All Languages) - Page 4
washer washer is in an installed installed owner's responsibility to have a licensed electrician replace it with a properly grounded three prong grounding type receptacle. Water supply requirements Hot and cold water faucets MUST be installed within 42 inches (107 cm) of your washer The washer MUST be - Electrolux EWFLS70JIW | Installation Instructions (All Languages) - Page 5
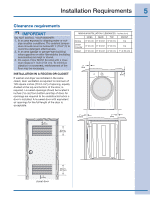
). To minimize vibration or movement, reinforcement of the floor may be necessary. INSTALLATION IN A RECESS OR CLOSET If washer and dryer are installed in the same closet, door ventilation is required: A minimum of 120 square inches (774.2 cm²) of opening, equally divided at the top and bottom of the - Electrolux EWFLS70JIW | Installation Instructions (All Languages) - Page 6
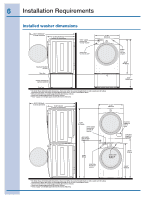
Requirements Installed washer dimensions 50.6" (128.53cm)* to clear open door 31.50" (80.01cm)* to front of closed door water supply connection on rear of unit ¹ drain hose on rear of unit ² 27.00" (68.58cm) power cord on rear of unit ³ freestand washer on floor floor line washer mounted - Electrolux EWFLS70JIW | Installation Instructions (All Languages) - Page 7
. 1. Temporarily remove door tape. 2. Open washer door and remove everything from the drum. 3. Close door and reapply door tape. 4. Using the washer. 5. Remove styrofoam base and shipping plug and set them aside. 6. Carefully return the washer to an upright position. 7. Carefully move the washer to - Electrolux EWFLS70JIW | Installation Instructions (All Languages) - Page 8
5 BOLTS Installing hole plugs IMPORTANT Save all shipping bolts and spacers for future use. If the washer is to be transported at a later date, the shipping hardware must be reinstalled to help prevent shipping damage. Locate 7 hole plugs in the small bag supplied with washer instruction guides - Electrolux EWFLS70JIW | Installation Instructions (All Languages) - Page 9
floor on ALL four legs. Keep the leveling leg extension at a minimum for best performance of the washer. NOTE For pedestal installations, see additional installation instructions included with the pedestal. Connecting inlet water 1. Run some water from the hot and cold faucets to flush the water - Electrolux EWFLS70JIW | Installation Instructions (All Languages) - Page 10
a brief, helpful "Installation Cycle" on your new washer. 8. If you have any questions during initial operation, please review the "Service Prevention Checklist" in your Use & Care Guide before calling for service. 9. Place these instructions in a location near the washer for future reference. NOTE - Electrolux EWFLS70JIW | Installation Instructions (All Languages) - Page 11
Installation Instructions 11 Performing Installation Cycle If your washer has this console: 1.Empty washer's drum and close door. 2.After you plug in the washer the first time: wake up the washer by pressing any button, rotate cycle knob to hand wash cycle, press the start button and then the cancel - Electrolux EWFLS70JIW | Installation Instructions (All Languages) - Page 12
, counter-sunk hinge screws from door. 3 Close the door. 4 Rotate the door trim approximately ¾" counter-clockwise and pull it away from the front of the door. 3 While supporting the weight of the door with both hands, separate the door from the hinge. 4 Gently place the door face down on a flat - Electrolux EWFLS70JIW | Installation Instructions (All Languages) - Page 13
13 C) Removing Hinge from Front Panel 1 With the hinge in open position, remove 2 short, course-thread, panhead screws on hinge plate. D) Removing Door Lock from Front Panel 1 Remove 2 short, course-thread, panhead screws from the door lock. 2 Remove 3 short, fine-thread, counter-sunk screws in - Electrolux EWFLS70JIW | Installation Instructions (All Languages) - Page 14
14 Reversing Door Reversing door and hardware E) Reattaching Door Lock to Front Panel 1 Rotate the door lock and move it to the opposite opening. 2 Connect the harness to the door lock by inserting it in the terminal and firmly pushing it in place. F) Reattaching Hinge to Front Panel 1 Rotate the - Electrolux EWFLS70JIW | Installation Instructions (All Languages) - Page 15
Reversing Door 15 G) Removing Striker Plate I) Removing Hole Plug 1 Remove 2 long, course-thread, counter-sunk screws and striker plate. 2 Set the striker plate to the side for later. H) Removing Latch Indicator 1 Insert flat blade screwdriver into open slot of hole plug. 2 Gently pry upward to - Electrolux EWFLS70JIW | Installation Instructions (All Languages) - Page 16
small tabs on either side of the hole plug into the two slots on either side of the hole in the door. insert tab insert tab 3 Firmly press downward on the indicator until the tab snaps in place. insert tab 3 Firmly press downward on the hole plug until the tab snaps in - Electrolux EWFLS70JIW | Installation Instructions (All Languages) - Page 17
. P) Reinstalling Trim Plug 1 Open the door to a 90 degree angle. 2 Install the trim plug with 1 long, course- thread, panhead screw. 4 Close the door and test the operation of the down. UP Q) Plug in washer and continue operation. 3 Rotate the trim ring cover plate and move it to the opposite - Electrolux EWFLS70JIW | Installation Instructions (All Languages) - Page 18
use of a MOBILE HOME INSTALLATION KIT. UNIVERSAL APPLIANCE WRENCH P/N 137019200 Your washer was supplied with a UNIVERSAL APPLIANCE WRENCH. If you desire another wrench, you may order one. TOUCH UP PAINT PENS Island White Touch Up Pen - P/N 5304468812 Mediterranean Blue Touch Up Pen - P/N 5304468813 - Electrolux EWFLS70JIW | Installation Instructions (All Languages) - Page 19
Installation Instructions Electrolux Front-Load Washer Instructions d'installation Laveuse à chargement frontal Electrolux Instrucciones de Instalación Lavadora de carga frontal Electrolux - Electrolux EWFLS70JIW | Installation Instructions (All Languages) - Page 20
sécurité présentées dans ce guide sont identifiées par le mot AVERTISSEMENT ment aux instructions du fabricant et aux codes locaux. • L'installation électrique de installation 3-5 Dimensions de l'installation 6 Instructions d'installation 7-11 Inversion de la porte 12-17 Options 18 © Electrolux - Electrolux EWFLS70JIW | Installation Instructions (All Languages) - Page 21
3 Veuillez lire et conserver ce guide Merci d'avoir choisi Electrolux, la nouvelle marque de qualité en matière d'électroménager. Ces instructions d'installation font partie de notre engagement à vous satisfaire et à vous fournir un produit de qualité pendant toute la durée de vie de votre - Electrolux EWFLS70JIW | Installation Instructions (All Languages) - Page 22
relatives à l'alimentation en eau Les robinets d'eau chaude et d'eau froide DOIVENT être installés à une distance de 107 cm (42 po) ou moins de l'arrivée d'eau froide ne doit pas dépasser 68,9 kPa (10 lb/po²). Le service des eaux de votre localité peut vous informer sur la pression de votre - Electrolux EWFLS70JIW | Installation Instructions (All Languages) - Page 23
cm (3 po) du haut et du bas de la porte. Les ouvertures d'aération ne doivent pas être obstruées lorsqu'une porte est 1" 0" installée. Une porte à persiennes dont les ouvertures (2.54cm) (0cm) sur l'ensemble de la porte sont équivalentes aux recommandations peut être utilisée. 3" (7.6cm) 60 - Electrolux EWFLS70JIW | Installation Instructions (All Languages) - Page 24
6 Exigences d'installation Dimensions, laveuse installée 50.6" (128.53cm)* Avec la porte grande ouverte 31.50" (80.01cm)* À partir de l'avant de la porte lorsqu'elle est fermée Raccord de l'alimentation en eau à l'arrière de la laveuse ¹ 27.00" (68.58cm) Tuyau de vidange à l'arrière de la - Electrolux EWFLS70JIW | Installation Instructions (All Languages) - Page 25
Déballage de la laveuse 7 Retrait de l'emballage en mousse AVERTISSEMENT RISQUE D'ÉTOUFFEMENT Détruisez le carton d'emballage et les sacs en plastique après avoir déballé l'appareil. Les enfants pourraient les utiliser pour jouer. Le carton recouvert de tapis, les couvertures et les feuilles de - Electrolux EWFLS70JIW | Installation Instructions (All Languages) - Page 26
usage ultérieur. Si la laveuse doit être transportée plus tard, ces pièces d'expédition doivent être installées pour éviter de l'endommager. Trouvez les 7 bouchons du petit sac fourni avec les guides de votre laveuse. Insérez-les dans les trous du panneau arrière de la laveuse. 7 BOUCHONS (DANS - Electrolux EWFLS70JIW | Installation Instructions (All Languages) - Page 27
niveau le plus près possible de la laveuse afin d'op- timiser le rendement de la laveuse. REMARQUE Pour une installation sur socle, reportez-vous aux instructions d'installation complémentaires incluses avec le socle. Branchement de l'entrée d'eau 1. Faites couler de l'eau chaude et froide des - Electrolux EWFLS70JIW | Installation Instructions (All Languages) - Page 28
le tuyau de vidange au moyen d'une attache (incluse dans la trousse d'installation fournie) au tuyau d'évacuation, au tuyau d'entrée, à la cuve à Liste de vérification avant service » de votre Guide d'utilisation et d'entretien avant d'effectuer une demande de service. 9. Laissez ces instructions - Electrolux EWFLS70JIW | Installation Instructions (All Languages) - Page 29
laveuse quittera le programme INSTALL CYCLE (Programme d'installation) et reviendra à son mode de fonctionnement normal la bouton et suivez les instructions qui s'affichent sur l'interface utilisateur ACL, y compris le choix de la langue. 2.Le programme d'installation procédera automatiquement à - Electrolux EWFLS70JIW | Installation Instructions (All Languages) - Page 30
12 Inversion de la porte Préparation à l'inversion de la porte 1 Assurez-vous qu'il y a suffisamment d'espace avant d'inverser la porte. 2 Vous aurez besoin d'un tournevis à pointe carrée n° 2. 3 Protégez la surface de travail, comme le dessus de la laveuse ou le plancher près de la laveuse, avec un - Electrolux EWFLS70JIW | Installation Instructions (All Languages) - Page 31
Inversion de la porte 13 C) Retrait de la charnière du panneau avant 1 Avec la charnière en position ouverte, retirez les deux vis courtes à tête cylindrique large de la plaque de charnière. D) Retrait du loquet de porte du panneau avant 1 Retirez les deux vis courtes à tête cylindrique large du - Electrolux EWFLS70JIW | Installation Instructions (All Languages) - Page 32
14 Inversion de la porte Inversion de la porte et de la quincaillerie E) Remontage du loquet de porte au panneau avant 1 Faites pivoter le loquet de porte et déplacezle du côté opposé de l'ouverture. 2 Branchez le faisceau au loquet de porte en l'insérant dans le connecteur et en appuyant - Electrolux EWFLS70JIW | Installation Instructions (All Languages) - Page 33
Inversion de la porte 15 G) Retrait de la plaque-percuteur 1 Retirez les deux vis longues à tête fraisée et la plaque-percuteur. I) Retrait du bouchon 2 Réservez la plaque-percuteur pour une utilisation ultérieure. H) Retrait du voyant de loquet 1 IInsérez un tournevis à pointe plate dans la - Electrolux EWFLS70JIW | Installation Instructions (All Languages) - Page 34
d'un côté ou de l'autre du voyant de loquet dans les deux fentes d'un côté ou de l'autre du trou de la porte. insérez le languette L) Réinstallation du bouchon 1 Faites pivoter le bouchon et déplacez-le dans le trou opposé de la porte. 2 Insérez solidement les deux petites languettes d'un côté ou - Electrolux EWFLS70JIW | Installation Instructions (All Languages) - Page 35
la droite, le point de pivot est vers le haut. Pour retirer le couvercle de la gauche, le point de pivot est vers le bas. P) Réinstallation du bouchon de l'anneau de garniture 1 Ouvrez la porte à un angle de 90 degrés. 2 Installez le bouchon de garniture avec la longue vis à tête cylindrique - Electrolux EWFLS70JIW | Installation Instructions (All Languages) - Page 36
installation dans une maison mobile nécessite l'utilisation d'une TROUSSE D'INSTALLATION DE MAISON MOBILE. ATTENTION Tout défaut d'utiliser les accessoires fabriqués ou certifiés par le fabricant connaître le distributeur de pièces autorisé Electrolux le plus près de chez vous. AVERTISSEMENT RISQUE - Electrolux EWFLS70JIW | Installation Instructions (All Languages) - Page 37
Installation Instructions Electrolux Front-Load Washer Instructions d'installation Laveuse à chargement frontal Electrolux Instrucciones de Instalación Lavadora de carga frontal Electrolux - Electrolux EWFLS70JIW | Installation Instructions (All Languages) - Page 38
en este manual aparecen precedidas ctrico de Canadá (Canadian Electrical Code) Parte 1. • Para evitar lesiones en la ya está instalada sobre un pedestal. No apile la lavadora sobre que puedan presentarse. Cuando instale, opere o repare cualquier Electrolux Major Appliances Todos los derechos - Electrolux EWFLS70JIW | Installation Instructions (All Languages) - Page 39
Requisitos de instalación 3 Lea y conserve esta guía ¿Preguntas? Gracias por elegir Electrolux, la nueva marca de alta calidad de electrodomésticos para el hogar. Estas instrucciones de instalación forman parte de nuestro compromiso de satisfacer al cliente y de ofrecer un producto de calidad a - Electrolux EWFLS70JIW | Installation Instructions (All Languages) - Page 40
4 Requisitos de instalación Requisitos del sistema eléctrico CIRCUITO - Circuito individual de bifurcación de 15 amp., correctamente polarizado y con conexión a tierra con fusible de retardo de 15 amp. o con interruptor automático. SUMINISTRO ELÉCTRICO: corriente alterna de 2 cables, con conexión - Electrolux EWFLS70JIW | Installation Instructions (All Languages) - Page 41
de instalación 5 Requisitos de despeje IMPORTANTE NO INSTALE LA LAVADORA: 1. En una zona expuesta a 60 sq. in. (387.1cm²) ESPACIOS MÍNIMOS PARA LA INSTALACIÓN: cm (pulgadas) Hueco LATERALES PARTE PARTE PARTE TRASERA SUPERIOR DELANTERA 0 cm (0") 0 cm (0")* 0 cm (0") n/d Debajo de la 0 cm - Electrolux EWFLS70JIW | Installation Instructions (All Languages) - Page 42
trasera de la lavadora ¹ 27.00" (68.58cm) manguera de drenaje en la parte trasera de la lavadora ² cable eléctrico en la parte trasera de la lavadora ³ lavadora independiente sobre el piso línea del piso lavadora colocada sobre pedestal opcional 38.00" (96.52cm) 53.00" (134.62cm) línea del - Electrolux EWFLS70JIW | Installation Instructions (All Languages) - Page 43
colocar la cinta sobre esta. 4. Utilizando una alfombra, frazada o trozo de cartón para proteger el piso, recueste la lavadora cuidadosamente sobre su parte trasera. PRECAUCIÓN PELIGRO DE EXCESO DE PESO Para evitar lesiones en la espalda u otro tipo de lesiones, procure levantar o mover la lavadora - Electrolux EWFLS70JIW | Installation Instructions (All Languages) - Page 44
8 Desembalaje de la lavadora Retiro del embalaje de protección 1 HORQUILLA PARA TRANSPORTE 5 ESPACIADORES 5 ABRAZADERAS "P" 5 PERNOS LLAVE UNIVERSAL (INCLUIDA) NOTA Es posible que el material de goma en los espaciadores necesite tiempo para suavizarse antes de poder tirar de él a través de los - Electrolux EWFLS70JIW | Installation Instructions (All Languages) - Page 45
rendimiento de la lavadora. a c NOTA Para instalar un pedestal, consulte las instrucciones de instalación adicionales que vienen con dicho de agua caliente y fría para enjuagar los caños de agua y eliminar las partículas que puedan obstruir los filtros de la llave de paso y para determinar - Electrolux EWFLS70JIW | Installation Instructions (All Languages) - Page 46
10 Instrucciones de instalación Conexión del desagüe y del suministro eléctrico 1. Enganche un extremo del gancho de la manguera de drenaje (empacada en el tambor de la lavadora) en la manguera de drenaje. Continúe deslizando la manguera alrededor del soporte y encájela en su lugar. 2. Coloque el - Electrolux EWFLS70JIW | Installation Instructions (All Languages) - Page 47
al ciclo "hand wash" (lavado a INSTAL PASS", lo que significa que su nueva lavadora está correctamente instalada y lista para ser usada. Si la pantalla solicita una acción como "NO WATER" (no hay agua), "CHECK HOSES" (verifique las mangueras) o "CALL SERVICE de LCD mostrará "INSTAL CYCLE", lo que signi - Electrolux EWFLS70JIW | Installation Instructions (All Languages) - Page 48
puerta. 3 Cierre la puerta de la lavadora. 4 Gire la moldura de la puerta aproximadamente 1,9 cm (¾ pulgadas) hacia la izquierda y retírela de la parte frontal de la puerta. 3 Mientras soporta el peso de la puerta con ambas manos, separe la puerta de la bisagra. 4 Coloque cuidadosamente la cara - Electrolux EWFLS70JIW | Installation Instructions (All Languages) - Page 49
hacia afuera mientras lo extrae lentamente a través de la abertura para acceder al enchufe preformado acoplado. 3 Deslice la bisagra hacia la parte central del panel delantero y gírela hacia adentro mientras la extrae lentamente del panel delantero para acceder al enchufe preformado acoplado - Electrolux EWFLS70JIW | Installation Instructions (All Languages) - Page 50
la conexión del enchufe preformado a través del panel delantero y luego gire el seguro hasta que quede acoplado. Deslice el seguro hacia la parte central del panel delantero hasta que los agujeros de los tornillos se alineen. 4 Utilice los pasadores de ubicación laterales para alinear la bisagra - Electrolux EWFLS70JIW | Installation Instructions (All Languages) - Page 51
Inversión de la puerta 15 G) Desinstalación de la placa del pestillo I) Extracción del tapón para agujero 1 Retire los 2 tornillos largos, con rosca gruesa y avellanados, y la placa del pestillo. 2 Deje la placa del pestillo a un lado para utilizarla posteriormente. H) Desinstalación del indicador - Electrolux EWFLS70JIW | Installation Instructions (All Languages) - Page 52
16 Inversión de la puerta J) Reinstalación del indicador de pestillo 1 Gire el indicador de pestillo y muévalo hacia el agujero opuesto de la puerta. introduzca el indicador por la ranura K) Reinstalación de la placa del pestillo 1 Gire la placa del pestillo y muévala hacia el lateral opuesto de - Electrolux EWFLS70JIW | Installation Instructions (All Languages) - Page 53
la puerta de la lavadora. 2 Oriente la moldura de modo tal que la posición 12 se encuentre a aproximadamente 1,9 cm (¾ pulgadas) hacia la izquierda de la parte superior central. La abertura del anillo de moldura debe estar en el lateral de la bisagra. 3 Inserte el anillo de moldura en las ranuras - Electrolux EWFLS70JIW | Installation Instructions (All Languages) - Page 54
unidad y facilitar su uso. Dicho pedestal agregará aproximadamente 38,1 cm (15 pulgadas el distribuidor donde adquirió la lavadora. KIT DE SECADORA PARA CENTRO DE LAVADO la distribuidora autorizada de repuestos Electrolux más cercana a su domicilio de desconectarlos. Los errores de cableado pueden - Electrolux EWFLS70JIW | Installation Instructions (All Languages) - Page 55
- Electrolux EWFLS70JIW | Installation Instructions (All Languages) - Page 56
-
 1
1 -
 2
2 -
 3
3 -
 4
4 -
 5
5 -
 6
6 -
 7
7 -
8
-
9
-
10
-
11
-
12
-
13
-
14
-
15
-
16
-
17
-
18
-
19
-
20
-
21
-
22
-
23
-
24
-
25
-
26
-
27
-
28
-
29
-
30
-
31
-
32
-
33
-
34
-
35
-
36
-
37
-
38
-
39
-
40
-
41
-
42
-
43
-
44
-
45
-
46
-
47
-
48
-
49
-
50
-
51
-
52
-
53
-
54
-
55
-
56
 |
 |
137064300 B (1004)
Installation Instructions
Electrolux Front-Load Washer
Instructions d’installation
Laveuse à chargement frontal Electrolux
Instrucciones de Instalación
Lavadora de carga frontal Electrolux