Epson 830p Quick Start
Epson 830p - PowerLite XGA LCD Projector Manual
 |
UPC - 010343851177
View all Epson 830p manuals
Add to My Manuals
Save this manual to your list of manuals |
Epson 830p manual content summary:
- Epson 830p | Quick Start - Page 1
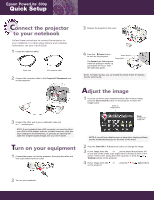
Epson® PowerLite® 830p Quick Setup Connect the projector to your notebook Follow these instructions to connect the projector to your notebook. For other setup options and complete instructions, see your User's Guide. 1 Locate the required cables: Power cord VGA computer cable 2 Connect the - Epson 830p | Quick Start - Page 2
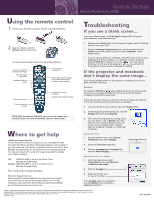
Control projector volume Choose which source to display Optimize the computer image NOTE: With an optional USB cable, you can use the remote as a wireless mouse. For more information, see your User's Guide. Where to get help Telephone Support Services To use the Epson PrivateLine® Support service
-
 1
1 -
 2
2
 |
 |
1
Locate the required cables:
2
Connect the computer cable to the
Computer1/Component
port
on the projector.
3
Connect the other end to your notebook’s video-out
or
monitor port.
NOTE:
If your notebook has a DVI connector, you need to either
use a DVI-to-VGA adapter with the included computer cable (see
your computer’s documentation), or purchase an optional DVI
cable (for a higher-quality image). See your
User’s Guide
.
T
urn on your equipment
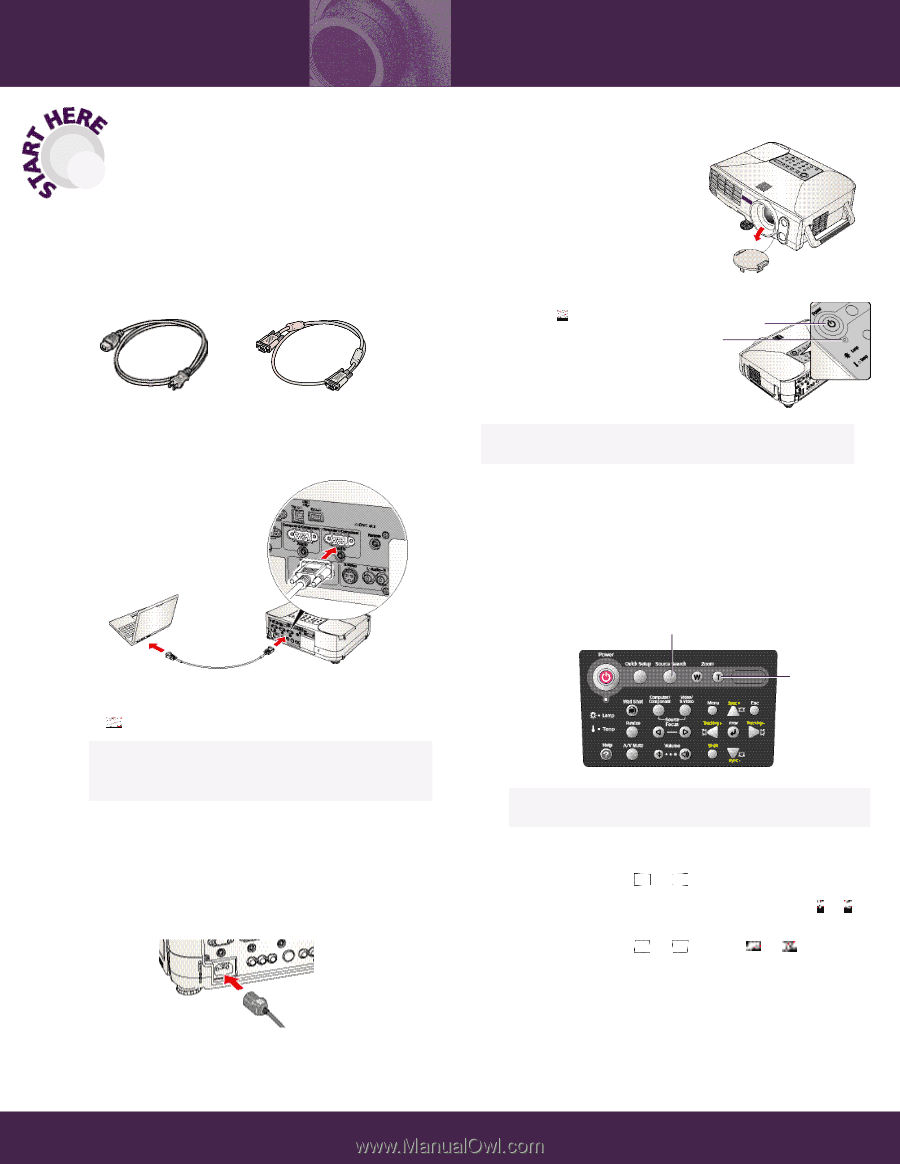
1
Connect the power cord to the projector, then plug the other end
into a grounded electrical outlet.
2
Turn on your notebook.
3
Remove the projector’s lens cover.
4
Press the
Power
button
to turn on the projector.
The
Power
light flashes green
while the projector warms up
and adjusts the focus. Then
the light stays green.
C
onnect the projector
to your notebook
Follow these instructions to connect the projector to
your notebook. For other setup options and complete
instructions, see your
User’s Guide
.
Epson
®
PowerLite
®
830p
Quick Setup
VGA computer cable
1
If you’ve turned on your notebook and you don’t see an image,
press the
Source Search
button on the projector to select the
image source.
NOTE:
If you still see a blank screen or have other display problems,
see the troubleshooting tips on the back of this sheet.
2
Press the
Zoom
(
W
or
T
) buttons to reduce or enlarge the image.
3
If your image looks like
or
, you’ve placed the projector off
to one side of the screen at an angle. Place it directly in front of the
center of the screen, facing the screen squarely, or press the
or
Tracking
buttons on the projector.
4
If your image looks like
or
, press the
or
Sync
buttons
on the projector.
Zoom
to adjust the
image size
A
djust the image
NOTE:
For faster startup, you can enable the Direct Power On feature.
See the
User’s Guide
.
Select an
image source
Power button
Power light
Power cord