Epson CX5400 Quick Reference Guide
Epson CX5400 - Stylus Color Inkjet Manual
 |
UPC - 010343848412
View all Epson CX5400 manuals
Add to My Manuals
Save this manual to your list of manuals |
Epson CX5400 manual content summary:
- Epson CX5400 | Quick Reference Guide - Page 1
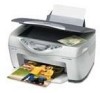
Quick Reference Guide Using Your Stylus CX Without a Computer Maintaining Your Stylus CX Solving Problems Requirements and Notices CPD-16737 4046294-00 - Epson CX5400 | Quick Reference Guide - Page 2
cameras, scanners, and ink jet printers. Trademarks EPSON and EPSON Stylus are registered trademarks and EPSON Smart Panel is a trademark of SEIKO EPSON CORPORATION. BorderFree and DuraBrite are registered trademarks and EPSON Connection, EPSON SoundAdvice, and EPSON Store are service marks of Epson - Epson CX5400 | Quick Reference Guide - Page 3
18 Cancelling Copies and Settings 18 MAINTAINING YOUR STYLUS CX 19 Checking Ink Levels 19 Replacing an Ink Cartridge 20 Purchasing Ink Cartridges 20 Ink Cartridge Precautions 20 Removing and Installing Ink Cartridges 21 Cleaning the Print Head 23 Running a Nozzle Check 24 Aligning the - Epson CX5400 | Quick Reference Guide - Page 4
the Stylus CX Messages 28 Problems and Solutions 29 Copying Problems 29 Paper Feeding Problems 30 Copy Quality Problems 31 Where To Get Help 32 REQUIREMENTS AND NOTICES 33 Windows System Requirements 33 Macintosh System Requirements 33 Important Safety Instructions 34 Ink Cartridge Safety - Epson CX5400 | Quick Reference Guide - Page 5
-such as 4 × 6 glossy photos-by using the Stylus CX menus. In addition, the menus let you run maintenance programs and check your ink levels, as described on page 19. For more information on copying, printing, scanning, and maintenance, doubleclick the EPSON Information Center icon on your computer - Epson CX5400 | Quick Reference Guide - Page 6
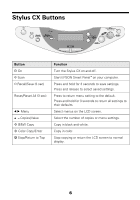
CX Buttons Button P On ] Scan N Recall/Save (3 sec) Reset/Reset All (3 sec) l r Menu + - Copies/Value x B&W Copy x Color Copy/Enter y Stop/Return to Top Function Turn the Stylus CX on and off. Start EPSON Smart Panel™ on your computer. Press and hold for 3 seconds to save settings. Press and - Epson CX5400 | Quick Reference Guide - Page 7
DB Photo Paper Copy with draft quality to save ink. Copy text with normal quality. Copy text and graphics with higher quality. Copy text and graphics with highest quality. High-quality copy on EPSON Matte Paper Heavyweight. High-quality copy on EPSON Photo Paper or Glossy Photo Paper. High-quality - Epson CX5400 | Quick Reference Guide - Page 8
Copy button to start the process. Align the print head if vertical lines appear jagged, or printed photos appear grainy. Nozzle Check Press the x Color Copy button to print the pattern. Print a nozzle check pattern to determine if the print head needs cleaning. Head Cleaning Press the x Color - Epson CX5400 | Quick Reference Guide - Page 9
shown in bold. Description Replace the cartridge when you see a message that one of your ink colors is low or empty. Display the percentage of ink remaining in each cartridge. Feed or eject paper after clearing a paper jam. Copying Documents 1. Make sure your Stylus CX is turned on. 2. Flip the - Epson CX5400 | Quick Reference Guide - Page 10
guide against the paper (but not too tightly). 6. Flip the feeder guard back over the paper. (Make sure you didn't insert the paper in front of the feeder guard.) 7. Open the scanner edge so your entire document is scanned. Then close the scanner lid. Move the document in about 0.1 inch from the - Epson CX5400 | Quick Reference Guide - Page 11
same size as your original. Copying Photographs You can use the EPSON Stylus CX5400 to copy your favorite photos so they look just like professional photo EPSON® Photo Paper, Glossy Photo Paper, or DURABrite Ink Glossy Photo Paper. EPSON paper name Photo Paper or Glossy Photo Paper DURABrite Ink - Epson CX5400 | Quick Reference Guide - Page 12
Insert up to 20 sheets of EPSON Photo Paper, Glossy Photo Paper, or DURABrite Ink Glossy Photo Paper against the right guide against the paper (but not too tightly). 5. Flip the feeder guard back over the paper. (Make sure you didn't insert the paper in front of the feeder guard.) Left edge guide - Epson CX5400 | Quick Reference Guide - Page 13
in about 0.1 inch from the edges Right menu button 7. Close the scanner lid. Selecting Photo Settings 1. Press the right Menu button to display Copy display Quality&Paper. Quality&Paper Photo Paper If you're using DURABrite Ink Glossy Photo Paper, press the - Value button to select DB Photo - Epson CX5400 | Quick Reference Guide - Page 14
the x Color Copy button. Your photo is scanned and printed. Improving Copy Quality You can use the Quality&Paper menu on the Stylus CX to improve the quality of your copies on plain paper, EPSON Premium Bright White Paper, Photo Quality Ink Jet Paper, or Matte Paper Heavyweight. 1. Load paper and - Epson CX5400 | Quick Reference Guide - Page 15
button. Your document is copied. Reducing or Enlarging Copies You can have the Stylus CX resize your document automatically to fit the paper you're using, or you fit the size paper you are using. ■ If you want to convert from one size to another, Reduce/Enlarge press the + or - Value buttons to - Epson CX5400 | Quick Reference Guide - Page 16
the size of your copy. Making Multiple Copies on One Sheet You can place two or four pages (reduced ) on a single sheet of paper. Follow the instructions below for the type of copies you want. Multiple Copies Make sure letter-size paper is loaded in the Stylus CX. 2. Place your card or wallet-size - Epson CX5400 | Quick Reference Guide - Page 17
Sheet 1. Make sure letter-size paper is loaded in the Stylus CX. 2. Place the first page on the glass, with the x Color Copy or B&W Copy button. ■ If you are making a 2-up copy, your page is printed. ■ If you are making a 4-up copy, you see another message prompting you to change the original - Epson CX5400 | Quick Reference Guide - Page 18
might want to save settings for copying a 4 × 6 snapshot on EPSON DURABrite Ink Glossy Photo Paper. You can then "reprint" photos by pressing a automatically selected again. 3. To return to the default settings, press the Reset button. 4. Whenever you want to use your saved settings, press the - Epson CX5400 | Quick Reference Guide - Page 19
you have left. View instructions and ink levels Select maintenance programs Start maintenance programs Checking Ink Levels Press the left Menu button until you see Ink Levels on the LCD screen. This shows an approximate percentage of the ink remaining in each cartridge. Ink Levels C: 80% M: 80 - Epson CX5400 | Quick Reference Guide - Page 20
the print head, you can replace the cartridge. Be sure you have a new ink cartridge before you begin. Once you start the ink cartridge replacement procedure, you must complete all the steps in one session. Purchasing Ink Cartridges Use these EPSON ink cartridges within six months of installing them - Epson CX5400 | Quick Reference Guide - Page 21
the EPSON Stylus CX5400, never move the print head by hand. You cannot print if any ink cartridge is empty. Leave the empty cartridge installed until you have obtained a replacement. Otherwise the ink remaining in the print head nozzles may dry out. Removing and Installing Ink Cartridges 1. Make - Epson CX5400 | Quick Reference Guide - Page 22
3. Pinch the tabs on the front and back of the cartridge, lift it out of the printer, and dispose of it carefully. 4. Before you remove the new cartridge from its package, shake it four or five times. 22 - Epson CX5400 | Quick Reference Guide - Page 23
you may inhibit normal operation and printing. If you need to replace other ink cartridges, repeat steps 3 through 5 before continuing with step 6. 6. Carefully lower the scanner and press it down until it clicks into place. The Stylus CX begins charging the ink delivery system. The On light flashes - Epson CX5400 | Quick Reference Guide - Page 24
Copy button. 2. Examine the nozzle check pattern you print. It should look something like this, with the lines EPSON Information Center (doubleclick the icon on your computer desktop). You can also turn the Stylus CX off and wait overnight to allow any dried ink to soften. Then try cleaning the print - Epson CX5400 | Quick Reference Guide - Page 25
, you may need to align the print head. 1. Make sure the Stylus CX is turned on and not printing, and the Error light is off. 2. Load plain with the two vertical lines most precisely printed on top of each other. You may need to use a magnifying glass or loupe. Select one pattern each for rows 1, 2, - Epson CX5400 | Quick Reference Guide - Page 26
: If you select a pattern other than 8 in any row, that pattern becomes pattern #8 the next time you align the print head. 6. When you're finished, press the x Color Copy button to print the second alignment sheet. Or, if you want to end the alignment process at this point, press the y Stop button - Epson CX5400 | Quick Reference Guide - Page 27
the best pattern, then press the x Color Copy button. (In this example, pattern 4 is best.) 9. When you're finished, press the x Color Copy button to print the third alignment sheet. Or, if you want to end the alignment process at this point, press the y Stop button. 10. Repeat steps 7 through 8 to - Epson CX5400 | Quick Reference Guide - Page 28
. Checking the Stylus CX Messages Here is a list of error messages and what you should do when you see them. Error message Quality&Paper setting is not acceptable for B&W copy. Press the Stop button. No XXX ink cartridge - - > Press the Color Copy button to install a new ink cartridge. XXX ink out - Epson CX5400 | Quick Reference Guide - Page 29
Stylus CX, then press it again to turn it back on. If the message still appears, contact your dealer or EPSON as described on page 32. Problems and Solutions For problems setting up your computer and installing your software, see the Start Here sheet for solutions. For problems scanning, printing - Epson CX5400 | Quick Reference Guide - Page 30
The scanner's fluorescent lamp isn't on. ■ The lamp turns off automatically to save power (sleep mode). The lamp comes on when you start scanning. ■ Make sure the Stylus CX is plugged into a power outlet and turned on. Paper Feeding Problems Paper doesn't feed correctly or jams in the printer. ■ If - Epson CX5400 | Quick Reference Guide - Page 31
saturation and absorption of genuine EPSON inks. ■ Use a support sheet with special paper or try loading your paper one sheet at a time. ■ Align the print head; see page 25 for instructions. ■ The ink cartridges may be old or low on ink; see page 20 for instructions on replacing an ink cartridge. 31 - Epson CX5400 | Quick Reference Guide - Page 32
reach EPSON Support at http://support.epson.com. At this site, you can download drivers and other files, look at product documentation, access troubleshooting information, and receive technical advice through e-mail. Automated Telephone Services A variety of automated help services are available - Epson CX5400 | Quick Reference Guide - Page 33
or more recommended) ■ CD-ROM or DVD drive for installing the software ■ Windows-compliant USB port and the USB cable that came with your EPSON Stylus CX5400. Macintosh System Requirements To use your EPSON Stylus CX5400 and its software, your system should have: ■ An Apple® iMac™ series, Power - Epson CX5400 | Quick Reference Guide - Page 34
Instructions Before using your EPSON Stylus CX5400, read and follow these safety instructions: ■ Be sure to follow all warnings and instructions marked on the Stylus CX. ■ Use only the type of power source indicated on the Stylus the Stylus CX with the Stylus CX, make Stylus Stylus CX (at least - Epson CX5400 | Quick Reference Guide - Page 35
disposal or recycling. Do not put in the trash. Ink Cartridge Safety Instructions ■ Leave the ink cartridges installed. Removing the cartridges can dehydrate the print head and may prevent the EPSON Stylus CX5400 from printing. ■ Keep ink cartridges out of the reach of children and do not drink - Epson CX5400 | Quick Reference Guide - Page 36
as the Stylus CX. Note that there is a valve in the ink supply port, making covers or plugs unnecessary, but care is needed to prevent the ink from staining items that the cartridge touches. Do not touch the ink cartridge ink supply port or surrounding area. LCD Panel Safety Instructions ■ Use only - Epson CX5400 | Quick Reference Guide - Page 37
installation. This equipment generates, uses, and can radiate radio frequency energy and, if not installed and used in accordance with the instructions or an experienced radio/TV technician for help. WARNING The connection of a non- this equipment has more than one interface connector, do not leave - Epson CX5400 | Quick Reference Guide - Page 38
accept any interference received, including interference that may cause undesired operation. Trade Name: EPSON Type of Product: Multifunction printer Model: C141A ENERGY STAR Compliance As an ENERGY STAR Partner, EPSON has determined that this product meets the ENERGY STAR guidelines for energy - Epson CX5400 | Quick Reference Guide - Page 39
change or fading of prints or reimbursement of materials or services required for reprinting. This warranty does not cover damage to the EPSON product caused by parts or supplies not manufactured, distributed or certified by Epson. This warranty does not cover ribbons, ink cartridges or third party - Epson CX5400 | Quick Reference Guide - Page 40
of misuse, abuse, improper installation, neglect, improper shipping, damage caused by disasters such as fire, flood, and lightning, improper electrical current, software problems, interaction with non-Epson products, or service other than by an Epson Authorized Servicer. If a claimed defect cannot
-
 1
1 -
 2
2 -
 3
3 -
 4
4 -
 5
5 -
 6
6 -
 7
7 -
8
-
9
-
10
-
11
-
12
-
13
-
14
-
15
-
16
-
17
-
18
-
19
-
20
-
21
-
22
-
23
-
24
-
25
-
26
-
27
-
28
-
29
-
30
-
31
-
32
-
33
-
34
-
35
-
36
-
37
-
38
-
39
-
40
 |
 |
Quick Reference Guide
Using Your Stylus CX Without a Computer
Maintaining Your Stylus CX
Solving Problems
Requirements and Notices
CPD-16737
4046294-00