Epson EMP 9000 Owners Manual
Epson EMP 9000 - SXGA LCD Projector Manual
 |
View all Epson EMP 9000 manuals
Add to My Manuals
Save this manual to your list of manuals |
Epson EMP 9000 manual content summary:
- Epson EMP 9000 | Owners Manual - Page 1
- Epson EMP 9000 | Owners Manual - Page 2
covers on the projector except the lamp and filter covers. Dangerous electrical voltages inside the projector can cause severe injury. Except as specifically directed in this Owner's Manual, do not attempt to service this product yourself. Refer all servicing to qualified service personnel. Warning - Epson EMP 9000 | Owners Manual - Page 3
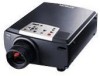
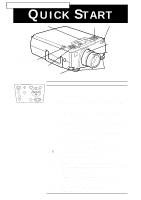
EMP-9000/9000NL/8000/8000NL QUICK START operation panel speaker remoto control receiver operation indicator speaker foot adjust lever zoom ring focus ring front foot Power Help Computer Video Menu Esc Sync. Tracking A/V mute Resize Sync. Keystone Shift Volume Operation projector. - Epson EMP 9000 | Owners Manual - Page 4
EMP-9000/9000NL/8000/8000NL QUICK START Freeze A/V Mute E-Zoom 3 2 Power R/C ON OFF 4 1 5 Enter Esc Remote control Button Function Freeze Keeps the current computer or video image on the screen. A/V Mute Turns off/on the audio/video output of the projector :Video To change the subscreen - Epson EMP 9000 | Owners Manual - Page 5
- Epson EMP 9000 | Owners Manual - Page 6
® DATA/VIDEO PROJECTOR Owner's Manual - Epson EMP 9000 | Owners Manual - Page 7
alterations to this product, or (excluding the U.S.) failure to strictly comply with SEIKO EPSON CORPORATION's operating and maintenance instructions. SEIKO EPSON CORPORATION shall not be liable against any damages or problems arising from the use of any options or any consumable products other than - Epson EMP 9000 | Owners Manual - Page 8
ix Optional Accessories ix About This Manual xi Safety Instructions xii Where to Get Help xiv World Wide Web site xiv Transporting your projector xv 1 Installation 1 Unpacking the Projector 2 Additional Components 3 Setting Up the Projector 4 Connecting to a Computer 6 Connecting to - Epson EMP 9000 | Owners Manual - Page 9
40 Using the Remote Control 41 Using the Operation Panel 44 Projector Status Indicators 46 Operation Indicator 46 Lamp Indicator 47 Temperature Indicator 47 3 Using the Projector Menus 49 Accessing the Main Menu 50 Changing a Menu Setting 50 Menu Options 54 Video Menu (Image - Epson EMP 9000 | Owners Manual - Page 10
83 Cleaning the Lens 84 Cleaning the Projector Case 84 Cleaning the Air Filter 85 Replacing the Lamp 86 6 Troubleshooting 89 Problems with the Projector 90 Problems with the Image or Sound 92 Technical Specifications 95 Supported Monitor Displays 97 Monitor and Computer In - Epson EMP 9000 | Owners Manual - Page 11
s s s s vi Contents - Epson EMP 9000 | Owners Manual - Page 12
s s s s s s Introduction Your compact, lightweight EPSON EMP-9000/9000NL/ 8000/8000NL projector lets you project full-color images and video onto a operations on your computer screen during presentations. Additionally, you can install the projector's ELP Link IV software to control the projector - Epson EMP 9000 | Owners Manual - Page 13
Your projector features the newest resizing technology DAR (Digital Active Resizing) which supports the true XGA (EMP8000/8000NL) and SXGA (EMP-9000/9000NL) computer output, as well as VGA, SXGA (EMP-9000/9000NL) output and SVGA, XGA (EMP-8000/8000NL) output. No matter what type of computer output - Epson EMP 9000 | Owners Manual - Page 14
of your computer's mouse. Optional Accessories To enhance your use of the projector, EPSON provides the following optional accessories: • Spare Lamp ELPLP08 (A screwdriver is contained with the spare lamp.) • Image Presentation Camera ELPDC01 • Mac Adapter Set ELPAP01 • ELP Communication - Epson EMP 9000 | Owners Manual - Page 15
• Hard Travel Case ELPKS15 • Long Throw Zoom Lens ELPLL02 • Portable Screen ELPSC06 • VGA-Computer Cable (1.8m) ELPKC02 • VGA-Computer Cable (3.0m) ELPKC09 • VGA-Computer Cable (1.8m) ELPKC11 • Work Station Cable (5BNC/13W3) ELPKC12 • Work Station Cable (5BNC/5BNC) ELPKC13 • Work - Epson EMP 9000 | Owners Manual - Page 16
This Manual Chapter 1, "Installation", gives step-by-step instructions on how to set up the projector and connect it to your computer, video source, or other external speaker or PA system. Read the installation procedures that apply to your configuration. Chapter 2, "Using the Projector", describes - Epson EMP 9000 | Owners Manual - Page 17
near a wall outlet where the plug can be easily unplugged. 6. Insert the projector's three-pin grounding-type plug into a properly grounded outlet. If you have a two-prong outlet, contact an electrician to replace it. Do not handle the plug with wet hands. 7. Take the following precautions when - Epson EMP 9000 | Owners Manual - Page 18
or frayed • If liquid has been spilled into the projector, or it has been exposed to rain or water • If it does not operate normally when you follow the operating instructions, or if it exhibits a distinct change in performance, indicating a need for service • If it has been dropped or the housing - Epson EMP 9000 | Owners Manual - Page 19
If you are having trouble setting up or running your projector, first see Chapter 6, "Troubleshooting". If you cannot resolve the problem, contact the appropriate representative listed in the section entitled "After sales service contact addresses" at the end of this manual. Before you call, please - Epson EMP 9000 | Owners Manual - Page 20
the original packaging, use equivalent materials, placing plenty of cushioning around the projector. • When transporting the projector for business use, first put the projector in a hard carrying case (such as the optional EPSON accessory case: ELPKS15), then pack it in a firm box, using cushioning - Epson EMP 9000 | Owners Manual - Page 21
s s s s xvi Introduction - Epson EMP 9000 | Owners Manual - Page 22
s s s s ss s s s s s s s s s 1 Installation This chapter describes how to unpack and set up your projector, and connect it to other equipment. The projector must be connected to a computer or a video source such as a video tape deck, camcorder, digital camera or laser disk player before it can - Epson EMP 9000 | Owners Manual - Page 23
, make sure you have all these components: • Projector • Remote control • 2 AA batteries • Power cord • Computer cable (mini D-sub 15pin) • Computer cable materials in case you need to ship the projector in the future. It should be transported in its original packaging or the equivalent. s s s - Epson EMP 9000 | Owners Manual - Page 24
, you need an S-Video cable. (One is usually provided with your video device.) A separate cable is required for each video source. • To connect the projector to a Macintosh PowerBook, you need a video-out cable. (One is provided by/or can be purchased from Apple for all new PowerBooks that have - Epson EMP 9000 | Owners Manual - Page 25
described above is for a standard lens. When using the optional lens, refer to the Owner's manuals attached to it. 3. Turn the projector so that the lens is at right angles to the screen. If the projector is not angled correctly, the screen image will be crooked. 4. Connect one end of the power - Epson EMP 9000 | Owners Manual - Page 26
lens when the projector is on. There is a risk that the projector might come on suddenly even though it is not in use. The light from the lamp can damage your with the projector. Make sure the polarity of the batteries is correct. 7. Replace the battery compartment cover. When replacing batteries, - Epson EMP 9000 | Owners Manual - Page 27
Connecting to a Computer You can connect the projector to a computer capable of SVGA, VGA, SXGA and XGA output. The following types of computers are supported: • IBM desktop PC or compatible • IBM laptop or compatible • Apple Macintosh desktop computer, including Macintosh Quadra®, Macintosh - Epson EMP 9000 | Owners Manual - Page 28
and computer if they are on. ♦ Note: Computer configurations vary. See your computer manual for the location of the ports needed to connect your projector. Connecting the Video and Monitor Cables First connect the computer cable and computer monitor cable. Refer to this illustration while - Epson EMP 9000 | Owners Manual - Page 29
when you need to view the video output but the projection screen is behind you.) 2. Connect one end of the computer cable to the projector's Computer 1 port. (Use the Computer 2 port if you are connecting a second computer.) ♦ Note: If your computer output is a 5BNC type, use the computer cable - Epson EMP 9000 | Owners Manual - Page 30
. Mouse/Com 1 port PS/2 mouse cable (or USB mouse cable) 9-pin serial cable main cable 1. Connect the small end of the main cable to the projector's Mouse/Com 1 port. (Use the Mouse/Com 2 port if you are connecting a second computer.) s s s s s s Connecting to a Computer 9 - Epson EMP 9000 | Owners Manual - Page 31
mouse port on the back of your computer and replace it with the other end of the PS/2 mouse cable or USB mouse cable included with the projector. (Your computer's mouse will be disabled while port that is being used to support a serial mouse. 5. Tighten the screws on all connectors. s s s s 10 - Epson EMP 9000 | Owners Manual - Page 32
(if you'll be projecting with audio) Follow the steps in each section for the cables you need to connect. Before beginning, turn off the projector and computer if they are on. ♦ Note: Laptop configurations vary. See your computer manual for the location of the ports needed to connect your - Epson EMP 9000 | Owners Manual - Page 33
computer cable ♦ Note: If your computer output is a 5BNC type, use the computer cable (5BNC). 1. Connect one end of the computer cable to the projector's Computer 1 port. (Use the Computer 2 port if you are connecting a second computer.) 2. Connect the other end of the video cable to the laptop - Epson EMP 9000 | Owners Manual - Page 34
mouse cable) main cable 1. Connect the small end of the main cable to the projector's Mouse/Com 1 port. (Use the Mouse/Com 2 port if you are connecting end of the PS/2 mouse cable or USB mouse cable included with the projector to the MOUSE terminal on the square end of the main cable. 3. Connect - Epson EMP 9000 | Owners Manual - Page 35
have to set the display to appear on both the laptop's screen and the projector. Some laptops let you change this setting with the keyboard's function keys or by using a setup utility provided by the computer manufacturer. Check your laptop's manual or online help for instructions. s s s s 14 - Epson EMP 9000 | Owners Manual - Page 36
(if you'll be projecting with audio) Follow the steps in each section for the cables you need to connect. Before beginning, turn off the projector and computer if they are on. ♦ Note: Macintosh configurations vary. See your computer manual for the location of the ports needed to connect your - Epson EMP 9000 | Owners Manual - Page 37
desktop adapter Computer 1 port Macintosh monitor adapter computer cable Macintosh monitor cable 1. Connect one end of the computer cable to the projector's Computer 1 port. (Use the Computer 2 port if you are connecting a second computer.) ♦ Note: If your computer output is a 5BNC type, use - Epson EMP 9000 | Owners Manual - Page 38
) and set its DIP switches in accordance with the resolution you want to use, such as 16-inch mode. See your Macintosh documentation for instructions. 3. Connect the small terminal of the Macintosh desktop adapter to the other end of the computer cable. 4. Disconnect the monitor cable from the video - Epson EMP 9000 | Owners Manual - Page 39
computer's monitor, attach the large end of the Macintosh monitor adapter to the monitor cable and connect the other end of the adapter to the projector's Computer Out port. 6. Tighten the screws on all the connectors. Connecting the Mouse and Serial Cables If you want to use the remote control as - Epson EMP 9000 | Owners Manual - Page 40
. Mouse/Com 1 port Mac serial cable Mac mouse cable (or USB mouse cable) main cable 1. Connect the small end of the main cable to the projector's Mouse/Com 1 port. (Use the Mouse/Com 2 port to connect a second computer.) s s s s s s Connecting to a Computer 19 - Epson EMP 9000 | Owners Manual - Page 41
mouse cable to the MOUSE terminal on the large end of the main cable. 3. Disconnect your Macintosh's mouse cable. Connect the other end of the projector's Mac mouse cable or USB mouse cable to the mouse port on your Macintosh. 4. To use the ELP Link IV software or use the Effects - Epson EMP 9000 | Owners Manual - Page 42
to the audio-out port on your computer. Connecting to a PowerBook Your PowerBook must have video-out capability in order to connect to the projector. To connect the projector to your PowerBook, you need to: • Connect the computer cable • Connect the mouse and/or serial cable (if you want to use the - Epson EMP 9000 | Owners Manual - Page 43
you need to connect. Before beginning, turn off the projector and computer if they are on. ♦ Note: PowerBook configurations vary, so the location of your computer's ports may not match the illustrations. See your PowerBook manual for the port locations if necessary. Connecting the Computer - Epson EMP 9000 | Owners Manual - Page 44
1. Connect one end of the computer cable to the projector's Computer 1 port. (Use the Computer 2 port the resolution you want to use (such as 16-inch mode). See your Macintosh documentation for instructions. 3. Connect the small terminal of the Macintosh desktop adapter to the other end of the video - Epson EMP 9000 | Owners Manual - Page 45
4. Connect the computer cable (with the Macintosh desktop adapter attached) to the video-out port on the PowerBook. If a video-out cable was provided with your PowerBook, connect the smaller end of the video-out cable to the videoout port on the back of the PowerBook. Connect the other end to the - Epson EMP 9000 | Owners Manual - Page 46
. Mouse/Com 1 port Mac serial cable Mac mouse cable (or USB mouse cable) main cable 1. Connect the small end of the main cable to the projector's Mouse/Com 1 port. (Use the Mouse/Com 2 port if you are connecting a second computer.) s s s s s s Connecting to a Computer 25 - Epson EMP 9000 | Owners Manual - Page 47
2. To use the remote control as a wireless mouse, connect one end of the projector's Mac mouse cable or USB mouse cable to the MOUSE terminal on the large end of the main cable. 3. Connect the other end of the - Epson EMP 9000 | Owners Manual - Page 48
Mirroring in the Display Control Panel if you set up your configuration to display on the LCD screen as well as the projector screen. Connecting to a High-End Workstation The EMP-9000/9000NL/8000/8000NL are capable of remapping input resolutions up to 1280 × 1024 pixels. Since 1280 × 1024 pixels - Epson EMP 9000 | Owners Manual - Page 49
(synchronization) signal differently, so the VGA-13W3 computer cable (Epson Recommended) has a DIP switch to control sync routing. Contact video source, and a component video source at the same time. The projector supports NTSC, PAL, and SECAM video formats, and automatically detects and identifies - Epson EMP 9000 | Owners Manual - Page 50
cable that came with your video source. 3. For Composite Video, connect the yellow RCA plug on one end of the RCA video cable to the projector's Video jack. Connect the other yellow RCA plug to the video-out jack of your video source. RCA audio cable RCA video cable s s s s s s Connecting to - Epson EMP 9000 | Owners Manual - Page 51
source. 5. For S-Video, insert one end of an S-Video cable into the projector's S-Video connector. Insert the other end into the S-video-out jack of your video source. 6. Connect the RCA audio cable to the Audio jacks of the projector: insert the white plug into the L jack and the red plug into the - Epson EMP 9000 | Owners Manual - Page 52
, which you can purchase from any computer store. The 5BNC video cable supplied by EPSON as an optional accessory does not work with component video. Connecting to an External Speaker or PA System Although the projector's internal speakers are enough for most small- or medium-size rooms, you can - Epson EMP 9000 | Owners Manual - Page 53
3. Connect the RCA plugs to the external amplified speaker or PA system. Insert the cable's red plug into the Audio R jack, and the white plug into the Audio L jack. ♦ Note: The internal speakers are disabled when an external audio system is used. s s s s 32 - Epson EMP 9000 | Owners Manual - Page 54
s 2 Using the Projector This chapter provides the following information about using your projector: • Turning the equipment on and off • Focusing and positioning the screen image • Controlling the projector with the remote control and the operation panel • Monitoring the projector's operating status - Epson EMP 9000 | Owners Manual - Page 55
The illustration below identifies the parts of your projector. operation panel speaker remoto control receiver operation indicator speaker foot adjust lever zoom ring focus ring front foot s s s s 34 - Epson EMP 9000 | Owners Manual - Page 56
the remote control or operation panel. The power indicator flashes green as the projector warms up. When the projector is fully warmed up, lamp is on. This can damage your eyes. It is especially important that children are not allowed to look into the lens. ♦ Caution: When turning the projector - Epson EMP 9000 | Owners Manual - Page 57
,press any button. The fan will remain on and the operation indicator will flash orange for about one minute as the projector cools down. operation indicator When the projector has cooled down, the operation indicator stops flashing and remains orange. ♦ Note: If you press the Power button - Epson EMP 9000 | Owners Manual - Page 58
Focusing and Positioning the Screen Image When an image appears on the screen, check that it is in focus and correctly positioned on the screen. zoom ring focus ring • To focus the image, rotate the focus ring (the outer ring on the lens). • To adjust the size of the image, rotate the inner zoom - Epson EMP 9000 | Owners Manual - Page 59
If you need to raise or lower the image on the screen, extend or retract the two feet at the bottom of the projector as follows: 1. Stand behind the projector and support the front of it while you lift the foot adjust levers above the feet. This unlocks the feet so they can move - Epson EMP 9000 | Owners Manual - Page 60
with images greater than 1024 × 768 (EMP-8000/8000NL) and 1366 × 1024 (EMP-9000/9000NL) : either project a portion of the image or project the entire image in a compressed format. The projector automatically reduces the image size to the projector's maximum resolution. The Resize button cannot be - Epson EMP 9000 | Owners Manual - Page 61
Controlling the Projector You can use the operation panel on top of the projector or the remote control to perform the following actions: • Turn power on or off • Auto set-up of the computer image • Switch between input images (Computer 1, Computer 2, video-computer) • Access the projector menus to - Epson EMP 9000 | Owners Manual - Page 62
and your computer. You can use the remote control up to 10 metres (30 feet) from the projector. ♦ Note: The projector may not respond to remote control commands in these conditions: ambient light is too bright; a certain type of fluorescent light is present; a strong light source ( - Epson EMP 9000 | Owners Manual - Page 63
. To display a portion of the enlarged image which is outside of the display area, press the Pointer button to scroll the image. Power Turns the projector on or off. Effect buttons Enter Use to display special effects that have been assigned in the Effect menu or with the optional ELP Link - Epson EMP 9000 | Owners Manual - Page 64
size : 1/9 division Main screen input source: Computer Subscreen input source : Video To change the subscreen position, press the Pointer button. The subscreen will move to the selected direction , Tracking, Sync Signal, Position. Adjusts the volume. s s s s s s Controlling the Projector 43 - Epson EMP 9000 | Owners Manual - Page 65
program and access the custom features only using the remote control. The following table summarizes the functions on the operation panel. Button Function Power Turns the projector on or off. Help Displays the Help menu. Menu Esc Displays the menu. Terminates the current function that you - Epson EMP 9000 | Owners Manual - Page 66
to adjust an image with vertical fuzzy lines, or to change numeric settings during menu operations. Selects a menu option. If you press the Enter can optimize the computer image. Turns off/on the audio/videio output of the projector. To turn on the audio/video output, press the A/V mute button again - Epson EMP 9000 | Owners Manual - Page 67
Status Indicators The power and lamp indicators at the top of the projector tell you its operating status. Operation Indicator Lamp Indicator Temperature Indicator ♦ Caution: A red indicator warns you if a serious problem occurs. See Chapter 6, "Troubleshooting," for what to do if a warning - Epson EMP 9000 | Owners Manual - Page 68
life and will not longer project images. Replace the projection lamp with a new one. Red Flashing There is a problem with the projection lamp, lamp power supply, lamp fuse, or a circuit malfunctioned in the projector. Temperature Indicator Displays the internal temperature condition. This - Epson EMP 9000 | Owners Manual - Page 69
s s s s 48 - Epson EMP 9000 | Owners Manual - Page 70
s s 3 Using the Projector Menus The eight projector menus let you to control your projector. • The Video menu controls remote control. • The Setting menu lets you select various projector options. • The User's Logo menu lets you select various projector options. • The About menu provides information - Epson EMP 9000 | Owners Manual - Page 71
To display the Main menu, press the Menu button on the operation panel or remote control. The Main menu appears: Press the Menu button again to hide the menu. Changing a Menu Setting To change a menu setting: 1. Press the Menu button on the operation panel or remote control to display the Main menu - Epson EMP 9000 | Owners Manual - Page 72
2. Press the up or down buttons (operation panel) or press the top or bottom of the Enter button (remote) to scroll through the menu 1 5 Tracking Freeze A/V Mute E-Zoom 3 2 Power R/C ON OFF 4 Enter Esc Shift Volume up and down buttons Enter button s s s s s s Changing a Menu Setting 51 - Epson EMP 9000 | Owners Manual - Page 73
3. Press either the Enter button (operation panel or remote) to display a submenu. Power Help Computer Video Menu image source is the computer or a video source. 4. Press the up or down buttons (operation panel) or the top or bottom of the Enter button (remote) to scroll through the menu - Epson EMP 9000 | Owners Manual - Page 74
6. When you have finished changing settings, press the Menu button again to hide the menu, or press the Esc to go back to the Main menu. Your changes are saved automatically. s s s s s s Changing a Menu Setting 53 - Epson EMP 9000 | Owners Manual - Page 75
projected image. The following options are available when the image source is Computer. ♦ Note: The computer must be connected and operating, and the image source on the projector must be set to Computer for you to access these menu options. Menu item Description Position Select this item by - Epson EMP 9000 | Owners Manual - Page 76
item by pressing the Enter button. The projector will enter color adjustment mode. Use the Enter button (remote) or the up and down buttons (operation panel) to select a color. Next, reset the menu. If you change your mind, select No and then press the Enter button to clear the confirmation - Epson EMP 9000 | Owners Manual - Page 77
image source must be set to Video, and the video source (such as a VCR or camcorder) must be connected and operating for you to access these menu options (for example, the projector must actually be projecting an image from a video tape, if you're using a VCR). Menu item Description Position - Epson EMP 9000 | Owners Manual - Page 78
screen. Next, select Yes and then press the Enter button to reset the menu. If you change your mind, select No and then press the Enter button to clear the confirmation screen without changing any settings. Audio Menu The Audio menu lets you make adjustments related to audio. Menu item - Epson EMP 9000 | Owners Manual - Page 79
mind, select No and then press the Enter button to clear the confirmation screen without changing any settings. Setting Menu The Setting menu lets you adjust or set the various projector options. Menu item Description Keystone Adjusts the trapezoid distorted image to normal. PinP Selects the - Epson EMP 9000 | Owners Manual - Page 80
lamp will be turnned on when the saving energy condition is canceled. Returns all menu items to their initial factory defaults. Select this item and then press the Enter button to display the confirmation screen. Next, select Yes and then press the Enter button to reset the menu. If you change your - Epson EMP 9000 | Owners Manual - Page 81
projector) you wish to use as a logo. 2. Press the Menu button to open the Menu window. 3. Select the User's Logo menu option by pressing the down arrow button on the operation Select Yes and press the Enter button. If you want to change the position, select No. 7. Next, the Zoom rate setting - Epson EMP 9000 | Owners Manual - Page 82
you can press the A/V Mute button on the operation panel or the remote control to display the user logo menus to their factory defaults. It does not change or delete any user logo you may have Advanced menu enables you to set various projector options. Menu item Description Language Selects the - Epson EMP 9000 | Owners Manual - Page 83
mouse control to the computer connected to the Mouse/Com 2 port only. Selecting 1 ↔ 2 tells the projector to automatically switch wireless mouse control whenever the input source computer is changed. Reset Returns all menu items to their initial factory defaults. Select this item and then press - Epson EMP 9000 | Owners Manual - Page 84
Image source = Computer or Component Video Menu item Description Lamp Displays the number of hours the current lamp has been used. The lamp light turns red when the projector lamp is near the end of its normal life. When this happens, replace the projector lamp with a new one as soon as possible - Epson EMP 9000 | Owners Manual - Page 85
s s s s 64 - Epson EMP 9000 | Owners Manual - Page 86
Using the ELP Link IV Software The ELP Link IV Software is a utility you can run from your desktop or laptop computer to control projector features and draw special graphics on your screen. You can also use the software to reconfigure the special effect buttons on the remote control. s s s s s s 65 - Epson EMP 9000 | Owners Manual - Page 87
Presentation support function The presentation support function allows you to perform realtime presentation effectively by a remote control shipped with the projector. Projector setting function The projector setting function allows you to control the projector from your computer. ♦ Note: See the - Epson EMP 9000 | Owners Manual - Page 88
be added for Acrobat Reader to work) • At least 6MB of free hard disk space for ELP Link IV installation (8MB to be added for Acrobat Reader and 3MB for User's Guide installation) • Double-speed CD-ROM drive (Quad-speed or faster recommended) • VGA or better monitor Using a Macintosh • 68000 series - Epson EMP 9000 | Owners Manual - Page 89
. ELP Link IV User's Guide Provides you with detailed information and instructions to use ELP Link IV. The User's Guide is provided in a PDF (Portable Document Format) file. To read this manual, Adobe Acrobat Reader must be installed. ♦ Note: A Portuguese User's Guide is not provided. Adobe - Epson EMP 9000 | Owners Manual - Page 90
the Cables When you are using the following EPSON projector, follow the instructions below. If not, please see the User's Guide packed with your projector. ♦ Caution: Before connecting the cables to your computer, make sure that the computer and projector are turned off and unplugged from any - Epson EMP 9000 | Owners Manual - Page 91
Using the serial mouse connect to the serial port connect to the printer port or modem port PC serial cable PC serial mouse cable connect to Mouse/Com Connecting to your Macintosh connect to the ADB port connect to the printer port or modem port Mac serial cable Mac mouse cable connect to - Epson EMP 9000 | Owners Manual - Page 92
Software on Your PC After connecting the projector to your PC, install the Windows-based projector software as described below. 1. Turn on the computer and start Windows. 2. Insert the EPSON Projector Software CD-ROM into the CD-ROM drive. The following dialog box appears. ♦ Note: If the dialog - Epson EMP 9000 | Owners Manual - Page 93
5. Check the displayed message, and then click Next. 6. The product license will be displayed. After reading it, click Yes if you agree to its terms and conditions. ♦ Note: If you do not agree to its terms and conditions, click No. Installation will be cancelled. s s s s 72 - Epson EMP 9000 | Owners Manual - Page 94
them carefully. 8. Click Next. The recommended installation location will be displayed, but you may install elsewhere if you wish. To specify a different installation location, click Browse, and select the desired directory from the dialog. s s s s s s Installing the Projector Software on Your PC 73 - Epson EMP 9000 | Owners Manual - Page 95
may enter a different folder name, or select one of the existing folders if you prefer. 10. This screen will be displayed when installation is complete. Click Finish. This completes the installation of ELP Link IV. If you placed a checkmark in the box next to Acrobat Reader in step 4 above, then the - Epson EMP 9000 | Owners Manual - Page 96
next to Acrobat Reader in step 4. Click Yes to install. 1. Follow the screen directions to install the software. ♦ Note: For details on launching ELP Link IV and using the application, please refer to your PDF User's Guide. (page xx) s s s s s s Installing the Projector Software on Your PC 75 - Epson EMP 9000 | Owners Manual - Page 97
Your Macintosh After connecting the projector to your Macintosh, install the Macintosh-based projector software as described below. 1. Turn on your Macintosh, then insert the EPSON Projector Software CD-ROM in the CD-ROM drive. 2. Double-click the ELP Link 4 Installer icon. The following dialog box - Epson EMP 9000 | Owners Manual - Page 98
unless you select ELP Link 4 in this step. The ELP Link PDF User's Guide cannot be used unless you install Acrobat Reader. 6. Select the drive and folder to install to. 7. Click the Install button, and installation will begin. s s s s s s Installing the Projector Software on Your Macintosh 77 - Epson EMP 9000 | Owners Manual - Page 99
. ♦ Note: This screen will only be displayed if you placed a checkmark in the box next to Acrobat Reader in step 4. 9. Follow the screen directions to install the software. ♦ Note: For details on launching ELP Link IV and using the application, please refer to your PDF User's - Epson EMP 9000 | Owners Manual - Page 100
Link 4 icon. User's Guide Open the DATA folder, then the English folder. Open the ELPLink4 folder, then double-click the User's Guide icon. ♦ Note: Make sure that Acrobat Reader is installed on your Macintosh before accessing the User's Guide. s s s s s s Accessing the Projector Software 79 - Epson EMP 9000 | Owners Manual - Page 101
Projector Software on the CD-ROM Directly When you install or access the software on the CD-ROM directly, follow the instructions below. For Windows users Select Explorer from your Start menu, and use Explorer for the following operations (for Windows NT). User's Guide (PDF) Open the DATA folder, then the ENGLISH - Epson EMP 9000 | Owners Manual - Page 102
will be copied with it. Acrobat Reader Open the DATA folder, then the English folder. Open the AR folder. Double-click the Installer icon. User's Guide (PDF) Copy the PDF file from the DATA folder to your hard disk. s s s s s s Installing or Accessing the Projector Software on the CD-ROM Directly 81 - Epson EMP 9000 | Owners Manual - Page 103
s s s s 82 - Epson EMP 9000 | Owners Manual - Page 104
keep it from overheating. The only parts you should replace are the lamp and air filter. If any other part needs replacing, contact your dealer or a qualified service person. ♦ Warning: Before you clean any part of the projector, turn off the projector and unplug the power cord. Never open any - Epson EMP 9000 | Owners Manual - Page 105
remove dirt or smears on the lens, moisten a soft cloth with an alcohol-based cleaner and gently wipe the lens surface. Cleaning the Projector Case To clean the projector case, first unplug the power cable. To remove dirt or dust, wipe the case with a soft, dry, lint-free cloth. To remove stubborn - Epson EMP 9000 | Owners Manual - Page 106
easily. ♦ Note: Standing the projector with the handle at the top keeps dust from getting inside the projector housing. 3. Pull up the filter or if the filter is torn, replace it. Contact your dealer or call EPSON Service Center. 5. Replace the filter cover when you're done. s s s - Epson EMP 9000 | Owners Manual - Page 107
your local EPSON dealer for a spare lamp. Request part number ELPLP08. ♦ Warning: Let the lamp cool before replacing it. Also, do not touch the glass portion of the lamp assembly. Touching the glass portion of the lamp will result in premature lamp failure. 1. Turn off the projector and unplug - Epson EMP 9000 | Owners Manual - Page 108
insert the new lamp unit by lowering it into position. Make sure it is inserted securely. 6. Tighten the screws you loosened in step 3. 7. Replace the lamp cover and tighten the cover screws. (Make sure the lamp cover is securely fastened. The projector turns itself off if the lamp cover is open - Epson EMP 9000 | Owners Manual - Page 109
s s s s 88 - Epson EMP 9000 | Owners Manual - Page 110
ss s s s s s s s s s 6 Troubleshooting This chapter describes the problems indicated by the warning lights and provides information on how to solve problems with the projector. It is divided into the following sections: • Problems with the projector. See this section if the projector is not working - Epson EMP 9000 | Owners Manual - Page 111
the power cord back in and turn on the projector. If this does not solve the problem, check the warning lights at the top of the projector. These lights alert you to problems with projector operation. Operation Indicator Lamp Indicator Temperature Indicator See the following pages for information - Epson EMP 9000 | Owners Manual - Page 112
you clean the air filter, the problem may be caused by damage to the cooling fan or internal circuits. Contact a qualified service person. ♦ Warning: Do not attempt to service this product yourself except as specifically explained in this User's Guide. s s s s s s Problems with the Projector 91 - Epson EMP 9000 | Owners Manual - Page 113
on the remote control or the operation panel to choose another image source. ❑ Only part of the computer image is displayed. If the computer's output resolution setting is higher than 1024 × 768 (EMP-8000/8000NL) or 1366 × 1024 (ΕΜP− 9000/9000ΝL), the projector resizes the image. If the computer - Epson EMP 9000 | Owners Manual - Page 114
is securely attached to both the projector and the audio source. Also, make sure that the Mute button is off. The wrong source is selected. Press either the Computer or Video button on the remote control or operation panel to select the proper source. s s s s s s Problems with the Image or Sound 93 - Epson EMP 9000 | Owners Manual - Page 115
s s s s 94 - Epson EMP 9000 | Owners Manual - Page 116
panels 1.3 inches (33.1 mm) Resolution EMP-8000/8000NL: 1024 (horizontal) x 768 (vertical) pixels EMP-9000/9000NL: 1366 (horizontal) x 1024 : vertical) Zoom ratio 1:1.4 * *standard lens Projector Lamp Type Power Part number UHE Lamp (Ultra High Efficiency Lamp) 220 W ELPLP08 s s s s s s - Epson EMP 9000 | Owners Manual - Page 117
- 240 VAC ± 10% 50/60 Hz 100 - 120 VAC, 4 A, 50/60 Hz 200 - 240 VAC, 2 A, 50/60 Hz Operation: 41 - 104˚ F (5 - 40˚ C), non-condensing Storage: 14 - 140˚ F (-10 - 60˚ C), non-condensing Operation: 20 - 80% RH, non-condensing Storage: 10 - 90% RH, non-condensing s s s s 96 Technical Specifications - Epson EMP 9000 | Owners Manual - Page 118
EMP-8000/8000NL) or 1366 × 1024pixels (EMP9000/9000NL). To display a higher resolution image, the projector compresses it to 1024 × 768 (EMP-8000/8000NL) or 1366 × 1024 (EMP-9000/9000NL). The following table lists the display formats supported by the projector 640 640 800 800 800 800 800 1024 1024 - Epson EMP 9000 | Owners Manual - Page 119
Format Mac Video SXGA3_85 *UXGA48I *UXGA60 *UXGA65 *UXGA70 *UXGA75 *UXGA80 *UXGA85 MACLC13 MAC16 MAC19-60 MAC19 MAC21 SDTV480P (ANSI/ SMPTE) SDTV480P (ATSC) SDTV480I (ANSI/ SMPTE) SDTV480I (ATSC) HDTV720P (SMPTE) *HDTV1080P (ANSI/ SMPTE) *HDTV1080I (ANSI/ SMPTE) NTSC PAL SECAM Hor Pix [Pixels] - Epson EMP 9000 | Owners Manual - Page 120
Monitor and Computer In 1/2 connector pin assignments The Monitor and Computer In 1/2 connectors are female video RGB, 15-pin micro-D-style connectors. The pin assignments are: Input pin Signal 1 Red analogue input 2 Green analogue input 3 Blue analogue input 4 GND 5 GND 6 Red GND 7 - Epson EMP 9000 | Owners Manual - Page 121
s s s s 100 Technical Specifications - Epson EMP 9000 | Owners Manual - Page 122
s s s s ss s s s s s s s s s Glossary Brightness. The balance of light and dark shades in an image. Composite video. A type of video signal that encodes colours, luminance and sychronization information so it can be carried in one signal. Contrast. A measure of the luminance differences between the - Epson EMP 9000 | Owners Manual - Page 123
Serial. A type of communication interface that transmits data over a single wire. s s s s 102 Glossary - Epson EMP 9000 | Owners Manual - Page 124
cooling 90 D DAR viii E Effect Menu 58 ELP Communication Cable Set ix ELP Link IV vii ELP Link IV Software xi ELP Link IV User's Guide 68 ELP Link IV utility 68 External Speaker 31 external speaker 1 F Format 97 G Glossary 101 H Hard Travel Case x I Image 92 - Epson EMP 9000 | Owners Manual - Page 125
Installing the Projector Software 71 M Mac NTSC 101 O operation indicator 34 operation panel 34 Optional Accessories ix P PA System 31 PA system 1 PAL 101 PC serial cable 2 pin assignments 99 Power cord 2 Projector ix Projector Software CD-ROM Treble 57 Troubleshooting xi, 89 s s s s 104 Index - Epson EMP 9000 | Owners Manual - Page 126
U USB mouse cable 2, 9 User's Logo Menu 59 V Video Source 28 video-out cable 22 Volume 57 W wireless mouse 1 Work Station Cable x Workstation 27 World Wide Web xiv s s s s s s 105 - Epson EMP 9000 | Owners Manual - Page 127
s s s s 106 Index - Epson EMP 9000 | Owners Manual - Page 128
World-Wide Warranty Terms The EPSON Multi-Media Projector you purchased includes Epson's World-Wide Warranty, which allows you to obtain repair service for your product outside the country where you purchased it in over 45 countries in the world. Please note that the terms stated in the - Epson EMP 9000 | Owners Manual - Page 129
as Lamps or optional equipment b.In case the product was damaged due to inappropriate use or failure to properly use in accordance with details of this manual, or transportation c.In case the product was repaired or modified by any party other than EPSON or an Epson-authorized servicer d.Problems - Epson EMP 9000 | Owners Manual - Page 130
Center Austria Tech. Help Desk: 0810 200129 Web Address: http://www.epson.at BELGIUM : EPSON Support Center BeNeLux Tech. Help Desk: 070 222083 Web Address: http://www.epson.be BULGARIA : PROSOFT 6. AI Jendov Str. BG-1113 Sofia Tel: 00359.2.730.231 Fax: 00359.2.9711049 E-mail: Prosoft@internet - Epson EMP 9000 | Owners Manual - Page 131
427 20099 Sesto San Giovanni (MI) Tech. Help Desk: 02.29400341 Web Address: http://www.epson.it LUXEMBURG : EPSON Support Center BeNeLux Tech. Help Desk: 0032 70 222083 Web Address: http://www.epson.be MACEDONIA : Rema Kompjuteri d.o.o. St. Naroden Front 19a lok 16 91000 Skopje/ Macedonia Tel: 00389 - Epson EMP 9000 | Owners Manual - Page 132
NETHERLANDS : EPSON Support Center BeNeLux Tech. Help Desk: 043 3515753 Web Address: http://www.epson.nl NORWAY : Tech. Help Desk: 800.11828 PORTUGAL : EPSON Portugal, S.A. Rua do Progresso, 471-1 Perafita- Apartado 5132 Tech. Help Desk: 0808 200015 Web Address: http://www.epson.pt POLAND : FOR EVER - Epson EMP 9000 | Owners Manual - Page 133
: Tech. Help Desk: 08 445 1258 SWITZERLAND : EXCOM Service AG Moosacher Str. 6 CH-8820 Wädenswil Tel: 01.7822111 Han TR-Karaköy-Istanbul Tel: 0090.212.2520809 Fax: 0090.212.2580804 UNITED KINGDOM : EPSON (UK) Ltd. Campus 100, Maylands Avenue Hemel Hempstead, Herts, HP2 7TJ Tech. Help Desk: 0990 - Epson EMP 9000 | Owners Manual - Page 134
, Ontario CANADA L4B IJ3 Tel: 905-709-3839 Web Address: http://www.epson.com MEXICO : Epson Mexico, S.A. de C.V. AV. Sonora #150 Mexico, 06100, DF Tel: (52 5) 328-4008 Web Address: http://www.epson.com.mx COSTA RICA : Epson Costa Rica, S.A. Embajada Americana, 200 Sur y 300 Oeste San Jose, Costa - Epson EMP 9000 | Owners Manual - Page 135
, Sao Paulo, SP 06460-020 Tel: (55 11) 7295-1757 Web Address: http://www.epson.com.br CHILE : Epson Chile S.A. La Concepcion 322 Providencia, Santiago Tel: (562) 236-2543 Web Address: http://www.epson.cl COLOMBIA : Epson Colombia Ltda. Diagonal 109, 15-49 Bogota, Colombia Tel: (57 1) 523-5000 Web - Epson EMP 9000 | Owners Manual - Page 136
Harbour Road, Wan Chai, HONG KONG Tech. Hot Line: (852) 2585 4399 Fax: (852) 2827 4383 Web Address: http://www.epson.com.hk JAPAN : SEIKO EPSON CORPORATION SHIMAUCHI PLANT VD Customer Support Group: 4897 Shimauchi, Matsumoto-shi, Nagano-ken, 390-8640 JAPAN Tel: 0263-48-5438 Fax: 0263-48-5680 KOREA - Epson EMP 9000 | Owners Manual - Page 137
s s s s 116 World-Wide Warranty Terms - Epson EMP 9000 | Owners Manual - Page 138
- Epson EMP 9000 | Owners Manual - Page 139
E Printed in Japan 75416242
-
 1
1 -
 2
2 -
 3
3 -
 4
4 -
 5
5 -
 6
6 -
 7
7 -
8
-
9
-
10
-
11
-
12
-
13
-
14
-
15
-
16
-
17
-
18
-
19
-
20
-
21
-
22
-
23
-
24
-
25
-
26
-
27
-
28
-
29
-
30
-
31
-
32
-
33
-
34
-
35
-
36
-
37
-
38
-
39
-
40
-
41
-
42
-
43
-
44
-
45
-
46
-
47
-
48
-
49
-
50
-
51
-
52
-
53
-
54
-
55
-
56
-
57
-
58
-
59
-
60
-
61
-
62
-
63
-
64
-
65
-
66
-
67
-
68
-
69
-
70
-
71
-
72
-
73
-
74
-
75
-
76
-
77
-
78
-
79
-
80
-
81
-
82
-
83
-
84
-
85
-
86
-
87
-
88
-
89
-
90
-
91
-
92
-
93
-
94
-
95
-
96
-
97
-
98
-
99
-
100
-
101
-
102
-
103
-
104
-
105
-
106
-
107
-
108
-
109
-
110
-
111
-
112
-
113
-
114
-
115
-
116
-
117
-
118
-
119
-
120
-
121
-
122
-
123
-
124
-
125
-
126
-
127
-
128
-
129
-
130
-
131
-
132
-
133
-
134
-
135
-
136
-
137
-
138
-
139
 |
 |
