Epson NX415 Quick Guide
Epson NX415 - Stylus Color Inkjet Manual
 |
UPC - 010343871717
View all Epson NX415 manuals
Add to My Manuals
Save this manual to your list of manuals |
Epson NX415 manual content summary:
- Epson NX415 | Quick Guide - Page 1
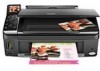
Epson Stylus® NX410 Series Quick Guide Basic Copying, Printing, and Scanning Maintenance Solving Problems - Epson NX415 | Quick Guide - Page 2
All Photos for Printing 17 Printing Photos From an Index Sheet 18 Memory Card Print Settings 20 Printing From Your Computer 21 Printing in Windows 21 Printing With a Macintosh 23 Selecting the Correct Paper Type 27 Scanning a Document or Photo 28 Basic Scanning 28 Restoring and Correcting - Epson NX415 | Quick Guide - Page 3
Maintaining Your Printer 30 Checking the Print Head Nozzles 30 Cleaning the Print Head 31 Checking Ink Levels 32 Purchasing Epson Ink Cartridges 32 Replacing Ink Cartridges 33 Solving Problems 36 Checking for Software Updates 36 Error Indicators 37 Problems and Solutions 38 Where to Get - Epson NX415 | Quick Guide - Page 4
printing from your computer ■ Scan a document or photo and restore or correct the color ■ Perform routine maintenance and solve simple problems This book tells you how to do most of these things without ever turning on your computer! For additional instructions, see the on-screen Epson Information - Epson NX415 | Quick Guide - Page 5
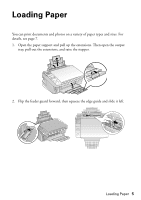
You can print documents and photos on a variety of paper types and sizes. For details, see page 7. 1. Open the paper support and pull up the extensions. Then open the output tray, pull out the extensions, and raise the stopper. 2. Flip the feeder guard forward, then squeeze the edge guide and slide - Epson NX415 | Quick Guide - Page 6
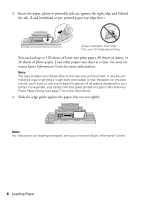
want to use one of Epson's special ink jet papers designed for your printer. For example, your photos will look great printed on Epson Ultra Premium Photo Paper Glossy (see page 7 for more information). 4. Slide the edge guide against the paper, but not too tightly. Note: For instructions on loading - Epson NX415 | Quick Guide - Page 7
creative projects. You can purchase genuine Epson ink and paper at Epson Supplies CentralSM at www.epson.com/ink3 (U.S. sales) or www.epson.ca (Canadian sales). You can also purchase supplies from an Epson authorized reseller. To find the nearest one, call 800-GO-EPSON (800-463-7766). Paper type - Epson NX415 | Quick Guide - Page 8
Paper type Epson Photo Quality Self-adhesive Sheets Epson Iron-on Cool Peel Transfer Paper Size A4 (8.3 × 11.7 inches) Letter (8.5 x 11 inches) Part number S041106 S041153 Sheet count 10 10 8 Loading Paper - Epson NX415 | Quick Guide - Page 9
a Document or Photo Follow the instructions in this section to position your originals correctly on the scanner glass and make color or black-and-white copies. Placing the Original on the Glass 1. Open the document cover and place your original face-down on the scanner glass, with the top facing - Epson NX415 | Quick Guide - Page 10
Epson printer. 2. Load letter- or A4-size plain paper or Epson special paper in the sheet feeder (see page 5). 3. Place your original document on the scanner cropping may occur). Note: You cannot print borderless on plain paper. 9. To change any other print settings, press Menu and select your - Epson NX415 | Quick Guide - Page 11
turn on your Epson printer. 2. Load 4 × 6-inch, 5 × 7-inch, letter-size, or A4-size Epson special paper in the sheet feeder (see page 5). 3. Place your original photo on the scanner glass (see page 9). 4. Press the Copy button. 5. Flip up the LCD display screen, if necessary. 6. To print more than - Epson NX415 | Quick Guide - Page 12
software on your computer. 1. Press the P On button to turn on your Epson printer. 2. Load 4 × 6-inch, 5 × 7-inch, letter-size, or A4-size Epson special paper. 3. Place your original photo on the scanner your photo, press OK. 9. To change print settings, press Menu and select your settings (see - Epson NX415 | Quick Guide - Page 13
Photo Paper Glossy Epson Photo Paper Glossy Paper Type setting Plain Paper Matte Prem. Glossy Ultra Glossy Photo Paper ■ To change the paper size, select Paper Size and choose the size you loaded. Note: Paper Size options depend on the Paper Type you choose. ■ To change the print quality, select - Epson NX415 | Quick Guide - Page 14
; just insert it into one of the memory card slots and you're ready to print. See the on-screen Epson Information Center for instructions on copying memory card files between your printer and a computer; printing photos by date; printing photos from a slideshow; printing photos directly from your - Epson NX415 | Quick Guide - Page 15
standard Inserting the Card 1. Make sure your Epson printer is turned on. 2. Insert your card into the correct slot as shown: Insert just one card at a time (it won't go screen and print them (page 16) ■ Print an index sheet so you can select which photos to print (see page 18) Inserting the Card - Epson NX415 | Quick Guide - Page 16
Epson printer while the memory card access light is flashing; you may lose data on the card. Selecting Individual Photos for Printing You can select individual photos for printing View and Print Photos. 3. Press l or r to move through your photos and display one that you want to print. 4. Press - Epson NX415 | Quick Guide - Page 17
You can quickly select all of the photos on your memory card for printing. 1. Press the Memory Card button, press l or r to select Print All Photos, then press OK. 2. To print one copy of all the photos on 4 × 6-inch Epson photo paper (various types available), press x Start and go to step 5. To - Epson NX415 | Quick Guide - Page 18
photos on your memory card. Then you can select the photos you want by marking them on the sheet and scanning the sheet. Your Epson printer automatically prints them. Printing an Index Sheet 1. Load several sheets of plain letter- or A4-size paper (see page 5). 2. Insert a memory card in a memory - Epson NX415 | Quick Guide - Page 19
indicate how many copies you want of that photo. To print one copy of all the photos on the index sheet, fill in the All circle at the top. 2. Open the document cover. Then place the index sheet face-down on the scanner glass, in the lower right corner so that the top - Epson NX415 | Quick Guide - Page 20
done, press OK. 6. Press OK, then press x Start to start scanning and printing. Wait until printing finishes before printing from any additional index sheets. If you need to cancel printing, press y Stop/Clear Settings. Memory Card Print Settings Press the Menu button to change settings. When you're - Epson NX415 | Quick Guide - Page 21
or document stored on your Windows or Macintosh computer. For detailed instructions on printing, see the on-screen Epson Information Center. Before you start, make sure you've installed your printer software and connected your Epson printer to your computer as described on the Start Here sheet. Tip - Epson NX415 | Quick Guide - Page 22
, click the Shortcuts tab and select one of the presets. You can create print double-sided, click the Page Layout tab and select settings as necessary. 6. For more printing options, click the Advanced tab. Note: For more information about print settings, click Help or see your on-screen Epson - Epson NX415 | Quick Guide - Page 23
the section below for your Mac OS® operating system. Mac OS X 10.5 1. Open a photo or document in an application. 2. Open the File menu and select Print. 3. Select your Epson printer as the Printer setting. Select your Epson printer Click to expand 4. Click the arrow to expand the - Epson NX415 | Quick Guide - Page 24
setting with a Sheet Feeder - Borderless option. Note: If the setting you want isn't shown (for example, Scale), check for it in your application before printing. Or check for it in the settings for your application at the bottom of this window. Copy and page settings Application settings 6. Choose - Epson NX415 | Quick Guide - Page 25
application. 2. Open the File menu and select Page Setup. Select the following settings: Select your Epson printer Select your Paper Size Select your document or image orientation For borderless printing, choose a Paper Size setting with a Sheet Feeder - Borderless option. 3. Click OK to close the - Epson NX415 | Quick Guide - Page 26
, you may need to select Advanced before you can select Print Settings. For more information about printer settings, click the ? button. 5. Choose any other printing options you may need from the pop-up menu. See your on-screen Epson Information Center for details. 6. Click the Advanced button to - Epson NX415 | Quick Guide - Page 27
. Pause or resume printing Cancel printing Select the print job Selecting the Correct Paper Type Select the correct Type (see page 22) or Media Type (see page 26) setting in your printer software. This tells your Epson printer what kind of paper you're using, so the ink coverage can be adjusted - Epson NX415 | Quick Guide - Page 28
of tools. Note: For detailed scanning instructions, see the on-screen Epson Information Center. Basic Scanning You can scan original documents and photos and save them as files on your computer using the Epson Scan software. You can also launch Epson Scan from any TWAIN-compliant application, such - Epson NX415 | Quick Guide - Page 29
Office, or Professional Mode, you see a different Epson Scan window.) 5. If you want to restore faded color in a photo or make other corrections, click Customize. Then follow the instructions in the next section. 6. Click the Scan button. The image is scanned and you see its icon in Windows Explorer - Epson NX415 | Quick Guide - Page 30
Maintaining Your Printer Follow the instructions in this chapter for checking and cleaning the print head nozzles and replacing ink cartridges. To align the print head, if necessary, see your on-screen Epson Information Center. Caution: To keep your Epson printer looking like new, don't place - Epson NX415 | Quick Guide - Page 31
If you don't see any improvement after cleaning the print head four times, turn off your Epson printer and wait at least six hours to let any dried ink soften. Then try cleaning the print head again. If quality does not improve, one of the ink cartridges may need to be replaced. If that doesn't help - Epson NX415 | Quick Guide - Page 32
to print when ink is low. This window can optionally display ink offers and other updates from Epson. Note: To disable checking for ink offers or updates from Epson, see the instructions in your on-screen Epson Information Center. Purchasing Epson Ink Cartridges You can purchase genuine Epson ink - Epson NX415 | Quick Guide - Page 33
are vacuum packed to maintain reliability. Note: Leave the expended cartridge installed until you have obtained a replacement, or the ink remaining in the print head nozzles may dry out. 1. Turn on your Epson printer. 2. If an ink cartridge is expended, you see a message on the LCD display screen - Epson NX415 | Quick Guide - Page 34
remove the cartridge from the package. Caution: Do not touch the green chip on the front of the cartridge. This can damage the ink cartridge. 6. Remove the yellow tape from the bottom of the ink cartridge. Caution: Do not remove any other labels or seals, or ink may leak. 34 Maintaining Your Printer - Epson NX415 | Quick Guide - Page 35
turn off your Epson printer while ink is charging or you'll waste ink. If you see an ink replacement message on the display screen, press OK and press down all the cartridges securely. Then press OK again. Note: If you replaced a cartridge while copying a document or photo, cancel printing and make - Epson NX415 | Quick Guide - Page 36
your NX410 Series software. Open your on-screen Epson Information Center and select Download the Latest Software or visit Epson's support website at epson.com/support (U.S.) or epson.ca/support (Canada). With Windows, you can select Driver Update on the Maintenance tab in the printer settings window - Epson NX415 | Quick Guide - Page 37
could be recognized. Make sure photos are positioned correctly. See your manual. Make sure your photo is placed correctly on the scanner glass (see page 9). A printer error has occurred. Turn off the printer and turn it on again. Please see your documentation. Turn your Epson printer off, make - Epson NX415 | Quick Guide - Page 38
are at the end of their service life. Contact Epson for help (see page 40). The printer's ink pads are at the end of their service life. Contact Epson Support. Cannot recognize the memory card or disk. The memory card is not inserted correctly or there is a problem with the card. Remove it and - Epson NX415 | Quick Guide - Page 39
loaded matches the paper size and paper type settings on the control panel or in your printer software (see page 27). ■ For the best print quality, use Epson special paper (see page 7) and genuine Epson ink cartridges (see page 32). ■ If you notice light or dark bands across your printouts or they - Epson NX415 | Quick Guide - Page 40
to common problems. You can download drivers and documentation, get FAQs and troubleshooting advice, or e-mail Epson with your questions. Speak to a Support Representative Before you call Epson for support, please have the following information ready: ■ Product name (Epson Stylus NX410 Series - Epson NX415 | Quick Guide - Page 41
in all directions. It will not operate properly if it is tilted or at an angle. ■ Make sure the back of the printer is at least 4 inches (10 cm) away from the wall. ■ Do not open the scanner section while the NX410 Series is copying, printing, or scanning. ■ Do not spill liquid on the - Epson NX415 | Quick Guide - Page 42
your hand inside the printer or touch any cartridges during printing. ■ Install a new ink cartridge immediately after removing an expended one. Leaving cartridges uninstalled can dry out the print head and may prevent the printer from printing. ■ If you remove an ink cartridge for later use, protect - Epson NX415 | Quick Guide - Page 43
installation. This equipment generates, uses, and can radiate radio frequency energy and, if not installed and used in accordance with the instructions interface cable with this device. If this equipment has more than one interface connector, do not leave cables connected to unused interfaces. - Epson NX415 | Quick Guide - Page 44
or CPU Boards and Power Supplies used with Class B Personal Computers: We: Located at: Epson America, Inc. MS 3-13 3840 Kilroy Airport Way Long Beach, CA 90806 Telephone: ( that may cause undesired operation. Trade Name: Epson Type of Product: Multifunction printer Model: C351C 44 Notices - Epson NX415 | Quick Guide - Page 45
Will Do To Correct Problems: Should your Epson printer prove defective during the warranty period, please call the Epson ConnectionSM at (562) 276-4382 (U.S.) or (905) 709-3839 (Canada) for warranty repair instructions and return authorization. An Epson service technician will provide telephone - Epson NX415 | Quick Guide - Page 46
with non-Epson products, or service other than by an Epson Authorized Servicer. If a claimed defect Epson Authorized Reseller nearest you, visit our website at: http://www.epson.com. To find the Epson Customer Care Center nearest you, visit http://www.epson.com/support. You can also write to: Epson - Epson NX415 | Quick Guide - Page 47
or alterations to this product, or (excluding the U.S.) failure to strictly comply with Seiko Epson Corporation's operating and maintenance instructions. Seiko Epson Corporation shall not be liable for any damages or problems arising from the use of any options or any consumable products other than - Epson NX415 | Quick Guide - Page 48
CPD-27264 Printed in XXXXXX
-
 1
1 -
 2
2 -
 3
3 -
 4
4 -
 5
5 -
 6
6 -
 7
7 -
8
-
9
-
10
-
11
-
12
-
13
-
14
-
15
-
16
-
17
-
18
-
19
-
20
-
21
-
22
-
23
-
24
-
25
-
26
-
27
-
28
-
29
-
30
-
31
-
32
-
33
-
34
-
35
-
36
-
37
-
38
-
39
-
40
-
41
-
42
-
43
-
44
-
45
-
46
-
47
-
48
 |
 |
Epson Stylus
NX410 Series
Quick Guide
Basic Copying, Printing, and Scanning
Maintenance
Solving Problems
®