Eufy Video Smart Lock S330 Video_Smart_Lock_manual_us
Eufy Video Smart Lock S330 Manual
 |
View all Eufy Video Smart Lock S330 manuals
Add to My Manuals
Save this manual to your list of manuals |
Eufy Video Smart Lock S330 manual content summary:
- Eufy Video Smart Lock S330 | Video_Smart_Lock_manual_us - Page 1
Innovations Limited. All rights reserved. eufy Security and eufy Security Logo are trademarks of Anker Innovations Limited, registered in the United States and other countries. All other trademarks are the property of their respective owners. T8530 51005003294 V01 Video Smart Lock QUICK START GUIDE - Eufy Video Smart Lock S330 | Video_Smart_Lock_manual_us - Page 2
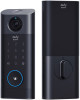
01 EN eufy Security Video Smart Lock Model: T8530 Fingerprint Scanner: Use to lock and unlock the door. ❹ Battery Indicator: Turns red when the battery is low. ❺ Camera Lens Microphone ❻ Ambient Light Sensor: Detects the amount of light. IR LED Keypad Status Light & Lock and Unlock - Eufy Video Smart Lock S330 | Video_Smart_Lock_manual_us - Page 3
How To Open / Close Lock Cylinder Cover 03 EN ❶ ❸ ❷ ❹ ❺ ❻ Battery Serial Number QR Code SYNC Button: Press and hold to pair with the doorbell chime. Thumbturn Screw Hole EN 04 - Eufy Video Smart Lock S330 | Video_Smart_Lock_manual_us - Page 4
COMPATIBLE DOORS Backset 2⅜" / 60 mm or 2¾" / 70 mm Minimum Distance 2⅜" / 60 mm Door Hole Diameter 1" / 25 mm MicroSD Card Slot: To store video recordings, insert a storage card (sold separately) Reset Hole SYNC Button * Also sold as Wi-Fi bridge 05 EN Cross Bore Diameter 1 ½" / 38 mm 2 ⅛" / 54 - Eufy Video Smart Lock S330 | Video_Smart_Lock_manual_us - Page 5
INSTALLING VIDEO SMART LOCK What You Need » Step 1. Deadbolt Installation Set A B » Step 2. Strike Plate Installation Set C D E F 07 EN » Step 3. Exterior Assembly G » Step 4. Interior Assembly Installation Set H I J K L M EN 08 - Eufy Video Smart Lock S330 | Video_Smart_Lock_manual_us - Page 6
Step 1. Install Deadbolt 1. Check your door to see if the deadbolt requires adjuestment. Backset Latch Hole 2-3/8 2⅜" / 60 mm 180° If the backset is 70 mm, turn the faceplate 180° to extend the length. 2-3/4 2¾" / 70 mm ❶ ❷ ❸ 09 EN ❹ If the latch hole is round, contact customer service to - Eufy Video Smart Lock S330 | Video_Smart_Lock_manual_us - Page 7
Step 2. Install Strike Plate Step 3. Install Exterior Assembly Option 1 C D E F If you have a 38mm cross bore, remove the spacer before installation. Cross bore diameter 1 ½" or 38 mm Option 2: Add the strike reinforcer for more security. 11 EN C D E F C D E F EN 12 - Eufy Video Smart Lock S330 | Video_Smart_Lock_manual_us - Page 8
Step 4. Install Interior Assembly 1. Detach the back cover from the interior assembly. 13 EN 2. Run the wires through the back cover. 3. Secure the back cover with screws. H I J Tightly fasten the screws H in place. Set the screws with your hands, then use a screwdriver to secure them. - Eufy Video Smart Lock S330 | Video_Smart_Lock_manual_us - Page 9
4. (Optional) If the back cover is not fastened tightly to the door, use the additional screw provided. 5. Wire to the interior assembly. H I J K 15 EN Upside Down EN 16 - Eufy Video Smart Lock S330 | Video_Smart_Lock_manual_us - Page 10
6. Mount the interior assembly. Make sure both wires are tucked into the cabin on the back of the interior assembly. H I J K 17 EN Check if the deadbolt retracts by turning the thumbturn EN 18 - Eufy Video Smart Lock S330 | Video_Smart_Lock_manual_us - Page 11
19 EN 7. Fully charge the battery before first use. It might take about 6 hours. L M LED Indicator Red: Charging Blue: Fully Charged L M EN 20 - Eufy Video Smart Lock S330 | Video_Smart_Lock_manual_us - Page 12
UP THE SYSTEM 1. Download and install the eufy Security app, then sign up for an account. ❹ ❺ 21 EN 2. Follow on-screen instructions to add the doorbell chime first, and then the smark lock to your device list. OPTION 2 Wi-Fi Bridge&Doorbell Chime Video Smart Lock 1 doorbell chime can link - Eufy Video Smart Lock S330 | Video_Smart_Lock_manual_us - Page 13
BATTERY IS REPLACED BY AN INCORRECT TYPE. DISPOSE OF USED BATTERIES ACCORDING TO THE INSTRUCTIONS installation. This equipment generates uses and can radiate radio frequency energy and, if not installed and used in accordance with the instructions LIFE, service, or the shop where you bought this - Eufy Video Smart Lock S330 | Video_Smart_Lock_manual_us - Page 14
DESCRIPCIÓN GENERAL ❶ ❷ ❸ ❹ ❺ ❻ ❻ ❼ ❽ ❾ ❿ 26 ES eufy Security Video Smart Lock Modelo: T8530 Escáner de huellas dactilares: Úselo para cerrar y abrir la puerta. Indicador de batería: Se vuelve rojo cuando el nivel de batería es - Eufy Video Smart Lock S330 | Video_Smart_Lock_manual_us - Page 15
Cómo abrir y cerrar la tapa del cilindro de la cerradura 28 ES ❶ ❸ ❷ ❹ ❺ ❻ Batería Número de serie Código QR Botón de sincronización: Manténgalo pulsado para emparejarlo con el timbre de la puerta. Pestillo giratorio Orificio para el tornillo ES 29 - Eufy Video Smart Lock S330 | Video_Smart_Lock_manual_us - Page 16
Puente de acceso wifi y timbre de puerta* Modelo: T8021 ❸ ❶ ❷ PUERTAS COMPATIBLES Profundidad de la cerradura 2⅜" / 60 mm or 2¾" / 70 mm Distancia mínima 2⅜" / 60 mm Diámetro de orificio de la puerta 1" / 25 mm Ranura para tarjeta MicroSD: Para guardar las grabaciones de vídeo, inserte una - Eufy Video Smart Lock S330 | Video_Smart_Lock_manual_us - Page 17
INSTALACIÓN DEL VIDEO SMART LOCK Qué necesita » PASO 1. Kit de montaje de cerrojo A B » PASO 2. Kit de montaje de placa protectora » PASO 3. Panel exterior G » PASO 4. Kit de montaje de pieza interior H I J K C D E F 32 ES L M ES 33 - Eufy Video Smart Lock S330 | Video_Smart_Lock_manual_us - Page 18
PASO 1. Montaje del cerrojo 1.Revise la puerta para comprobar si debe ajustarse el cerrojo. Profundidad de la cerradura Espacio para el bombín 2-3/8 2⅜" / 60 mm 180° Si la profundidad de la cerradura es de 70 mm, gire la placa frontal 180° para agrandarla. 2-3/4 2¾" / 70 mm ❶ ❷ ❸ 34 ES ❹ Si el - Eufy Video Smart Lock S330 | Video_Smart_Lock_manual_us - Page 19
PASO 2. Instalación de la placa protectora Opción 1 C D E PASO 3. Instalación de la pieza exterior F Cross bore diameter 1 ½" or 38 mm Si el orificio transversal es de 38 mm, retire el separador antes de montarla. 36 ES Opción 2 Ponga la placa de refuerzo para que la sujeción sea mayor. C - Eufy Video Smart Lock S330 | Video_Smart_Lock_manual_us - Page 20
PASO 4. Instalación de la pieza interior 1.Quite la tapa trasera de la pieza interior. 2.Pase los cables por la tapa trasera. 3.Atornille la tapa trasera. H I J Apriete bien los tornillos. H Enrosque los tornillos con las manos y luego use un destornillador para fijarlos bien. I 38 ES - Eufy Video Smart Lock S330 | Video_Smart_Lock_manual_us - Page 21
4. (Opcional) Si la tapa trasera no está bien sujeta a la puerta, use el tornillo adicional incluido. 5. Conecte el cable a la pieza interior. H I J K 40 ES Posición al revés ES 41 - Eufy Video Smart Lock S330 | Video_Smart_Lock_manual_us - Page 22
6. Mount the interior assembly. Make sure both wires are tucked into the cabin on the back of the interior assembly. H I J K 42 ES Compruebe que el cerrojo se mueve al girar el pasador ES 43 - Eufy Video Smart Lock S330 | Video_Smart_Lock_manual_us - Page 23
44 ES 7. Cargue la batería del todo antes del primer uso. Puede tardar unas 6 horas. L M Indicador LED Rojo: Cargando Azul: Carga completa L M ES 45 - Eufy Video Smart Lock S330 | Video_Smart_Lock_manual_us - Page 24
e instale la aplicación eufy Security y regístrese para disponer de una cuenta. ❹ ❺ 46 ES 2.Siga las instrucciones en pantalla para añadir primero el sonido del timbre y luego la cerradura inteligente a la lista de dispositivos. OPTION 2 Wi-Fi Bridge&Doorbell Chime Video Smart Lock Un - Eufy Video Smart Lock S330 | Video_Smart_Lock_manual_us - Page 25
6 AVISO Equipo de clase II Advertencia - si cambia una batería por otra incorrecta, se podría anular la protección; - si tira la batería al fuego o la pone en un horno caliente, o si la aplasta o corta por medios mecánicos, podría provocar una explosión; - si deja una pila en una zona con una - Eufy Video Smart Lock S330 | Video_Smart_Lock_manual_us - Page 26
APERÇU 49 FR eufy Security Video Smart Lock Modèle : T8530 Lecteur d'empreintes digitales : utilisez-le pour verrouiller et ❹ déverrouiller la porte. Témoin de batterie : devient rouge lorsque la batterie est faible. ❺ Objectif de la caméra ❻ Microphone Détecteur de lumière ambiante : - Eufy Video Smart Lock S330 | Video_Smart_Lock_manual_us - Page 27
Comment ouvrir/fermer le couvercle du barillet de serrure 51 FR ❶ ❸ ❷ ❹ ❺ ❻ Batterie Numéro de série Code QR Bouton SYNC : maintenez enfoncé pour coupler avec le carillon de la sonnette. Barrette tournante Trou de vis FR 52 - Eufy Video Smart Lock S330 | Video_Smart_Lock_manual_us - Page 28
Pont Wi-Fi et carillon de sonnette* Modèle : T8021 ❸ ❶ ❷ PORTES COMPATIBLES Support 2⅜" / 60 mm or 2¾" / 70 mm Distance minimale 2⅜" / 60 mm Diamètre de baie de porte 1" / 25 mm Logement pour carte MicroSD : pour stocker des enregistrements - Eufy Video Smart Lock S330 | Video_Smart_Lock_manual_us - Page 29
INSTALLATION DE LA SERRURE VIDÉO INTELLIGENTE Éléments requis » ÉTAPE 1. Kit d'installation de pêne dormant A B » ÉTAPE 2. Kit d'installation de gâche C D E F 55 FR » ÉTAPE 3. Montage extérieur G » ÉTAPE 4. Kit d'installation d'ensemble intérieur H I J K L M FR 56 - Eufy Video Smart Lock S330 | Video_Smart_Lock_manual_us - Page 30
Trou de la serrure 2-3/8 2⅜" / 60 mm 180° Si le support est de 70 mm, tournez la façade de 180° pour augmenter la longueur. 2-3/4 2¾" / 70 mm ❶ ❷ ❸ 57 FR ❹ Si le trou de la serrure est rond, contactez le service client pour recevoir une plaque frontale ronde et remplacer la plaque existante - Eufy Video Smart Lock S330 | Video_Smart_Lock_manual_us - Page 31
la gâche ÉTAPE 3. Installer l'ensemble extérieur Option 1 C D E F Si vous avez un alésage transversal de 38 mm, retirez l'entretoise avant l'installation. Cross bore diameter 1 ½" or 38 mm 59 FR Option 2 : ajoutez le renfort de butée pour plus de sécurité. C D E F C D E F FR - Eufy Video Smart Lock S330 | Video_Smart_Lock_manual_us - Page 32
ÉTAPE 4. Installer l'ensemble intérieur 1.Détachez le capot arrière de l'ensemble intérieur. 2.Faites passer les fils à travers le capot arrière. 3.Fixez le capot arriè - Eufy Video Smart Lock S330 | Video_Smart_Lock_manual_us - Page 33
4. (Facultatif) Si le capot arrière n'est pas solidement fixé à la porte, utilisez la vis supplémentaire fournie. 5. Câblez à l'ensemble intérieur. H I J K 63 FR La tête en bas FR 64 - Eufy Video Smart Lock S330 | Video_Smart_Lock_manual_us - Page 34
6. Mount the interior assembly. Make sure both wires are tucked into the cabin on the back of the interior assembly. H I J K 65 FR Vérifiez si le pêne dormant se rétracte en tournant le bouton FR 66 - Eufy Video Smart Lock S330 | Video_Smart_Lock_manual_us - Page 35
67 FR 7. Chargez complètement la batterie avant la première utilisation. Cela peut prendre environ 6 heures. L M Voyant LED Rouge : en charge Bleu : charge terminée L M FR 68 - Eufy Video Smart Lock S330 | Video_Smart_Lock_manual_us - Page 36
l'application eufy Security, puis inscrivez-vous pour obtenir un compte. ❹ ❺ 69 FR 2.Suivez les instructions à l'écran pour ajouter d'abord le carillon de la sonnette, puis la serrure intelligente à votre liste d'appareils. OPTION 2 Wi-Fi Bridge&Doorbell Chime Video Smart Lock 1 carillon - Eufy Video Smart Lock S330 | Video_Smart_Lock_manual_us - Page 37
ou une fuite de liquide ou de gaz inflammable. ATTENTION : IL EXISTE UN RISQUE D'EXPLOSION SI LA BATTERIE EST REMPLACÉE PAR UN MODÈLE INAPPROPRIÉ. JETEZ LES BATTERIES USAGÉES CONFORMÉMENT AUX INSTRUCTIONS Classe de protection IP du modèle T8530 : IP65 pour l'ensemble extérieur, IPX0 pour l'ensemble - Eufy Video Smart Lock S330 | Video_Smart_Lock_manual_us - Page 38
) United Kingdom +44 (0) 1604 936 200 Mon-Sun 6:00-19:00 Germany +49 (0) 69 9579 7960 Mo-Fr 8:00-16:00 Sa 9:00-16:00 [email protected] @EufyOfficial @EufyOfficial @EufyOfficial Anker Innovations Limited Room 1318-19, Hollywood Plaza, 610 Nathan Road, Mongkok, Kowloon, Hong Kong
-
 1
1 -
 2
2 -
 3
3 -
 4
4 -
 5
5 -
 6
6 -
 7
7 -
8
-
9
-
10
-
11
-
12
-
13
-
14
-
15
-
16
-
17
-
18
-
19
-
20
-
21
-
22
-
23
-
24
-
25
-
26
-
27
-
28
-
29
-
30
-
31
-
32
-
33
-
34
-
35
-
36
-
37
-
38
 |
 |

Anker Innovations Limited. All rights reserved. eufy Security and eufy Security Logo
are trademarks of Anker Innovations Limited, registered in the United States and
other countries. All other trademarks are the property of their respective owners.
T8530
51005003294
V01
Video Smart Lock
QUICK START GUID
E