Fisher and Paykel DE7027P2 User Guide
Fisher and Paykel DE7027P2 Manual
 |
View all Fisher and Paykel DE7027P2 manuals
Add to My Manuals
Save this manual to your list of manuals |
Fisher and Paykel DE7027P2 manual content summary:
- Fisher and Paykel DE7027P2 | User Guide - Page 1
AeroCare clothes dryer Installation instructions and User guide US - Fisher and Paykel DE7027P2 | User Guide - Page 2
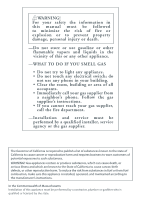
WARNING! For your safety the information in this manual must be followed to minimize the risk of fire the gas supplier's instructions. • If you cannot reach your gas supplier, call the fire department. -Installation and service must be performed by a qualified installer, service agency or the gas - Fisher and Paykel DE7027P2 | User Guide - Page 3
for your dryer Before you call for service User warnings Fault codes Solving operating problems Solving drying problems Limited warranty How to get service 1 2 3 7 48 50 52 54 56 61 63 66 68 69 70 71 73 76 76 77 80 82 84 Important! SAVE THESE INSTRUCTIONS The models shown in this User Guide may - Fisher and Paykel DE7027P2 | User Guide - Page 4
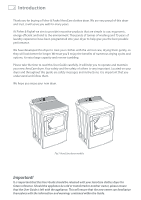
Fisher & Paykel AeroCare clothes dryer. We are very proud of this dryer and trust it will serve you well for many years. At Fisher & Paykel AeroCare dryer. Your safety and the safety of others is very important. Located on your dryer and throughout this guide are safety messages and instructions; - Fisher and Paykel DE7027P2 | User Guide - Page 5
at all times to ensure you and your family are not harmed while operating your dryer. It is important to always act with caution and use common sense when operating your dryer. Use only as instructed by the User Guide. This is the safety alert symbol. This symbol alerts you to hazards that can - Fisher and Paykel DE7027P2 | User Guide - Page 6
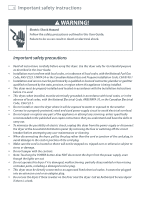
■■ Read all instructions carefully before using this dryer. Use this dryer only for its intended purpose as described in this User Guide. ■■ Installation or replace any part of the appliance or attempt any servicing, unless specifically recommended in the published user repair instructions that you - Fisher and Paykel DE7027P2 | User Guide - Page 7
time you use the dryer, before or after each load. ■■ The dryer must be exhausted to the outside. Carefully follow the exhausting and venting details in the Installation Instructions. ■■ The interior of the appliance and the exhaust duct should be cleaned periodically by qualified service personnel. - Fisher and Paykel DE7027P2 | User Guide - Page 8
be placed directly in the dryer. Damage to the dryer can result if the metal reinforcements come loose during drying. If you wish to dry these items use the drying rack supplied with your dryer. ■■ BEFORE THE APPLIANCE IS REMOVED FROM SERVICE OR DISCARDED, REMOVE THE DOOR. SAVE THESE INSTRUCTIONS - Fisher and Paykel DE7027P2 | User Guide - Page 9
injury or death, follow all installation instructions. SAVE THESE INSTRUCTIONS Before you begin Read the important safety instructions on the inside cover and on pages 3 - 6 before you start installing the dryer. Check to make sure you have all the tools and parts necessary to correctly install this - Fisher and Paykel DE7027P2 | User Guide - Page 10
(1.5 m) long. To the installer Read these instructions completely and carefully. ■■ These instructions must be left with the home owner for future The dryer must be exhausted to the outdoors. ■■ Remove the door from an old dryer before it is removed and discarded. ■■ The wiring diagram and service - Fisher and Paykel DE7027P2 | User Guide - Page 11
9 Unpacking To ensure the best performance from the dryer, please follow the instructions below. WARNING! Excess Weight Hazard Use two or more people to move and install the dryer. Failure to do so can result in back or other injury. Important! Only remove the packaging at the customer's premises - Fisher and Paykel DE7027P2 | User Guide - Page 12
instructions Location requirements WARNING! Explosion Hazard Keep flammable materials and vapors, such as gasoline, away from the dryer. Place dryer at least 18" (460 mm) above the floor for a garage installation. Failure to do so can result in death, explosion, fire, or burns. The dryer - Fisher and Paykel DE7027P2 | User Guide - Page 13
at the front, and 1" (25 mm) clearance at the rear, or 5" (127 mm) clearance if the dryer exhaust duct is at the rear. Consideration must also be given to provide adequate clearance for proper operation and service. 27" (683 mm) 52 1/2" (1332 mm) 29 1/2" (743 mm) 41 1/2" (1051 mm)* * Excludes - Fisher and Paykel DE7027P2 | User Guide - Page 14
12 Installation instructions Requirements for alcove or closet installation Your dryer is approved for installation in an alcove or closet (as specified on the dryer back). WARNING! When installing a dryer in a closet alcove it MUST be exhausted to the outdoors. No other fuel burning appliance can - Fisher and Paykel DE7027P2 | User Guide - Page 15
with the Manufactured Home Construction & Safety Standard, title 24 CFR, part 3280. If or when such standard is not applicable, installation must comply with the American National Standard for Mobile Home, ANSI/NFPA No. 501. ■■ The dryer MUST be vented to the outdoors with the termination securely - Fisher and Paykel DE7027P2 | User Guide - Page 16
14 Installation instructions Connecting a gas dryer (skip for electric dryer) Refer to page 7 for tools required. Note: installation and service of this dryer must be performed by a qualified installer, service agency or the gas supplier. Gas supply and installation requirements In the Commonwealth - Fisher and Paykel DE7027P2 | User Guide - Page 17
and discard old flexible gas connector and duct material. Gas type This gas dryer is equipped with a valve and burner assembly for use only with natural gas. Your local service organization can convert this dryer for use with propane (LP) gas, using conversion kit WC254C1258A001. Important! All - Fisher and Paykel DE7027P2 | User Guide - Page 18
16 Installation instructions Elevation adjustment ■■ The input ratings of gas operated clothes dryers are based on their operation at sea level, and need not be adjusted for operation at : add to vertical dimension the distance between cabinet bottom to floor Fig.6 Gas connection at rear of dryer - Fisher and Paykel DE7027P2 | User Guide - Page 19
Installation instructions 17 Connecting the dryer to the gas supply Gas connection parts Ensure you have the following parts before installing the dryer. New metal flexible gas line connector Adapter Elbow 3/8" NPT Pipe size at least 1/2" (12.7 mm) Adapter 1/8" NPT pipe plug for checking gas inlet - Fisher and Paykel DE7027P2 | User Guide - Page 20
18 Installation instructions Connecting to supply Apply pipe compound to all male threads Plugged Tapping Shut-off valve Fig.10 Connecting supply Important! Do not over tighten the - Fisher and Paykel DE7027P2 | User Guide - Page 21
. Use of an approved UL or CSA gas detector is recommended. If a gas leak is detected follow the "What to do if you smell gas" instructions, stated on the inside font cover of this user - Fisher and Paykel DE7027P2 | User Guide - Page 22
not use an extension cord. Failure to follow these instructions can result in death, fire or electrical shock. The appliance must be electrically grounded in accordance with all local codes and ordinances. In the absence of local codes, the dryer must be electrically grounded in accordance with the - Fisher and Paykel DE7027P2 | User Guide - Page 23
Installation instructions 21 Connecting an electric dryer (skip for gas dryers) - in the United States only Refer to cover off the terminal block. Never use an extension cord or adapter plug with the dryer. Use only new ducting materials. Remove and discard old duct material. WARNING! Electric Shock - Fisher and Paykel DE7027P2 | User Guide - Page 24
supply does not meet the required specifications. Grounding instructions This dryer MUST be connected to a grounded metal, permanent wiring dryer. WARNING! Improper connection of the equipment-grounding conductor can result in a risk of electric shock. Check with a qualified electrician or service - Fisher and Paykel DE7027P2 | User Guide - Page 25
Installation instructions 23 Connecting the dryer using 4-wire connection (must be used for mobile home installation) Note: the National Electrical Code requires that new constructions use a 4-wire connection to an electric dryer (effective as of January 1, 1996). Where local codes do not permit - Fisher and Paykel DE7027P2 | User Guide - Page 26
24 Installation instructions Connecting the dryer using 3-wire connection Important! ■■ DO NOT use in Canada. ■■ /240V 30 amp power supply cord kit (min length 4 feet (1.5 m)) marked for use with dryers and provided with closed loop or spade terminals with upturned ends (not supplied) 3⁄4" (19 mm - Fisher and Paykel DE7027P2 | User Guide - Page 27
14-30R) A replacement power cord is available, if required. Use of part number 248C1014G001 (240 V cord set) is recommended. Contact Fisher & Paykel Customer Care (refer to page 84). Grounding instructions This dryer MUST be connected to a grounded metal, permanent wiring system. WARNING! Improper - Fisher and Paykel DE7027P2 | User Guide - Page 28
metal exhaust duct only. Do not use a plastic exhaust duct. Do not use a metal foil exhaust duct. Failure to follow these instructions can result in death or fire. ■■ This dryer must be vented to the outdoors. This will prevent the build up of lint and moisture in the room in which it - Fisher and Paykel DE7027P2 | User Guide - Page 29
Installation instructions 27 Dimensions Exhaust outlet location Exhaust outlet 3 1⁄2" (89 mm) 11 3⁄4" (298 mm) Note: add to vertical dimension the distance between cabinet bottom to floor Fig. - Fisher and Paykel DE7027P2 | User Guide - Page 30
28 Installation instructions Exhaust system setup Hood or wall cap ■■ Ensure the exhaust straight ducting (including the distance between the last turn and the wall cap) to ensure the best performance of the dryer. Turns other than 90° ■■ One turn of 45° or less may be ignored. ■■ Two 45° turns - Fisher and Paykel DE7027P2 | User Guide - Page 31
Installation instructions 29 Sealing of joints ■■ All joints must be tightly sealed to avoid leaks. ■■ The male end of each section of duct must be installed away from the dryer. ■■ Do not use screws or fasteners that extend into the duct to secure the joint as lint will accumulate around these, - Fisher and Paykel DE7027P2 | User Guide - Page 32
30 Installation instructions UL-listed flexible metal (foil-type) transition duct ■■ Connecting the dryer to the house vent using (foil-type) ducts that comply with the requirements of the "Outline for Clothes Dryer Transition Duct Subject UL 2158A", shall be used in the United States and Canada. - Fisher and Paykel DE7027P2 | User Guide - Page 33
Installation instructions 31 For transition venting (dryer to wall): DO: Elbows DO cut duct as short as possible and install straight into wall Fig.20 Correct venting short as possible DO NOT crush duct against the wall Fig.21 Dangerous venting installation set ups DO NOT set dryer on duct - Fisher and Paykel DE7027P2 | User Guide - Page 34
instructions creating a potential fire hazard. ■■ Shorten the life of the dryer. ■■ Reduce the performance, resulting in longer drying times and an m) in total. The correct exhaust installation is YOUR RESPONSIBILITY. Problems due to incorrect installation are not covered by the limited warranty. - Fisher and Paykel DE7027P2 | User Guide - Page 35
Installation instructions 33 Preferred 4" (102 mm) Hoods 4" Dia (102 mm) 4" Dia (102 mm) Number of 90˚ elbows/bends 0 1 2 3 4 4" (102 mm) When you have a 4" (102 mm) Hood Maximum - Fisher and Paykel DE7027P2 | User Guide - Page 36
34 Installation instructions Standard rear exhaust We strongly recommend the use of rigid metal exhaust duct. We recommend you install your dryer first, before installing your washer. This will allow you easier access for connecting the exhaust. Place the end of the exhaust duct on the outlet - Fisher and Paykel DE7027P2 | User Guide - Page 37
Installation instructions 35 Dryer exhaust to right, left or bottom of cabinet WARNING! Before performing this exhaust installation, be sure to disconnect the dryer from its electrical supply. Protect your hands and arms from sharp edges when working inside the cabinet. Be sure to wear gloves. - Fisher and Paykel DE7027P2 | User Guide - Page 38
36 Installation instructions Adding shortened duct section Connect portion "A" of the original length of duct to the blower housing, ensuring the shortened duct is aligned with the tab in the base. Use the screw saved previously to secure the duct in place through the tab on the dryer base. Fixing - Fisher and Paykel DE7027P2 | User Guide - Page 39
Installation instructions 37 Adding ducting dryer internal duct and the elbow, and also the joint between the elbow and the side duct. Duct tape Fig.28 Securing joints correctly with duct tape ■■ Cover the original duct opening at the back with a plate (kit WE1M454), available from Fisher & Paykel - Fisher and Paykel DE7027P2 | User Guide - Page 40
instructions Adding elbow for exhaust through bottom of cabinet ■■ Insert the elbow section of the duct through the rear opening and connect it to the dryer (kit WE1M454, available from Fisher & Paykel (refer to page 84). Refer to Figure 29 (page 37). ■■ Move the dryer into its final position. - Fisher and Paykel DE7027P2 | User Guide - Page 41
Installation instructions 39 Water connection (for selected models with Steam cycles) found. WARNING!: Failure to do so may result in a flood and damage to property. To connect the dryer Parts required: ■■ Flat rubber washers (4). ■■ Filter washer. ■■ "Y" connector. ■■ Short inlet hose. ■■ Long - Fisher and Paykel DE7027P2 | User Guide - Page 42
40 Installation instructions 4 Check that the washer inlet hose (which has been removed from female connector and couple the hose to the inlet valve on the rear of the dryer. Fig.32 Attaching the inlet hose to the dryer 7 Check that all connections are firmly hand tight, then using a pair of pliers - Fisher and Paykel DE7027P2 | User Guide - Page 43
Installation instructions 41 Reversing the door Tools required: ■■ Standard #2 Phillips screwdriver. ■■ Tape-tipped putty in untapped holes. Fig.34 Removing the door 4 Loosen the top screw from each hinge on the dryer face to half way. With one hand holding the top of the door and the other hand - Fisher and Paykel DE7027P2 | User Guide - Page 44
42 Installation instructions 5 To invert the direction of the door panel, lay the door face down on a safe, protected surface and remove the four screws from the hinges. - Fisher and Paykel DE7027P2 | User Guide - Page 45
Installation instructions 43 8 Reattach the hinges on the opposite side to the door unscrew both the cover plate and the strike plate (the strike plate being the plate with the metal part protruding). Reinstall one plate in place of the other. Fig.39 Exchanging cover plate and strike plate location - Fisher and Paykel DE7027P2 | User Guide - Page 46
44 Installation instructions Leveling the dryer Position the dryer near the final location. Adjust the four leveling legs (wind up or down) at the corners as needed, to ensure the dryer matches the height of the washer and is level from side to side and front to back. The dryer must rest firmly on - Fisher and Paykel DE7027P2 | User Guide - Page 47
2. Parts Check that all parts have been installed. 3. Tools Check all tools are present. 4. Grounding Important! Make sure the dryer is joints in the ducting are secured with duct tape, as described in the instructions. Screws or other fastening devices which extend into the inside of the duct - Fisher and Paykel DE7027P2 | User Guide - Page 48
instructions Additionally for electric dryer models only, check: ■■ Dryer is plugged or directly wired into an approved fitting, and is properly grounded. ■■ Dryer starts, heats, cools and shuts off. ■■ Customer has been shown how to use the dryer. Additionally for gas dryer again. The dryer may emit - Fisher and Paykel DE7027P2 | User Guide - Page 49
Installation instructions 47 Servicing Important! Label all wires prior to disconnection when servicing controls. Wiring errors can cause improper and dangerous operation after servicing/installation. For service and other information, refer to the "How to get service" section in the back of this - Fisher and Paykel DE7027P2 | User Guide - Page 50
INSTRUCTIONS outlined in this User Guide before operating this appliance, pages 3 - 6. Failure to do so can result in death, electric shock, fire or injury to persons. Features Perfect with the Fisher & Paykel AquaSmart™ washer The dryer is minimized. Autosensing AeroCare's internal computer measures - Fisher and Paykel DE7027P2 | User Guide - Page 51
in cool air. WRINKLE FREE will continue for 24 hours or until the dryer is stopped by pressing POWER, or opening the door. WRINKLE FREE can be the TIME DRY cycle. Drum light A convenient light located inside the dryer helps make unloading easier. The light switches on automatically when the door - Fisher and Paykel DE7027P2 | User Guide - Page 52
when dry rather than when they are wet. 1 Press POWER to activate your dryer. 2 Your dryer will default to the REGULAR cycle. Select your desired drying cycle by turning start the drying cycle. 1 2 Fig.45 AeroCare control panel (models may vary) Note: the control panel may differ depending on what - Fisher and Paykel DE7027P2 | User Guide - Page 53
and spread them out to cool. DO NOT leave the clothes in the dryer or bunched up in a clothes basket, these must be spread out in be extremely hot. 3 4 Important! Failure to follow the advice in this guide may result in damage to your garments and your expectations of drying performance may not - Fisher and Paykel DE7027P2 | User Guide - Page 54
help you with the overall running of your dryer (eg user warnings). Time to go Your AeroCare dryer displays approximately how many minutes the cycle has progress lights indicate what part of the cycle the dryer is currently up to (DAMP, DRY, or COOLING). The light for the current part of the cycle - Fisher and Paykel DE7027P2 | User Guide - Page 55
controls 53 Keylock Keylock can be used to deactivate the buttons on your AeroCare dryer when it is in use. This will avoid accidental button touches from items left on top of the dryer (eg washing baskets, clothing) as well as touches from any little fingers. To turn Keylock ON or OFF: ■■ Touch - Fisher and Paykel DE7027P2 | User Guide - Page 56
best that you sort your garments into loads of similar items, and loads that take similar times to dry, before placing them in the dryer. Heavier items (eg towels, t-shirts and sheets) are best dried separately from lightweight items (eg synthetics and shirts). This prevents the possibility of some - Fisher and Paykel DE7027P2 | User Guide - Page 57
hazard. ■■ Do not under any circumstances dry an electric blanket or any other electrical, plastic or rubber item on a drying cycle with heat in your AeroCare dryer, unless the care label specifically states it is safe to do so. Only dry on the AIR DRY cycle. ■■ Do not dry curtains in your - Fisher and Paykel DE7027P2 | User Guide - Page 58
Drying cycles Note: not all cycles may be available on your model of dryer To change a drying cycle or options you have selected after a cycle has stages of the cycle have passed. Always follow manufacturer's care label instructions when drying your garments. If you are unsure of the temperature - Fisher and Paykel DE7027P2 | User Guide - Page 59
Dryer cycles 57 Heavy Dryness Level Drying Temp Wrinkle Free Drum Reverse Heavy An extended, high heat cycle designed for heavy fabrics and denims to garments that you may wish to wear immediately (eg casual items). Damp Dry Medium On On Note: fasten buttons before placing shirts in the dryer. - Fisher and Paykel DE7027P2 | User Guide - Page 60
is important that you check the care label of any item carefully, to ensure it is suitable for tumble-drying, before placing it into the dryer. ■■ Check bulky items during the cycle to ensure even drying. Reposition if necessary. For items containing down or feathers, place a damp towel tied in - Fisher and Paykel DE7027P2 | User Guide - Page 61
dried for a specific time period. A high heat cycle where the time can be adjusted using the MORE and LESS buttons. n/a* High Off On Note: the dryer dries for the selected time regardless of the level of moisture in your clothes. It is important to check your items throughout a TIME DRY cycle - Fisher and Paykel DE7027P2 | User Guide - Page 62
level is an option available on automatic sensing cycles only. On manually timed or pre-programed cycles dryness will vary depending on the load AIR DRY cycle only. Important! ■■ Ensure the water supply to the dryer is connected and turned on before using the AEROSTEAM or AEROSTEAM PLUS cycles - Fisher and Paykel DE7027P2 | User Guide - Page 63
not described in AeroCare's cycles (refer to pages 56 to 60), refer to the table below. Always remember to follow the manufacturer's instructions (please read forming. Check the care label - can the blanket be dried in the dryer? Include 4 - 5 medium sized towels along with the blanket for cushioning - Fisher and Paykel DE7027P2 | User Guide - Page 64
door to assess this) before starting the cycle. Ensure the dry-cleaning product is recommended for use in a domestic dryer. Follow the manufacturer's instructions for how to prepare the load. Set the dryer to the EASY IRON cycle, this cycle uses a medium heat. At the end of the cycle remove the dry - Fisher and Paykel DE7027P2 | User Guide - Page 65
have selected your drying cycle you may wish to change the default drying options. Dryness Level Your AeroCare dryer takes the guess work out of choosing drying times by sensing the dryness of the load. When your dryer senses that the clothes have dried to the dryness level you have selected, the - Fisher and Paykel DE7027P2 | User Guide - Page 66
to stop the cycle and turn the dryer off. Fig.50 WRINKLE FREE option ON After completing each tumble AeroCare will beep to remind you that the The START/PAUSE light will stop flashing and turn on solid. The dryer will tumble periodically during the delay start countdown. Touch the DELAY START - Fisher and Paykel DE7027P2 | User Guide - Page 67
models only) When your load reaches the DAMP/DRY stage, the dryer will play a musical series of beeps to alert you to remove . Drum Reverse (selected models only) When DRUM REVERSE is turned ON, AeroCare will automatically change the direction of the drum regularly to ensure more even drying, - Fisher and Paykel DE7027P2 | User Guide - Page 68
located on the right-hand side of the control panel). Stopping your dryer Your AeroCare dryer can be stopped during any stage of the drying process, to allow clothes and parts of the drum may be extremely hot. Take extreme care when removing the clothes load. Finishing your cycle early AeroCare will - Fisher and Paykel DE7027P2 | User Guide - Page 69
softener sheets If you want to use fabric softener sheets, you must ensure that they are labeled "dryer safe". Always follow the manufacturer's instructions on the packaging. Do not place them in a dryer with warm clothes as there is a chance the fabric softener in the sheet may stain your clothes - Fisher and Paykel DE7027P2 | User Guide - Page 70
the cycles and heat settings that we recommend you use in the AeroCare dryer. By following our recommendations, you can ensure that your clothes will EASY IRON, BULKY DELICATE AIR DRY, RACK DRY Additional drying instructions Hang to dry (line dry) Drip dry Dry in shade Dry flat Do - Fisher and Paykel DE7027P2 | User Guide - Page 71
To install the drying rack, guide the rack (with the end of the rack with the hooks extending closest to you) into the dryer. Hold the back of the rack, as this may result in damage. Drying rack part number: WC212D1411G002 Important! ■■ Check articles regularly throughout the cycle to avoid over- - Fisher and Paykel DE7027P2 | User Guide - Page 72
cycles To customize a cycle You can program your AeroCare dryer to remember the drying options you prefer for each at this point also). Note: some options may not be selectable for clothes care reasons. The dryer will beep to alert you when settings cannot be selected for that cycle. 5 Touch the - Fisher and Paykel DE7027P2 | User Guide - Page 73
of the cycle (ie end of cycle (EOC) beeps), and reset the dryer to the settings it left the factory with (factory reset). Note: DRYNESS return to normal mode when you have finished modifying your options. Your dryer will automatically remember your changes. Adjusting your options 1 Enter the Option - Fisher and Paykel DE7027P2 | User Guide - Page 74
the default settings, exit Option Adjustment mode and power off your washer. Touch POWER to exit if you do not wish to reset your dryer. Fig.55 Resetting back to the factory settings Remember, to save changes and exit from the Option Adjustment mode at any time (ie return to - Fisher and Paykel DE7027P2 | User Guide - Page 75
they can damage the paint and plastic surfaces. Before you start cleaning your AeroCare dryer, ensure that it is disconnected from the power (ie remove the plug or near your dryer as they can damage your machine's control panel as well as any of its plastic parts. Damage to your dryer caused by - Fisher and Paykel DE7027P2 | User Guide - Page 76
in or around your dryer. AeroCare will flash the "Clean Lint Filter" signal light on the panel each time you power your dryer on to remind you dryer. Important! If the lint filter becomes damaged, contact Fisher & Paykel (refer to page 84) to arrange getting a new filter. Do not operate your dryer - Fisher and Paykel DE7027P2 | User Guide - Page 77
Plastic or other combustible ductwork has NOT BEEN USED. Carefully follow the details on exhausting the dryer in the "Installation instructions". Refer to page 26. Ensure that the area around the dryer is kept clear and free from combustible materials, gasoline and other flammable vapors or liquids - Fisher and Paykel DE7027P2 | User Guide - Page 78
a Fisher & Paykel Authorized Service Agent to arrange service (refer to page 84). Record the fault code number displayed and the serial number of your dryer (located on the drum opening surround (open the door)) before calling. The fault code will indicate to the Service Agent what the problem could - Fisher and Paykel DE7027P2 | User Guide - Page 79
may encounter when using this appliance and some suggestions that may help to correct the problem. If you still have problems, please contact a Fisher & Paykel Authorized Service Agent. Pressing POWER does not turn on the dryer Is the electrical cord plugged in? If not, plug the cord in. If there is - Fisher and Paykel DE7027P2 | User Guide - Page 80
78 Solving operating problems Dryer stops working mid cycle Is there a fault code or user warning cycle for the load? What dryness level did you select? Try selecting a lower/higher temperature. Is the dryer overloaded for the cycle? Try dividing the load in half and dry half at a time. Is the - Fisher and Paykel DE7027P2 | User Guide - Page 81
problems 79 Dryer is beeping, displaying unfamiliar light patterns and/or a message on the digital display See the USER WARNINGS and FAULT CODES sections (refer to page 76). Try turning the dryer supply. You may be required call an Authorized Service Agent to replace this. Water visible on inside of - Fisher and Paykel DE7027P2 | User Guide - Page 82
(eg towels, flannelette sheets) dried in your dryer recently? Static problems Have your clothes been over-dried? Select a instructions on the care label of clothing for tumble drying correctly? Were delicate items dried separately on the DELICATE cycle or the RACK DRY cycle? Were there metal parts - Fisher and Paykel DE7027P2 | User Guide - Page 83
Solving drying problems 81 Tangling Try separating out larger items from smaller items. Load items individually and loosely into the dryer and Check your garments care labels. Try not to leave wet clothes sitting in the dryer for a long period before starting it. Damp patches on items after using a - Fisher and Paykel DE7027P2 | User Guide - Page 84
82 Limited warranty When you purchase any new Fisher & Paykel AeroCare dryer product for personal or consumer use you automatically receive a two year limited warranty covering parts and labor for servicing within the 48 mainland United States, Hawaii, Alaska, Washington DC and Canada. Products for - Fisher and Paykel DE7027P2 | User Guide - Page 85
service call will be charged if the problem is not found to be a defect of the product. For example: 1. Correcting faulty installation of the product. 2. Instructing domestic use or 2. Use in accordance with the product's user guide. C Defects to the product caused by accident, neglect, misuse, - Fisher and Paykel DE7027P2 | User Guide - Page 86
service Please read your User Guide. If you then have any questions about operating the product, need the name of your local Fisher & Paykel Authorized Service Agent, or believe the product is defective and wish service without cost to you for parts only, any defective parts, the serial number of - Fisher and Paykel DE7027P2 | User Guide - Page 87
- Fisher and Paykel DE7027P2 | User Guide - Page 88
www.fisherpaykel.com Copyright © Fisher & Paykel 2013. All rights reserved. The product specifications in this booklet apply to the specific products and models described at the date of issue. Under our
-
 1
1 -
 2
2 -
 3
3 -
 4
4 -
 5
5 -
 6
6 -
 7
7 -
8
-
9
-
10
-
11
-
12
-
13
-
14
-
15
-
16
-
17
-
18
-
19
-
20
-
21
-
22
-
23
-
24
-
25
-
26
-
27
-
28
-
29
-
30
-
31
-
32
-
33
-
34
-
35
-
36
-
37
-
38
-
39
-
40
-
41
-
42
-
43
-
44
-
45
-
46
-
47
-
48
-
49
-
50
-
51
-
52
-
53
-
54
-
55
-
56
-
57
-
58
-
59
-
60
-
61
-
62
-
63
-
64
-
65
-
66
-
67
-
68
-
69
-
70
-
71
-
72
-
73
-
74
-
75
-
76
-
77
-
78
-
79
-
80
-
81
-
82
-
83
-
84
-
85
-
86
-
87
-
88
 |
 |

US
AeroCare clothes dryer
Installation instructions
and
User guide