Frigidaire FAFW3511KR Installation Instructions
Frigidaire FAFW3511KR - 27" Front-Load Washer Manual
 |
UPC - 012505381560
View all Frigidaire FAFW3511KR manuals
Add to My Manuals
Save this manual to your list of manuals |
Frigidaire FAFW3511KR manual content summary:
- Frigidaire FAFW3511KR | Installation Instructions - Page 1
All about the Installation of your Washer TABLE OF CONTENTS Important Safety Instructions 2-3 Installation Instructions 9-10 Installation Requirements 4-5 Accessories 11 Installed Dryer Dimensions 6 Notes 12 Unpacking Washer 7-8 Français 13 137337000A (1003) - Frigidaire FAFW3511KR | Installation Instructions - Page 2
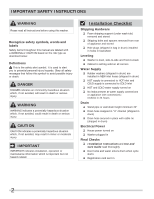
Shipping Hardware ‰ Foam shipping support (under wash tub) ‰ Washer is level, side-to-side and front-to-back ‰ Cabinet is setting solid on all corners Water Supply ‰ Rubber washers ‰ Washer plugged in Final Checks ‰ Installation Instructions and Use and Care Guide read thoroughly ‰ Door locks and - Frigidaire FAFW3511KR | Installation Instructions - Page 3
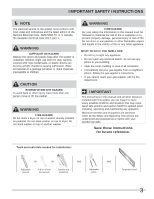
IMPORTANT SAFETY INSTRUCTIONS Í NOTE The electrical service to the washer must conform with local codes and ordinances and the latest edition of the National Electrical Code, ANSI/NFPA 70, or in Canada, the Canadian electrical code C22.1 part 1. WARNING SUFFOCATION HAZARD Destroy the carton and - Frigidaire FAFW3511KR | Installation Instructions - Page 4
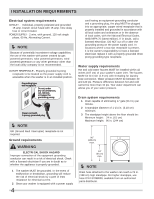
of this washer with power accessible when the washer is in an is properly grounded. 1 The washer MUST be grounded. In the . 2 Since your washer is equipped with a 107 cm) of your washer's water inlet. The faucets hose attached to the washer can reach a 74 in. (188 cm) high standpipe - Frigidaire FAFW3511KR | Installation Instructions - Page 5
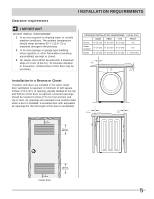
REAR TOP FRONT Alcove 0" (0 cm) 0" (0 cm)* 0" (0 cm) n/a UnderCounter 0" (0 cm) 0" (0 cm)* 0" (0 cm) n/a Closet 0" (0 cm) 0" (0 cm)* 0" (0 cm) 1" (2.54 cm) 0" (0cm) 0" (0cm) Installation in a Recess or Closet If washer and dryer are installed in the same closet, door ventilation is - Frigidaire FAFW3511KR | Installation Instructions - Page 6
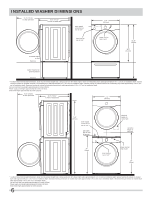
131cm) to clear open door 30.3" (77cm)* to front of closed door water supply connection on rear of unit1 drain hose on rear of unit3 27.0" (68.5cm) power cord on rear of unit2 freestand washer on floor floor line 51.25" (130cm) 36.0" (91.5cm) washer mounted on optional pedestal floor line * To - Frigidaire FAFW3511KR | Installation Instructions - Page 7
from the drum. 3 Close door and reapply door tape. 4 Using a rug, blanket or piece of cardboard to protect the floor, carefully lay the washer on it's back. CAUTION EXCESSIVE WEIGHT HAZARD To avoid back or other injury, have more than one person move or lift the washer. 5 Remove styrofoam base and - Frigidaire FAFW3511KR | Installation Instructions - Page 8
shipping bolts and spacers for future use. If the washer is to be transported at a later date, the shipping hardware must be reinstalled to help prevent shipping damage. Installing hole plugs Locate 4 hole plugs in the small bag supplied with washer instruction guides. Insert them in the holes in - Frigidaire FAFW3511KR | Installation Instructions - Page 9
a level on top of the washer. 2 Use adjustable pliers to adjust the leveling legs so the washer is level front-to-rear and side-to-side, minimum for best performance of the washer. Í NOTE For pedestal installations, see additional installation instructions included with the pedestal. Connecting - Frigidaire FAFW3511KR | Installation Instructions - Page 10
and money. 7 If you have any questions during initial operation, please review the "Service Prevention Checklist" in your Use & Care Guide before calling for service. 8 Place these instructions in a location near the washer for future reference. Í NOTE A wiring diagram and technical data sheet are - Frigidaire FAFW3511KR | Installation Instructions - Page 11
MATCHING STORAGE PEDESTAL* Classic White Pedestal - P/N CFPWD15W Classic Blue Pedestal - P/N CFPWD15N Classic Red Pedestal - P/N CFPWD15R Classic Silver Pedestal - P/N CFPWD15A Classic Black Pedestal - P/N CFPWD15B A storage pedestal accessory, specifically designed for this washer may be - Frigidaire FAFW3511KR | Installation Instructions - Page 12
NOTES 12 - Frigidaire FAFW3511KR | Installation Instructions - Page 13
Tout à propos de Installation de votre Laveuse TABLE DES MATIÈRES Mesures de sécurité importantes 14-15 Déballage de la laveuse 19-20 Exigences d'installation 16-17 Instructions d'installation 21-22 Dimensions, appareil install 18 Accessoires 23 - Frigidaire FAFW3511KR | Installation Instructions - Page 14
de danger. Liste de vérification d'installation Matériel d'expédition ‰ Le support d'expédition en mousse (sous la cuve de lavage) a été enlevé et Vérifications finales ‰ Vous avez lu entièrement les instructions d'installation et le Guide d'utilisation et d'entretien ‰ La porte se verrouille et l'eau - Frigidaire FAFW3511KR | Installation Instructions - Page 15
phone d'un voisin, appelez immédia- tement le fournisseur de gaz. Suivez ses instructions. • Si vous ne pouvez joindre votre fournisseur de gaz, appelez les pompiers. IMPORTANT Les instructions comprises dans ce guide et toute autre documentation fournie avec cet appareil ne sont pas conçues pour - Frigidaire FAFW3511KR | Installation Instructions - Page 16
ou par toute autre source d'alimentation différente de celle fournie par les services publics n'est pas recommandée. PRISE - Prise à trois alvéoles et l'eau froide ne doit pas dépasser 68,9 kPa (10 lb/po²). Le service des eaux de votre localité peut vous informer sur la pression de votre alimentation - Frigidaire FAFW3511KR | Installation Instructions - Page 17
Exigences de dégagement IMPORTANT N'INSTALLEZ PAS VOTRE LAVEUSE : 1 À un endroit exposé aux écoulements d'eau ou aux aléas des conditions météorologiques extérieures. La température ambiante ne devrait jamais tomber sous 15,6 °C (60 °F) afin d'optimiser l'efficacité du détergent. 2 À un endroit ( - Frigidaire FAFW3511KR | Installation Instructions - Page 18
fermée Raccord de l'alimentation en eau à l'arrière de la laveuse1 27.0" (68.5cm) Laveuse autonome sur le plancher Plancher Tuyau de vidange à 30.3" (77cm)* À partir de l'avant de la porte lorsqu'elle est fermée 27.0" (68.5cm) 71.5" (182cm) Raccord de l'alimentation en eau à l'arrière - Frigidaire FAFW3511KR | Installation Instructions - Page 19
Retrait de l'emballage en mousse AVERTISSEMENT RISQUE D'ÉTOUFFEMENT Détruisez le carton d'emballage et les sacs en plastique après avoir déballé l'appareil. Les enfants pourraient les utiliser pour jouer. Le carton recouvert de tapis, les couvertures et les feuilles de plastique peuvent être é - Frigidaire FAFW3511KR | Installation Instructions - Page 20
, ces pièces d'expédition doivent être installées pour éviter de l'endommager. Pose des bouchons Trouvez les 4 bouchons du petit sac fourni avec les guides de votre laveuse. Insérez-les dans les trous du panneau arrière de la laveuse. x 4 4 BOUCHONS (DANS UN SAC) 20 - Frigidaire FAFW3511KR | Installation Instructions - Page 21
près possible de la laveuse afin d'optimiser le rendement de la laveuse. Í REMARQUE Pour une installation sur socle, reportez-vous aux instructions d'installation complémentaires incluses avec le socle. Branchement de l'entrée d'eau 1 Faites couler de l'eau chaude et froide des robinets pour - Frigidaire FAFW3511KR | Installation Instructions - Page 22
à l'utilisation initiale, veuillez revoir la section intitulée « Liste de vérification avant service » de votre Guide d'utilisation et d'entretien avant d'effectuer une demande de service. 8 Laissez ces instructions à proximité de la laveuse pour vous y reporter ultérieurement. Í REMARQUE Un sch - Frigidaire FAFW3511KR | Installation Instructions - Page 23
commander des pièces de rechange pour votre laveuse, communiquez avec le marchand qui vous a vendu votre appareil, ou reportez-vous au guide d'utilisation et d'entretien pour obtenir plus de détails. AVERTISSEMENT RISQUE ÉLECTRIQUE Étiquetez tous les fils avant de les débrancher pendant l'entretien - Frigidaire FAFW3511KR | Installation Instructions - Page 24
-
 1
1 -
 2
2 -
 3
3 -
 4
4 -
 5
5 -
 6
6 -
 7
7 -
8
-
9
-
10
-
11
-
12
-
13
-
14
-
15
-
16
-
17
-
18
-
19
-
20
-
21
-
22
-
23
-
24
 |
 |

All about the
Installation
of your
Washer
Important Safety Instructions
..............................
2-3
Installation Requirements
...................................
4-5
Installed Dryer Dimensions
....................................
6
Unpacking Washer
..............................................
7-8
Installation Instructions
....................................
9-10
Accessories
.........................................................
11
Notes
.................................................................
12
Français
..............................................................
13
TABLE OF CONTENTS
137337000A (1003)