Frigidaire FGES3075KB Installation Instructions (All Languages)
Frigidaire FGES3075KB - Gallery Premier 30"Slide Manual
 |
UPC - 057112102849
View all Frigidaire FGES3075KB manuals
Add to My Manuals
Save this manual to your list of manuals |
Frigidaire FGES3075KB manual content summary:
- Frigidaire FGES3075KB | Installation Instructions (All Languages) - Page 1
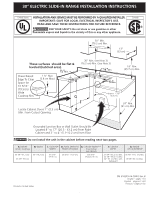
30" ELECTRIC SLIDE-IN RANGE INSTALLATION INSTRUCTIONS United States INSTALLATION AND SERVICE MUST BE PERFORMED BY A QUALIFIED INSTALLER. IMPORTANT: SAVE FOR LOCAL ELECTRICAL INSPECTOR'S USE. READ AND SAVE THESE INSTRUCTIONS FOR FUTURE REFERENCE. FOR YOUR SAFETY: Do not store or use gasoline or - Frigidaire FGES3075KB | Installation Instructions (All Languages) - Page 2
RANGE INSTALLATION INSTRUCTIONS NOTES: 1. Do not pinch the power supply cord or the flexible gas conduit between the range and the wall. 2. Do not seal the range height (see page 3), insert the appliance in the counter and then level. Make sure the unit is supported by the leveling legs and NOT - Frigidaire FGES3075KB | Installation Instructions (All Languages) - Page 3
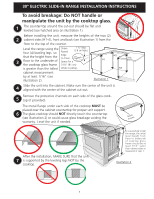
30" ELECTRIC SLIDE-IN RANGE INSTALLATION INSTRUCTIONS To avoid breakage: Do NOT handle or manipulate the unit by the cooktop glass. 1 The counter-top around the cut-out should be flat and leveled (see hatched area on illustration 1). Before installing the unit, measure the heights of the two - Frigidaire FGES3075KB | Installation Instructions (All Languages) - Page 4
the appliance. • Be sure your range is installed and grounded properly by a qualified installer or service technician. • This range must oven racks, broiler pan, food and other utensils before self-cleaning the oven. Wipe up excess spillage. Follow the precleaning instructions in the Owner's Guide - Frigidaire FGES3075KB | Installation Instructions (All Languages) - Page 5
shock exists if an incorrect size range cord kit is used, the Installation Instructions are not followed, or the strain relief bracket is discarded. For connector should be connected to the grounding terminal or wire lead on the appliance. Failure to do any of the above could result in a fire, - Frigidaire FGES3075KB | Installation Instructions (All Languages) - Page 6
RANGE INSTALLATION INSTRUCTIONS 4. Electrical Connection to the Range (U.S.A.) Three Conductor Wire Connection to Range replace the 3 screws. Silver Colored Terminal Red Wire Four Conductor Wire Connection to Range power supply cord to the frame of the appliance with the ground screw, using the hole - Frigidaire FGES3075KB | Installation Instructions (All Languages) - Page 7
30" ELECTRIC SLIDE-IN RANGE INSTALLATION INSTRUCTIONS Direct Electrical Connection to the Circuit Breaker, Fuse Box or Junction Box If the appliance is connected directly to the circuit breaker, fuse box or junction box, use flexible, armored or nonmetallic sheathed copper cable (with grounding - Frigidaire FGES3075KB | Installation Instructions (All Languages) - Page 8
Note: Door removal is not a requirement for installation of the range, but is an added convenience. Refer to the Use and Care Guide for oven door removal instructions. Standard Installation The range cooktop overlaps the countertop at the 1 sides and the range rests on the floor. The cooktop is 31 - Frigidaire FGES3075KB | Installation Instructions (All Languages) - Page 9
or materials in this appliance. Refer to the warranty and service information in your Use and Care Manual for our phone number and address. Please call or write if you have inquiries about your range product and/or need to order parts. 2. Operation of Oven Elements The oven is equipped with an - Frigidaire FGES3075KB | Installation Instructions (All Languages) - Page 10
-IN RANGE INSTALLATION INSTRUCTIONS 8. Important Safety Warning To reduce the risk of tipping of the range, the range must be secured to the floor by properly installed anti-tip brackets and screws packed with the range. Those parts are located in a plastic bag in the oven. Failure to install the - Frigidaire FGES3075KB | Installation Instructions (All Languages) - Page 11
artefacto. 30" Mín. (76.2 cm) Mín. 13" (33 cm) Lije la parte elevade del borde para obtener las 31 5/16" (81 cm) de ancho del - 43.2 cm) del armario derecho y de 2" a 4" (5.1-10.2 cm) del suelo. No instale la unidad en el gabinete si no ha leido esta página. A. ALTURA (Debajo de la cubierta)) - Frigidaire FGES3075KB | Installation Instructions (All Languages) - Page 12
y el armario debe de ser igual al ancho del corte. E 22 7/8" (58,1 cm) min. 23 1/4" (59,05 cm) max. (véa la nota 4) 1 1/8" (2,86 cm) E PARTE DELANTERA DEL F Ref. ARMARIO A. ALTURA (Debajo de la cubierta)) 35 7/8" (91,1 cm) - 36 5/8" (93 cm) B. ANCHURA C. ANCHURA DE LA PLANCHA DE COCINAR 30 - Frigidaire FGES3075KB | Installation Instructions (All Languages) - Page 13
2). Ilustración 1 4 Deslice la unidad hacia el gabinete. Asegúrese que la unidad este centrada con el centro de la abertura del gabinete. 5 Remueva la parte en plástico extruido en cada lado de la cubierta de vidrio. (Algunos modelos) Es imprescindible que el reborde de metal que se encuentra - Frigidaire FGES3075KB | Installation Instructions (All Languages) - Page 14
título 24, HUD (parte 280)] o cuando este código no se aplica, la Standard for Manufactured Home Installation 1982 (Manufactured Home sites todo exceso de derrames. Siga las instrucciones para la pre-limpieza en el Manual del usuario. Ubicación de la placa de serie Encontrará el modelo y el - Frigidaire FGES3075KB | Installation Instructions (All Languages) - Page 15
nimo, debe de ser utilizado (ver la figura 5). No desajuste las tuercas que aseguran la conexión de la cocina al bloque terminal cuando esté instalándola. El corte o la perdida de corriente eléctrica puede ocurrir. Peligro de choque eléctrico • La conexión a tierra es requerida para este electrodom - Frigidaire FGES3075KB | Installation Instructions (All Languages) - Page 16
ón del conductor a tierra del armazón al alambre neutral del cable de bronce del suministro eléctrico (vea figura 3). 1. Retire los 3 tornillos de la parte baja de la cubierta del cable trasero (cubierta de acceso), luego levante la cubierta hacia arriba para tener acceso al bloque de conexión del - Frigidaire FGES3075KB | Installation Instructions (All Languages) - Page 17
INSTRUCCIONES DE INSTALACIÓN PARA LA ESTUFA ELÉCTRICA DESLIZABLE DE 30" Conexión eléctrica directa al cortacircuito, a la caja de fusibles o la caja de empalmes Si el aparato está conectado directamente al cortacircuito, a la caja de fusibles o a la caja de empalmes, use un cable blindado flexible - Frigidaire FGES3075KB | Installation Instructions (All Languages) - Page 18
esten 2 verticales y alineados antes de instalar la plancha de cocinar. Lije el borde del mostrador para obtener las 31 1/2 (81 cm)" en la parte superior del mostrador. Instale las puertas del armario a 31" (78,7 cm) de 3 espacio entre ellas para que no interfieran con la abertura de la puerta de la - Frigidaire FGES3075KB | Installation Instructions (All Languages) - Page 19
o letra del lote de la placa de serie de su estufa. Antes de Llamar al Servicio Lea la sección Evite Llamadas de Servicio en su Manual del Usuario. Esto le podrá ahorrar tiempo y gasto. Esta lista incluye ocurrencias comunes que no son el resultado de defectos de materiales o fabricación de este - Frigidaire FGES3075KB | Installation Instructions (All Languages) - Page 20
3/16"(0,5cm) de día. (si se está instalando en concreto) Instrucciones de Instalación del Soporte Antivuelco Los soportes se fijan al suelo en la parte trasera de la estufa para sujetar ambos niveladores de las patas traseras. Cuando los esté instalando al piso, asegúrese Soporte antivuelco Borde de - Frigidaire FGES3075KB | Installation Instructions (All Languages) - Page 21
INSTALLATION ET L'ENTRETIEN DOIVENT ÊTRE EFFECTUÉS PAR UN INSTALLATEUR QUALIFIÉ. IMPORTANT : CONSERVEZ POUR L'INSPECTEUR D'ÉLECTRICITÉ LOCAL. LISEZ ET CONSERVEZ CES INSTRUCTIONS . 22 1/8" (56,2cm) Max 24" (61cm) si un dosseret est installé G. HAUTEUR DU DESSUS DE COMPTOIR 35 7/8" (91,1 cm) Min. 36 - Frigidaire FGES3075KB | Installation Instructions (All Languages) - Page 22
INSTRUCTIONS D'INSTALLATION POUR LA CUISINIÈRE 30" ENCASTRABLE NOTES: 1 Ne coincez pas 31), insérez l'appareil dans le comptoir et ensuite nivelez-le. Assurez-vous que l'appareil est bien supporté par les pattes de nivellement et non par la table de cuisson. IMPORTANT: La largeur du comptoir et - Frigidaire FGES3075KB | Installation Instructions (All Languages) - Page 23
INSTRUCTIONS D'INSTALLATION POUR LA CUISINIÈRE 30" ENCASTRABLE Pour éviter les cassures: NE PAS manipuler l'appareil par la table de cuisson vitrifiée. 1 Le comptoir alentour de l'ouverture de découpage doit être plat et à niveau (voir hachures sur illustration 1). Avant d'installer supporté. - Frigidaire FGES3075KB | Installation Instructions (All Languages) - Page 24
l'installateur 1. Lisez toutes les instructions contenues dans ces instructions d'installation avant d'installer la cuisinière. 2. Enlevez four. Essuyez tous les renversements excessifs. Suivez les instructions pour le prénettoyage dans le Guide de l'utilisateur. Emplacement de la plaque signalétique - Frigidaire FGES3075KB | Installation Instructions (All Languages) - Page 25
est requis, repoussez la pastille. Il existe des risques d'incendie ou de choc électrique, si la capacité du cordon utilisé est inadéquate, si les instructions d'installation ne sont pas suivies ou si le réducteur de tension n'est pas utilisé. Dans les maisons mobiles (États-Unis), les nouvelles - Frigidaire FGES3075KB | Installation Instructions (All Languages) - Page 26
INSTRUCTIONS D'INSTALLATION POUR LA CUISINIÈRE 30" ENCASTRABLE 4. Connexions électriques à la cuisinière (U.S.A.) Pour une connexion à un câble d'alimentation à trois conducteurs (EtatsUnis seulement) Si les codes locaux - Frigidaire FGES3075KB | Installation Instructions (All Languages) - Page 27
INSTRUCTIONS D'INSTALLATION POUR LA CUISINIÈRE 30" ENCASTRABLE Connexions électriques au système électrique de la résidence L'appareil doit être raccordé directement au disjoncteur ou au compartiment - Frigidaire FGES3075KB | Installation Instructions (All Languages) - Page 28
les instructions à la page 30 ou sur le gabarit fourni avec le support anti-bascule de l'appareil. Afin d'obtenir une installation maximale, un centre de service. Installation de panneaux latéraux Vous pouvez commander un nécessaire pour panneaux latéraux dans un centre de service. Distancez les - Frigidaire FGES3075KB | Installation Instructions (All Languages) - Page 29
èle et de série inscrits sur la plaque signalétique de votre cuisinière. Avant d'appeler le service d'entretien Révisez la liste des vérifications préventives et les instructions d'opération dans votre Guide de l'utilisateur. Vous sauverez probablement du temps et de l'argent. La liste contient les - Frigidaire FGES3075KB | Installation Instructions (All Languages) - Page 30
Foret de 3/16"(0,5 cm) de diamètre Foret de maçonnerie de 3/16"(0,5 cm) diamètre (si l'installation se fait dans du béton) Instructions d'installation des supports anti‑bascule Les supports anti‑bascule se fixent au plancher, à l'arrière de la cuisinière, pour retenir les deux pieds niveleurs - Frigidaire FGES3075KB | Installation Instructions (All Languages) - Page 31
INSTRUCTIONS D'INSTALLATION POUR LA CUISINIÈRE 30" ENCASTRABLE NOTES: 31 - Frigidaire FGES3075KB | Installation Instructions (All Languages) - Page 32
INSTRUCTIONS D'INSTALLATION POUR LA CUISINIÈRE 30" ENCASTRABLE NOTES: 32
-
 1
1 -
 2
2 -
 3
3 -
 4
4 -
 5
5 -
 6
6 -
 7
7 -
8
-
9
-
10
-
11
-
12
-
13
-
14
-
15
-
16
-
17
-
18
-
19
-
20
-
21
-
22
-
23
-
24
-
25
-
26
-
27
-
28
-
29
-
30
-
31
-
32
 |
 |
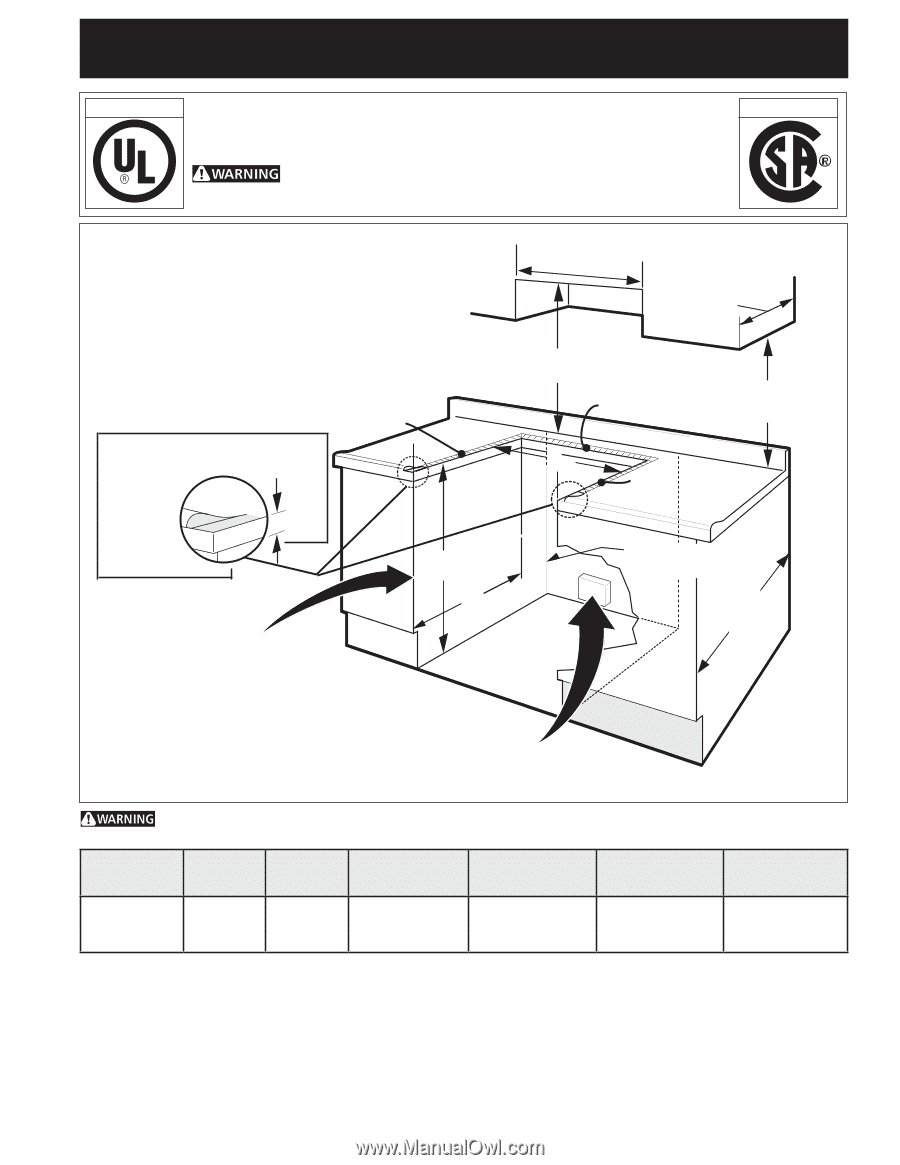
30" ELECTRIC SLIDE-IN RANGE INSTALLATION INSTRUCTIONS
P/N 318201616 (0907) Rev. B
English – pages 1-10
Español – páginas 11-20
Français – pages 21-32
Printed in United States
F
G
E
½”
Min.
¼”
Min.
½”
Min.
Shave Raised
Edge To Clear
Space for
31 5/16"
(79.5cm)
Wide
Cooktop Rim.
Grounded Junction Box or Wall Outlet Should Be
Located 8" to 17" (20.3 - 43.2 cm) From Right
Cabinet and 2" to 4" (5.1-10.2 cm) From Floor
24" Min.
(61 cm) Min.
30" Min.
(76.2 cm) Min.
13"
(33 cm)
Locate Cabinet Doors 1" (2.5 cm)
Min. From Cutout Opening
Approx. 1 7/8"
(4.8 cm)
18" Min.
(45.7 cm) Min.
30" Min. (see Note 3)
(76.2 cm) Min. (See Note 3)
1 ½" Max.
(3.8 cm Max.)
These surfaces
should be flat &
leveled (hatched area).
Do not install the unit in the cabinet before reading next two pages.
INSTALLATION AND SERVICE MUST BE PERFORMED BY A QUALIFIED INSTALLER.
IMPORTANT: SAVE FOR LOCAL ELECTRICAL INSPECTOR'S USE.
READ AND SAVE THESE INSTRUCTIONS FOR FUTURE REFERENCE.
FOR YOUR SAFETY: Do not store or use gasoline or other
flammable vapors and liquids in the vicinity of this or any other appliance.
Canada
United States
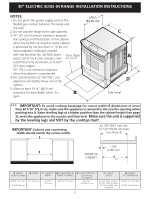
A
. HEIGHT
(Under Cooktop)
B
.
WIDTH
C.
COOKTOP
WIDTH
D
.
TOTAL DEPTH TO
FRONT OF RANGE
E
.
CUTOUT WIDTH***
(Countertop
and cabinet)
F
.
CUTOUT
DEPTH
G
.
HEIGHT
OF COUNTERTOP
35 7/8" (91,1 cm) -
36 5/8" (93 cm)
30" (76,2 cm)
31 5/16"
(79.5 cm)
28 5/16" (71,9 cm)
30±1/16"
(76,2±0,15 cm)
21 3/4" (55,2 cm) Min.
22 1/8" (56,2 cm) Max
24" (61 cm) Min. with
backguard
35 7/8" (91,1 cm) Min.
36 5/8" (93 cm) Max.