Frigidaire FRA106HT1 Installation Instructions (All Languages)
Frigidaire FRA106HT1 Manual
 |
UPC - 012505274022
View all Frigidaire FRA106HT1 manuals
Add to My Manuals
Save this manual to your list of manuals |
Frigidaire FRA106HT1 manual content summary:
- Frigidaire FRA106HT1 | Installation Instructions (All Languages) - Page 1
of front and rear coils. Make sure air conditioner does not fall during installation. Do This First (for existing sleeve) Note that the air conditioner dimensions are: 24" wide,14" high, and 19" deep (without front). Install Air Conditioner according to these installation instructions to achieve - Frigidaire FRA106HT1 | Installation Instructions (All Languages) - Page 2
and have a rear grille that securely attaches to sleeve, or rear flange that serves as a stop for the Air Conditioner. CAUTION: When installation is complete, replacement unit MUST have a rearward slope as shown in Fig.1. 2. Remove old Air Conditioner from wall sleeve and prepare wall sleeve as - Frigidaire FRA106HT1 | Installation Instructions (All Languages) - Page 3
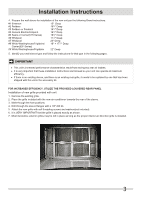
the unit in the accessory kit. FOR INCREASED EFFICIENCY, UTILIZE THE PROVIDED LOUVERED REAR PANEL Installation of new grille provided with unit 1. Remove the existing grille. 2. Place the grille included with the new air conditioner towards the rear of the sleeve. 3. Mark through the hole positions - Frigidaire FRA106HT1 | Installation Instructions (All Languages) - Page 4
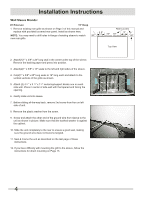
Installation Instructions Wall Sleeve Brands: #1 Emerson 15" Deep 1. Remove existing rear grille as shown on Page 3 of this manual and replace with provided louvered rear panel. Install as shown here. NOTE: You may need to drill holes in flange of existing sleeve to match 80º new rear grille - Frigidaire FRA106HT1 | Installation Instructions (All Languages) - Page 5
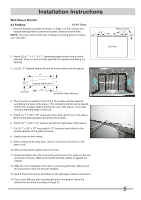
Instructions Wall Sleeve Brands: #2 Fedders 19-3/4" Deep 1. Remove existing rear grille as shown on Page 3 of this manual and replace with provided louvered rear panel. Install as shown here. NOTE: You may need to drill holes in flange of existing sleeve to match 80º new rear grille Rear - Frigidaire FRA106HT1 | Installation Instructions (All Languages) - Page 6
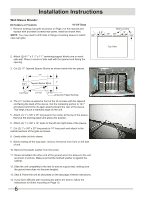
Installation Instructions Wall Sleeve Brands: #3 Fedders or Friedrich 16-3/4" Deep 1. Remove existing rear grille as shown on Page 3 of this manual and replace with provided louvered rear panel. Install as shown here. NOTE: You may need to drill holes in flange of existing sleeve to match 80º - Frigidaire FRA106HT1 | Installation Instructions (All Languages) - Page 7
Installation Instructions Wall Sleeve Brands: #4 General Electric/Hotpoint 16-7/8" Deep 1. Remove existing rear grille as shown on Page 3 of this manual and replace with provided louvered rear panel. Install as shown here. NOTE: You may need to drill holes in flange of existing sleeve to match - Frigidaire FRA106HT1 | Installation Instructions (All Languages) - Page 8
Installation Instructions Wall Sleeve Brands: #5 Sears or Carrier 51S Series 18-5/8" Deep 1. Remove existing rear grille as shown on Page 3 of this manual and replace with provided louvered rear panel. Install as shown here. NOTE: You may need to drill holes in flange of existing sleeve to - Frigidaire FRA106HT1 | Installation Instructions (All Languages) - Page 9
Instructions Wall Sleeve Brands: #6 Whirlpool 17-1/8" Deep 1. Remove existing rear grille as shown on Page 3 of this manual and replace with provided louvered rear panel. Install as shown here. NOTE: You may need to drill holes in flange of existing sleeve to match 80º new rear grille Rear - Frigidaire FRA106HT1 | Installation Instructions (All Languages) - Page 10
Installation Instructions Wall Sleeve Brands: #7 Whirlpool 23" Deep 1. Remove existing rear grille as shown on Page 3 of this manual and replace with provided louvered rear panel. Install as shown here. NOTE: You may need to drill holes in flange of existing sleeve to match 80º new rear - Frigidaire FRA106HT1 | Installation Instructions (All Languages) - Page 11
Installation Instructions Wall Sleeve Brands: #8 White Westinghouse/Frigidaire/ Carrier 52F Series 16"+ 17-1/2" Deep 1. Remove existing rear grille as shown on Page 3 of this manual and replace with provided louvered rear panel. Install as shown here. NOTE: You may need to drill holes in flange - Frigidaire FRA106HT1 | Installation Instructions (All Languages) - Page 12
Installation Instructions Wall Sleeve Brands: #9 White Westinghouse or Frigidaire 22" Deep 1. Remove existing rear grille as shown on Page 3 of this manual and replace with provided louvered rear panel. Install as shown here. NOTE: You may need to drill holes in flange of existing sleeve to - Frigidaire FRA106HT1 | Installation Instructions (All Languages) - Page 13
Installation Instructions Direct Unit Mounting The previous directions are the preferable way to mount the new rear grill. The unit's performance is slightly better and the possibility of draughts is reduced. As a last resort, direct mounting of the grille to the unit can be considered. Note: The - Frigidaire FRA106HT1 | Installation Instructions (All Languages) - Page 14
Installation Instructions FINISHING INSTALLATION: 1. Install the 1" x 11 2 " x 84" long stuffer seal between the wall-sleeve and the unit. A flat-bladed screwdriver or putty knife is recommended. 2. Assemble the trim frame by inserting top and bottom pieces into side pieces and snapping into place.
-
 1
1 -
 2
2 -
 3
3 -
 4
4 -
 5
5 -
 6
6 -
 7
7 -
8
-
9
-
10
-
11
-
12
-
13
-
14
 |
 |

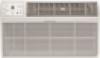
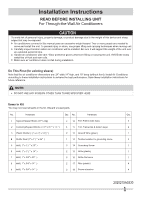
READ BEFORE INSTALLING UNIT
For Through-the-Wall Air Conditioners
1
Installation Instructions
To avoid risk of personal injury, property damage, or product damage due to the weight of this device and sharp
edges that may be exposed:
Air conditioners covered in this manual pose an excessive weight hazard. Two or more people are needed to
move and install the unit. To prevent injury or strain, use proper lifting and carrying techniques when moving unit.
Carefully inspect location where air conditioner will be installed. Be sure it will support the weight of the unit over
an extended period of time.
Handle air conditioner with care. Wear protective gloves whenever lifting or carrying the unit. AVOID the sharp
metal fins of front and rear coils.
Make sure air conditioner does not fall during installation.
NOTE:
DO NOT USE ANY SCREWS OTHER THAN THOSE SPECIFIED HERE
Note that the air conditioner dimensions are: 24" wide,14" high, and 19" deep (without front). Install Air Conditioner
according to these installation instructions to achieve the best performance. Save these installation instructions for
future reference.
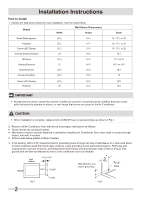
Do This First (for existing sleeve)
You may not need all parts in the kit. Discard unused parts.
Items in Kit
Hardware
2
2
3
Tapered Spacer Blocks (17” Long)
Plastic Divider (
)
4
Stuffer Seal (
)
4
1
2
3
4
5
seal
(
)
1
6
2
7
3
8
No.
Qty.
2
9
Centering/Support Blocks (
”
)
4
”
x 3
”
x 1
1
2
1
2
1
2
”
x 4
”
x 14
”
1
8
1
2
1
2
1
”
x 1
”
x 84
”
1
2
1
”
x 1
”
x 25
”
1
2
seal
(
)
1
”
x 1
”
x 14
”
1
2
seal
(
)
1
”
x
3/8
”
x 25
”
seal
(
)
1
”
x
3/8
”
x 14
”
seal
(
)
1
”
x
3/4
”
x 14
”
2
Hardware
2
1
1
Ground Wire (green)
2
13
10
11
12
14
Grounding Screw
15
1
16
1
17
No.
Qty.
4
18
Trim Frame (top & bottom legs)
Grille (plastic)
Grille Aluminum
Nuts (plastic)
Screw w/washer
4
Trim Frame (side legs)
2020215A0330
Toothed washer for grounding screw
2