Ganz Security Z8-D2M Z8-D2_VD2 Series Operation Guide
Ganz Security Z8-D2M Manual
 |
View all Ganz Security Z8-D2M manuals
Add to My Manuals
Save this manual to your list of manuals |
Ganz Security Z8-D2M manual content summary:
- Ganz Security Z8-D2M | Z8-D2_VD2 Series Operation Guide - Page 1
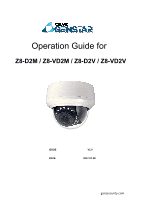
Operation Guide for Z8-D2M / Z8-VD2M / Z8-D2V / Z8-VD2V ISSUE DATE V1.0 2017-07-28 ganzsecurity.com - Ganz Security Z8-D2M | Z8-D2_VD2 Series Operation Guide - Page 2
Operation Guide Contents About This Document Purpose This document describes how to set and use OSD menu for coaxial HD cameras managed by DVR. Intended Audience This document is intended for: z Technical support engineers z Maintenance engineers Symbol Conventions The symbols that may be - Ganz Security Z8-D2M | Z8-D2_VD2 Series Operation Guide - Page 3
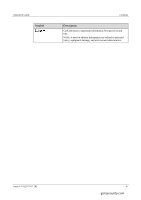
Operation Guide Symbol Contents Description Calls attention to important information, best practices and tips. NOTE is used to address information not related to personal injury, equipment damage, and environment deterioration. Issue V1.0 (2017-07-28) iii ganzsecurity.com - Ganz Security Z8-D2M | Z8-D2_VD2 Series Operation Guide - Page 4
Operation Guide Contents Contents About This Document...ii 1 OSD Main Menu ...1 1.1 Procedure ...1 1.1.1 Camera Control over DVR UTC ...1 1.1.2 Camera Control Using Five Buttons...2 1.2 OSD Main Menu Interface ...2 2 OSD - Ganz Security Z8-D2M | Z8-D2_VD2 Series Operation Guide - Page 5
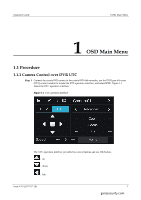
Operation Guide 1 OSD Main Menu 1 OSD Main Menu 1.1 Procedure 1.1.1 Camera Control over DVR UTC Step 1 Connect the coaxial HD camera to the coaxial HD disk recorder, use - Ganz Security Z8-D2M | Z8-D2_VD2 Series Operation Guide - Page 6
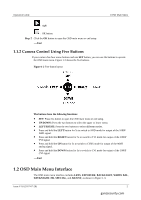
Operation Guide 1 OSD Main Menu : right : OK button Step 2 Click the OK button to open the OSD main menu or end setup. ----End 1.1.2 Camera Control Using Five - Ganz Security Z8-D2M | Z8-D2_VD2 Series Operation Guide - Page 7
Operation Guide Figure 1-3 OSD main menu interface 1 OSD Main Menu ----End Issue V1.0 (2017-07-28) 3 ganzsecurity.com - Ganz Security Z8-D2M | Z8-D2_VD2 Series Operation Guide - Page 8
Operation Guide 2 OSD Setting 2 OSD Setting 2.1 LENS You can set LENS to MANUAL or DC. Procedure Step 1 Press the UP or DOWN button to select LENS. Step 2 Press the LEFT or RIGHT button to set LENS to MANUAL or DC. The default value is MANUAL. ----End 2.2 EXPOSURE Exposure is intended to adjust - Ganz Security Z8-D2M | Z8-D2_VD2 Series Operation Guide - Page 9
Operation Guide Figure 2-1 EXPOSURE interface 2 OSD Setting Step 3 Set exposure parameters. Table 2-1 lists the exposure parameters. Table 2-1 Exposure parameters Parameter Meaning Setup SHUTTER This parameter is used to adjust shutter manually for the desired image brightness. The greater - Ganz Security Z8-D2M | Z8-D2_VD2 Series Operation Guide - Page 10
Operation Guide 2 OSD Setting Parameter D-WDR DEFOG Meaning Setup Overexposure or missing dark details may occur when areas of low brightness and high brightness coexist in the - Ganz Security Z8-D2M | Z8-D2_VD2 Series Operation Guide - Page 11
Operation Guide Figure 2-2 HSBLC interface 2 OSD Setting ----End Procedure Step 1 Press the UP or DOWN button to select SELECT, and press the LEFT or RIGHT button to - Ganz Security Z8-D2M | Z8-D2_VD2 Series Operation Guide - Page 12
Operation Guide Figure 2-3 Area setup interface 2 OSD Setting 1. When POSITION is displayed, press the UP, DOWN, LEFT, and RIGHT buttons to set the position of the area. - Ganz Security Z8-D2M | Z8-D2_VD2 Series Operation Guide - Page 13
Operation Guide Figure 2-4 NIGHT MODE interface 2 OSD Setting 1. Press the UP or DOWN button to select AGC LEVEL, and press the LEFT or RIGHT button to set - Ganz Security Z8-D2M | Z8-D2_VD2 Series Operation Guide - Page 14
Operation Guide Figure 2-5 BLC interface 2 OSD Setting Procedure Step 1 Press the UP or DOWN button to select LEVEL, and press the LEFT or RIGHT button to set - Ganz Security Z8-D2M | Z8-D2_VD2 Series Operation Guide - Page 15
Operation Guide 2 OSD Setting BLC area setup is the same as HSBLC area setup. For details the illuminance and color temperature of the target object are changed. You can set WHITEBAL to ATW, AWG, MANUAL WB, OUTDOOR, INDOOR, or AWC-SET. Procedure Step 1 Press the UP or DOWN button to select WHITE - Ganz Security Z8-D2M | Z8-D2_VD2 Series Operation Guide - Page 16
Operation Guide 2.5 Day&Night You can set Day &Night to COLOR,D&N EXT, B/W, or D&N AUTO. Procedure Step 1 Press the UP or DOWN button to select Day &Night. Step 2 - Ganz Security Z8-D2M | Z8-D2_VD2 Series Operation Guide - Page 17
Operation Guide 2 OSD Setting 2.5.2 B/W Set Day &Night to B/W and press the OK button to open the B/W interface, as shown in Figure 2-9. Figure 2-9 B/W interface WHITE BAL is unavailable - Ganz Security Z8-D2M | Z8-D2_VD2 Series Operation Guide - Page 18
Operation Guide Figure 2-10 IR SMART interface 2 OSD Setting 1. Press the UP or DOWN button to select LEVEL, and press the LEFT or RIGHT button to set - Ganz Security Z8-D2M | Z8-D2_VD2 Series Operation Guide - Page 19
Operation Guide 2 OSD Setting 3. Press the UP or DOWN button to select RETURN, and press the OK button to return to the B/W interface. Step 3 Press the UP - Ganz Security Z8-D2M | Z8-D2_VD2 Series Operation Guide - Page 20
Operation Guide 2 OSD Setting 2.6 NR You can set the 2DNR parameter to reduce the noise level of an image. Press the UP or DOWN button to select - Ganz Security Z8-D2M | Z8-D2_VD2 Series Operation Guide - Page 21
Operation Guide Figure 2-14 SPECIAL interface 2 OSD Setting 2.7.1 CAM TITLE Press the UP or DOWN button to select CAM TITLE, and press the LEFT or RIGHT button - Ganz Security Z8-D2M | Z8-D2_VD2 Series Operation Guide - Page 22
Operation Guide 2 OSD Setting : Press this button to move the cursor to the previous character. Press the UP, DOWN, LEFT, and RIGHT buttons to select , and press - Ganz Security Z8-D2M | Z8-D2_VD2 Series Operation Guide - Page 23
Operation Guide Figure 2-16 D-EFFECT interface 2 OSD Setting Procedure Step 1 Press the UP or DOWN button to select FREEZE, and press the LEFT or RIGHT button to - Ganz Security Z8-D2M | Z8-D2_VD2 Series Operation Guide - Page 24
Operation Guide Figure 2-17 MOTION interface 2 OSD Setting Procedure Step 1 Press the UP or DOWN button to select SELECT, and press the LEFT or RIGHT button to - Ganz Security Z8-D2M | Z8-D2_VD2 Series Operation Guide - Page 25
Operation Guide 2 OSD Setting Motion area setup is the same as HSBLC area setup. For details, see "Step 2 of section 2.3.1 "HSBLC." Step 3 Press the UP or DOWN - Ganz Security Z8-D2M | Z8-D2_VD2 Series Operation Guide - Page 26
Operation Guide 2 OSD Setting 2.7.4 PRIVACY Press the UP or DOWN button to select PRIVACY, and press the LEFT or RIGHT button to set this parameter to ON - Ganz Security Z8-D2M | Z8-D2_VD2 Series Operation Guide - Page 27
Operation Guide Figure 2-21 Area setup interface. 2 OSD Setting Privacy area setup is the same as HSBLC area setup. For details, see Step 2 of section 2.3.1 "HSBLC." Step 3 - Ganz Security Z8-D2M | Z8-D2_VD2 Series Operation Guide - Page 28
Operation Guide Figure 2-22 DEFECT interface 2 OSD Setting The parameters on the DEFECT interface are set to the optimal default values and do not need to be - Ganz Security Z8-D2M | Z8-D2_VD2 Series Operation Guide - Page 29
Operation Guide Figure 2-23 LIVE DPC interface 2 OSD Setting Procedure Step 1 Press the UP or DOWN button to select AGC LEVEL, and press the LEFT or RIGHT - Ganz Security Z8-D2M | Z8-D2_VD2 Series Operation Guide - Page 30
Operation Guide Figure 2-24 WHITE DPC interface 2 OSD Setting Procedure Step 1 Press the UP or DOWN button to select POS/SIZE, and press the OK button to - Ganz Security Z8-D2M | Z8-D2_VD2 Series Operation Guide - Page 31
Operation Guide Figure 2-26 DPC interface 2 OSD Setting Step 3 Press the UP or DOWN button to select DPC VIEW, and press the LEFT or RIGHT button to - Ganz Security Z8-D2M | Z8-D2_VD2 Series Operation Guide - Page 32
Operation Guide Figure 2-27 BLACK DPC interface 2 OSD Setting Procedure Step 1 Press the UP or DOWN button to select POS/SIZE, and press the OK button to - Ganz Security Z8-D2M | Z8-D2_VD2 Series Operation Guide - Page 33
Operation Guide Figure 2-29 START interface 2 OSD Setting Step 3 Press the UP or DOWN button to select DPC VIEW, and press the LEFT or RIGHT button to - Ganz Security Z8-D2M | Z8-D2_VD2 Series Operation Guide - Page 34
Operation Guide Figure 2-30 RS485interface 2 OSD Setting Procedure Step 1 Press the UP or DOWN button to select CAM ID, and press the LEFT or RIGHT button to - Ganz Security Z8-D2M | Z8-D2_VD2 Series Operation Guide - Page 35
Operation Guide Figure 2-31 ADJUST interface 2 OSD Setting Procedure Step 1 Press the UP or DOWN button to select SHARPNESS, and press the OK button to open the - Ganz Security Z8-D2M | Z8-D2_VD2 Series Operation Guide - Page 36
Operation Guide 2 OSD Setting 2. Press the UP or DOWN button to select START AGC, and press the LEFT or RIGHT button to set this parameter. 3. Press the - Ganz Security Z8-D2M | Z8-D2_VD2 Series Operation Guide - Page 37
Operation Guide 2 OSD Setting 2.7.9 EXIT Press the UP or DOWN button to select EXIT, and press the LEFT or RIGHT button to set this parameter. SAVE&END:
-
 1
1 -
 2
2 -
 3
3 -
 4
4 -
 5
5 -
 6
6 -
 7
7 -
8
-
9
-
10
-
11
-
12
-
13
-
14
-
15
-
16
-
17
-
18
-
19
-
20
-
21
-
22
-
23
-
24
-
25
-
26
-
27
-
28
-
29
-
30
-
31
-
32
-
33
-
34
-
35
-
36
-
37
 |
 |

Z8-D2M / Z8-VD2M / Z8-D2V / Z8-VD2V
ISSUE
V1.0
DATE
2017-07-28
Operation Guide for
ganzsecurity.com