Garmin Plastic Transom Mount Transducer with Depth Temperature Dual Frequency 8-
Garmin Plastic Transom Mount Transducer with Depth Temperature Dual Frequency 8-pin Manual
 |
View all Garmin Plastic Transom Mount Transducer with Depth Temperature Dual Frequency 8-pin manuals
Add to My Manuals
Save this manual to your list of manuals |
Garmin Plastic Transom Mount Transducer with Depth Temperature Dual Frequency 8-pin manual content summary:
- Garmin Plastic Transom Mount Transducer with Depth Temperature Dual Frequency 8- - Page 1
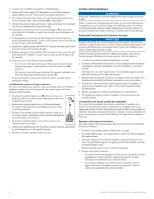
Mounting the Transducer Dual-Frequency Transducer Installation Instructions Warning See the Important Safety and Product Information guide in the Garmin sounder product box for product warnings and other important information. caution Always wear safety goggles, ear protection, and a dust mask - Garmin Plastic Transom Mount Transducer with Depth Temperature Dual Frequency 8- - Page 2
you like, tilt the transducer back slightly and repeat steps 2-4 until you see the most symmetrical arches at the desired speed. 2 Dual-Frequency Transducer Installation Instructions - Garmin Plastic Transom Mount Transducer with Depth Temperature Dual Frequency 8- - Page 3
Instructions d'installation d'une sonde bi-fréquences Avertissement Consultez le guide Informations importantes relatives au produit la pointe de la mèche pour vous servir de repère. • Si vous installez le support de montage sur de la fibre de verre, collez un morceau d'adhésif sur l'emplacement - Garmin Plastic Transom Mount Transducer with Depth Temperature Dual Frequency 8- - Page 4
la ligne de flottaison. 7. Serrez le contre-écrou 10-32 jusqu'à ce qu'il touche le support de montage, puis serrez encore d'1/4 de tour (ne serrez pas outre mesure). 8. Si vous voulez ce que les arcs soient symétriques à la vitesse souhaitée. 4 Instructions d'installation d'une sonde bi-fréquences - Garmin Plastic Transom Mount Transducer with Depth Temperature Dual Frequency 8- - Page 5
Istruzioni di installazione del trasduttore a doppia frequenza Attenzione Per avvisi sul prodotto e altre informazioni importanti, consultare la guida Informazioni importanti sulla sicurezza e sul prodotto inclusa nella confezione dell'ecoscandaglio Garmin. attenzione Durante le operazioni di - Garmin Plastic Transom Mount Transducer with Depth Temperature Dual Frequency 8- - Page 6
6. Accertarsi che il trasduttore sia parallelo al livello dell'acqua. 7. Serrare il dado di bloccaggio 10-32 finché non tocca la staffa di montaggio, quindi stringere ancora di 1/4 di giro (non serrare più del necessario). 8. Se si desidera instradare il cavo attraverso lo specchio di poppa, - Garmin Plastic Transom Mount Transducer with Depth Temperature Dual Frequency 8- - Page 7
Zweifrequenzschwinger - Installationsanweisungen Warnung Lesen Sie alle Produktwarnungen und sonstigen wichtigen Informationen in der Anleitung Wichtige Sicherheits- und Produktinformationen, die dem Garmin-Echolot beiliegt. Achtung Tragen Sie beim Bohren, Schneiden und Schmirgeln immer - Garmin Plastic Transom Mount Transducer with Depth Temperature Dual Frequency 8- - Page 8
6. Achten Sie darauf, dass der Schwinger parallel zur Wasserlinie ausgerichtet ist. 7. Ziehen Sie die Sicherungsmutter (Größe 10-32) fest, bis sie die Halterung berührt, und ziehen Sie sie dann um eine weitere Vierteldrehung an. (Ziehen Sie die Mutter nicht zu fest an.) 8. Wenn Sie das Kabel durch - Garmin Plastic Transom Mount Transducer with Depth Temperature Dual Frequency 8- - Page 9
Instrucciones de instalación del transductor de frecuencia dual Aviso Consulta la guía Información importante sobre el producto y tu seguridad que se incluye en la caja de la sonda de Garmin y en la que encontrarás avisos e información importante sobre el producto. advertencia Utiliza siempre - Garmin Plastic Transom Mount Transducer with Depth Temperature Dual Frequency 8- - Page 10
6. Asegúrate de que el transductor esté alineado en paralelo respecto a la línea de flotación. 7. Aprieta la tuerca de fijación de 10-32 hasta que entre en contacto con el soporte de montaje y, a continuación, apriétala 1/4 de vuelta más (no la aprietes en exceso). 8. Si deseas pasar el cable a trav - Garmin Plastic Transom Mount Transducer with Depth Temperature Dual Frequency 8- - Page 11
Instruções de Instalação do Transdutor de Frequência Dupla Aviso Consulte o guia Informações importantes de segurança e do produto na embalagem do sonar da Garmin para avisos relativos ao mesmo e outras informações importantes. atenção Utilize sempre óculos de protecção, protecção nos ouvidos e - Garmin Plastic Transom Mount Transducer with Depth Temperature Dual Frequency 8- - Page 12
6. Certifique-se de que o transdutor está alinhado paralelamente à linha de água. 7. Aperte a porca de aperto 10-32 até que esta toque no suporte de montagem e, de seguida, aperte mais 1/4 de volta (não aperte demasiado). 8. Se pretender passar o cabo pelo painel de popa, escolha um local de - Garmin Plastic Transom Mount Transducer with Depth Temperature Dual Frequency 8- - Page 13
Installationsvejledning til transducer med dobbeltfrekvens Advarsel Se guiden Vigtige produkt- og sikkerhedsinformationer i æsken med Garminekkoloddet for at se produktadvarsler og andre vigtige oplysninger. advarsel Bær altid beskyttelsesbriller, høreværn og støvmaske, når du borer, skærer - Garmin Plastic Transom Mount Transducer with Depth Temperature Dual Frequency 8- - Page 14
6. Kontroller, at transduceren er justeret, så den sidder parallelt med vandlinjen. 7. Stram 10-32 låsemøtrikken, indtil den rører ved monteringsbeslaget, og stram den derefter 1/4 omgang mere (undgå at overspænde). 8. Hvis du vil føre kablet gennem agterspejlet, skal du vælge en - Garmin Plastic Transom Mount Transducer with Depth Temperature Dual Frequency 8- - Page 15
Installeringsinstruksjoner for dobbelfrekvenssvinger Advarsel Se veiledningen Viktig sikkerhets- og produktinformasjon som ligger i produktesken til Garmin-ekkoloddmodulen, for å lese advarsler angående produktet og annen viktig informasjon. forsiktig Bruk alltid vernebriller, hørselsvern og stø - Garmin Plastic Transom Mount Transducer with Depth Temperature Dual Frequency 8- - Page 16
6. Kontroller at svingeren er parallell med vannlinjen. 7. Stram 10-32-låsemutteren til den berører monteringsbraketten, og stram deretter til enda 1/4 omdreining (ikke stram for hardt til). 8. Hvis du vil føre kabelen gjennom akterspeilet, velger du en kabelgjennomgang som er godt over vannlinjen ➍ - Garmin Plastic Transom Mount Transducer with Depth Temperature Dual Frequency 8- - Page 17
Installationsinstruktioner för givare med två frekvenser Varning Läs guiden Viktig säkerhets- och produktinformation som medföljer i produktförpackningen för Garmins ekolod för viktig information om produkten och säkerhet. varning Använd alltid skyddsglasögon, hörselskydd och andningsskydd när - Garmin Plastic Transom Mount Transducer with Depth Temperature Dual Frequency 8- - Page 18
6. Se till att givaren är parallell med vattenlinjen. 7. Dra åt 10-32-låsmuttern tills den kommer i kontakt med monteringsfästet och dra sedan åt ytterligare 1/4 varv (dra inte åt för hårt). 8. Om du vill dra kabeln genom akterspegeln väljer du en genomföringsplats en bra bit ovanför vattenlinjen ➍ - Garmin Plastic Transom Mount Transducer with Depth Temperature Dual Frequency 8- - Page 19
- Garmin Plastic Transom Mount Transducer with Depth Temperature Dual Frequency 8- - Page 20
For the latest free software updates (excluding map data) throughout the life of your Garmin products, visit the Garmin Web site at www.garmin.com. October 2011 © 2011 Garmin Ltd. or its subsidiaries Garmin International, Inc. 1200 East 151st Street, Olathe, Kansas 66062, USA Garmin (Europe) Ltd.
-
 1
1 -
 2
2 -
 3
3 -
 4
4 -
 5
5 -
 6
6 -
 7
7 -
8
-
9
-
10
-
11
-
12
-
13
-
14
-
15
-
16
-
17
-
18
-
19
-
20
 |
 |

Dual-Frequency Transducer
Installation Instructions
WARNINg
See the
Important Safety and Product Information
guide in the Garmin
sounder product box for product warnings and other important information.
CAUTION
Always wear safety goggles, ear protection, and a dust mask when drilling,
cutting, or sanding.
Follow these instructions to properly install the Garmin 8-pin transom-mount
dual-frequency transducer.
Tools Needed
•
Drill and drill bits
•
3
/
8
in. wrench or socket
•
Masking tape
•
Number 2 Phillips screwdriver
•
Marine sealant
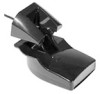
About the Transducer
The transducer is the component of your sonar system that transmits sound
waves through the water and receives them to relay the information to your
Garmin sounder. With the supplied hardware, you can install the transducer
on the transom of your boat.
AssemblinG the Transducer
1. Insert the rubber washer
➊
and the plastic spacer
➋
into the transducer
➌
at the same time.
If necessary, moisten the rubber washer to help insert in the transducer
along with the plastic spacer.
➊
➋
➍
➎
➏
➐
➌
2.
Pull the cable back and slide the transducer into the mounting bracket
➍
.
3. Place a 5 mm flat washer
➎
on the 10-32 x 1.75 in. screw
➏
, and insert
the screw through the mounting bracket, transducer, spacer, and rubber
washer.
4. Place a 5 mm flat washer on the exposed end of the 10-32 x 1.75 in.
screw, and fasten it with the 10-32 lock nut
➐
.
Do not tighten the 10-32 lock nut. You will adjust the transducer and
tighten the nut after you install the transducer on the boat.
MountinG the Transducer
About the MountinG Location
The mounting location is the most important consideration when installing
a transducer. It is very important to select a mounting location where there
will be the least possible turbulent water while the boat is moving. Turbulent
water will result in poor sonar performance.
When selecting a mounting location, consider the following guidelines:
•
The location is as close to the center of the boat as possible.
•
The location is not behind strakes, struts, fittings, water intake or
discharge ports, or anything that creates air bubbles or causes the
water to become turbulent.
•
The location is not in the path of the propeller on single-drive boats.
The transducer can cause cavitation that can degrade the performance
of the boat and damage the propeller.
•
On boats with outboard or inboard/outboard motors, the location
should be at least 15 in. (38 cm) away from the propeller.
•
On twin-drive boats, the location should be between the drives, if
possible.
•
Avoid locations where the transducer might be jarred when launching,
hauling, or storing.
SelectinG a Transom-Mount Location
Before you can select a transom-mount location, you must review the
transom-mount location considerations (page 1).
1. Identify a transom-mount location.
2.
Drive the boat at the speed you plan to use the sonar.
3.
Observe the location you identified in step 1, and verify that the location
is relatively free from turbulent water.
4.
If the location will subject the transducer to turbulent water, repeat steps
1-3 until you have selected the ideal mounting location.
InstallinG the Transom-Mount Hardware
Notice
Do not cut the transducer cable. Cutting the transducer cable will void your
warranty.
1. Position the transducer
mount
➊
at the selected
mounting location on the
transom (page 1).
2. Align the transducer parallel
with the water line
➋
, and
mark the center location of
each hole on the transducer
mount.
3. Using a
5
/
32
in. (4 mm)
bit, drill the pilot holes
approximately 1 in. (25 mm)
deep at the marked locations,
while taking the following
precautions:
•
To avoid drilling the holes too deep, wrap a piece of tape around the
bit at 1 in. (25 mm) from the point of the bit to act as a guide.
•
If you are installing the bracket on fiberglass, place a piece of tape
over the pilot-hole location to reduce cracking of the gel-coat.
4. Apply marine sealant to the included 30 mm M5 screws, and loosely
attach the transducer assembly to the transom.
5.
Adjust the transducer assembly so that it extends beyond the bottom of
the transom
➌
approximately
1
/
8
in. (3 mm) on fiberglass hulls or
3
/
8
in.
(10 mm) on aluminum hulls.
➋
➊
➌
➍
➎
➏
September 2011
190-00789-05 Rev. A
Printed in Taiwan